标签:
hibernate 环境的配置步骤:
加入 hibernate 所需的 jar 包,并将这些 jar 添加到 project 中,如图:

hibernate.cfg.xml 的建立。hibernate 的 hibernate.cfg.xml 配置文件默认在 project/src 目录下,如图:

hibernate.cfg.xml 中的内容如下(当然,这是从 hibernate 的参考文档中拷贝过来的,还未修改):
<?xml version=‘1.0‘ encoding=‘utf-8‘?>
<!DOCTYPE hibernate-configuration PUBLIC
        "-//Hibernate/Hibernate Configuration DTD 3.0//EN"
        "http://hibernate.sourceforge.net/hibernate-configuration-3.0.dtd">

<hibernate-configuration>

    <session-factory>

        <!-- Database connection settings -->
        <property name="connection.driver_class">org.hsqldb.jdbcDriver</property>
        <property name="connection.url">jdbc:hsqldb:hsql://localhost</property>
        <property name="connection.username">sa</property>
        <property name="connection.password"></property>

        <!-- JDBC connection pool (use the built-in) -->
        <property name="connection.pool_size">1</property>

        <!-- SQL dialect -->
        <property name="dialect">org.hibernate.dialect.HSQLDialect</property>

        <!-- Enable Hibernate‘s automatic session context management -->
        <property name="current_session_context_class">thread</property>

        <!-- Disable the second-level cache  -->
        <property name="cache.provider_class">org.hibernate.cache.NoCacheProvider</property>

        <!-- Echo all executed SQL to stdout -->
        <property name="show_sql">true</property>

        <!-- Drop and re-create the database schema on startup -->
        <property name="hbm2ddl.auto">update</property>

        <mapping resource="org/hibernate/tutorial/domain/Event.hbm.xml"/>

    </session-factory>

</hibernate-configuration>
至此,hibernate 环境配置完成。
hibernate 与 mysql 集成:
添加支持 mysql 驱动的 jar 包,如下图:

2. 修改 hibernate.cfg.xml
<!-- Database connection settings -->
        <property name="connection.driver_class">org.hsqldb.jdbcDriver</property>
        <property name="connection.url">jdbc:hsqldb:hsql://localhost</property>
        <property name="connection.username">sa</property>
        <property name="connection.password"></property>


        <!-- SQL dialect -->
        <property name="dialect">org.hibernate.dialect.HSQLDialect</property>
修改为 mysql 的连接方式:
<!-- Database connection settings -->
        <property name="connection.driver_class">com.mysql.jdbc.Driver</property>
        <property name="connection.url">jdbc:mysql://localhost/hibernate</property>
        <property name="connection.username">root</property>
        <property name="connection.password">root</property>


        <!-- SQL dialect -->
        <property name="dialect">org.hibernate.dialect.MySQLDialect</property>
至此,hibernate + mysql 环境搭建完成(当然,要在 mysql 数据库下建立一个名为 hibernate 的数据库)。
下面我们测试一下:
建立以下包和类 ,并修改 hibernate.cfg.xml

贴下代码:
2.1 Student.java
package com.hibernate.model;

public class Student {

	private int id;
	private String name;
	private int age;

	public int getAge() {
		return age;
	}

	public int getId() {
		return id;
	}

	public String getName() {
		return name;
	}

	public void setAge(int age) {
		this.age = age;
	}

	public void setId(int id) {
		this.id = id;
	}

	public void setName(String name) {
		this.name = name;
	}

}
2.2 Student.hbm.xml
<?xml version="1.0"?>
<!DOCTYPE hibernate-mapping PUBLIC
        "-//Hibernate/Hibernate Mapping DTD 3.0//EN"
        "http://hibernate.sourceforge.net/hibernate-mapping-3.0.dtd">

<hibernate-mapping package="com.hibernate.model">
	<class name="Student">
		<id name="id"/>
		<property name="name"/>
		<property name="age"/>
	</class>
</hibernate-mapping>
2.3 hibernate.cfg.xml
<?xml version=‘1.0‘ encoding=‘utf-8‘?>
<!DOCTYPE hibernate-configuration PUBLIC
        "-//Hibernate/Hibernate Configuration DTD 3.0//EN"
        "http://hibernate.sourceforge.net/hibernate-configuration-3.0.dtd">

<hibernate-configuration>

    <session-factory>

        <!-- Database connection settings -->
        <property name="connection.driver_class">com.mysql.jdbc.Driver</property>
        <property name="connection.url">jdbc:mysql://localhost/hibernate</property>
        <property name="connection.username">root</property>
        <property name="connection.password">root</property>

        <!-- JDBC connection pool (use the built-in) hibernate连接池-->
        <!-- <property name="connection.pool_size">1</property> -->

        <!-- SQL dialect -->
        <property name="dialect">org.hibernate.dialect.MySQLDialect</property>

        <!-- Enable Hibernate‘s automatic session context management -->
        <!-- <property name="current_session_context_class">thread</property> -->

        <!-- Disable the second-level cache  -->
        <property name="cache.provider_class">org.hibernate.cache.NoCacheProvider</property>

        <!-- Echo all executed SQL to stdout -->
        <property name="show_sql">true</property>

        <!-- Drop and re-create the database schema on startup -->
        <property name="hbm2ddl.auto">update</property>

        <mapping resource="com/hibernate/model/Student.hbm.xml"/>

    </session-factory>

</hibernate-configuration>
2.4 StudentTest
package com.hibernate;


import org.hibernate.Session;
import org.hibernate.SessionFactory;
import org.hibernate.cfg.Configuration;

import com.hibernate.model.Student;

public class StudentTest {

	public static void main(String[] args) {
		Student s = new Student();
		s.setId(1);
		s.setName("s1");
		s.setAge(18);

		//cfd.configure(),configure()不写参数默认查找src目录下的hibernate.cfg.xml
		Configuration cfd = new Configuration();
		//buildSessionFactory()产生一个SessionFactory工厂
		SessionFactory sf = cfd.configure().buildSessionFactory();
		Session session = sf.openSession();
		session.beginTransaction();
		session.save(s);
		session.getTransaction().commit();
		session.close();
		sf.close();
	}
}
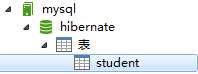
运行下 StudentTest 类中的 main 方法,则在名为 hibernate 数据库中新创建一个名为 student 的表并添加数据,如下图:

---------------------------------------------------------------------------------------------------------------------
注:
hibernate 使用操作数据库的步骤:
通过 Configuration 类的 configure() 查找配置文件 hibernate.cfg.xml 。
获取配置文件后通过 buildSessionFactory() 来创建 SessionFactory 。
通过 SessionFactory 的 openSession() 创建一个 Session 。
通过 Session 的 beginTransaction() 开启一个事物 。
调用 Session 的 save() 、update() 、delete() 等方法执行数据库操作 。
通过 Session 的 getTransaction() 获取当前正在操作的事物,再通过把这个事物的 commit() 将数据更新至数据库 。
最后关掉 Session 、 SessionFactory 。
                Configuration cfd = new Configuration();
		SessionFactory sf = cfd.configure().buildSessionFactory();
		Session session = sf.openSession();
		session.beginTransaction();
		//session.save(s); 调用session的增删改查方法
		session.getTransaction().commit();
		session.close();
		sf.close();
end。
hibernate学习笔记02-- eclipse 下 hibernate+mysql 的实现。
标签:
原文地址:http://my.oschina.net/u/1474779/blog/499086