标签:des style blog http java color
var casper = require(‘casper‘).create();
我们也可以通过实例化主方法的方式获得一个自身的实例:
var casper = new require(‘casper‘).Casper();
提示:
如果扩展casper类,后面的章节会讲到
不管是casper构造函数还是create()方法,都接受一个参数选项,这个标准的javascript对象一样。
var casper = require(‘casper‘).create({
    verbose: true,
    logLevel: "debug"
});
var casper = require(‘casper‘).create({
    clientScripts:  [
        ‘includes/jquery.js‘,      // These two scripts will be injected in remote
        ‘includes/underscore.js‘   // DOM on every request
    ],
    pageSettings: {
        loadImages:  false,        // The WebPage instance used by Casper will
        loadPlugins: false         // use these settings
    },
    logLevel: "info",              // Only "info" level messages will be logged
    verbose: true                  // log messages will be printed out to the console
});
你也能够在运行时中改变 options:
var casper = require(‘casper‘).create();
casper.options.waitTimeout = 1000;
所有可用的属性如下:
Type: Array
Default: []
一个本地script脚本文件路径的集合,它们能被加载到所有页面
Type: Boolean
Default: true
如果CasperJS的脚本在运行过程中出现一个uncaught error ,那么casperjs运行结束
Type: Object
Default: {}
一个javascript对象,他包含了一个获取到指定http状态的就触发执行的回调方法,使用方法已经包含在例子中了
Type: String
Default: "error"
日志等级
Type: Function
Default: null
当一个javascript 的alert()被触发时的回调方法
Type: Function
Default: null
当Casper#die() 被触发时的回调方法
Type: Function
Default: null
当一个“error”等级的事件被触发时的回调方法
Type: Function
Default: null
请求的资源没有被load下来时被触发的回调方法
Type: Function
Default: null
页面已经被初始化后被触发的回调方法
Type: Function
Default: null
该方法替换了PhantomJS的WebPage#onResourceReceived()的回调,只要正确的casper实例作为第一个参数被传入
Type: Function
Default: null
该方法替换了PhantomJS的WebPage#onResourceRequested()的回调,只要正确的casper实例作为第一个参数被传入
Type: Function
Default: null
当一个step方法已经执行完成后,这个方法被执行
Type: Function
Default: Function
当一个step方法在执行超时后,如果设置了这个方法,这个方法将被执行
默认情况下,脚本会退出并显示一个错误,如果是在test环境中,它将会增加一个失败到测试结果中。
Type: Function
Default: Function
当脚本在执行时,超过了option设置的timeout值后,如果设置了这个方法,这个方法将被执行
默认情况下,超时的脚本将会退出并显示错误,如果是在test环境中,它将会增加一个失败到测试结果中。
Type: Function
Default: Function
当一个waitFor*方法在执行时,超过了设置的waitTimeout 值后,如果设置了这个方法,这个方法将被执行
默认情况下,超时的脚本将会退出并显示错误,如果是在test环境中,它将会增加一个失败到测试结果中。
Type: WebPage
Default: null
一个存在于PhantomJS的 webPage实例
Type: Object
Default: {}
PhantomJS的 webPage实例,可用的设置如下:
Type: Array
Default: []
新增于1.0版本
一个远程script脚本文件路径的集合,它们能被加载到所有页面
Type: Boolean
Default: true
新增于1.0版本
当这个属性设置为true,从<input type=”password”> 获得的密码信息将不被明文显示出来,它是默认为true,设置safelogs为false,密码会被明文显示(不推荐)
Type: Boolean
Default: false
When this option is enabled, caught step errors are not thrown (though related events are still emitted). Mostly used internally in a testing context.
当这个选项是可用的,会导致步骤错误不会被抛出,一般用户测试框架中
Type: Number
Default: null
用毫秒计算的最大step超时时间,当设置以后,每个定义的step方法都将在超时时间到达以前执行完成,你可以定义onStepTimeout() 回调方法来捕获这种情况,默认情况下,这个脚本将会抛出一个错误信息并结束
Type: Number
Default: null
用毫秒计算的最大超时时间
Type: Boolean
Default: false
实时输出log信息
Type: Object
Default: null
窗口尺寸, eg. {width: 800, height: 600}
提示:
phantomjs默认的窗口尺寸为400*300, casperjs继承了这个尺寸
Type: Number
Default: 100
重试时的默认延迟间隔时间,在 wait*系列的方法中生效
Type: Number
Default: 5000
默认的等待超时时间,在 wait*系列的方法中生效
Signature: back()
Moves back a step in browser’s history:
从浏览器的历史记录回退一步
casper.start(‘http://foo.bar/1‘)
casper.thenOpen(‘http://foo.bar/2‘);
casper.thenOpen(‘http://foo.bar/3‘);
casper.back();
casper.run(function() {
    console.log(this.getCurrentUrl()); // ‘http://foo.bar/2‘
});
也可以查看forward()
Signature: base64encode(String url [, String method, Object data])
Encodes a resource using the base64 algorithm synchronously using client-side XMLHttpRequest.
对客户端的XMLHttpRequest进行base64编码转换
注意:
我们不能使用window.btoa(),因为它在webkit版本的phantomjs中会导致失败
实例: 对 google logo 图片进行base64编码:
var base64logo = null;
casper.start(‘http://www.google.fr/‘, function() {
    base64logo = this.base64encode(‘http://www.google.fr/images/srpr/logo3w.png‘);
});

casper.run(function() {
    this.echo(base64logo).exit();
});
你也能将一个http post请求的内容进行编码
var base64contents = null;
casper.start(‘http://domain.tld/download.html‘, function() {
    base64contents = this.base64encode(‘http://domain.tld/‘, ‘POST‘, {
        param1: ‘foo‘,
        param2: ‘bar‘
    });
});

casper.run(function() {
    this.echo(base64contents).exit();
});
Signature: bypass(Numbr nb)
新增于1.1版本
Bypasses a given number of defined navigation steps:
跳过指定数量的步骤
casper.start();
casper.then(function() {
    // This step will be executed
});
casper.then(function() {
    this.bypass(2);
});
casper.then(function() {
    // This test won‘t be executed
});
casper.then(function() {
    // Nor this one
});
casper.run();
Signature: click(String selector)
对匹配表达式的元素执行一次点击,这个方法用两种方式进行尝试:
实例:
casper.start(‘http://google.fr/‘);

casper.thenEvaluate(function(term) {
    document.querySelector(‘input[name="q"]‘).setAttribute(‘value‘, term);
    document.querySelector(‘form[name="f"]‘).submit();
}, ‘CasperJS‘);

casper.then(function() {
    // Click on 1st result link
    this.click(‘h3.r a‘);
});

casper.then(function() {
    console.log(‘clicked ok, new location is ‘ + this.getCurrentUrl());
});

casper.run();
Signature: clickLabel(String label[, String tag])
新增于0.6.1版本
Clicks on the first DOM element found containing label text. Optionaly ensures that the element node name is tag:
点击匹配到包含指定文本的第一个DOM元素,或者确保元素的节点名是一个标签
// <a href="...">My link is beautiful</a>
casper.then(function() {
    this.clickLabel(‘My link is beautiful‘, ‘a‘);
});

// <button type="submit">But my button is sexier</button>
casper.then(function() {
    this.clickLabel(‘But my button is sexier‘, ‘button‘);
});
Signature: capture(String targetFilepath, [Object clipRect, Object imgOptions])
PhantomJS’ WebPage#render的替代方法. 增加 一个 clipRect 参数,他能够设置页面的大小
casper.start(‘http://www.google.fr/‘, function() {
    this.capture(‘google.png‘, {
        top: 100,
        left: 100,
        width: 500,
        height: 400
    });
});

casper.run();
新增于1.1版本
imgOptions 对象允许指定两个选项:
实例:
casper.start(‘http://foo‘, function() {
    this.capture(‘foo‘, undefined, {
        format: ‘jpg‘,
        quality: 75
    });
});
Signature: captureBase64(String format[, Mixed area])
新增于 0.6.5.
Computes the Base64 representation of a binary image capture of the current page, or an area within the page, in a given format.
截屏Base64编码的二进制图片,它可以根据给定的格式,截屏全部页面,也可以截屏页面的某个区域
支持这些图片格式:bmp, jpg, jpeg, png, ppm, tiff, xbm , xpm.
area选项可以用以下的形式:
实例:
casper.start(‘http://google.com‘, function() {
    // selector capture
    console.log(this.captureBase64(‘png‘, ‘#lga‘));
    // clipRect capture
    console.log(this.captureBase64(‘png‘, {
        top: 0,
        left: 0,
        width: 320,
        height: 200
    }));
    // whole page capture
    console.log(this.captureBase64(‘png‘));
});
casper.run();
Signature: captureSelector(String targetFile, String selector [, Object imgOptions])
Captures the page area containing the provided selector and saves it to targetFile:
根据页面区域提供的表达式截取页面并且保存为一个目标文件
casper.start(‘http://www.weather.com/‘, function() {
    this.captureSelector(‘weather.png‘, ‘#wx-main‘);
});

casper.run();
新增于1.1版本
imgOptions对象允许指定两个参数
Signature: clear()
新增于 0.6.5.
清楚当前页面的执行环境上下文,用于避免以前页面的dom仍然存在。
可以把他作为停止远程DOM环境下javascript执行的一种方法:
casper.start(‘http://www.google.fr/‘, function() {
    this.clear(); // javascript execution in this page has been stopped
});

casper.then(function() {
    // ...
});

casper.run();
Signature: debugHTML([String selector, Boolean outer])
向控制台输出getHTML()的结果,它和getHTML()具有同样的参数。
Signature: debugPage()
Logs the textual contents of the current page directly to the standard output, for debugging purpose:
记录当前页面的文本并且输出到标准输出,主要用来调试
casper.start(‘http://www.google.fr/‘, function() {
    this.debugPage();
});

casper.run();
Signature: die(String message[, int status])
Exits phantom with a logged error message and an optional exit status code:
当记录到一个error时,退出phantom,并且设置退出状态码
casper.start(‘http://www.google.fr/‘, function() {
    this.die("Fail.", 1);
});

casper.run();
Signature: download(String url, String target[, String method, Object data])
Saves a remote resource onto the filesystem. You can optionally set the HTTP method using the method argument, and pass request arguments through the data object (see base64encode()):
保存一个远程资源文件到文件系统,你可以设置可选参数,使用method设置http请求方法,使用data设置请求参数
casper.start(‘http://www.google.fr/‘, function() {
    var url = ‘http://www.google.fr/intl/fr/about/corporate/company/‘;
    this.download(url, ‘google_company.html‘);
});

casper.run(function() {
    this.echo(‘Done.‘).exit();
});
注意:
如果你在下载文件时碰到一些麻烦,尝试不使用web security.
Signature: each(Array array, Function fn)
遍历数组里的元素,去执行一个回调:
var links = [
    ‘http://google.com/‘,
    ‘http://yahoo.com/‘,
    ‘http://bing.com/‘
];

casper.start().each(links, function(self, link) {
    self.thenOpen(link, function() {
        this.echo(this.getTitle());
    });
});

casper.run();
提示:
googlematch.js是一个使用它的例子
Signature: eachThen(Array array, Function then)
New in version 1.1.
Iterates over provided array items and adds a step to the stack with current data attached to it:
遍历数组里的元素,增加一个步骤,用元素去处理它:
casper.start().eachThen([1, 2, 3], function(response) {
    this.echo(response.data);
}).run();
这是一个打开URL的例子:
var casper = require(‘casper‘).create();
var urls = [‘http://google.com/‘, ‘http://yahoo.com/‘];

casper.start().eachThen(urls, function(response) {
  this.thenOpen(response.data, function(response) {
    console.log(‘Opened‘, response.url);
  });
});

casper.run();
提示:
当前的元素将被存储在response.data属性里
Signature: echo(String message[, String style])
Prints something to stdout, optionally with some fancy color (see the colorizer module for more information):
打印一些东西到标准输出,可选参数可以让你设置你想要的颜色
casper.start(‘http://www.google.fr/‘, function() {
    this.echo(‘Page title is: ‘ + this.evaluate(function() {
        return document.title;
    }), ‘INFO‘); // Will be printed in green on the console
});

casper.run();
Signature: evaluate(Function fn[, arg1[, arg2[, …]]])
基于PhantomJS’ WebPage#evaluate ,在当前页面的DOM环境下执行javascript语句:
casper.evaluate(function(username, password) {
    document.querySelector(‘#username‘).value = username;
    document.querySelector(‘#password‘).value = password;
    document.querySelector(‘#submit‘).click();
}, ‘sheldon.cooper‘, ‘b4z1ng4‘);
提示:
如果是填充或者提交表单,最好使用fill()方法
注意:在1.0版本以前,这种方式传递的参数使用一个被保存来用于其他目的的对象,所以它可能在某些情况系不会工作,所以我们鼓励你使用上述方法。
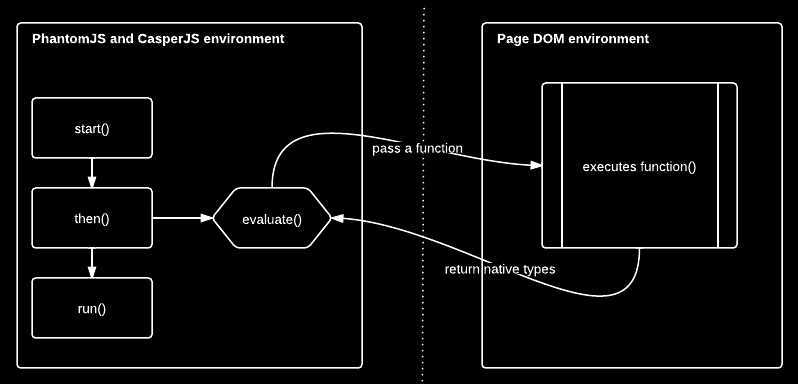
理解 evaluate():
这种方法背后的概念可能是在capserjs中最难理解的,作为一个提示,可以把evaluate()方法想象成连接CasperJS 环境和一个打开页面的一扇门,每当你使用evaluate(),你就进入了浏览器控制台,并且进入页面执行代码。
这是一个示意图用来描述两者之间的关系
Signature: evaluateOrDie(Function fn[, String message])
Evaluates an expression within the current page DOM and die() if it returns anything but true:
在当前页面的dom环境中执行一个语句,如果他返回的是不为true的任何东西,都会执行die()
    this.evaluateOrDie(function() {
        return /logged in/.match(document.title);
    }, ‘not authenticated‘);
});

casper.run();
Signature: exit([int status])
Exits PhantomJS with an optional exit status code.
退出phantomjs,并且返回一个退出状态码
Signature: exists(String selector)
Checks if any element within remote DOM matches the provided selector:
检查是否有DOM元素匹配提供的表达式
casper.start(‘http://foo.bar/home‘, function() {
    if (this.exists(‘#my_super_id‘)) {
        this.echo(‘found #my_super_id‘, ‘INFO‘);
    } else {
        this.echo(‘#my_super_id not found‘, ‘ERROR‘);
    }
});

casper.run();
Signature: fetchText(String selector)
Retrieves text contents matching a given selector expression. If you provide one matching more than one element, their textual contents will be concatenated:
获取一个给定的选择器表达式匹配的文本内容,如果他们匹配了不止一个元素,他们的文本内容将被连接起来
casper.start(‘http://google.com/search?q=foo‘, function() {
    this.echo(this.fetchText(‘h3‘));
}).run();
Signature: forward()
Moves a step forward in browser’s history:
从浏览器的历史记录向前一步
casper.start(‘http://foo.bar/1‘)
casper.thenOpen(‘http://foo.bar/2‘);
casper.thenOpen(‘http://foo.bar/3‘);
casper.back();    // http://foo.bar/2
casper.back();    // http://foo.bar/1
casper.forward(); // http://foo.bar/2
casper.run();
也可以查看back()
Signature: log(String message[, String level, String space])
记录一条消息在一个可选的空间,一个可选的级别, 可选的级别是 debug, info, warning 和 error. space是一个可以设置过滤你的日志的命名空间。默认情况下, Casper 日志在两个不同的空间: phantom 和 remote, 用来区分它是发生在PhantomJS环境还是远程环境:
casper.start(‘http://www.google.fr/‘, function() {
    this.log("I‘m logging an error", "error");
});

casper.run();
Signature: fill(String selector, Object values[, Boolean submit])
Fills the fields of a form with given values and optionally submits it. Fields are referenced by their name attribute.
用给定的值填充表单的内容并且提交它,使用它们的name属性
1.1版本变化:可以使用css3或者xpath来替代,可以使用fillSelectors() 和 fillXPath() 方法.
html表单的例子:
<form action="/contact" id="contact-form" enctype="multipart/form-data">
    <input type="text" name="subject"/>
    <textearea name="content"></textearea>
    <input type="radio" name="civility" value="Mr"/> Mr
    <input type="radio" name="civility" value="Mrs"/> Mrs
    <input type="text" name="name"/>
    <input type="email" name="email"/>
    <input type="file" name="attachment"/>
    <input type="checkbox" name="cc"/> Receive a copy
    <input type="submit"/>
</form>
一个提交表单的脚本:
casper.start(‘http://some.tld/contact.form‘, function() {
    this.fill(‘form#contact-form‘, {
        ‘subject‘:    ‘I am watching you‘,
        ‘content‘:    ‘So be careful.‘,
        ‘civility‘:   ‘Mr‘,
        ‘name‘:       ‘Chuck Norris‘,
        ‘email‘:      ‘chuck@norris.com‘,
        ‘cc‘:         true,
        ‘attachment‘: ‘/Users/chuck/roundhousekick.doc‘
    }, true);
});

casper.then(function() {
    this.evaluateOrDie(function() {
        return /message sent/.test(document.body.innerText);
    }, ‘sending message failed‘);
});

casper.run(function() {
    this.echo(‘message sent‘).exit();
});
fill() 方法 支持 input的单选项. 如果是多行选择,采用列表的方式支持:
<form action="/contact" id="contact-form" enctype="multipart/form-data">
    <select multiple name="category">
    <option value=?"0">Friends?</option>?
    <option value=?"1">?Family?</option>?
    <option value=?"2">?Acquitances?</option>?
    <option value=?"3">?Colleagues</option>?
    </select>
</form>
一个提交多行选项表单的实例:
casper.then(function() {
   this.fill(‘form#contact-form‘, {
       ‘categories‘: [‘0‘, ‘1‘] // Friends and Family
   });
});
注意:
Signature: fillSelectors(String selector, Object values[, Boolean submit])
新增于1.1版本
用给定的值填充表单的内容并且提交它,使用CSS3 选择器:
casper.start(‘http://some.tld/contact.form‘, function() {
    this.fillSelectors(‘form#contact-form‘, {
        ‘input[name="subject"]‘:    ‘I am watching you‘,
        ‘input[name="content"]‘:    ‘So be careful.‘,
        ‘input[name="civility"]‘:   ‘Mr‘,
        ‘input[name="name"]‘:       ‘Chuck Norris‘,
        ‘input[name="email"]‘:      ‘chuck@norris.com‘,
        ‘input[name="cc"]‘:         true,
        ‘input[name="attachment"]‘: ‘/Users/chuck/roundhousekick.doc‘
    }, true);
});
Signature: fillXPath(String selector, Object values[, Boolean submit])
New in version 1.1.
Fills form fields with given values and optionally submits it. While the form element is always referenced by a CSS3 selector, fields are referenced by XPath selectors:
用给定的值填充表单的内容并且提交它,这时候form元素总是使用css3选择器,而fields选择xpath选择器
casper.start(‘http://some.tld/contact.form‘, function() {
    this.fillXPath(‘form#contact-form‘, {
        ‘//input[@name="subject"]‘:    ‘I am watching you‘,
        ‘//input[@name="content"]‘:    ‘So be careful.‘,
        ‘//input[@name="civility"]‘:   ‘Mr‘,
        ‘//input[@name="name"]‘:       ‘Chuck Norris‘,
        ‘//input[@name="email"]‘:      ‘chuck@norris.com‘,
        ‘//input[@name="cc"]‘:         true,
    }, true);
});
注意:fillXPath()方法不能使用xpath填充字段,PhantomJS在uploadFile()时只能使用css3选择器,这是他的限制
Signature: getCurrentUrl()
Retrieves current page URL. Note that the url will be url-decoded:
获得当前页面的URL,注意这个URL是已经解码过的
casper.start(‘http://www.google.fr/‘, function() {
    this.echo(this.getCurrentUrl()); // "http://www.google.fr/"
});

casper.run();
Signature: getElementAttribute(String selector, String attribute)
新增于1.0版本
Retrieves the value of an attribute on the first element matching the provided selector:
获取选择器匹配的第一个元素的属性值
var casper = require(‘casper‘).create();

casper.start(‘http://www.google.fr/‘, function() {
    require(‘utils‘).dump(this.getElementAttribute(‘div[title="Google"]‘, ‘title‘)); // "Google"
});

casper.run();
Signature: getElementsAttribute(String selector, String attribute)
New in version 1.1.
获取选择器匹配的所有元素的属性值
var casper = require(‘casper‘).create();

casper.start(‘http://www.google.fr/‘, function() {
    require(‘utils‘).dump(this.getElementsAttribute(‘div[title="Google"]‘, ‘title‘)); // "[‘Google‘]"
});

casper.run();
Signature: getElementBounds(String selector)
获取选择器匹配的元素的区域
它返回一个对象,包括以下键:top, left, width 和 height,如果没有匹配到元素,则返回null
var casper = require(‘casper‘).create();

casper.start(‘http://www.google.fr/‘, function() {
    require(‘utils‘).dump(this.getElementBounds(‘div[title="Google"]‘));
});

casper.run();
将会得到以下输出:
{
    "height": 95,
    "left": 352,
    "top": 16,
    "width": 275
}
Signature: getElementsBounds(String selector)
新增于1.0版本
获取选择器匹配的所有元素的区域信息的数组
它返回一个对象数组,对象包括以下四个键:top, left, width 和 height
Signature: getElementInfo(String selector)
New in version 1.0.
Retrieves information about the first element matching the provided selector:
获取选择器匹配的第一个元素的信息
casper.start(‘http://google.fr/‘, function() {
    require(‘utils‘).dump(this.getElementInfo(‘#hplogo‘));
});
得到以下结果:
{
"attributes": {
"align": "left",
"dir": "ltr",
"id": "hplogo",
"onload": "window.lol&&lol()",
"style": "height:110px;width:276px;background:url(/images/srpr/logo1w.png) no-repeat",
"title": "Google"
},
"height": 110,
"html": "<div nowrap=\"nowrap\" style=\"color:#777;font-size:16px;font-weight:bold;position:relative;left:214px;top:70px\">France</div>",
"nodeName": "div",
"tag": "<div dir=\"ltr\" title=\"Google\" align=\"left\" id=\"hplogo\" onload=\"window.lol&&lol()\" style=\"height:110px;width:276px;background:url(/images/srpr/logo1w.png) no-repeat\"><div nowrap=\"nowrap\" style=\"color:#777;font-size:16px;font-weight:bold;position:relative;left:214px;top:70px\">France</div></div>",
"text": "France\n",
"visible": true,
"width": 276,
"x": 62,
"y": 76
}
提示:
这个方法返回的不是一个dom对象,它只是对象的一个描述,因为casper环境里是不能直接获取页面里的对象的
Signature: getElementsInfo(String selector)
New in version 1.1.
获取选择器匹配的所有元素的信息
casper.start(‘http://google.fr/‘, function() {
    require(‘utils‘).dump(this.getElementsInfo(‘#hplogo‘));
});
得到以下结果:
[
{
"attributes": {
"align": "left",
"dir": "ltr",
"id": "hplogo",
"onload": "window.lol&&lol()",
"style": "height:110px;width:276px;background:url(/images/srpr/logo1w.png) no-repeat",
"title": "Google"
},
"height": 110,
"html": "<div nowrap=\"nowrap\" style=\"color:#777;font-size:16px;font-weight:bold;position:relative;left:214px;top:70px\">France</div>",
"nodeName": "div",
"tag": "<div dir=\"ltr\" title=\"Google\" align=\"left\" id=\"hplogo\" onload=\"window.lol&&lol()\" style=\"height:110px;width:276px;background:url(/images/srpr/logo1w.png) no-repeat\"><div nowrap=\"nowrap\" style=\"color:#777;font-size:16px;font-weight:bold;position:relative;left:214px;top:70px\">France</div></div>",
"text": "France\n",
"visible": true,
"width": 276,
"x": 62,
"y": 76
}
]
这个方法返回的不是一个nodelist,它只是对象的列表的一个描述,因为casper环境里是不能直接获取页面里的对象的
Signature: getFormValues(String selector)
新增于1.0版本
获取一个给定的表单的所有字段值:
casper.start(‘http://www.google.fr/‘, function() {
    this.fill(‘form‘, {q: ‘plop‘}, false);
    this.echo(this.getFormValues(‘form‘).q); // ‘plop‘
});

casper.run();
Signature: getGlobal(String name)
通过名称,获取远程DOM环境下的一个全局变量的值,基本上,getGlobal(‘foo‘)意味着将从页面获得window.foo的值:
casper.start(‘http://www.google.fr/‘, function() {
    this.echo(this.getGlobal(‘innerWidth‘)); // 1024
});

casper.run();
Signature: getHTML([String selector, Boolean outer])
新增于1.0版本
获取当前页面的HTML代码,默认情况下,它会输出整个页面的html文本
casper.start(‘http://www.google.fr/‘, function() {
    this.echo(this.getHTML());
});

casper.run();
The getHTML() method can also dump HTML contents matching a given selector; for example with this HTML code:
getHTML()方法能得到给定的选择器匹配的元素的HTML文本;以下是HTML代码的实例:
<html>
    <body>
        <h1 id="foobar">Plop</h1>
    </body>
</html>
你可以这样取得它的文本:
casper.start(‘http://www.site.tld/‘, function() {
    this.echo(this.getHTML(‘h1#foobar‘)); // => ‘Plop‘
});
outer参数允许你得到html格式的文本输出:
casper.start(‘http://www.site.tld/‘, function() {
    this.echo(this.getHTML(‘h1#foobar‘, true)); // => ‘<h1 id="foobar">Plop</h1>‘
});
Signature: getPageContent()
新增于1.0版本
取得当前页面的文本,用其他文档类型来处理它:
var casper = require(‘casper‘).create();

casper.start().then(function() {
    this.open(‘http://search.twitter.com/search.json?q=casperjs‘, {
        method: ‘get‘,
        headers: {
            ‘Accept‘: ‘application/json‘
        }
    });
});

casper.run(function() {
    require(‘utils‘).dump(JSON.parse(this.getPageContent()));
    this.exit();
});
Signature: getTitle()
获取当前页面的标题
casper.start(‘http://www.google.fr/‘, function() {
    this.echo(this.getTitle()); // "Google"
});

casper.run();
Signature: mouseEvent(String type, String selector)
新增于0.69版本
Triggers a mouse event on the first element found matching the provided selector.
对选择器匹配的第一个元素执行一个鼠标事件
支持的鼠标事件有mouseup, mousedown, click, mousemove, mouseover 和 mouseout:
casper.start(‘http://www.google.fr/‘, function() {
    this.mouseEvent(‘click‘, ‘h2 a‘);
});

casper.run();
Signature: open(String location, Object Settings)
执行一个http请求打开一个给定的链接,你能够发起GET, POST, PUT, DELETE 和 HEAD 请求
标准的get请求的实例:
casper.start();

casper.open(‘http://www.google.com/‘).then(function() {
    this.echo(‘GOT it.‘);
});

casper.run();
标准的POST请求的实例:
casper.start();

casper.open(‘http://some.testserver.com/post.php‘, {
    method: ‘post‘,
    data:   {
        ‘title‘: ‘Plop‘,
        ‘body‘:  ‘Wow.‘
    }
});

casper.then(function() {
    this.echo(‘POSTED it.‘);
});

casper.run();
通过自定义参数的数组:
casper.open(‘http://some.testserver.com/post.php‘, {
       method: ‘post‘,
       data: {
            ‘standard_param‘: ‘foo‘,
            ‘nested_param[]‘: [       // please note the use of square brackets!
                ‘Something‘,
                ‘Something else‘
            ]
       }
});
新增于1.0版本
你也可以增加公共的请求头,通过headers 选项:
casper.open(‘http://some.testserver.com/post.php‘, {
    method: ‘post‘,
    data:   {
        ‘title‘: ‘Plop‘,
        ‘body‘:  ‘Wow.‘
    },
    headers: {
        ‘Accept-Language‘: ‘fr,fr-fr;q=0.8,en-us;q=0.5,en;q=0.3‘
    }
});
Signature: reload([Function then])
新增于1.0版本
刷新当前页面的请求
casper.start(‘http://google.com‘, function() {
    this.echo("loaded");
    this.reload(function() {
        this.echo("loaded again");
    });
});

casper.run();
Signature: repeat(int times, Function then)
针对当前的步骤,重复执行指定的次数
casper.start().repeat(3, function() {
    this.echo("Badger");
});

casper.run();
Signature: resourceExists(String|Function|RegExp test)
检查资源是否已被加载,你可以将方法,字符串,正则表达式作为参数来执行测试:
casper.start(‘http://www.google.com/‘, function() {
    if (this.resourceExists(‘logo3w.png‘)) {
        this.echo(‘Google logo loaded‘);
    } else {
        this.echo(‘Google logo not loaded‘, ‘ERROR‘);
    }
});

casper.run();
提示:
如果你想等待资源被加载,请使用waitForResource()方法。
Signature: run(fn onComplete[, int time])
运行整个测试步骤,并且在执行完成后执行一个回调。很显然,这是一个强制执行casper测试的方法。
代码不会运行:
casper.start(‘http://foo.bar/home‘, function() {
    // ...
});

// hey, it‘s missing .run() here!
这样就会运行:
casper.start(‘http://foo.bar/home‘, function() {
    // ...
});

casper.run();
Casper.run() 也能接受一个onComplete回调,你可以考虑作为一个自定义的最后一步时要执行的所有其他的步骤被执行,不要忘记执行exit(),如果你执行回调。
casper.start(‘http://foo.bar/home‘, function() {
    // ...
});

casper.then(function() {
    // ...
});

casper.run(function() {
    this.echo(‘So the whole suite ended.‘);
    this.exit(); // <--- don‘t forget me!
});
Binding a callback to complete.error will trigger when the onComplete callback fails.
绑定一个回调到complete.error,当onComplete或调失败时触发
Signature: scrollTo(Number x, Number y)
新增于1.1-beat3版本
滚动当前文档到根据x,y定义的指定的坐标系:
casper.start(‘http://foo.bar/home‘, function() {
    this.scrollTo(500, 300);
});
提示:
这个操作是同步的
Signature: scrollToBottom()
新增于 1.1-beta3版本
滚动到当前文档的底部:
casper.start(‘http://foo.bar/home‘, function() {
    this.scrollToBottom();
});
提示:
这个操作是同步的
Signature: sendKeys(Selector selector, String keys[, Object options])
新增于1.0版本
对选定的元素发送本地键盘事件:
casper.then(function() {
    this.sendKeys(‘form.contact input#name‘, ‘Duke‘);
    this.sendKeys(‘form.contact textarea#message‘, "Damn, I‘m looking good.");
    this.click(‘form.contact input[type="submit"]‘);
});
新增于1.1版本
目前支持sendkeys()方法的html元素有<input>, <textarea>,包括其他有contenteditable="true"属性的html元素
(Boolean) reset:
新增于1.1-beta3版本
当设置为 true, 这个属性首先清空当前的元素值.默认情况下,它设置为 false,并且 sendKeys() 将通过追加的方式修改对应的值.
(Boolean) keepFocus:
sendKeys() 默认情况下会移除焦点,它将会自动的关闭窗口. 如果你想保持焦点,使用keepFocus 选项.例如, 如果你使用 jQuery-UI, 你能够在你能够在:
casper.then(function() {
    this.sendKeys(‘form.contact input#name‘, ‘action‘, {keepFocus: true});
    this.click(‘form.contact ul.ui-autocomplete li.ui-menu-item:first-  child a‘);
});
(String) modifiers:
sendKeys()接受一个modifiers 去支持关键词修饰语. 这个选项是一个关键词修饰语的字符串, separated by the + character::
casper.then(function() {
    this.sendKeys(‘document‘, ‘s‘, {modifiers: ‘ctrl+alt+shift‘});
});
可用的修饰语:
Signature: setHttpAuth(String username, String password)
设置 HTTP_AUTH_USER 和 HTTP_AUTH_PW 值, 这是为 HTTP 协议的认证体系设置的:
casper.start();

casper.setHttpAuth(‘sheldon.cooper‘, ‘b4z1ng4‘);

casper.thenOpen(‘http://password-protected.domain.tld/‘, function() {
    this.echo("I‘m in. Bazinga.");
})
casper.run();
你也可以直接通过URL来打开:
var url = ‘http://sheldon.cooper:b4z1ng4@password-protected.domain.tld/‘;

casper.start(url, function() {
    this.echo("I‘m in. Bazinga.");
})

casper.run();
Signature: start(String url[, Function then])
配置开始casper,然后打开URL和通过then参数增加操作步骤:
casper.start(‘http://google.fr/‘, function() {
    this.echo("I‘m loaded.");
});

casper.run();
另外:
casper.start(‘http://google.fr/‘);

casper.then(function() {
    this.echo("I‘m loaded.");
});

casper.run();
再举例:
casper.start(‘http://google.fr/‘);

casper.then(function() {
    casper.echo("I‘m loaded.");
});

casper.run();
上面都是不同的风格。
提示:
你必须调用start()方法来执行步骤和运行用例,如果没有的话,会得到一个错误信息。
Signature: status(Boolean asString)
新增于 1.0版本.
返回一个当前casper实例的状态
casper.start(‘http://google.fr/‘, function() {
    this.echo(this.status(true));
});

casper.run();
Signature: then(Function then)
这个方法是增加一个执行步骤的标准方法:
casper.start(‘http://google.fr/‘);

casper.then(function() {
    this.echo("I‘m in your google.");
});

casper.then(function() {
    this.echo(‘Now, let me write something‘);
});

casper.then(function() {
    this.echo(‘Oh well.‘);
});

casper.run();
你能够增加许多你需要的步骤,注意当前的casper实例自动绑定this
使用run()去执行你的步骤
提示:
为了使用then()你必须先使用一个start()
访问当前HTTP响应
新增于1.0版本
你能够读取当前http响应对象,通过使用step回调的第一个参数:
casper.start(‘http://www.google.fr/‘, function(response) {
    require(‘utils‘).dump(response);
});
能得到的:
$ casperjs dump-headers.js
{
    "contentType": "text/html; charset=UTF-8",
    "headers": [
        {
            "name": "Date",
            "value": "Thu, 18 Oct 2012 08:17:29 GMT"
        },
        {
            "name": "Expires",
            "value": "-1"
        },
        // ... lots of other headers
    ],
    "id": 1,
    "redirectURL": null,
    "stage": "end",
    "status": 200,
    "statusText": "OK",
    "time": "2012-10-18T08:17:37.068Z",
    "url": "http://www.google.fr/"
}
因此,也可以取得特定名称的头部:
casper.start(‘http://www.google.fr/‘, function(response) {
    this.echo(response.headers.get(‘Date‘));
});
得到如下结果:
$ casperjs dump-headers.js
Thu, 18 Oct 2012 08:26:34 GMT
注意:
step方法添加到then()有两种不同的处理方式:
1、先前的步骤已经被执行
2、先前的http请求已经执行并且页面已经下载完成
请注意,没有一个加载页面的单一的定义,什么时候domready事件被触发?什么时候所有的请求完成?什么时候所有的应用逻辑执行完成?或者所有的元素被渲染?这个答案依赖于上下文,因此,我们鼓励使用waitfor*()系列的方法来控制你的期望。
一个常见的使用waitForSelector()的方法:
casper.start(‘http://my.website.com/‘);

casper.waitForSelector("#plop", function() {
    this.echo("I‘m sure #plop is available in the DOM");
});

casper.run();
Signature: thenBypass(Number nb)
新增于 1.1版本
增加一个导航步骤,将绕过给定数量的步骤:
casper.start(‘http://foo.bar/‘);
casper.thenBypass(2);
casper.then(function() {
    // This test won‘t be executed
});
casper.then(function() {
    // Nor this one
});
casper.then(function() {
    // While this one will
});
casper.run();
Signature: thenBypassIf(Mixed condition, Number nb)
新增于 1.1版本
增加一个导航步骤,如果condition 为true或者执行的方法返回true,将绕过给定数量的步骤,:
var universe = {
    answer: 42
};
casper.start(‘http://foo.bar/‘);
casper.thenBypassIf(function() {
    return universe && universe.answer === 42;
}, 2);
casper.then(function() {
    // This step won‘t be executed as universe.answer is 42
});
casper.then(function() {
    // Nor this one
});
casper.then(function() {
    // While this one will
});
casper.run();
Signature: thenBypassUnless(Mixed condition, Number nb)
新增于 1.1版本
和 thenBypassIf()相反。
Signature: thenClick(String selector[, Function then])
增加一个导航步骤去点击一个执行的元素,并且增加一个新的导航步骤去单步执行:
// Click the first link in the casperJS page
casper.start(‘http://casperjs.org/‘).thenClick(‘a‘, function() {
    this.echo("I clicked on first link found, the page is now loaded.");
});

casper.run();
这是一个便捷的方法,同时调用了then()和click()
Signature: thenEvaluate(Function fn[, arg1[, arg2[, …]]])
增加一个导航步骤在当前的页面DOM环境下执行javascript代码:
// Querying for "Chuck Norris" on Google
casper.start(‘http://google.fr/‘).thenEvaluate(function(term) {
    document.querySelector(‘input[name="q"]‘).setAttribute(‘value‘, term);
    document.querySelector(‘form[name="f"]‘).submit();
}, ‘Chuck Norris‘);

casper.run();
这是一个便捷的方法,同时调用了then()和evaluate()
Signature: thenOpen(String location[, mixed options])
Adds a new navigation step for opening a new location, and optionally add a next step when its loaded:
增加一个打开新的URL的导航步骤,并且在下载完成后,执行下一步
casper.start(‘http://google.fr/‘).then(function() {
    this.echo("I‘m in your google.");
});

casper.thenOpen(‘http://yahoo.fr/‘, function() {
    this.echo("Now I‘m in your yahoo.")
});

casper.run();
新增于1.0版本
你可以在第二个参数中指明请求的设置:
casper.start().thenOpen(‘http://url.to/some/uri‘, {
    method: "post",
    data: {
        username: ‘chuck‘,
        password: ‘n0rr15‘
    }
}, function() {
    this.echo("POST request has been sent.")
});

casper.run();
Signature: thenOpenAndEvaluate(String location[, Function then[, arg1[, arg2[, …]]])
他是一个打开URL和执行远程dom环境代码的快捷方法:
casper.start(‘http://google.fr/‘).then(function() {
    this.echo("I‘m in your google.");
});

casper.thenOpenAndEvaluate(‘http://yahoo.fr/‘, function() {
    var f = document.querySelector(‘form‘);
    f.querySelector(‘input[name=q]‘).value = ‘chuck norris‘;
    f.submit();
});

casper.run(function() {
    this.debugPage();
    this.exit();
});
Signature: toString()
新增于1.0版本
返回当前casper实例的字符串
casper.start(‘http://google.fr/‘, function() {
    this.echo(this); // [object Casper], currently at http://google.fr/
});

casper.run();
Signature: unwait()
新增于1.1版本
中断所有当前等待的进程,如果有的话
Signature: userAgent(String agent)
新增于1.0版本
Sets the User-Agent string to send through headers when performing requests:
设置user-agent字符串,当你发送执行请求的包头时
casper.start();

casper.userAgent(‘Mozilla/5.0 (Macintosh; Intel Mac OS X)‘);

casper.thenOpen(‘http://google.com/‘, function() {
    this.echo("I‘m a Mac.");
    this.userAgent(‘Mozilla/4.0 (compatible; MSIE 6.0; Windows NT 5.1)‘);
});

casper.thenOpen(‘http://google.com/‘, function() {
    this.echo("I‘m a PC.");
});

casper.run();
Signature: viewport(Number width, Number height[, Function then])
改变当前窗口的尺寸
casper.viewport(1024, 768);
要确认你的页面已经处理完成,你可以异步的使用它:
casper.viewport(1024, 768).then(function() {
    // new view port is now effective
});
新增于1.1版本
在1.1版本,你可以直接使用 viewport()方法作为一个步骤:
casper.viewport(1024, 768, function() {
    // new view port is effective
});
提示:
PhantomJS默认的窗口为400*300,casperjs默认继承了它
Signature: visible(String selector)
检查选择器表达式匹配的DOM元素在远程页面是可用的:
casper.start(‘http://google.com/‘, function() {
    if (this.visible(‘#hplogo‘)) {
        this.echo("I can see the logo");
    } else {
        this.echo("I can‘t see the logo");
    }
});
Signature: wait(Number timeout[, Function then])
在给定的时间后,阻止步骤继续执行,并且在选项里执行一个步骤:
casper.start(‘http://yoursite.tld/‘, function() {
    this.wait(1000, function() {
        this.echo("I‘ve waited for a second.");
    });
});

casper.run();
你也可以用这种方式来实现:
casper.start(‘http://yoursite.tld/‘);

casper.wait(1000, function() {
    this.echo("I‘ve waited for a second.");
});

casper.run();
Signature: waitFor(Function testFx[, Function then, Function onTimeout, Number timeout, Object details])
Waits until a function returns true to process any next step.
等待,知道一个方法返回true,再继续下一步
你也可以通过onTimeout设置一个超时的回调,并且设置一个毫秒计数的timeout用来进行超时退出,默认的超时是5000毫秒
casper.start(‘http://yoursite.tld/‘);

casper.waitFor(function check() {
    return this.evaluate(function() {
        return document.querySelectorAll(‘ul.your-list li‘).length > 2;
    });
}, function then() {
    this.captureSelector(‘yoursitelist.png‘, ‘ul.your-list‘);
});

casper.run();
执行onTimeout回调的实例:
casper.start(‘http://yoursite.tld/‘);

casper.waitFor(function check() {
    return this.evaluate(function() {
        return document.querySelectorAll(‘ul.your-list li‘).length > 2;
    });
}, function then() {    // step to execute when check() is ok
    this.captureSelector(‘yoursitelist.png‘, ‘ul.your-list‘);
}, function timeout() { // step to execute if check has failed
    this.echo("I can‘t haz my screenshot.").exit();
});

casper.run();
details 是一个waitFor.timeout事件传递的信息属性包,它能够用来获取更明确的错误信息,或者有条件的忽略一些超时事件
Signature: waitForAlert(Function then[, Function onTimeout, Number timeout])
新增于1.1-beta4版本.
等待直到JavaScript alert被触发,这个步骤会把alert的消息传到response.data属性里
casper.waitForAlert(function(response) {
    this.echo("Alert received: " + response.data);
});
Signature: waitForPopup(String|RegExp urlPattern[, Function then, Function onTimeout, Number timeout])
新增于 1.0版本.
等待一个popup控件(弹出式窗口)被打开和加载
当前加载的弹出式窗口,有可用的casper.popups的类数组属性:
casper.start(‘http://foo.bar/‘).then(function() {
    this.test.assertTitle(‘Main page title‘);
    this.clickLabel(‘Open me a popup‘);
});

// this will wait for the popup to be opened and loaded
casper.waitForPopup(/popup\.html$/, function() {
    this.test.assertEquals(this.popups.length, 1);
});

// this will set the popup DOM as the main active one only for time the
// step closure being executed
casper.withPopup(/popup\.html$/, function() {
    this.test.assertTitle(‘Popup title‘);
});

// next step will automatically revert the current page to the initial one
casper.then(function() {
    this.test.assertTitle(‘Main page title‘);
});
Signature: waitForResource(String|Function|RegExp testFx[, Function then, Function onTimeout, Number timeout])
等待直到一个匹配testFx的元素出现,然后执行下一个步骤
testFx参数即可以是一个字符串,也可以是一个方法,也可以是一个正则表达式:
casper.waitForResource("foobar.png", function() {
    this.echo(‘foobar.png has been loaded.‘);
});
使用正则表达式:
casper.waitForResource(/foo(bar|baz)\.png$/, function() {
    this.echo(‘foobar.png or foobaz.png has been loaded.‘);
});
使用方法:
casper.waitForResource(function testResource(resource) {
    return resource.url.indexOf("https") === 0;
}, function onReceived() {
    this.echo(‘a secure resource has been loaded.‘);
});
Signature: waitForUrl(String|RegExp url[, Function then, Function onTimeout, Number timeout])
新增于 1.1版本.
等待直到当前的页面URL和给定的参数匹配(字符串或者正则表达式):
casper.start(‘http://foo/‘).waitForUrl(/login\.html$/, function() {
    this.echo(‘redirected to login.html‘);
});

casper.run();
Signature: waitForSelector(String selector[, Function then, Function onTimeout, Number timeout])
等待直到在远程dom环境下找到选择器匹配的元素,然后进入下一步骤。使用方法和waitFor()一样:
casper.start(‘http://foo.bar/‘);

casper.waitWhileSelector(‘.selector‘, function() {
    this.echo(‘.selector is no more!‘);
});

casper.run();
Signature: waitForSelectorTextChange(String selectors[, Function then, Function onTimeout, Number timeout])
等待直到选择器表达式匹配的元素的文本变成了不同的值,然后进入下一步骤。使用方法和waitFor()一样:
casper.start(‘http://foo.bar/‘);

casper.waitForSelectorTextChange(‘.selector‘, function() {
    this.echo(‘The text on .selector has been changed.‘);
});

casper.run();
Signature: waitForText(String text[, Function then, Function onTimeout, Number timeout])
新增于 1.0版本.
等待直到text传入的值包含在当前文本中,然后进入下一步骤,使用方法和waitFor()一样:
Signature: waitUntilVisible(String selector[, Function then, Function onTimeout, Number timeout])
Waits until an element matching the provided selector expression is visible in the remote DOM to process a next step. Uses waitFor().
等待直到选择器表达式匹配的元素变成了不可用,然后进入下一步骤,使用方法和waitFor()一样:
Signature: warn(String message)
记录日志,并且打印一个警告消息到标准输出中:
casper.warn("I‘m a warning message.");
提示:
调用warn()将会执行warn事件
Signature: withFrame(String|Number frameInfo, Function then)
新增于1.0版本.
根据传入的name或者index索引值,从主页面切换到frame,然后执行下一步骤:
这个页面的上下文切换仅持续到该步骤执行完成
casper.start(‘tests/site/frames.html‘, function() {
    this.test.assertTitle(‘FRAMESET TITLE‘);
});

casper.withFrame(‘frame1‘, function() {
    this.test.assertTitle(‘FRAME TITLE‘);
});

casper.withFrame(0, function() {
    this.test.assertTitle(‘FRAME TITLE‘);
});

casper.then(function() {
    this.test.assertTitle(‘FRAMESET TITLE‘);
});
Signature: withPopup(Mixed popupInfo, Function then)
新增于1.0版本.
根据传入的信息,从主页面切换到弹出式窗口,然后执行下一步骤:
这个页面的上下文切换仅持续到该步骤执行完成:
casper.start(‘http://foo.bar/‘).then(function() {
    this.test.assertTitle(‘Main page title‘);
    this.clickLabel(‘Open me a popup‘);
});

// this will wait for the popup to be opened and loaded
casper.waitForPopup(/popup\.html$/, function() {
    this.test.assertEquals(this.popups.length, 1);
});

// this will set the popup DOM as the main active one only for time the
// step closure being executed
casper.withPopup(/popup\.html$/, function() {
    this.test.assertTitle(‘Popup title‘);
});

// next step will automatically revert the current page to the initial one
casper.then(function() {
    this.test.assertTitle(‘Main page title‘);
});
提示:
当前的弹出式窗口,可以在Casper.popups中查询到属性值
Signature: zoom(Number factor)
新增于1.0版本.
设置当前页面的缩放比例:
var casper = require(‘casper‘).create();

casper.start().zoom(2).thenOpen(‘http://google.com‘, function() {
    this.capture(‘big-google.png‘);
});

casper.run();
[译文]casperjs 的API-casper模块,布布扣,bubuko.com
标签:des style blog http java color
原文地址:http://www.cnblogs.com/reach296/p/3848808.html