标签:
时下最热的技术莫过于Docker了,很多人都觉得Docker是个新技术,其实不然,Docker除了其编程语言用go比较新外,其实它还真不是个新东西,也就是个新瓶装旧酒的东西,所谓的The New “Old Stuff”。Docker和Docker衍生的东西用到了很多很酷的技术,我会用几篇 文章来把这些技术给大家做个介绍,希望通过这些文章大家可以自己打造一个山寨版的docker。
当然,文章的风格一定会尊重时下的“流行”——我们再也没有整块整块的时间去看书去专研,而我们只有看微博微信那样的碎片时间(那怕我们有整块的时间,也被那些在手机上的APP碎片化了)。所以,这些文章的风格必然坚持“马桶风格”(希望简单到占用你拉一泡屎就时间,而且你还不用动脑子,并能学到些东西)
废话少说,我们开始。先从Linux Namespace开始。
Linux Namespace是Linux提供的一种内核级别环境隔离的方法。不知道你是否还记得很早以前的Unix有一个叫chroot的系统调用(通过修改根目录把用户jail到一个特定目录下),chroot提供了一种简单的隔离模式:chroot内部的文件系统无法访问外部的内容。Linux Namespace在此基础上,提供了对UTS、IPC、mount、PID、network、User等的隔离机制。
举个例子,我们都知道,Linux下的超级父亲进程的PID是1,所以,同chroot一样,如果我们可以把用户的进程空间jail到某个进程分支下,并像chroot那样让其下面的进程 看到的那个超级父进程的PID为1,于是就可以达到资源隔离的效果了(不同的PID namespace中的进程无法看到彼此)
?Linux Namespace 有如下种类,官方文档在这里《Namespace in Operation》
| 分类 | 系统调用参数 | 相关内核版本 |
|---|---|---|
| Mount namespaces | CLONE_NEWNS | Linux 2.4.19 |
| ?UTS namespaces | CLONE_NEWUTS | Linux 2.6.19 |
| IPC namespaces | CLONE_NEWIPC | Linux 2.6.19 |
| PID namespaces | CLONE_NEWPID | Linux 2.6.24 |
| Network namespaces | CLONE_NEWNET | 始于Linux 2.6.24 完成于 Linux 2.6.29 |
| User namespaces | CLONE_NEWUSER | 始于 Linux 2.6.23 完成于 Linux 3.8) |
主要是?三个系统调用
unshare() 和 setns() 都比较简单,大家可以自己man,我这里不说了。
下面还是让我们来看一些示例(以下的测试程序最好在Linux 内核为3.8以上的版本中运行,我用的是ubuntu 14.04)。
首先,我们来看一下一个最简单的clone()系统调用的示例,(后面,我们的程序都会基于这个程序做修改):
|
1
2
3
4
5
6
7
8
9
10
11
12
13
14
15
16
17
18
19
20
21
22
23
24
25
26
27
28
29
30
31
32
33
34
35
36
|
#define _GNU_SOURCE#include <sys/types.h>#include <sys/wait.h>#include <stdio.h>#include <sched.h>#include <signal.h>#include <unistd.h>/* 定义一个给 clone 用的栈,栈大小1M */#define STACK_SIZE (1024 * 1024)static char container_stack[STACK_SIZE];char* const container_args[] = { "/bin/bash", NULL};int container_main(void* arg){ printf("Container - inside the container!\n"); /* 直接执行一个shell,以便我们观察这个进程空间里的资源是否被隔离了 */ execv(container_args[0], container_args); printf("Something‘s wrong!\n"); return 1;}int main(){ printf("Parent - start a container!\n"); /* 调用clone函数,其中传出一个函数,还有一个栈空间的(为什么传尾指针,因为栈是反着的) */ int container_pid = clone(container_main, container_stack+STACK_SIZE, SIGCHLD, NULL); /* 等待子进程结束 */ waitpid(container_pid, NULL, 0); printf("Parent - container stopped!\n"); return 0;} |
从上面的程序,我们可以看到,这和pthread基本上是一样的玩法。但是,对于上面的程序,父子进程的进程空间是没有什么差别的,父进程能访问到的子进程也能。
下面, 让我们来看几个例子看看,Linux的Namespace是什么样的。
下面的代码,我略去了上面那些头文件和数据结构的定义,只有最重要的部分。
|
1
2
3
4
5
6
7
8
9
10
11
12
13
14
15
16
17
18
|
int container_main(void* arg){ printf("Container - inside the container!\n"); sethostname("container",10); /* 设置hostname */ execv(container_args[0], container_args); printf("Something‘s wrong!\n"); return 1;}int main(){ printf("Parent - start a container!\n"); int container_pid = clone(container_main, container_stack+STACK_SIZE, CLONE_NEWUTS | SIGCHLD, NULL); /*启用CLONE_NEWUTS Namespace隔离 */ waitpid(container_pid, NULL, 0); printf("Parent - container stopped!\n"); return 0;} |
运行上面的程序你会发现(需要root权限),子进程的hostname变成了 container。
|
1
2
3
4
5
6
7
|
hchen@ubuntu:~$ sudo ./utsParent - start a container!Container - inside the container!root@container:~# hostnamecontainerroot@container:~# uname -ncontainer |
IPC全称 Inter-Process Communication,是Unix/Linux下进程间通信的一种方式,IPC有共享内存、信号量、消息队列等方法。所以,为了隔离,我们也需要把IPC给隔离开来,这样,只有在同一个Namespace下的进程才能相互通信。如果你熟悉IPC的原理的话,你会知道,IPC需要有一个全局的ID,即然是全局的,那么就意味着我们的Namespace需要对这个ID隔离,不能让别的Namespace的进程看到。
要启动IPC隔离,我们只需要在调用clone时加上CLONE_NEWIPC参数就可以了。
|
1
2
|
int container_pid = clone(container_main, container_stack+STACK_SIZE, CLONE_NEWUTS | CLONE_NEWIPC | SIGCHLD, NULL); |
首先,我们先创建一个IPC的Queue(如下所示,全局的Queue ID是0)
|
1
2
3
4
5
6
7
|
hchen@ubuntu:~$ ipcmk -Q Message queue id: 0hchen@ubuntu:~$ ipcs -q------ Message Queues --------key msqid owner perms used-bytes messages 0xd0d56eb2 0 hchen 644 0 0 |
如果我们运行没有CLONE_NEWIPC的程序,我们会看到,在子进程中还是能看到这个全启的IPC Queue。
|
1
2
3
4
5
6
7
8
9
|
hchen@ubuntu:~$ sudo ./utsParent - start a container!Container - inside the container!root@container:~# ipcs -q------ Message Queues --------key msqid owner perms used-bytes messages 0xd0d56eb2 0 hchen 644 0 0 |
但是,如果我们运行加上了CLONE_NEWIPC的程序,我们就会下面的结果:
|
1
2
3
4
5
6
7
8
|
root@ubuntu:~$ sudo./ipcParent - start a container!Container - inside the container!root@container:~/linux_namespace# ipcs -q------ Message Queues --------key msqid owner perms used-bytes messages |
我们可以看到IPC已经被隔离了。
我们继续修改上面的程序:
|
1
2
3
4
5
6
7
8
9
10
11
12
13
14
15
16
17
18
19
20
|
int container_main(void* arg){ /* 查看子进程的PID,我们可以看到其输出子进程的 pid 为 1 */ printf("Container [%5d] - inside the container!\n", getpid()); sethostname("container",10); execv(container_args[0], container_args); printf("Something‘s wrong!\n"); return 1;}int main(){ printf("Parent [%5d] - start a container!\n", getpid()); /*启用PID namespace - CLONE_NEWPID*/ int container_pid = clone(container_main, container_stack+STACK_SIZE, CLONE_NEWUTS | CLONE_NEWPID | SIGCHLD, NULL); waitpid(container_pid, NULL, 0); printf("Parent - container stopped!\n"); return 0;} |
运行结果如下(我们可以看到,子进程的pid是1了):
|
1
2
3
4
5
|
hchen@ubuntu:~$ sudo ./pidParent [ 3474] - start a container!Container [ 1] - inside the container!root@container:~# echo $$1 |
你可能会问,PID为1有个毛用啊?我们知道,在传统的UNIX系统中,PID为1的进程是init,地位非常特殊。他作为所有进程的父进程,有很多特权(比如:屏蔽信号等),另外,其还会为检查所有进程的状态,我们知道,如果某个子进程脱离了父进程(父进程没有wait它),那么init就会负责回收资源并结束这个子进程。所以,要做到进程空间的隔离,首先要创建出PID为1的进程,最好就像chroot那样,把子进程的PID在容器内变成1。
但是,我们会发现,在子进程的shell里输入ps,top等命令,我们还是可以看得到所有进程。说明并没有完全隔离。这是因为,像ps, top这些命令会去读/proc文件系统,所以,因为/proc文件系统在父进程和子进程都是一样的,所以这些命令显示的东西都是一样的。
所以,我们还需要对文件系统进行隔离。
下面的例程中,我们在启用了mount namespace并在子进程中重新mount了/proc文件系统。
|
1
2
3
4
5
6
7
8
9
10
11
12
13
14
15
16
17
18
19
20
21
|
int container_main(void* arg){ printf("Container [%5d] - inside the container!\n", getpid()); sethostname("container",10); /* 重新mount proc文件系统到 /proc下 */ system("mount -t proc proc /proc"); execv(container_args[0], container_args); printf("Something‘s wrong!\n"); return 1;}int main(){ printf("Parent [%5d] - start a container!\n", getpid()); /* 启用Mount Namespace - 增加CLONE_NEWNS参数 */ int container_pid = clone(container_main, container_stack+STACK_SIZE, CLONE_NEWUTS | CLONE_NEWPID | CLONE_NEWNS | SIGCHLD, NULL); waitpid(container_pid, NULL, 0); printf("Parent - container stopped!\n"); return 0;} |
运行结果如下:
|
1
2
3
4
5
6
7
|
hchen@ubuntu:~$ sudo ./pid.mntParent [ 3502] - start a container!Container [ 1] - inside the container!root@container:~# ps -elf F S UID PID PPID C PRI NI ADDR SZ WCHAN STIME TTY TIME CMD4 S root 1 0 0 80 0 - 6917 wait 19:55 pts/2 00:00:00 /bin/bash0 R root 14 1 0 80 0 - 5671 - 19:56 pts/2 00:00:00 ps -elf |
上面,我们可以看到只有两个进程 ,而且pid=1的进程是我们的/bin/bash。我们还可以看到/proc目录下也干净了很多:
|
1
2
3
4
5
6
7
8
9
10
11
12
13
14
|
root@container:~# ls /proc1 dma key-users net sysvipc16 driver kmsg pagetypeinfo timer_listacpi execdomains kpagecount partitions timer_statsasound fb kpageflags sched_debug ttybuddyinfo filesystems loadavg schedstat uptimebus fs locks scsi versioncgroups interrupts mdstat self version_signaturecmdline iomem meminfo slabinfo vmallocinfoconsoles ioports misc softirqs vmstatcpuinfo irq modules stat zoneinfocrypto kallsyms mounts swapsdevices kcore mpt sysdiskstats keys mtrr sysrq-trigger |
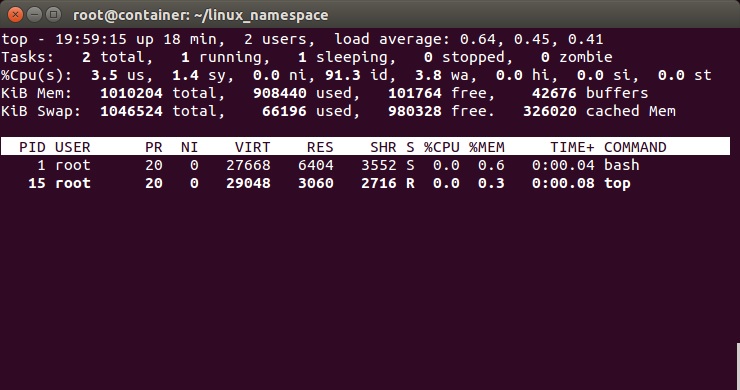
下图,我们也可以看到在子进程中的top命令只看得到两个进程了。
这里,多说一下。在通过CLONE_NEWNS创建mount namespace后,父进程会把自己的文件结构复制给子进程中。而子进程中新的namespace中的所有mount操作都只影响自身的文件系统,而不对外界产生任何影响。这样可以做到比较严格地隔离。
你可能会问,我们是不是还有别的一些文件系统也需要这样mount? 是的。
下面我将向演示一个“山寨镜像”,其模仿了Docker的Mount Namespace。
首先,我们需要一个rootfs,也就是我们需要把我们要做的镜像中的那些命令什么的copy到一个rootfs的目录下,我们模仿Linux构建如下的目录:
|
1
2
|
hchen@ubuntu:~/rootfs$ lsbin dev etc home lib lib64 mnt opt proc root run sbin sys tmp usr var |
然后,我们把一些我们需要的命令copy到 rootfs/bin目录中(sh命令必需要copy进去,不然我们无法 chroot )
|
1
2
3
4
5
6
7
8
9
10
|
hchen@ubuntu:~/rootfs$ ls ./bin ./usr/bin ./bin:bash chown gzip less mount netstat rm tabs tee top ttycat cp hostname ln mountpoint ping sed tac test touch umountchgrp echo ip ls mv ps sh tail timeout tr unamechmod grep kill more nc pwd sleep tar toe truncate which./usr/bin:awk env groups head id mesg sort strace tail top uniq vi wc xargs |
注:你可以使用ldd命令把这些命令相关的那些so文件copy到对应的目录:
|
1
2
3
4
5
6
|
hchen@ubuntu:~/rootfs/bin$ ldd bash linux-vdso.so.1 => (0x00007fffd33fc000) libtinfo.so.5 => /lib/x86_64-linux-gnu/libtinfo.so.5 (0x00007f4bd42c2000) libdl.so.2 => /lib/x86_64-linux-gnu/libdl.so.2 (0x00007f4bd40be000) libc.so.6 => /lib/x86_64-linux-gnu/libc.so.6 (0x00007f4bd3cf8000) /lib64/ld-linux-x86-64.so.2 (0x00007f4bd4504000) |
下面是我的rootfs中的一些so文件:
|
1
2
3
4
5
6
7
8
9
10
11
12
13
14
15
16
17
18
19
20
|
hchen@ubuntu:~/rootfs$ ls ./lib64 ./lib/x86_64-linux-gnu/./lib64:ld-linux-x86-64.so.2./lib/x86_64-linux-gnu/:libacl.so.1 libmemusage.so libnss_files-2.19.so libpython3.4m.so.1libacl.so.1.1.0 libmount.so.1 libnss_files.so.2 libpython3.4m.so.1.0libattr.so.1 libmount.so.1.1.0 libnss_hesiod-2.19.so libresolv-2.19.solibblkid.so.1 libm.so.6 libnss_hesiod.so.2 libresolv.so.2libc-2.19.so libncurses.so.5 libnss_nis-2.19.so libselinux.so.1libcap.a libncurses.so.5.9 libnss_nisplus-2.19.so libtinfo.so.5libcap.so libncursesw.so.5 libnss_nisplus.so.2 libtinfo.so.5.9libcap.so.2 libncursesw.so.5.9 libnss_nis.so.2 libutil-2.19.solibcap.so.2.24 libnsl-2.19.so libpcre.so.3 libutil.so.1libc.so.6 libnsl.so.1 libprocps.so.3 libuuid.so.1libdl-2.19.so libnss_compat-2.19.so libpthread-2.19.so libz.so.1libdl.so.2 libnss_compat.so.2 libpthread.so.0libgpm.so.2 libnss_dns-2.19.so libpython2.7.so.1libm-2.19.so libnss_dns.so.2 libpython2.7.so.1.0 |
包括这些命令依赖的一些配置文件:
|
1
2
3
|
hchen@ubuntu:~/rootfs$ ls ./etcbash.bashrc group hostname hosts ld.so.cache nsswitch.conf passwd profile resolv.conf shadow |
你现在会说,我靠,有些配置我希望是在容器起动时给他设置的,而不是hard code在镜像中的。比如:/etc/hosts,/etc/hostname,还有DNS的/etc/resolv.conf文件。好的。那我们在rootfs外面,我们再创建一个conf目录,把这些文件放到这个目录中。
|
1
2
|
hchen@ubuntu:~$ ls ./confhostname hosts resolv.conf |
这样,我们的父进程就可以动态地设置容器需要的这些文件的配置, 然后再把他们mount进容器,这样,容器的镜像中的配置就比较灵活了。
好了,终于到了我们的程序。
|
1
2
3
4
5
6
7
8
9
10
11
12
13
14
15
16
17
18
19
20
21
22
23
24
25
26
27
28
29
30
31
32
33
34
35
36
37
38
39
40
41
42
43
44
45
46
47
48
49
50
51
52
53
54
55
56
57
58
59
60
61
62
63
64
65
66
67
68
69
70
71
72
73
74
75
76
77
78
79
80
81
82
|
#define _GNU_SOURCE#include <sys/types.h>#include <sys/wait.h>#include <sys/mount.h>#include <stdio.h>#include <sched.h>#include <signal.h>#include <unistd.h>#define STACK_SIZE (1024 * 1024)static char container_stack[STACK_SIZE];char* const container_args[] = { "/bin/bash", "-l", NULL};int container_main(void* arg){ printf("Container [%5d] - inside the container!\n", getpid()); //set hostname sethostname("container",10); //remount "/proc" to make sure the "top" and "ps" show container‘s information if (mount("proc", "rootfs/proc", "proc", 0, NULL) !=0 ) { perror("proc"); } if (mount("sysfs", "rootfs/sys", "sysfs", 0, NULL)!=0) { perror("sys"); } if (mount("none", "rootfs/tmp", "tmpfs", 0, NULL)!=0) { perror("tmp"); } if (mount("udev", "rootfs/dev", "devtmpfs", 0, NULL)!=0) { perror("dev"); } if (mount("devpts", "rootfs/dev/pts", "devpts", 0, NULL)!=0) { perror("dev/pts"); } if (mount("shm", "rootfs/dev/shm", "tmpfs", 0, NULL)!=0) { perror("dev/shm"); } if (mount("tmpfs", "rootfs/run", "tmpfs", 0, NULL)!=0) { perror("run"); } /* * 模仿Docker的从外向容器里mount相关的配置文件 * 你可以查看:/var/lib/docker/containers/<container_id>/目录, * 你会看到docker的这些文件的。 */ if (mount("conf/hosts", "rootfs/etc/hosts", "none", MS_BIND, NULL)!=0 || mount("conf/hostname", "rootfs/etc/hostname", "none", MS_BIND, NULL)!=0 || mount("conf/resolv.conf", "rootfs/etc/resolv.conf", "none", MS_BIND, NULL)!=0 ) { perror("conf"); } /* 模仿docker run命令中的 -v, --volume=[] 参数干的事 */ if (mount("/tmp/t1", "rootfs/mnt", "none", MS_BIND, NULL)!=0) { perror("mnt"); } /* chroot 隔离目录 */ if ( chdir("./rootfs") != 0 || chroot("./") != 0 ){ perror("chdir/chroot"); } execv(container_args[0], container_args); perror("exec"); printf("Something‘s wrong!\n"); return 1;}int main(){ printf("Parent [%5d] - start a container!\n", getpid()); int container_pid = clone(container_main, container_stack+STACK_SIZE, CLONE_NEWUTS | CLONE_NEWIPC | CLONE_NEWPID | CLONE_NEWNS | SIGCHLD, NULL); waitpid(container_pid, NULL, 0); printf("Parent - container stopped!\n"); return 0;} |
sudo运行上面的程序,你会看到下面的挂载信息以及一个所谓的“镜像”:
|
1
2
3
4
5
6
7
8
9
10
11
12
13
14
15
16
17
18
19
20
21
22
|
hchen@ubuntu:~$ sudo ./mountParent [ 4517] - start a container!Container [ 1] - inside the container!root@container:/# mountproc on /proc type proc (rw,relatime)sysfs on /sys type sysfs (rw,relatime)none on /tmp type tmpfs (rw,relatime)udev on /dev type devtmpfs (rw,relatime,size=493976k,nr_inodes=123494,mode=755)devpts on /dev/pts type devpts (rw,relatime,mode=600,ptmxmode=000)tmpfs on /run type tmpfs (rw,relatime)/dev/disk/by-uuid/18086e3b-d805-4515-9e91-7efb2fe5c0e2 on /etc/hosts type ext4 (rw,relatime,errors=remount-ro,data=ordered)/dev/disk/by-uuid/18086e3b-d805-4515-9e91-7efb2fe5c0e2 on /etc/hostname type ext4 (rw,relatime,errors=remount-ro,data=ordered)/dev/disk/by-uuid/18086e3b-d805-4515-9e91-7efb2fe5c0e2 on /etc/resolv.conf type ext4 (rw,relatime,errors=remount-ro,data=ordered)root@container:/# ls /bin /usr/bin/bin:bash chmod echo hostname less more mv ping rm sleep tail test top truncate unamecat chown grep ip ln mount nc ps sed tabs tar timeout touch tty whichchgrp cp gzip kill ls mountpoint netstat pwd sh tac tee toe tr umount/usr/bin:awk env groups head id mesg sort strace tail top uniq vi wc xargs |
关于如何做一个chroot的目录,这里有个工具叫DebootstrapChroot,你可以顺着链接去看看(英文的哦)
接下来的事情,你可以自己玩了,我相信你的想像力 。:)
在下一篇,我将向你介绍User Namespace、Network Namespace以及Namespace的其它东西。
from: http://coolshell.cn/articles/17010.html
标签:
原文地址:http://www.cnblogs.com/GarfieldEr007/p/5424621.html