标签:
13、使用路由和 $location 切换视图
对于一些单页面应用来说,有时候需要为用户展示或者隐藏一些子页面视图,可以利用 Angular 的 $route 服务来管理这种场景。
你可以利用路由服务来定义这样的一种东西:对于浏览器所指向的特定 URL,Angular 将会加载并显示一个模板,并实例化一个控制器来为模板提供内容。
在应用中可以调用 $routeProvider 服务上的函数来创建路由,把需要创建的路由当成一个配置块传给这些函数即可。伪代码如下:
1 var someModule = anguler.module(‘someModule‘, [...module dependencies...]);
2
3 someModule.config(function($routeProvider) {
4     $routeProvider.
5         when(‘url‘, {controller : aController, templateUrl : ‘/path/to/template‘}).
6         when(...other mappings for your app...).
7         ...
8         otherwise(...what to do if nothing else matches);
9 });
以上代码中,当浏览器中的 URL 变成指定的取值时,Angular 将会加载 /path/to/template 路径下的模板,然后把这个模板中的根元素关联到 aController 上,最后一行中的 otherwise 调用可以告诉路由,在没有匹配到任何东西时跳转到这里。
下面构建一个小例子,但是需要把代码放到 web 服务器上中。
index.html
 1 <html ng-app="AMail">
 2     <head>
 3     </head>
 4     <body>
 5         <h1>A-Mail</h1>
 6         <div ng-view></div>
 7         <script src="../src/angular.js"></script>
 8         <script src="../src/angular-route.js"></script>
 9         <script src="controller.js"></script>
10     </body>
11 </html>
list.html
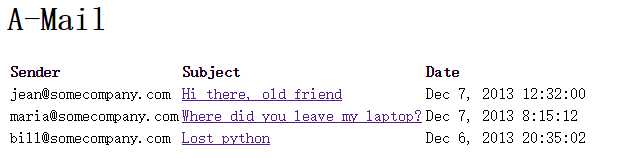
 1 <table>
 2     <tr>
 3         <td><strong>Sender</strong></td>
 4         <td><strong>Subject</strong></td>
 5         <td><strong>Date</strong></td>
 6     </tr>
 7     <tr ng-repeat="message in messages">
 8         <td>{{message.sender}}</td>
 9         <td><a href="#/view/{{message.id}}">{{message.subject}}</a></td>
10         <td>{{message.date}}</td>
11     </tr>
12 </table>
detail.html
 1 <div><strong>Subject: </strong>{{message.subject}}</div>
 2 <div><strong>Sender: </strong>{{message.sender}}</div>
 3 <div><strong>Date: </strong>{{message.date}}</div>
 4 <!-- ng-bind 性能不如 {{}},尽量只在 index.html 页面使用 ng-bind,避免花括号一闪而过-->
 5 <div>
 6     <strong>To: </strong>
 7     <span ng-repeat="recipient in message.recipients">{{recipient}}</span>
 8 </div>
 9 <div>{{message.message}}</div>
10 <a href="#/">back to message list</a>
controller.js
 1 //为核心的 AMail 服务创建模块
 2 var aMailServices = angular.module(‘AMail‘, [‘ngRoute‘]);
 3
 4 //在 URL,模板和控制器之间建立映射关系
 5 aMailServices.config(function($routeProvider) {
 6     $routeProvider.
 7     when(‘/‘, {
 8         controller: ListController,     // 全局的 function 方式去找 Controller
 9         templateUrl: ‘list.html‘
10     }).
11     //注意,为了创建详情视图,在 id 前面加了一个冒号,从而指定了一个参数化的 URL 组件
12     when(‘/view/:id‘, {
13         controller: ‘DetailController‘, // 用注册的方式去找 Controller
14         templateUrl: ‘detail.html‘
15     }).
16     otherwise({
17         redirectTo: ‘/‘
18     });
19 });
20
21 //一些虚拟邮件
22 messages = [{
23         id: 0, sender: ‘jean@somecompany.com‘, subject: ‘Hi there, old friend‘,
24         date: ‘Dec 7, 2013 12:32:00‘, recipients: [‘greg@somecompany.com‘],
25         message: ‘Hey, we should get together for lunch sometime and catch up.‘
26         + ‘There are many things we should collaborate on this year.‘
27     }, {
28         id: 1, sender: ‘maria@somecompany.com‘, subject: ‘Where did you leave my laptop?‘,
29         date: ‘Dec 7, 2013 8:15:12‘, recipients: [‘greg@somecompany.com‘],
30         message: ‘I thought you were going to put it in my desk drawer.‘
31         + ‘But it does not seem to be there.‘
32     }, {
33         id: 2, sender: ‘bill@somecompany.com‘, subject: ‘Lost python‘,
34         date: ‘Dec 6, 2013 20:35:02‘, recipients: [‘greg@somecompany.com‘],
35         message: "Nobody panic, but my pet python is missing from her cage."
36         + "She doesn‘t move too fast, so just call me if you see her."
37     }];
38
39 //把邮件发布给邮件列表模板,注意两种方式,建议使用下面注册的方式,避免全局的 function 污染
40 function ListController($scope) {
41     $scope.messages = messages;
42 }
43
44 aMailServices.controller(‘DetailController‘, function($scope, $routeParams) {
45     $scope.messages = messages[$routeParams.id];
46 });
效果如下:
14、与服务器交互
真正的应用需要和真实的服务器进行交互,Angular 中提供了一个叫做 $http 的服务。它提供了一个可扩展的抽象方法列表,使得与服务器的交互更加容易。它支持 HTTP、JSONP 和 CORS 方式。它还包含了安全性支持,避免 JSON 格式的脆弱性和 XSRF。可以让你轻松地转换请求和响应数据,甚至还实现了简单的缓存。
返回的响应数据示例如下:
 1 [
 2     {
 3         "id" : 0,
 4         "title" : "Paint pots",
 5         "description" : "Pots full of paint",
 6         "price" : 3.95
 7     },
 8     {
 9         "id" : 1,
10         "title" : "Polka dots",
11         "description" : "Dots with that polka groove",
12         "price" : 12.95
13     },
14     {
15         "id" : 2,
16         "title" : "Pebbles",
17         "description" : "Just little rocks, really",
18         "price" : 6.95
19     }
20 ]
我们可以像下面这样编写查询代码:
1 function ShoopingController($scope, $http) {
2     $http.get(‘/products‘).success(function (data, status, headers, config) {
3         $scope.items = data;
4     });
5 }
然后就可以应用到模板中了。
15、使用指令修改 DOM
指令扩展了 HTML 语法,同时它也是使用自定义的元素和属性把行为和 DOM 转换关联到一起的方式。通过这些指令,可以创建可复用的 UI 组件,配置你的应用,并且可以做到你能想象到的几乎所有事情,这些事情都可以在你的 UI 模板中实现。所以说,自定义指令是 Angular 的精髓。
与服务一样,你可以通过模块对象的 API 来定义指令,只要调用模块实例的 directive() 函数即可,其中 directiveFunction 是一个工厂函数,用来定义指令的特性。
var appModule = angular.module(‘appModule‘, [...]);
appModule.directive(‘directiveName‘, directiveFunction);
指令的东西很多,以后详解,这里先举个例子,感受下指令的魅力。
编写一个非常简单的指令:一个 <hello> 元素,它会把自己替换成 <div>Hi there</div>。
先看指令:
1 var appModule = angular.module(‘app‘, []);
2
3 appModule.directive(‘hello‘, function () {
4     return {
5         restrict: ‘E‘,
6         template: ‘<div>Hi there</div>‘,
7         replace: true
8     };
9 });
这里,restrict 属性表示描述指令的风格,E 表示允许使用元素的形式;template 属性表示需要替换的内容;replace 属性设置为 true 表示会用 HTML 内容来替换模板。
可以在模板中这样使用它:
1 <html lang="en" ng-app="app">
2     <script src="../src/angular.js"></script>
3     <script src="directive.js"></script>
4     <body>
5         <hello></hello>
6     </body>
7 </html>
把以上内容加载到浏览器中,就会显示
Hi there
16、校验用户输入
Angular 自动为 <form> 元素增加了一些好用的特性,使其更适合单页面应用。其中一个特性是,Angular 允许你为表单中的输入元素定义一个合法的状态,并且只有当所有元素都是合法状态时才允许提交表单。
控制器如下:
 1 var addUser = angular.module(‘AddUserModule‘, []);
 2
 3 addUser.controller(‘AddUserController‘, function ($scope) {
 4     $scope.message = ‘‘;
 5
 6     $scope.addUser = function () {
 7         // 这里把 user 真正保存到数据库中
 8         $scope.message = ‘Thanks, ‘ + $scope.user.first + ‘, we added you!‘;
 9     }
10 });
模板如下:
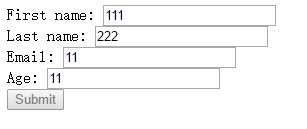
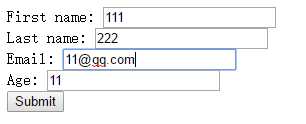
 1 <html ng-app="AddUserModule">
 2     <body>
 3         <form name="addUserForm" ng-controller="AddUserController">
 4             <div ng-show="message">{{message}}</div>
 5             <div>First name: <input name="firstName" ng-model="user.first" required></div>
 6             <div>Last name: <input ng-model="user.last" required></div>
 7             <div>Email: <input type="email" ng-model="user.email" required></div>
 8             <div>Age: <input type="number" ng-model="user.age" ng-maxlength="3" ng-minlength="1"></div>
 9             <div><button ng-click="addUser()" ng-disabled="!addUserForm.$valid">Submit</button></div>
10         </form>
11         <script src="../src/angular.js"></script>
12         <script src="submit.js"></script>
13     </body>
14 </html>
在控制器中,可以通过 $valid 属性获取表单的校验状态,当表单中的所有输入项都合法时,Angular 将会把这个属性设置为 true,否则没有输入完成时禁用了 Submit 按钮。
PS:到目前为止,已经介绍了 Angular 框架的几乎所有常用特性,掌握了这个《常用特性》系列的文章,就算是入门了,加油!
特别感谢:《用 AngularJS 开发下一代 Web 应用》
标签:
原文地址:http://www.cnblogs.com/JavaSubin/p/5517419.html