标签:
购物网站的产品页经常会放有一个产品展示图区。该图区有一个功能就是产品图的放大功能,移动左侧的焦点区域,可以放大细节部分观看,详情如下图。实现该功能的方法也非常简单。
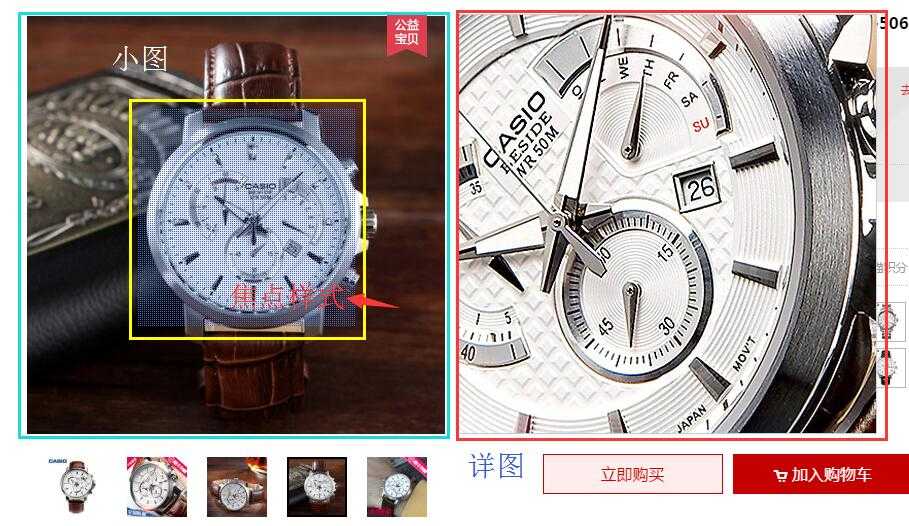
实验:制作产品焦点放大图。
所需技能:1、基本的获取页面元素的方法;
2、几个简单的事件;
3、会使用dom设置元素的属性;
案例原理:1、焦点框的跟随鼠标事件;
2、焦点框的移动区域规定;
3、大盒子内容的显示;
适合对象:js初学者
-------------------------------------------------------------------开始!-------------------------------------------------------------
一、首先我们准备CSS样式,CSS样式中需要注意的几个点是:
(1)焦点图相对定位,默认display:none;
(2)右侧显示大图的盒子(以下简称大图框)默认display:none;大图框中的内容在溢出盒子后要隐藏overflow:hidden;
二、开始书写script代码:
(1)首先获取页面元素:
1 //首先或许要操作的元素
2     function getId(tag){                //定义一个用id获取元素的方法,减少很多工作量!
3         return document.getElementById(tag)
4     }
5     var box=getId("box");
6     var small=getId("small");
7     var mask=getId("mask");
8     var big=getId("big");
9     var pic=big.children[0];              //这里是通过节点的方法获取元素
(2)明确鼠标移动到小图上会出现两个事件:1)焦点框要出来;2)大图框要显示出来。同理鼠标移除后这两个事假要取消
1 //鼠标移动到图片上出现两个效果
2     small.onmouseover=function(){
3         mask.style.display="block";
4         big.style.display="block";
5     }
6     small.onmouseout=function(){
7         mask.style.display="none";
8         big.style.display="none"
9     }
(3)设置焦点框的跟随:
1)当设置焦点框的跟随时,我们的跟随时间是事实发生的,所以此处的事件类型不在是onmouseover;而是onmousemove;
2)这段代码中涉及到的问题主要是一个mask(焦点框)的定位计算问题,容易忽略的问题是mask是相对谁的位置移动的?我的css样式中mask是放在small这个盒子中的,所以相对移动的位置一定是其已经定位的父元素small的位置。所以我用clientX,clientY获取的相对于浏览器当前窗口的位置坐标不能直接使用,必须减去其父盒子的margin值的影响。
//设置小图的焦点框,跟随鼠标;
    small.onmousemove=function(e){
        var marginL=box.offsetLeft;                //使用offsetLeft方法获得box的margin-left
        var marginT=box.offsetTop;                 //使用offsetTop方法获得box的margin-top
        var currentX= e.clientX;
        var currentY= e.clientY;                  //使用e.clientX和e.clinetY相对于浏览器的左上角的位置
        var x=currentX-marginL-mask.offsetWidth/2;
        var y=currentY-marginT-mask.offsetHeight/2;       //要想使焦点框的中心对齐鼠标,还需要减去焦点框的宽高的一半
/----------------------此处一会儿还要插入其他代码/---------------------------/
        mask.style.left=x+"px";
        mask.style.top=y+"px";                     //改变焦点框的位置
(4)闲置焦点框的位置的移动
1)上一步执行完成后焦点框的移动是不受任何闲置的,在我们浏览购物网站的过程中,明显可以感受到焦点框不容许移动的小图的外面,造成不好的用户体验;
2)要限制焦点框的移动,主要是x,y变化超过容许值时,给他一个固定的值;
 1  //设置小图的焦点框,跟随鼠标;
 2     small.onmousemove=function(e){
 3         var marginL=box.offsetLeft;
 4         var marginT=box.offsetTop;
 5         var currentX= e.clientX;
 6         var currentY= e.clientY;
 7         var x=currentX-marginL-mask.offsetWidth/2;
 8         var y=currentY-marginT-mask.offsetHeight/2;
 9
10         //给焦点框设置移动区域
11         if(x<0){x=0;}
12         if(x>small.offsetWidth-mask.offsetWidth)
13       {x=small.offsetWidth-mask.offsetWidth};     // 用于定位的x的最小值是0,最大值是small的长度-mask的长度 y轴线同理
14         if(y<0){y=0;}
15         if(y>small.offsetHeight-mask.offsetHeight)
        {y=small.offsetHeight-mask.offsetHeight};
16         mask.style.left=x+"px";          //注意在规定移动区域后再写mask的移动区域,注意代码的执行顺序
17         mask.style.top=y+"px";
(5)设置大图的显示
1)在big盒子中实现图片的移动,应该想到-margin值;
2)移动多少距离可以利用一个固定比例乘以mask的left和top值,想一下焦点区的左上角和大图框的左上角显示的位置是相同的!!!这一点就不是很难理解了
1  //设置大盒子中显示的内容
2         var relativeX=mask.offsetLeft;
3         var relativeY=mask.offsetTop;
4         var proporationX=pic.offsetWidth/small.offsetWidth;      //设置比例
5         var proporationY=pic.offsetHeight/small.offsetWidth;
6         pic.style.marginLeft=-relativeX*proporationX+"px";      //注意!margin的值必须是负值,“px不要丢掉
7         pic.style.marginTop=-relativeY*proporationY+"px";
到这一步我们的这个demo也就做完了!是不是很简单
下面我将整个代码粘贴出来,希望能和大家讨论交流。
这里是css代码
 <style>
        * {
            margin: 0;
            padding: 0;
        }

        #box {
            margin: 50px;

        }

        #small {
            width: 229px;
            height: 250px;
            border: 1px solid black;
            text-align: center;
            position: relative;
            float: left;
        }

        #mask {
            width: 100px;
            height: 100px;
            background-color: rgba(214, 111, 193, 0.3);
            position: absolute;
            top: 0;
            left: 0;
            /*display: none;*/
        }
        #big {
            width: 350px;
            height: 350px;
            border: 1px solid black;
            float: left;
            overflow: hidden;
            /*display: none;*/
        }
    </style>
这里是HTML
<body>
<div id="box">
    <div id="small">
        <img src="small_img.jpg" width="229" height="249" alt=""/>

        <div id="mask"></div>
    </div>
    <div id="big">
        <img src="big_img.JPG" width="549" height="600" alt=""/>
    </div>
</div>
这里是js代码
<script>
    //首先或许要操作的元素
    function getId(tag){
        return document.getElementById(tag)
    }
    var box=getId("box");
    var small=getId("small");
    var mask=getId("mask");
    var big=getId("big");
    var pic=big.children[0];
    console.log(pic);
    //鼠标移动到图片上出现两个效果
    small.onmouseover=function(){
        mask.style.display="block";
        big.style.display="block";
    }
    small.onmouseout=function(){
        mask.style.display="none";
        big.style.display="none"
    }
        //设置小图的焦点框,跟随鼠标;
    small.onmousemove=function(e){
        var marginL=box.offsetLeft;
        var marginT=box.offsetTop;
        var currentX= e.clientX;
        var currentY= e.clientY;
        var x=currentX-marginL-mask.offsetWidth/2;
        var y=currentY-marginT-mask.offsetHeight/2;

        //给焦点框设置移动区域
        if(x<0){x=0;}
        if(x>small.offsetWidth-mask.offsetWidth){x=small.offsetWidth-mask.offsetWidth};
        if(y<0){y=0;}
        if(y>small.offsetHeight-mask.offsetHeight){y=small.offsetHeight-mask.offsetHeight};
        mask.style.left=x+"px";
        mask.style.top=y+"px";
        //设置大盒子中显示的内容
        var relativeX=mask.offsetLeft;
        var relativeY=mask.offsetTop;
        var proporationX=pic.offsetWidth/small.offsetWidth;
        var proporationY=pic.offsetHeight/small.offsetWidth;
        pic.style.marginLeft=-relativeX*proporationX+"px";
        pic.style.marginTop=-relativeY*proporationY+"px";
    }
</script>
标签:
原文地址:http://www.cnblogs.com/wuhaozhou/p/5618990.html