标签:
本文介绍Identity的第三方登入技术.到目前为止只介绍了CookieAuthentication这种授权方式,即浏览器访问网站->网站尝试从Cookie解析用户数据->生成用户凭据即用户授权
而第三方登入则是通过第三方网站给予的数据来生成用户凭据实现授权.
本文假定你已经知道第三方登入的流程
微软官方提供了很多授权库,能方便的使用这些网站的第三方登入功能.
| 名称 | 描述 |
|---|---|
| Microsoft.Owin.Security.Google | 用Google账号认证用户 |
| Microsoft.Owin.Security.Facebook | 用Facebook账号认证用户 |
| Microsoft.Owin.Security.Twitter | 用Twitter账号认证用户 |
| Microsoft.Owin.Security.MicrosoftAccount | 用Microsoft账号认证用户 |
| Microsoft.Owin.Security.OAuth | 根据任一OAuth 2.0服务认证用户 |
目前为止国内已有
Microsoft.Owin.Security.QQ似乎太久没更新不能用了
Microsoft.Owin.Security.SinaWeiBo
Microsoft.Owin.Security.YouKu
微信+QQ
再拿MVC5默认项目的代码来说明
App_Start/Startup.Auth.cs
如果要开启第三方登入必须有下面两行配置
public void ConfigureAuth(IAppBuilder app){//省略app.UseExternalSignInCookie(DefaultAuthenticationTypes.ExternalCookie);//省略//这里假设使用Google的第三方登入app.UseGoogleAuthentication(new GoogleOAuth2AuthenticationOptions(){ClientId = "",ClientSecret = ""});}
这里可是有得说了,有人可能会疑惑UseExternalSignInCookie是什么,它与之前UseCookieAuthentication的区别是什么.
首先两者都是扩展方法,最终目的都是把一个中间件注册到Owin中.只是它们会额外添加一些option在注册的时候.
我认为两者最关键不同在于AuthenticationMode
app.UseCookieAuthentication(new CookieAuthenticationOptions{AuthenticationType = DefaultAuthenticationTypes.ApplicationCookie,LoginPath = new PathString("/Account/Login"),AuthenticationMode=AuthenticationMode= Microsoft.Owin.Security.AuthenticationMode.Active//默认值});
在UseCookieAuthentication可以配置这个值.AuthenticationMode是个枚举,有两个值Passive和Active.对于UseCookieAuthentication要设置为Active(可以手动设置为Passive,但是这样会有问题的).而UseExternalSignInCookie内部则被设置为Passive你是无法修改的.
故名思议Active主动的,Passive被动的.
被设置主动的授权中间件讲会自动的拦截所有401响应,在之前的例子中当响应为401时候回自动跳转到登入页面,这个过程就是由主动的授权中间件完成的.
而被动的授权中间件则要通过手动方式触发,这个触发的关键就是Challenge
我还是先拿Pro Asp.Net MVC的代码
[HttpPost][AllowAnonymous]public ActionResult GoogleLogin(string returnUrl) {var properties = new AuthenticationProperties {RedirectUri = Url.Action("GoogleLoginCallback",new { returnUrl = returnUrl})};HttpContext.GetOwinContext().Authentication.Challenge(properties, "Google");return new HttpUnauthorizedResult();}
先创建AuthenticationProperties意图保存回调链接地址给Google 第三方组件使用.
发起一次Challenge(质询).
Challenge(AuthenticationProperties properties, params string[] authenticationTypes)
这个Challenge中仅仅是利用AuthenticationProperties和authenticationTypes来创建Authentication的AuthenticationResponseChallenge.而这个AuthenticationResponseChallenge将在第三方组件中使用.
我们可以利用这个AuthenticationResponseChallenge(其实是利用内部的authenticationTypes)来找到对应的第三方组件,比如这里写了”Google”那么只有Microsoft.Owin.Security.Google会处理第三方登入.
在这次Challenge后,相应的第三方组件就上场了.通过分析源码发现其核心部分在Microsoft.Owin.Security.Google.GoogleOAuth2AuthenticationHandler. ApplyResponseChallengeAsync
在这个方法中该组件就开始生成请求,访问第三方网站.于是开始 OAuth授权过程,Google组件会获得第三方网站给予的accesstoken,并利用这个调用获取用户信息的api,根据这个api生成当前用户的ClaimIdentity实现本网站的授权.
回调页面完成登入,创建新用户,用户授权工作
[AllowAnonymous]public async Task<ActionResult> GoogleLoginCallback(string returnUrl) {//获得第三方用户信息ExternalLoginInfo loginInfo = await AuthManager.GetExternalLoginInfoAsync();//根据信息查询用户登入表AspNetUserLogins,如果在这个表中找不到数据说明这个用户第一次登入AppUser user = await UserManager.FindAsync(loginInfo.Login);//那么开始创建新用户if (user == null) {user = new AppUser {Email = loginInfo.Email,UserName = loginInfo.DefaultUserName,City = Cities.LONDON, Country = Countries.UK};IdentityResult result = await UserManager.CreateAsync(user);if (!result.Succeeded) {return View("Error", result.Errors);} else {result = await UserManager.AddLoginAsync(user.Id, loginInfo.Login);if (!result.Succeeded) {return View("Error", result.Errors);}}}//如果这个用户已经存在了,从数据库中获得数据进行登入,并把第三方提供的Claim加到这个用户中,实现授权ClaimsIdentity ident = await UserManager.CreateIdentityAsync(user,DefaultAuthenticationTypes.ApplicationCookie);ident.AddClaims(loginInfo.ExternalIdentity.Claims);AuthManager.SignIn(new AuthenticationProperties {IsPersistent = false }, ident);return Redirect(returnUrl ?? "/");}
下面看看MVC5默认项目是怎么做的.
首先在登入页面的右侧这是个部分视图
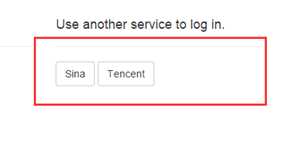
他会读取当前启动了哪些第三方登入.并生成按钮
点击后请求Account/ExternalLogin
[HttpPost][AllowAnonymous][ValidateAntiForgeryToken]public ActionResult ExternalLogin(string provider, string returnUrl){// 请求重定向到外部登录提供程序return new ChallengeResult(provider, Url.Action("ExternalLoginCallback", "Account", new { ReturnUrl = returnUrl }));}
ChallengeResult是继承自HttpUnauthorizedResult,返回401响应,但额外做了一些事
public override void ExecuteResult(ControllerContext context){var properties = new AuthenticationProperties() { RedirectUri = RedirectUri };if (UserId != null){properties.Dictionary[XsrfKey] = UserId;//增强安全性,先忽略他}context.HttpContext.GetOwinContext().Authentication.Challenge(properties, LoginProvider);}
跟刚才讲得一样发起了一个Challenge
最后返回401响应,让Google第三方组件截获之.开始OAuth授权.
下面都是回调页面
[AllowAnonymous]public async Task<ActionResult> ExternalLoginCallback(string returnUrl){var loginInfo = await AuthenticationManager.GetExternalLoginInfoAsync();if (loginInfo == null){return RedirectToAction("Login");}// 如果用户已具有登录名,则使用此外部登录提供程序将该用户登录var result = await SignInManager.ExternalSignInAsync(loginInfo, isPersistent: false);switch (result){case SignInStatus.Success:return RedirectToLocal(returnUrl);case SignInStatus.LockedOut:return View("Lockout");case SignInStatus.RequiresVerification:return RedirectToAction("SendCode", new { ReturnUrl = returnUrl, RememberMe = false });case SignInStatus.Failure:default:// 如果用户没有帐户,则提示该用户创建帐户,跳转到新的页面让用户填写一些信息ViewBag.ReturnUrl = returnUrl;ViewBag.LoginProvider = loginInfo.Login.LoginProvider;return View("ExternalLoginConfirmation", new ExternalLoginConfirmationViewModel { Email = loginInfo.Email });}}
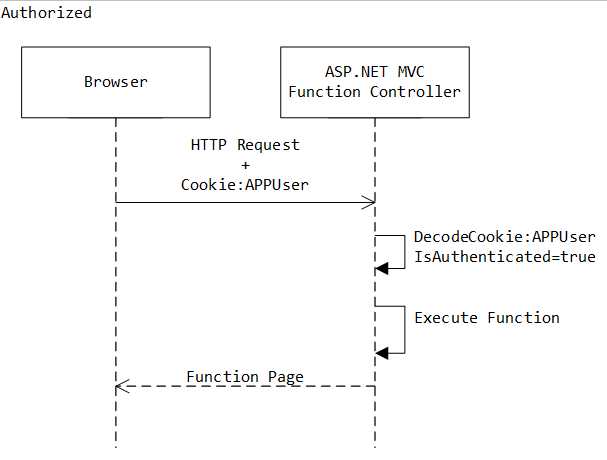
没次请求,Cookie中间件都会尝试从用户的Cookie解析生成用户标识(Identity),以此授权用户.上图即是次过程.
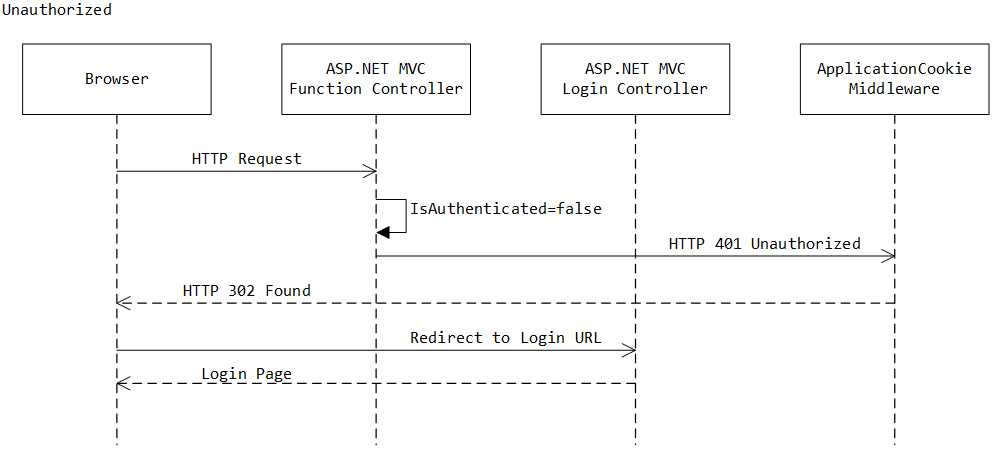
当的Cookie解析生成用户标识失败,则代表该用户未登入.此时网站将返回401响应,该响应被Cookie中间截获,它让用户去跳转到用户登入页面即返回了302的响应.
用户在这个页面登入后,网站授权用户,并记录用户的数据到Cookie中.

Asp.Net Identity学习笔记+MVC5默认项目解析_第三方登入&授权总结
标签:
原文地址:http://www.cnblogs.com/Recoding/p/5769667.html