标签:
本节内容:
项目:开发一个简单的BBS论坛
需求:
知识必备:
CSRF(Cross Site Request Forgery, 跨站域请求伪造)是一种网络的攻击方式,它在 2007 年曾被列为互联网 20 大安全隐患之一。其他安全隐患,比如 SQL 脚本注入,跨站域脚本攻击等在近年来已经逐渐为众人熟知,很多网站也都针对他们进行了防御。然而,对于大多数人来说,CSRF 却依然是一个陌生的概念。即便是大名鼎鼎的 Gmail, 在 2007 年底也存在着 CSRF 漏洞,从而被黑客攻击而使 Gmail 的用户造成巨大的损失。
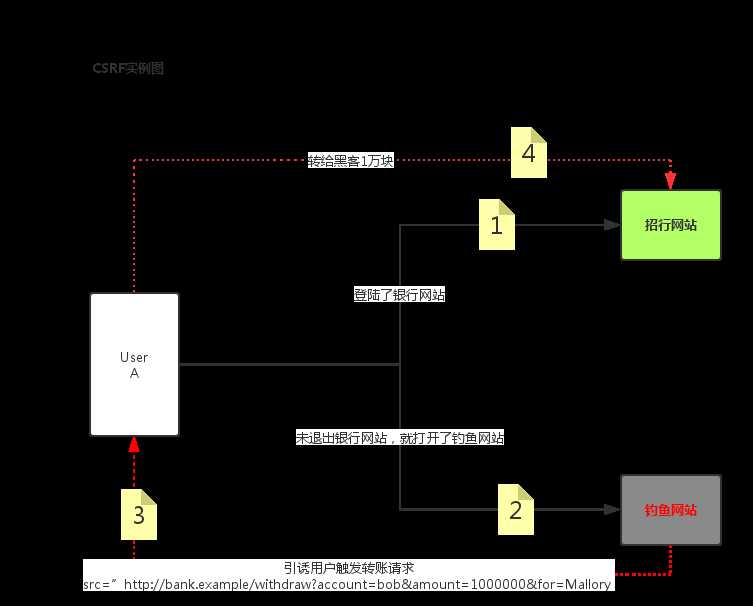
CSRF 攻击可以在受害者毫不知情的情况下以受害者名义伪造请求发送给受攻击站点,从而在并未授权的情况下执行在权限保护之下的操作。比如说,受害者 Bob 在银行有一笔存款,通过对银行的网站发送请求 http://bank.example/withdraw?account=bob&amount=1000000&for=bob2 可以使 Bob 把 1000000 的存款转到 bob2 的账号下。通常情况下,该请求发送到网站后,服务器会先验证该请求是否来自一个合法的 session,并且该 session 的用户 Bob 已经成功登陆。黑客 Mallory 自己在该银行也有账户,他知道上文中的 URL 可以把钱进行转帐操作。Mallory 可以自己发送一个请求给银行:http://bank.example/withdraw?account=bob&amount=1000000&for=Mallory。但是这个请求来自 Mallory 而非 Bob,他不能通过安全认证,因此该请求不会起作用。这时,Mallory 想到使用 CSRF 的攻击方式,他先自己做一个网站,在网站中放入如下代码: src=”http://bank.example/withdraw?account=bob&amount=1000000&for=Mallory ”,并且通过广告等诱使 Bob 来访问他的网站。当 Bob 访问该网站时,上述 url 就会从 Bob 的浏览器发向银行,而这个请求会附带 Bob 浏览器中的 cookie 一起发向银行服务器。大多数情况下,该请求会失败,因为他要求 Bob 的认证信息。但是,如果 Bob 当时恰巧刚访问他的银行后不久,他的浏览器与银行网站之间的 session 尚未过期,浏览器的 cookie 之中含有 Bob 的认证信息。这时,悲剧发生了,这个 url 请求就会得到响应,钱将从 Bob 的账号转移到 Mallory 的账号,而 Bob 当时毫不知情。等以后 Bob 发现账户钱少了,即使他去银行查询日志,他也只能发现确实有一个来自于他本人的合法请求转移了资金,没有任何被攻击的痕迹。而 Mallory 则可以拿到钱后逍遥法外。
在讨论如何抵御 CSRF 之前,先要明确 CSRF 攻击的对象,也就是要保护的对象。从以上的例子可知,CSRF 攻击是黑客借助受害者的 cookie 骗取服务器的信任,但是黑客并不能拿到 cookie,也看不到 cookie 的内容。另外,对于服务器返回的结果,由于浏览器同源策略的限制,黑客也无法进行解析。因此,黑客无法从返回的结果中得到任何东西,他所能做的就是给服务器发送请求,以执行请求中所描述的命令,在服务器端直接改变数据的值,而非窃取服务器中的数据。所以,我们要保护的对象是那些可以直接产生数据改变的服务,而对于读取数据的服务,则不需要进行 CSRF 的保护。比如银行系统中转账的请求会直接改变账户的金额,会遭到 CSRF 攻击,需要保护。而查询余额是对金额的读取操作,不会改变数据,CSRF 攻击无法解析服务器返回的结果,无需保护。
CSRF 攻击之所以能够成功,是因为黑客可以完全伪造用户的请求,该请求中所有的用户验证信息都是存在于 cookie 中,因此黑客可以在不知道这些验证信息的情况下直接利用用户自己的 cookie 来通过安全验证。要抵御 CSRF,关键在于在请求中放入黑客所不能伪造的信息,并且该信息不存在于 cookie 之中。可以在 HTTP 请求中以参数的形式加入一个随机产生的 token,并在服务器端建立一个拦截器来验证这个 token,如果请求中没有 token 或者 token 内容不正确,则认为可能是 CSRF 攻击而拒绝该请求。
token 可以在用户登陆后产生并放于 session 之中,然后在每次请求时把 token 从 session 中拿出,与请求中的 token 进行比对,但这种方法的难点在于如何把 token 以参数的形式加入请求。对于 GET 请求,token 将附在请求地址之后,这样 URL 就变成 http://url?csrftoken=tokenvalue。 而对于 POST 请求来说,要在 form 的最后加上 <input type=”hidden” name=”csrftoken” value=”tokenvalue”/>,这样就把 token 以参数的形式加入请求了。但是,在一个网站中,可以接受请求的地方非常多,要对于每一个请求都加上 token 是很麻烦的,并且很容易漏掉,通常使用的方法就是在每次页面加载时,使用 javascript 遍历整个 dom 树,对于 dom 中所有的 a 和 form 标签后加入 token。这样可以解决大部分的请求,但是对于在页面加载之后动态生成的 html 代码,这种方法就没有作用,还需要程序员在编码时手动添加 token。
To take advantage of CSRF protection in your views, follow these steps:
The CSRF middleware is activated by default in the MIDDLEWARE_CLASSES setting. If you override that setting, remember that ‘django.middleware.csrf.CsrfViewMiddleware‘ should come before any view middleware that assume that CSRF attacks have been dealt with.
If you disabled it, which is not recommended, you can use csrf_protect() on particular views you want to protect (see below).
In any template that uses a POST form, use the csrf_token tag inside the <form> element if the form is for an internal URL, e.g.:
<form action="" method="post">{% csrf_token %}
This should not be done for POST forms that target external URLs, since that would cause the CSRF token to be leaked, leading to a vulnerability.
In the corresponding view functions, ensure that RequestContext is used to render the response so that {%csrf_token %} will work properly. If you’re using the render() function, generic views, or contrib apps, you are covered already since these all use RequestContext.
While the above method can be used for AJAX POST requests, it has some inconveniences: you have to remember to pass the CSRF token in as POST data with every POST request. For this reason, there is an alternative method: on each XMLHttpRequest, set a custom X-CSRFToken header to the value of the CSRF token. This is often easier, because many JavaScript frameworks provide hooks that allow headers to be set on every request.
As a first step, you must get the CSRF token itself. The recommended source for the token is the csrftokencookie, which will be set if you’ve enabled CSRF protection for your views as outlined above.
Acquiring the token is straightforward:
|
1
2
3
4
5
6
7
8
9
10
11
12
13
14
15
16
17
|
// using jQueryfunction getCookie(name) { var cookieValue = null; if (document.cookie && document.cookie != ‘‘) { var cookies = document.cookie.split(‘;‘); for (var i = 0; i < cookies.length; i++) { var cookie = jQuery.trim(cookies[i]); // Does this cookie string begin with the name we want? if (cookie.substring(0, name.length + 1) == (name + ‘=‘)) { cookieValue = decodeURIComponent(cookie.substring(name.length + 1)); break; } } } return cookieValue;}var csrftoken = getCookie(‘csrftoken‘); |
The above code could be simplified by using the JavaScript Cookie library to replace getCookie:
|
1
|
var csrftoken = Cookies.get(‘csrftoken‘); |
Finally, you’ll have to actually set the header on your AJAX request, while protecting the CSRF token from being sent to other domains using settings.crossDomain in jQuery 1.5.1 and newer:
|
1
2
3
4
5
6
7
8
9
10
11
|
function csrfSafeMethod(method) { // these HTTP methods do not require CSRF protection return (/^(GET|HEAD|OPTIONS|TRACE)$/.test(method));}$.ajaxSetup({ beforeSend: function(xhr, settings) { if (!csrfSafeMethod(settings.type) && !this.crossDomain) { xhr.setRequestHeader("X-CSRFToken", csrftoken); } }}); |
Consider a simple form containing a FileField:
|
1
2
3
4
5
6
|
# In forms.py...from django import formsclass UploadFileForm(forms.Form): title = forms.CharField(max_length=50) file = forms.FileField() |
A view handling this form will receive the file data in request.FILES, which is a dictionary containing a key for each FileField (or ImageField, or other FileField subclass) in the form. So the data from the above form would be accessible as request.FILES[‘file‘].
Note that request.FILES will only contain data if the request method was POST and the <form> that posted the request has the attribute enctype="multipart/form-data". Otherwise, request.FILES will be empty.
Most of the time, you’ll simply pass the file data from request into the form as described in Binding uploaded files to a form. This would look something like:
|
1
2
3
4
5
6
7
8
9
10
11
12
13
14
15
16
|
from django.http import HttpResponseRedirectfrom django.shortcuts import renderfrom .forms import UploadFileForm# Imaginary function to handle an uploaded file.from somewhere import handle_uploaded_filedef upload_file(request): if request.method == ‘POST‘: form = UploadFileForm(request.POST, request.FILES) if form.is_valid(): handle_uploaded_file(request.FILES[‘file‘]) return HttpResponseRedirect(‘/success/url/‘) else: form = UploadFileForm() return render(request, ‘upload.html‘, {‘form‘: form}) |
Notice that we have to pass request.FILES into the form’s constructor; this is how file data gets bound into a form.
Here’s a common way you might handle an uploaded file:
|
1
2
3
4
|
def handle_uploaded_file(f): with open(‘some/file/name.txt‘, ‘wb+‘) as destination: for chunk in f.chunks(): destination.write(chunk) |
Looping over UploadedFile.chunks() instead of using read() ensures that large files don’t overwhelm your system’s memory.
There are a few other methods and attributes available on UploadedFile objects; see UploadedFile for a complete reference.
Before you save uploaded files, the data needs to be stored somewhere.
By default, if an uploaded file is smaller than 2.5 megabytes, Django will hold the entire contents of the upload in memory. This means that saving the file involves only a read from memory and a write to disk and thus is very fast.
However, if an uploaded file is too large, Django will write the uploaded file to a temporary file stored in your system’s temporary directory. On a Unix-like platform this means you can expect Django to generate a file called something like /tmp/tmpzfp6I6.upload. If an upload is large enough, you can watch this file grow in size as Django streams the data onto disk.
These specifics – 2.5 megabytes; /tmp; etc. – are simply “reasonable defaults” which can be customized as described in the next section.
|
1
2
3
4
5
6
7
8
9
10
11
12
13
14
15
16
17
18
19
20
21
22
23
24
25
26
27
28
29
30
31
32
33
34
35
36
37
|
数据库里评论之前的关系大概如下data = [ (‘a‘,None), (‘b‘, ‘a‘), (‘c‘, None), (‘d‘, ‘a‘), (‘e‘, ‘a‘), (‘g‘, ‘b‘), (‘h‘, ‘g‘), (‘j‘, None), (‘f‘, ‘j‘),]‘‘‘完整的层级关系如下:a -> b -> g ->ha -> da -> e‘‘‘#转成字典后的关系如下{ ‘a‘:{ ‘b‘:{ ‘g‘:{ ‘h‘:{} } }, ‘d‘:{}, ‘e‘:{} }, ‘j‘:{ ‘f‘:{} } } |
接下来其实直接用递归的方法去迭代一遍字典就行啦。
标签:
原文地址:http://www.cnblogs.com/g-123456/p/5960880.html