标签:pack nis generated cep 不能 i++ 继承 eth cat
一、线程的引入:
定义:同时对多项任务加以控制
我们上下代码:
1.未使用线程
 1 package com.learn.chap08.sec01;
 2 /**
 3  * 未使用线程--同步执行
 4  * @author Administrator
 5  *
 6  */
 7 public class Demo1 {
 8
 9     /**
10      * 听音乐
11      */
12     public static void music(){
13         for (int i = 0; i < 5; i++) {
14             System.out.println("听音乐");
15         }
16     }
17
18     /**
19      * 吃饭
20      */
21     public static void eat(){
22         for (int i = 0; i < 5; i++) {
23             System.out.println("吃饭");
24         }
25     }
26
27     public static void main(String[] args) {
28         music();
29         eat();
30     }
31 }
2. 使用线程
 1 package com.learn.chap08.sec01;
 2 /**
 3  * 使用多线程--异步执行
 4  * @author Administrator
 5  *
 6  */
 7 public class Eat extends Thread{
 8
 9     @Override
10     public void run() {
11         for (int i = 0; i < 5; i++) {
12             try {
13                 Thread.sleep(100); // 100毫秒
14             } catch (InterruptedException e) {
15                 // TODO Auto-generated catch block
16                 e.printStackTrace();
17             }
18             System.out.println("吃饭");
19         }
20     }
21
22 }
 1 package com.learn.chap08.sec01;
 2 /**
 3  * 使用多线程--异步执行
 4  * @author Administrator
 5  *
 6  */
 7 public class Music extends Thread {
 8
 9     @Override
10     public void run() {
11         // TODO Auto-generated method stub
12         for (int i = 0; i < 5; i++) {
13             try {
14                 Thread.sleep(100);
15             } catch (InterruptedException e) {
16                 // TODO Auto-generated catch block
17                 e.printStackTrace();
18             }
19             System.out.println("听音乐");
20         }
21     }
22
23 }
 1 package com.learn.chap08.sec01;
 2 /**
 3  * 使用多线程--异步执行
 4  * @author Administrator
 5  *
 6  */
 7 public class Demo2 {
 8     public static void main(String[] args) {
 9         /**
10          * 利用多线程--实现一边听音乐 一边吃饭
11          */
12         Music musicThread = new Music();
13         Eat eatThread     = new Eat();
14         musicThread.start();
15         eatThread.start();
16     }
17 }
二、使用多线程
1. 继承Thread类
代码如下:
 1 package com.learn.chap08.sec02;
 2
 3 public class Thread1 extends Thread {
 4     private String threadName;
 5     private int baoZi = 1;
 6
 7     public Thread1(String threadName) {
 8         super();
 9         this.threadName = threadName;
10     }
11
12     @Override
13     public void run() {
14         // TODO Auto-generated method stub
15         while(baoZi<=10){
16             System.out.println(this.threadName+" 吃第"+baoZi+"个包子");
17             baoZi++;
18         }
19     }
20
21     public static void main(String[] args) {
22         System.out.println("张三、李四各自吃10个包子");
23         Thread1 t1=new Thread1("张三线程");
24         Thread1 t2=new Thread1("李四线程");
25         t1.start();
26         t2.start();
27     }
28
29 }
2. 实现Runnable接口
代码如下:
 1 package com.learn.chap08.sec02;
 2
 3 public class Thread2 implements Runnable{
 4
 5     private String threadName;
 6     private int baoZi = 1;
 7
 8     public Thread2(String threadName) {
 9         super();
10         this.threadName = threadName;
11     }
12
13     @Override
14     public void run() {
15         // TODO Auto-generated method stub
16         while(baoZi<=10){
17             System.out.println(this.threadName+" 吃第"+baoZi+"个包子");
18             baoZi++;
19         }
20     }
21
22     public static void main(String[] args) {
23         System.out.println("张三、李四各自吃10个包子");
24         Thread1 t1=new Thread1("张三线程");
25         Thread1 t2=new Thread1("李四线程");
26         Thread t11=new Thread(t1);
27         Thread t12=new Thread(t2);
28         t11.start();
29         t12.start();
30     }
31
32 }
 1 package com.learn.chap08.sec02;
 2
 3 public class Thread3 implements Runnable{
 4
 5     private String threadName;
 6     private int baoZi = 1;
 7
 8     public Thread3(String threadName) {
 9         super();
10         this.threadName = threadName;
11     }
12
13     @Override
14     public synchronized void run() {
15         // TODO Auto-generated method stub
16         while(baoZi<=10){
17             System.out.println(this.threadName+" 吃第"+baoZi+"个包子");
18             baoZi++;
19         }
20     }
21
22     public static void main(String[] args) {
23
24         Thread3 t1=new Thread3("超级张三线程");
25
26         Thread t11=new Thread(t1);
27         Thread t12=new Thread(t1);
28         Thread t13=new Thread(t1);
29         // 实现资源共享
30         t11.start();
31         t12.start();
32         t13.start();
33     }
34
35 }
总结: Runnable接口 可以实现资源共享 而Thread不能。
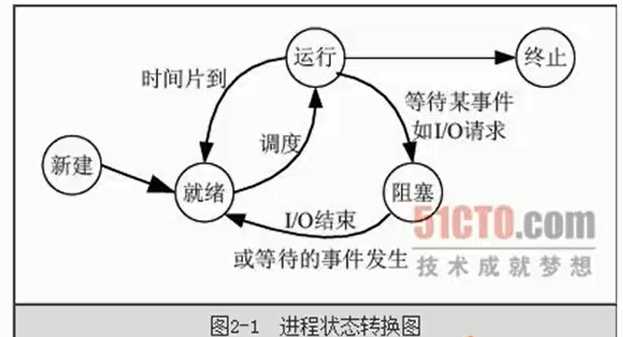
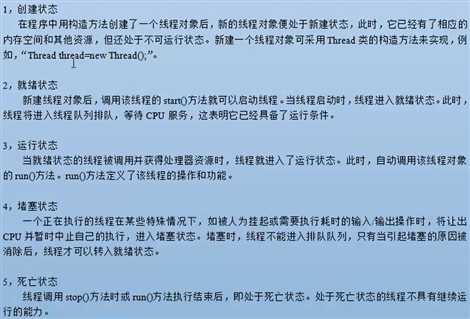
三、线程状态
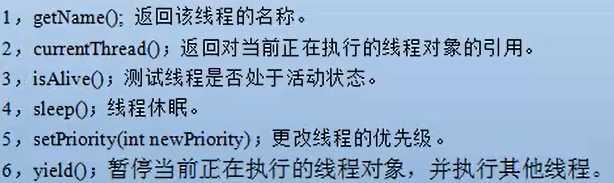
四、多线程常用的方法
举例代码如下:
 1 package com.learn.chap08.sec04;
 2
 3 public class Demo1 implements Runnable{
 4
 5     @Override
 6     public void run() {
 7         // TODO Auto-generated method stub
 8         for (int i = 0; i < 10; i++) {
 9             // 获取当前线程
10             Thread t=Thread.currentThread();
11             System.out.println(t.getName()+":"+i);
12         }
13
14     }
15
16     public static void main(String[] args) {
17         Demo1 demo1 = new Demo1();
18         new Thread(demo1).start();
19         new Thread(demo1,"线程一").start();
20         new Thread(demo1,"线程二").start();
21
22         Thread it = new Thread(demo1);
23         System.out.println(it.isAlive());
24         it.start();
25         System.out.println(it.isAlive());
26     }
27
28 }
运行结果
false
true
Thread-1:0
Thread-1:1
Thread-1:2
Thread-1:3
Thread-1:4
Thread-1:5
Thread-1:6
Thread-1:7
Thread-1:8
Thread-1:9
线程二:0
线程二:1
线程二:2
线程二:3
线程二:4
线程二:5
线程二:6
线程二:7
线程二:8
线程二:9
Thread-0:0
Thread-0:1
Thread-0:2
Thread-0:3
Thread-0:4
Thread-0:5
Thread-0:6
Thread-0:7
Thread-0:8
Thread-0:9
线程一:0
线程一:1
线程一:2
线程一:3
线程一:4
线程一:5
线程一:6
线程一:7
线程一:8
线程一:9
 1 package com.learn.chap08.sec04;
 2
 3 public class Demo2 implements Runnable{
 4
 5     @Override
 6     public void run() {
 7         // TODO Auto-generated method stub
 8         for (int i = 0; i < 10; i++) {
 9             try {
10                 Thread.sleep(1000); // 线程休眠
11                 // 获取当前线程
12                 Thread t=Thread.currentThread();
13                 System.out.println(t.getName()+":"+i);
14             } catch (InterruptedException e) {
15                 // TODO Auto-generated catch block
16                 e.printStackTrace();
17             }
18
19         }
20
21     }
22
23     public static void main(String[] args) {
24         Demo2 demo1 = new Demo2();
25         new Thread(demo1).start();
26         new Thread(demo1,"线程一").start();
27     }
28
29 }
运行结果
Thread-0:0
线程一:0
Thread-0:1
线程一:1
.
.
.
 1 package com.learn.chap08.sec04;
 2
 3 public class Demo3 implements Runnable{
 4
 5     @Override
 6     public void run() {
 7         // TODO Auto-generated method stub
 8         for (int i = 0; i < 10; i++) {
 9             // 获取当前线程
10             Thread t=Thread.currentThread();
11             System.out.println(t.getName()+":"+i);
12
13         }
14
15     }
16
17     public static void main(String[] args) {
18         Demo3 demo1 = new Demo3();
19         Thread t1 = new Thread(demo1,"线程一");
20         Thread t2 = new Thread(demo1,"线程二");
21         Thread t3 = new Thread(demo1,"线程三");
22         t1.setPriority(Thread.MAX_PRIORITY); // 更改线程的优先级
23         t2.setPriority(Thread.NORM_PRIORITY);
24         t3.setPriority(Thread.MIN_PRIORITY);
25         t1.start();
26         t2.start();
27         t3.start();
28     }
29
30 }
 1 package com.learn.chap08.sec04;
 2
 3 public class Demo4 implements Runnable{
 4
 5     @SuppressWarnings("static-access")
 6     @Override
 7     public void run() {
 8         // TODO Auto-generated method stub
 9         for (int i = 0; i < 10; i++) {
10             try {
11                 Thread.sleep(100);
12                 // 获取当前线程
13                 Thread t=Thread.currentThread();
14                 System.out.println(t.getName()+":"+i);
15                 if(i==5){
16                     System.out.println("线程礼让:");
17                     Thread.currentThread().yield();// 出现@SuppressWarnings("static-access")
18                 }
19             } catch (InterruptedException e) {
20                 // TODO Auto-generated catch block
21                 e.printStackTrace();
22             }
23         }
24     }
25
26     public static void main(String[] args) {
27         Demo4 demo1 = new Demo4();
28         Thread t1 = new Thread(demo1,"线程一");
29         Thread t2 = new Thread(demo1,"线程二");
30         t1.start();
31         t2.start();
32     }
33
34 }
运行结果
线程一:0
线程二:0
线程一:1
线程二:1
线程一:2
线程二:2
线程二:3
线程一:3
线程一:4
线程二:4
线程一:5
线程礼让:
线程二:5
线程礼让:
线程一:6
线程二:6
线程一:7
线程二:7
线程一:8
线程二:8
线程一:9
线程二:9
五、线程同步
1. 同步方法
2. 同步锁(锁机制)
上下代码:
 1 package com.learn.chap08.sec05;
 2
 3 public class Demo2 implements Runnable{
 4
 5     private int baoZi=10;
 6
 7     @Override
 8     /**
 9      * 同步方法
10      */
11     public synchronized void run() { // 用synchronized标识 的方法为同步方法  不加锁的话,下面的张三、李四、王五可能会同时进入run()方法
12         // TODO Auto-generated method stub
13         while(baoZi>0){
14             System.out.println(Thread.currentThread().getName()+"吃了第"+baoZi+"个包子");
15             baoZi--;
16         }
17     }
18
19     public static void main(String[] args) {
20         Demo2 demo1=new Demo2();
21         new Thread(demo1,"张三").start();
22         new Thread(demo1,"李四").start();
23         new Thread(demo1,"王五").start();
24     }
25
26 }
 1 package com.learn.chap08.sec05;
 2
 3 public class Demo3 implements Runnable{
 4
 5     private int baoZi=10;
 6
 7     @Override
 8     public void run() {
 9         /**
10          * 同步块
11          */
12         synchronized (this) { // 同步块
13             while(baoZi>0){
14                 System.out.println(Thread.currentThread().getName()+"吃了第"+baoZi+"个包子");
15                 baoZi--;
16             }
17         }
18     }
19
20     public static void main(String[] args) {
21         Demo3 demo1=new Demo3();
22         new Thread(demo1,"张三").start();
23         new Thread(demo1,"李四").start();
24         new Thread(demo1,"王五").start();
25     }
26
27 }
下面举例:java synchronized同步方法调用另一个同步方法,锁机制问题
1 public synchronized void methodA(int a, int b);
2
3 public synchronized void methodB(int a){
4     methodA(a, 0);
5 }
标签:pack nis generated cep 不能 i++ 继承 eth cat
原文地址:http://www.cnblogs.com/eaglezb/p/6011361.html