标签:undle 价格 state lib center 流程 创建项目 ctc strip
网络爬虫(又被称为网页蜘蛛,网络机器人,在FOAF社区中间,更经常的称为网页追逐者),是一种按照一定的规则,自动地抓取万维网信息的程序或者脚本。另外一些不常使用的名字还有蚂蚁、自动索引、模拟程序或者蠕虫。
Python标准库中提供了:urllib、urllib2、httplib等模块以供Http请求,但是,它的 API 太渣了。它是为另一个时代、另一个互联网所创建的。它需要巨量的工作,甚至包括各种方法覆盖,来完成最简单的任务。


import urllib2
import json
import cookielib


def urllib2_request(url, method="GET", cookie="", headers={}, data=None):
    """
    :param url: 要请求的url
    :param cookie: 请求方式,GET、POST、DELETE、PUT..
    :param cookie: 要传入的cookie,cookie= ‘k1=v1;k1=v2‘
    :param headers: 发送数据时携带的请求头,headers = {‘ContentType‘:‘application/json; charset=UTF-8‘}
    :param data: 要发送的数据GET方式需要传入参数,data={‘d1‘: ‘v1‘}
    :return: 返回元祖,响应的字符串内容 和 cookiejar对象
    对于cookiejar对象,可以使用for循环访问:
        for item in cookiejar:
            print item.name,item.value
    """
    if data:
        data = json.dumps(data)

    cookie_jar = cookielib.CookieJar()
    handler = urllib2.HTTPCookieProcessor(cookie_jar)
    opener = urllib2.build_opener(handler)
    opener.addheaders.append([‘Cookie‘, ‘k1=v1;k1=v2‘])
    request = urllib2.Request(url=url, data=data, headers=headers)
    request.get_method = lambda: method

    response = opener.open(request)
    origin = response.read()

    return origin, cookie_jar


# GET
result = urllib2_request(‘http://127.0.0.1:8001/index/‘, method="GET")

# POST
result = urllib2_request(‘http://127.0.0.1:8001/index/‘,  method="POST", data= {‘k1‘: ‘v1‘})

# PUT
result = urllib2_request(‘http://127.0.0.1:8001/index/‘,  method="PUT", data= {‘k1‘: ‘v1‘})
Requests 是使用 Apache2 Licensed 许可证的 基于Python开发的HTTP 库,其在Python内置模块的基础上进行了高度的封装,从而使得Pythoner进行网络请求时,变得美好了许多,使用Requests可以轻而易举的完成浏览器可有的任何操作。
1、GET请求
|
1
2
3
4
5
6
7
8
9
10
11
12
13
14
15
16
17
18
19
20
|
# 1、无参数实例import requestsret = requests.get(‘https://github.com/timeline.json‘)print ret.urlprint ret.text# 2、有参数实例import requestspayload = {‘key1‘: ‘value1‘, ‘key2‘: ‘value2‘}ret = requests.get("http://httpbin.org/get", params=payload)print ret.urlprint ret.text |
向 https://github.com/timeline.json 发送一个GET请求,将请求和响应相关均封装在 ret 对象中。
2、POST请求
|
1
2
3
4
5
6
7
8
9
10
11
12
13
14
15
16
17
18
19
20
21
22
23
|
# 1、基本POST实例import requestspayload = {‘key1‘: ‘value1‘, ‘key2‘: ‘value2‘}ret = requests.post("http://httpbin.org/post", data=payload)print ret.text# 2、发送请求头和数据实例import requestsimport jsonurl = ‘https://api.github.com/some/endpoint‘payload = {‘some‘: ‘data‘}headers = {‘content-type‘: ‘application/json‘}ret = requests.post(url, data=json.dumps(payload), headers=headers)print ret.textprint ret.cookies |
向https://api.github.com/some/endpoint发送一个POST请求,将请求和相应相关的内容封装在 ret 对象中。
3、其他请求
|
1
2
3
4
5
6
7
8
9
10
|
requests.get(url, params=None, **kwargs)requests.post(url, data=None, json=None, **kwargs)requests.put(url, data=None, **kwargs)requests.head(url, **kwargs)requests.delete(url, **kwargs)requests.patch(url, data=None, **kwargs)requests.options(url, **kwargs)# 以上方法均是在此方法的基础上构建requests.request(method, url, **kwargs) |
requests模块已经将常用的Http请求方法为用户封装完成,用户直接调用其提供的相应方法即可,其中方法的所有参数有:
def request(method, url, **kwargs):
    """Constructs and sends a :class:`Request <Request>`.

    :param method: method for the new :class:`Request` object.
    :param url: URL for the new :class:`Request` object.
    :param params: (optional) Dictionary or bytes to be sent in the query string for the :class:`Request`.
    :param data: (optional) Dictionary, bytes, or file-like object to send in the body of the :class:`Request`.
    :param json: (optional) json data to send in the body of the :class:`Request`.
    :param headers: (optional) Dictionary of HTTP Headers to send with the :class:`Request`.
    :param cookies: (optional) Dict or CookieJar object to send with the :class:`Request`.
    :param files: (optional) Dictionary of ``‘name‘: file-like-objects`` (or ``{‘name‘: (‘filename‘, fileobj)}``) for multipart encoding upload.
    :param auth: (optional) Auth tuple to enable Basic/Digest/Custom HTTP Auth.
    :param timeout: (optional) How long to wait for the server to send data
        before giving up, as a float, or a :ref:`(connect timeout, read
        timeout) <timeouts>` tuple.
    :type timeout: float or tuple
    :param allow_redirects: (optional) Boolean. Set to True if POST/PUT/DELETE redirect following is allowed.
    :type allow_redirects: bool
    :param proxies: (optional) Dictionary mapping protocol to the URL of the proxy.
    :param verify: (optional) whether the SSL cert will be verified. A CA_BUNDLE path can also be provided. Defaults to ``True``.
    :param stream: (optional) if ``False``, the response content will be immediately downloaded.
    :param cert: (optional) if String, path to ssl client cert file (.pem). If Tuple, (‘cert‘, ‘key‘) pair.
    :return: :class:`Response <Response>` object
    :rtype: requests.Response

    Usage::

      >>> import requests
      >>> req = requests.request(‘GET‘, ‘http://httpbin.org/get‘)
      <Response [200]>
    """

    # By using the ‘with‘ statement we are sure the session is closed, thus we
    # avoid leaving sockets open which can trigger a ResourceWarning in some
    # cases, and look like a memory leak in others.
    with sessions.Session() as session:
        return session.request(method=method, url=url, **kwargs)
更多requests模块相关的文档见:http://cn.python-requests.org/zh_CN/latest/
|
1
2
3
4
5
6
7
8
9
10
11
12
13
14
15
16
17
18
19
20
21
22
|
### 1、首先登陆任何页面,获取cookiei1 = requests.get(url= "http://dig.chouti.com/help/service")### 2、用户登陆,携带上一次的cookie,后台对cookie中的 gpsd 进行授权i2 = requests.post( url= "http://dig.chouti.com/login", data= { ‘phone‘: "86手机号", ‘password‘: "密码", ‘oneMonth‘: "" }, cookies = i1.cookies.get_dict())### 3、点赞(只需要携带已经被授权的gpsd即可)gpsd = i1.cookies.get_dict()[‘gpsd‘]i3 = requests.post( url="http://dig.chouti.com/link/vote?linksId=8589523", cookies={‘gpsd‘: gpsd})print(i3.text) |
“破解”微信公众号其实就是使用Python代码自动实现【登陆公众号】->【获取观众用户】-> 【向关注用户发送消息】。
注:只能向48小时内有互动的粉丝主动推送消息
1、自动登陆

分析对于Web登陆页面,用户登陆验证时仅做了如下操作:
{
‘username‘: 用户名,
‘pwd‘: 密码的MD5值,
‘imgcode‘: "",
‘f‘: ‘json‘
}
注:imgcode是需要提供的验证码,默认无需验证码,只有在多次登陆未成功时,才需要用户提供验证码才能登陆
# -*- coding:utf-8 -*-
import requests
import time
import hashlib


def _password(pwd):
    ha = hashlib.md5()
    ha.update(pwd)
    return ha.hexdigest()

def login():

    login_dict = {
        ‘username‘: "用户名",
        ‘pwd‘: _password("密码"),
        ‘imgcode‘: "",
        ‘f‘: ‘json‘
    }

    login_res = requests.post(
        url= "https://mp.weixin.qq.com/cgi-bin/login?lang=zh_CN",
        data=login_dict,
        headers={‘Referer‘: ‘https://mp.weixin.qq.com/cgi-bin/login?lang=zh_CN‘})

    # 登陆成功之后获取服务器响应的cookie
    resp_cookies_dict = login_res.cookies.get_dict()
    # 登陆成功后,获取服务器响应的内容
    resp_text = login_res.text
    # 登陆成功后,获取token
    token = re.findall(".*token=(\d+)", resp_text)[0]

    print resp_text
    print token
    print resp_cookies_dict

login()
登陆成功获取的相应内容如下:
|
1
2
3
4
5
|
响应内容:{"base_resp":{"ret":0,"err_msg":"ok"},"redirect_url":"\/cgi-bin\/home?t=home\/index&lang=zh_CN&token=537908795"}响应cookie:{‘data_bizuin‘: ‘3016804678‘, ‘bizuin‘: ‘3016804678‘, ‘data_ticket‘: ‘CaoX+QA0ZA9LRZ4YM3zZkvedyCY8mZi0XlLonPwvBGkX0/jY/FZgmGTq6xGuQk4H‘, ‘slave_user‘: ‘gh_5abeaed48d10‘, ‘slave_sid‘: ‘elNLbU1TZHRPWDNXSWdNc2FjckUxalM0Y000amtTamlJOUliSnRnWGRCdjFseV9uQkl5cUpHYkxqaGJNcERtYnM2WjdFT1pQckNwMFNfUW5fUzVZZnFlWGpSRFlVRF9obThtZlBwYnRIVGt6cnNGbUJsNTNIdTlIc2JJU29QM2FPaHZjcTcya0F6UWRhQkhO‘} |
2、访问其他页面获取用户信息
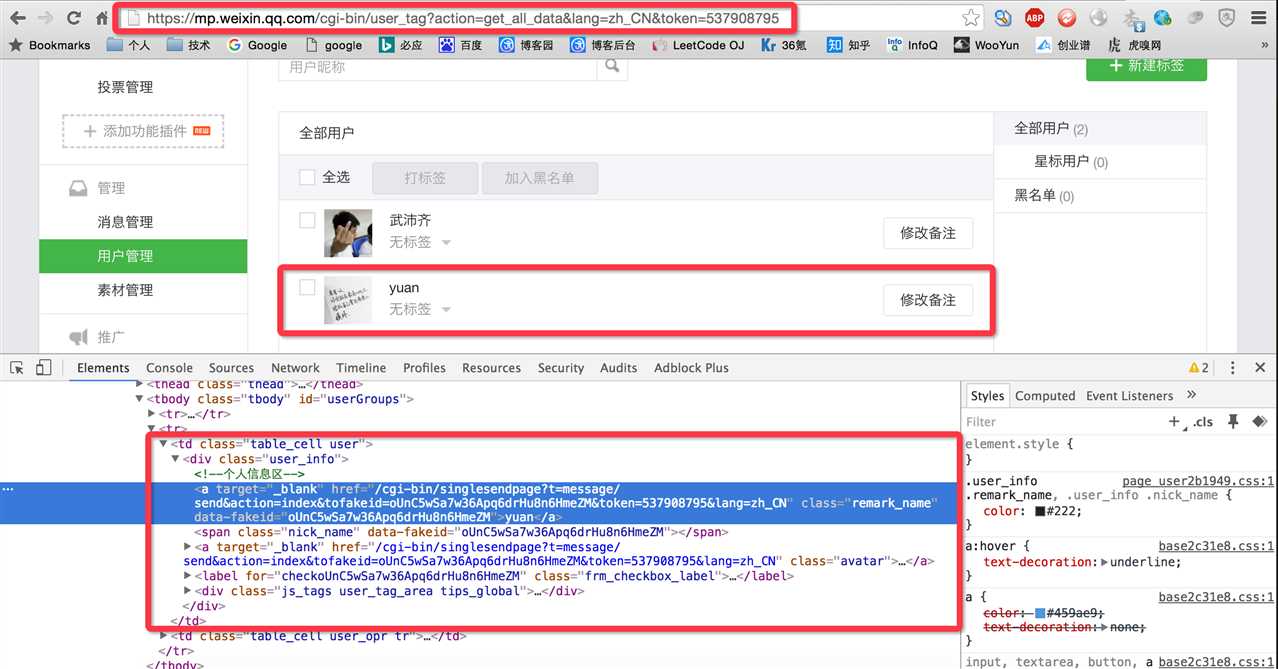
分析用户管理页面,通过Pyhton代码以Get方式访问此页面,分析响应到的 HTML 代码,从中获取用户信息:
|
1
|
{‘data_bizuin‘: ‘3016804678‘, ‘bizuin‘: ‘3016804678‘, ‘data_ticket‘: ‘C4YM3zZ... |
# -*- coding:utf-8 -*-
import requests
import time
import hashlib
import json
import re

LOGIN_COOKIES_DICT = {}

def _password(pwd):
    ha = hashlib.md5()
    ha.update(pwd)
    return ha.hexdigest()

def login():

    login_dict = {
        ‘username‘: "用户名",
        ‘pwd‘: _password("密码"),
        ‘imgcode‘: "",
        ‘f‘: ‘json‘
    }

    login_res = requests.post(
        url= "https://mp.weixin.qq.com/cgi-bin/login?lang=zh_CN",
        data=login_dict,
        headers={‘Referer‘: ‘https://mp.weixin.qq.com/cgi-bin/login?lang=zh_CN‘})

    # 登陆成功之后获取服务器响应的cookie
    resp_cookies_dict = login_res.cookies.get_dict()
    # 登陆成功后,获取服务器响应的内容
    resp_text = login_res.text
    # 登陆成功后,获取token
    token = re.findall(".*token=(\d+)", resp_text)[0]

    return {‘token‘: token, ‘cookies‘: resp_cookies_dict}


def standard_user_list(content):
    content = re.sub(‘\s*‘, ‘‘, content)
    content = re.sub(‘\n*‘, ‘‘, content)
    data = re.findall("""cgiData=(.*);seajs""", content)[0]
    data = data.strip()
    while True:
        temp = re.split(‘({)(\w+)(:)‘, data, 1)
        if len(temp) == 5:
            temp[2] = ‘"‘ + temp[2] + ‘"‘
            data = ‘‘.join(temp)
        else:
            break

    while True:
        temp = re.split(‘(,)(\w+)(:)‘, data, 1)
        if len(temp) == 5:
            temp[2] = ‘"‘ + temp[2] + ‘"‘
            data = ‘‘.join(temp)
        else:
            break

    data = re.sub(‘\*\d+‘, "", data)
    ret = json.loads(data)
    return ret


def get_user_list():

    login_dict = login()
    LOGIN_COOKIES_DICT.update(login_dict)

    login_cookie_dict = login_dict[‘cookies‘]
    res_user_list = requests.get(
        url= "https://mp.weixin.qq.com/cgi-bin/user_tag",
        params = {"action": "get_all_data", "lang": "zh_CN", "token": login_dict[‘token‘]},
        cookies = login_cookie_dict,
        headers={‘Referer‘: ‘https://mp.weixin.qq.com/cgi-bin/login?lang=zh_CN‘}
    )
    user_info = standard_user_list(res_user_list.text)
    for item in user_info[‘user_list‘]:
        print "%s %s " % (item[‘nick_name‘],item[‘id‘],)

get_user_list()
3、发送消息
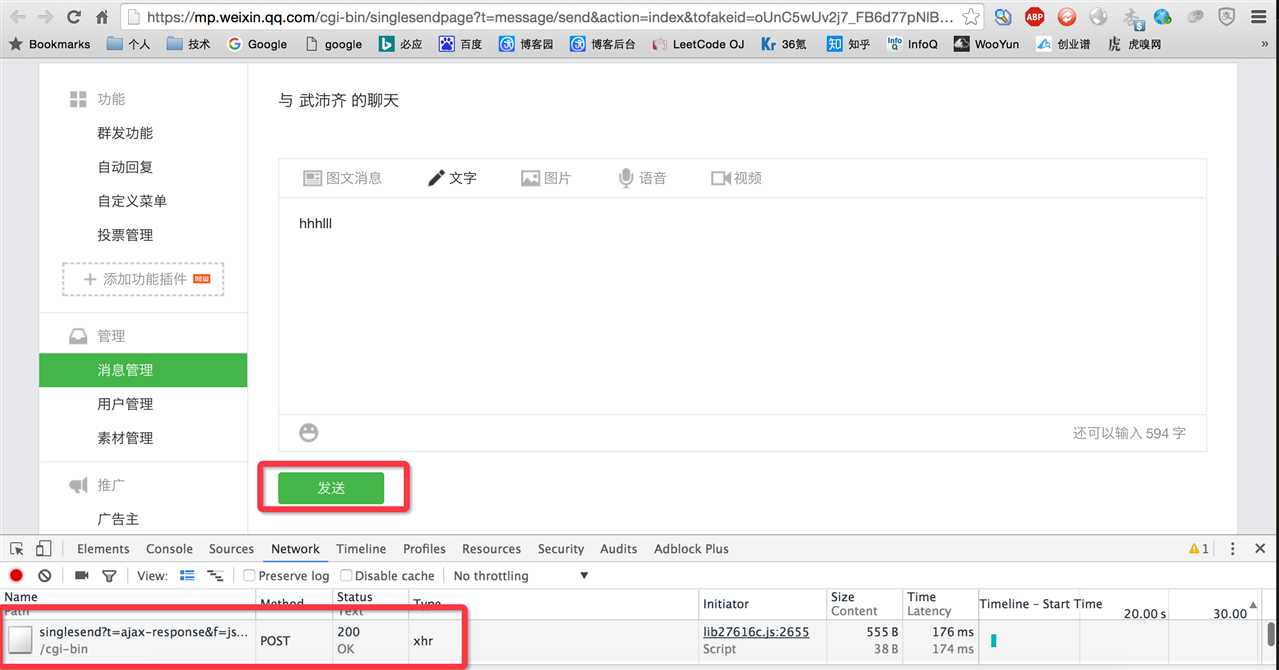
分析给用户发送消息的页面,从网络请求中剖析得到发送消息的URL,从而使用Python代码发送消息:
|
1
2
3
4
5
6
7
8
9
10
11
|
send_dict = { ‘token‘: 登陆时获取的token, ‘lang‘: "zh_CN", ‘f‘: ‘json‘, ‘ajax‘: 1, ‘random‘: "0.5322618900912392", ‘type‘: 1, ‘content‘: 要发送的内容, ‘tofakeid‘: 用户列表中获取的用户的ID, ‘imgcode‘: ‘‘} |
# -*- coding:utf-8 -*-
import requests
import time
import hashlib
import json
import re

LOGIN_COOKIES_DICT = {}

def _password(pwd):
    ha = hashlib.md5()
    ha.update(pwd)
    return ha.hexdigest()

def login():

    login_dict = {
        ‘username‘: "用户名",
        ‘pwd‘: _password("密码"),
        ‘imgcode‘: "",
        ‘f‘: ‘json‘
    }

    login_res = requests.post(
        url= "https://mp.weixin.qq.com/cgi-bin/login?lang=zh_CN",
        data=login_dict,
        headers={‘Referer‘: ‘https://mp.weixin.qq.com/cgi-bin/login?lang=zh_CN‘})

    # 登陆成功之后获取服务器响应的cookie
    resp_cookies_dict = login_res.cookies.get_dict()
    # 登陆成功后,获取服务器响应的内容
    resp_text = login_res.text
    # 登陆成功后,获取token
    token = re.findall(".*token=(\d+)", resp_text)[0]

    return {‘token‘: token, ‘cookies‘: resp_cookies_dict}


def standard_user_list(content):
    content = re.sub(‘\s*‘, ‘‘, content)
    content = re.sub(‘\n*‘, ‘‘, content)
    data = re.findall("""cgiData=(.*);seajs""", content)[0]
    data = data.strip()
    while True:
        temp = re.split(‘({)(\w+)(:)‘, data, 1)
        if len(temp) == 5:
            temp[2] = ‘"‘ + temp[2] + ‘"‘
            data = ‘‘.join(temp)
        else:
            break

    while True:
        temp = re.split(‘(,)(\w+)(:)‘, data, 1)
        if len(temp) == 5:
            temp[2] = ‘"‘ + temp[2] + ‘"‘
            data = ‘‘.join(temp)
        else:
            break

    data = re.sub(‘\*\d+‘, "", data)
    ret = json.loads(data)
    return ret


def get_user_list():

    login_dict = login()
    LOGIN_COOKIES_DICT.update(login_dict)

    login_cookie_dict = login_dict[‘cookies‘]
    res_user_list = requests.get(
        url= "https://mp.weixin.qq.com/cgi-bin/user_tag",
        params = {"action": "get_all_data", "lang": "zh_CN", "token": login_dict[‘token‘]},
        cookies = login_cookie_dict,
        headers={‘Referer‘: ‘https://mp.weixin.qq.com/cgi-bin/login?lang=zh_CN‘}
    )
    user_info = standard_user_list(res_user_list.text)
    for item in user_info[‘user_list‘]:
        print "%s %s " % (item[‘nick_name‘],item[‘id‘],)


def send_msg(user_fake_id, content=‘啥也没发‘):

    login_dict = LOGIN_COOKIES_DICT

    token = login_dict[‘token‘]
    login_cookie_dict = login_dict[‘cookies‘]

    send_dict = {
        ‘token‘: token,
        ‘lang‘: "zh_CN",
        ‘f‘: ‘json‘,
        ‘ajax‘: 1,
        ‘random‘: "0.5322618900912392",
        ‘type‘: 1,
        ‘content‘: content,
        ‘tofakeid‘: user_fake_id,
        ‘imgcode‘: ‘‘
    }

    send_url = "https://mp.weixin.qq.com/cgi-bin/singlesend?t=ajax-response&f=json&token=%s&lang=zh_CN" % (token,)
    message_list = requests.post(
        url=send_url,
        data=send_dict,
        cookies=login_cookie_dict,
        headers={‘Referer‘: ‘https://mp.weixin.qq.com/cgi-bin/login?lang=zh_CN‘}
    )


get_user_list()
fake_id = raw_input(‘请输入用户ID:‘)
content = raw_input(‘请输入消息内容:‘)
send_msg(fake_id, content)
以上就是“破解”微信公众号的整个过程,通过Python代码实现了自动【登陆微信公众号平台】【获取用户列表】【指定用户发送消息】。
Scrapy是一个为了爬取网站数据,提取结构性数据而编写的应用框架。 其可以应用在数据挖掘,信息处理或存储历史数据等一系列的程序中。
其最初是为了页面抓取 (更确切来说, 网络抓取 )所设计的, 也可以应用在获取API所返回的数据(例如 Amazon Associates Web Services ) 或者通用的网络爬虫。Scrapy用途广泛,可以用于数据挖掘、监测和自动化测试。
Scrapy 使用了 Twisted异步网络库来处理网络通讯。整体架构大致如下
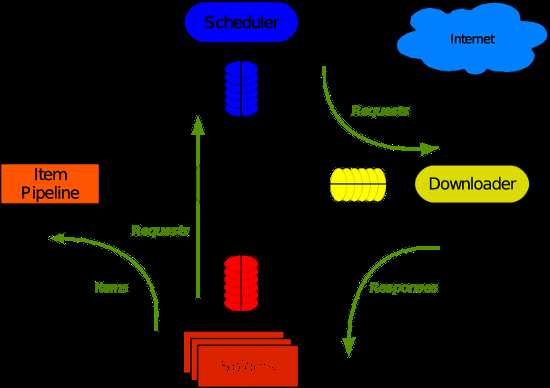
Scrapy主要包括了以下组件:
Scrapy运行流程大概如下:
一、安装
|
1
|
pip install Scrapy |
注:windows平台需要依赖pywin32,请根据自己系统32/64位选择下载安装,https://sourceforge.net/projects/pywin32/
二、基本使用
1、创建项目
运行命令:
|
1
|
scrapy startproject your_project_name |
自动创建目录:
|
1
2
3
4
5
6
7
8
9
|
project_name/ scrapy.cfg project_name/ __init__.py items.py pipelines.py settings.py spiders/ __init__.py |
文件说明:
注意:一般创建爬虫文件时,以网站域名命名
2、编写爬虫
在spiders目录中新建 xiaohuar_spider.py 文件
|
1
2
3
4
5
6
7
8
9
10
11
12
13
14
15
16
17
18
19
|
#!/usr/bin/env python# -*- coding:utf-8 -*-import scrapyclass XiaoHuarSpider(scrapy.spiders.Spider): name = "xiaohuar" allowed_domains = ["xiaohuar.com"] start_urls = [ "http://www.xiaohuar.com/hua/", ] def parse(self, response): # print(response, type(response)) # from scrapy.http.response.html import HtmlResponse # print(response.body_as_unicode()) current_url = response.url body = response.body unicode_body = response.body_as_unicode() |
3、运行
进入project_name目录,运行命令
|
1
|
scrapy crawl spider_name --nolog |
4、递归的访问
以上的爬虫仅仅是爬去初始页,而我们爬虫是需要源源不断的执行下去,直到所有的网页被执行完毕
|
1
2
3
4
5
6
7
8
9
10
11
12
13
14
15
16
17
18
19
20
21
22
23
24
25
26
27
28
29
30
31
32
33
34
35
36
37
38
39
40
41
42
|
#!/usr/bin/env python# -*- coding:utf-8 -*-import scrapyfrom scrapy.http import Requestfrom scrapy.selector import HtmlXPathSelectorimport reimport urllibimport osclass XiaoHuarSpider(scrapy.spiders.Spider): name = "xiaohuar" allowed_domains = ["xiaohuar.com"] start_urls = [ "http://www.xiaohuar.com/list-1-1.html", ] def parse(self, response): # 分析页面 # 找到页面中符合规则的内容(校花图片),保存 # 找到所有的a标签,再访问其他a标签,一层一层的搞下去 hxs = HtmlXPathSelector(response) # 如果url是 http://www.xiaohuar.com/list-1-\d+.html if re.match(‘http://www.xiaohuar.com/list-1-\d+.html‘, response.url): items = hxs.select(‘//div[@class="item_list infinite_scroll"]/div‘) for i in range(len(items)): src = hxs.select(‘//div[@class="item_list infinite_scroll"]/div[%d]//div[@class="img"]/a/img/@src‘ % i).extract() name = hxs.select(‘//div[@class="item_list infinite_scroll"]/div[%d]//div[@class="img"]/span/text()‘ % i).extract() school = hxs.select(‘//div[@class="item_list infinite_scroll"]/div[%d]//div[@class="img"]/div[@class="btns"]/a/text()‘ % i).extract() if src: ab_src = "http://www.xiaohuar.com" + src[0] file_name = "%s_%s.jpg" % (school[0].encode(‘utf-8‘), name[0].encode(‘utf-8‘)) file_path = os.path.join("/Users/wupeiqi/PycharmProjects/beauty/pic", file_name) urllib.urlretrieve(ab_src, file_path) # 获取所有的url,继续访问,并在其中寻找相同的url all_urls = hxs.select(‘//a/@href‘).extract() for url in all_urls: if url.startswith(‘http://www.xiaohuar.com/list-1-‘): yield Request(url, callback=self.parse) |
以上代码将符合规则的页面中的图片保存在指定目录,并且在HTML源码中找到所有的其他 a 标签的href属性,从而“递归”的执行下去,直到所有的页面都被访问过为止。以上代码之所以可以进行“递归”的访问相关URL,关键在于parse方法使用了 yield Request对象。
注:可以修改settings.py 中的配置文件,以此来指定“递归”的层数,如: DEPTH_LIMIT = 1
from scrapy.selector import Selector
from scrapy.http import HtmlResponse
html = """<!DOCTYPE html>
<html>
<head lang="en">
    <meta charset="UTF-8">
    <title></title>
</head>
<body>
    <li class="item-"><a href="link.html">first item</a></li>
    <li class="item-0"><a href="link1.html">first item</a></li>
    <li class="item-1"><a href="link2.html">second item</a></li>
</body>
</html>
"""
response = HtmlResponse(url=‘http://example.com‘, body=html,encoding=‘utf-8‘)
ret = Selector(response=response).xpath(‘//li[re:test(@class, "item-\d*")]//@href‘).extract()
print(ret)
#!/usr/bin/env python
# -*- coding:utf-8 -*-

import scrapy
import hashlib
from tutorial.items import JinLuoSiItem
from scrapy.http import Request
from scrapy.selector import HtmlXPathSelector


class JinLuoSiSpider(scrapy.spiders.Spider):
    count = 0
    url_set = set()

    name = "jluosi"
    domain = ‘http://www.jluosi.com‘
    allowed_domains = ["jluosi.com"]

    start_urls = [
        "http://www.jluosi.com:80/ec/goodsDetail.action?jls=QjRDNEIzMzAzOEZFNEE3NQ==",
    ]

    def parse(self, response):
        md5_obj = hashlib.md5()
        md5_obj.update(response.url)
        md5_url = md5_obj.hexdigest()
        if md5_url in JinLuoSiSpider.url_set:
            pass
        else:
            JinLuoSiSpider.url_set.add(md5_url)
            hxs = HtmlXPathSelector(response)
            if response.url.startswith(‘http://www.jluosi.com:80/ec/goodsDetail.action‘):
                item = JinLuoSiItem()
                item[‘company‘] = hxs.select(‘//div[@class="ShopAddress"]/ul/li[1]/text()‘).extract()
                item[‘link‘] = hxs.select(‘//div[@class="ShopAddress"]/ul/li[2]/text()‘).extract()
                item[‘qq‘] = hxs.select(‘//div[@class="ShopAddress"]//a/@href‘).re(‘.*uin=(?P<qq>\d*)&‘)
                item[‘address‘] = hxs.select(‘//div[@class="ShopAddress"]/ul/li[4]/text()‘).extract()

                item[‘title‘] = hxs.select(‘//h1[@class="goodsDetail_goodsName"]/text()‘).extract()

                item[‘unit‘] = hxs.select(‘//table[@class="R_WebDetail_content_tab"]//tr[1]//td[3]/text()‘).extract()
                product_list = []
                product_tr = hxs.select(‘//table[@class="R_WebDetail_content_tab"]//tr‘)
                for i in range(2,len(product_tr)):
                    temp = {
                        ‘standard‘:hxs.select(‘//table[@class="R_WebDetail_content_tab"]//tr[%d]//td[2]/text()‘ %i).extract()[0].strip(),
                        ‘price‘:hxs.select(‘//table[@class="R_WebDetail_content_tab"]//tr[%d]//td[3]/text()‘ %i).extract()[0].strip(),
                    }
                    product_list.append(temp)

                item[‘product_list‘] = product_list
                yield item

            current_page_urls = hxs.select(‘//a/@href‘).extract()
            for i in range(len(current_page_urls)):
                url = current_page_urls[i]
                if url.startswith(‘http://www.jluosi.com‘):
                    url_ab = url
                    yield Request(url_ab, callback=self.parse)
def parse(self, response):
    from scrapy.http.cookies import CookieJar
    cookieJar = CookieJar()
    cookieJar.extract_cookies(response, response.request)
    print(cookieJar._cookies)
更多选择器规则:http://scrapy-chs.readthedocs.io/zh_CN/latest/topics/selectors.html
5、格式化处理
上述实例只是简单的图片处理,所以在parse方法中直接处理。如果对于想要获取更多的数据(获取页面的价格、商品名称、QQ等),则可以利用Scrapy的items将数据格式化,然后统一交由pipelines来处理。
在items.py中创建类:
|
1
2
3
4
5
6
7
8
9
10
11
12
13
14
15
16
|
# -*- coding: utf-8 -*-# Define here the models for your scraped items## See documentation in:# http://doc.scrapy.org/en/latest/topics/items.htmlimport scrapyclass JieYiCaiItem(scrapy.Item): company = scrapy.Field() title = scrapy.Field() qq = scrapy.Field() info = scrapy.Field() more = scrapy.Field() |
上述定义模板,以后对于从请求的源码中获取的数据同意按照此结构来获取,所以在spider中需要有一下操作:
#!/usr/bin/env python
# -*- coding:utf-8 -*-

import scrapy
import hashlib
from beauty.items import JieYiCaiItem
from scrapy.http import Request
from scrapy.selector import HtmlXPathSelector
from scrapy.spiders import CrawlSpider, Rule
from scrapy.linkextractors import LinkExtractor


class JieYiCaiSpider(scrapy.spiders.Spider):
    count = 0
    url_set = set()

    name = "jieyicai"
    domain = ‘http://www.jieyicai.com‘
    allowed_domains = ["jieyicai.com"]

    start_urls = [
        "http://www.jieyicai.com",
    ]

    rules = [
        #下面是符合规则的网址,但是不抓取内容,只是提取该页的链接(这里网址是虚构的,实际使用时请替换)
        #Rule(SgmlLinkExtractor(allow=(r‘http://test_url/test?page_index=\d+‘))),
        #下面是符合规则的网址,提取内容,(这里网址是虚构的,实际使用时请替换)
        #Rule(LinkExtractor(allow=(r‘http://www.jieyicai.com/Product/Detail.aspx?pid=\d+‘)), callback="parse"),
    ]

    def parse(self, response):
        md5_obj = hashlib.md5()
        md5_obj.update(response.url)
        md5_url = md5_obj.hexdigest()
        if md5_url in JieYiCaiSpider.url_set:
            pass
        else:
            JieYiCaiSpider.url_set.add(md5_url)

            hxs = HtmlXPathSelector(response)
            if response.url.startswith(‘http://www.jieyicai.com/Product/Detail.aspx‘):
                item = JieYiCaiItem()
                item[‘company‘] = hxs.select(‘//span[@class="username g-fs-14"]/text()‘).extract()
                item[‘qq‘] = hxs.select(‘//span[@class="g-left bor1qq"]/a/@href‘).re(‘.*uin=(?P<qq>\d*)&‘)
                item[‘info‘] = hxs.select(‘//div[@class="padd20 bor1 comard"]/text()‘).extract()
                item[‘more‘] = hxs.select(‘//li[@class="style4"]/a/@href‘).extract()
                item[‘title‘] = hxs.select(‘//div[@class="g-left prodetail-text"]/h2/text()‘).extract()
                yield item

            current_page_urls = hxs.select(‘//a/@href‘).extract()
            for i in range(len(current_page_urls)):
                url = current_page_urls[i]
                if url.startswith(‘/‘):
                    url_ab = JieYiCaiSpider.domain + url
                    yield Request(url_ab, callback=self.parse)
此处代码的关键在于:
# -*- coding: utf-8 -*-

# Define your item pipelines here
#
# Don‘t forget to add your pipeline to the ITEM_PIPELINES setting
# See: http://doc.scrapy.org/en/latest/topics/item-pipeline.html

import json
from twisted.enterprise import adbapi
import MySQLdb.cursors
import re

mobile_re = re.compile(r‘(13[0-9]|15[012356789]|17[678]|18[0-9]|14[57])[0-9]{8}‘)
phone_re = re.compile(r‘(\d+-\d+|\d+)‘)

class JsonPipeline(object):

    def __init__(self):
        self.file = open(‘/Users/wupeiqi/PycharmProjects/beauty/beauty/jieyicai.json‘, ‘wb‘)


    def process_item(self, item, spider):
        line = "%s  %s\n" % (item[‘company‘][0].encode(‘utf-8‘), item[‘title‘][0].encode(‘utf-8‘))
        self.file.write(line)
        return item

class DBPipeline(object):

    def __init__(self):
        self.db_pool = adbapi.ConnectionPool(‘MySQLdb‘,
                                             db=‘DbCenter‘,
                                             user=‘root‘,
                                             passwd=‘123‘,
                                             cursorclass=MySQLdb.cursors.DictCursor,
                                             use_unicode=True)

    def process_item(self, item, spider):
        query = self.db_pool.runInteraction(self._conditional_insert, item)
        query.addErrback(self.handle_error)
        return item

    def _conditional_insert(self, tx, item):
        tx.execute("select nid from company where company = %s", (item[‘company‘][0], ))
        result = tx.fetchone()
        if result:
            pass
        else:
            phone_obj = phone_re.search(item[‘info‘][0].strip())
            phone = phone_obj.group() if phone_obj else ‘ ‘

            mobile_obj = mobile_re.search(item[‘info‘][1].strip())
            mobile = mobile_obj.group() if mobile_obj else ‘ ‘

            values = (
                item[‘company‘][0],
                item[‘qq‘][0],
                phone,
                mobile,
                item[‘info‘][2].strip(),
                item[‘more‘][0])
            tx.execute("insert into company(company,qq,phone,mobile,address,more) values(%s,%s,%s,%s,%s,%s)", values)

    def handle_error(self, e):
        print ‘error‘,e
上述中的pipelines中有多个类,到底Scapy会自动执行那个?哈哈哈哈,当然需要先配置了,不然Scapy就蒙逼了。。。
在settings.py中做如下配置:
|
1
2
3
4
5
|
ITEM_PIPELINES = { ‘beauty.pipelines.DBPipeline‘: 300, ‘beauty.pipelines.JsonPipeline‘: 100,}# 每行后面的整型值,确定了他们运行的顺序,item按数字从低到高的顺序,通过pipeline,通常将这些数字定义在0-1000范围内。 |
更多请参见Scrapy文档:http://scrapy-chs.readthedocs.io/zh_CN/latest/index.html
标签:undle 价格 state lib center 流程 创建项目 ctc strip
原文地址:http://www.cnblogs.com/guisheng/p/6036534.html