标签:如何 retina move 进度 参数 bsp sage extension ict
前言:
本次项目里面需要使用上传插件,网上找了很多三方插件都被产品PASS
后面找到了webiploader,然后对他进行了模块化的封装。
1.js的模块化管理
本文中使用了requier.js来管理。 至于如何使用大家可以百度一下!
主要是基于webiploader,然后进行一些样式处理。
先上一个效果图:

接受了两个参数和一个配置参数,
配置参数如不传,会有默认值。
如图
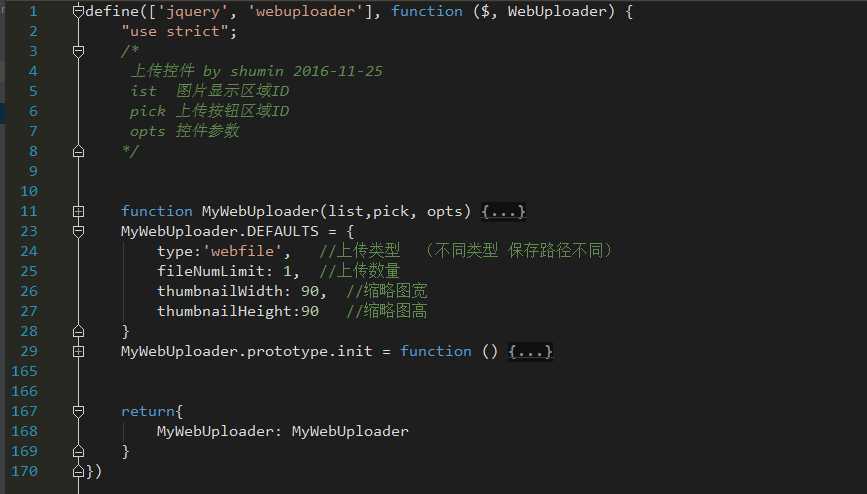
附上代码
  1 define([‘jquery‘, ‘webuploader‘], function ($, WebUploader) {
  2     "use strict";
  3     /*
  4      上传控件 by shumin 2016-11-25
  5      ist  图片显示区域ID
  6      pick 上传按钮区域ID
  7      opts 控件参数
  8     */
  9
 10
 11     function MyWebUploader(list,pick, opts) {
 12         this.$list = $(list);
 13         this.$pick = $(pick);
 14         this.$ = $;
 15         this.opts = $.extend({}, MyWebUploader.DEFAULTS, opts);
 16
 17         this.init();
 18
 19
 20
 21
 22     }
 23     MyWebUploader.DEFAULTS = {
 24         type:‘webfile‘,   //上传类型  (不同类型 保存路径不同)
 25         fileNumLimit: 1,  //上传数量
 26         thumbnailWidth: 90,  //缩略图宽
 27         thumbnailHeight:90   //缩略图高
 28     }
 29     MyWebUploader.prototype.init = function () {
 30         var self = this;
 31
 32
 33             // 优化retina, 在retina下这个值是2
 34         var ratio = window.devicePixelRatio || 1,
 35             // 缩略图大小
 36             thumbnailWidth = self.opts.thumbnailWidth * ratio,
 37             thumbnailHeight = self.opts.thumbnailHeight * ratio,
 38
 39             // Web Uploader实例
 40             uploader;
 41         uploader = WebUploader.create({
 42             // 选完文件后,是否自动上传。
 43             auto: false,
 44
 45             disableGlobalDnd: true,
 46             // swf文件路径
 47             swf: ‘/img/js/plugin/webuploader/Uploader.swf‘,
 48
 49             // 文件接收服务端。
 50             server: ‘/API/Upload?type=‘ + self.opts.type,
 51
 52             // 选择文件的按钮。可选。
 53             // 内部根据当前运行是创建,可能是input元素,也可能是flash.
 54             pick:self.$pick,
 55             fileNumLimit: self.opts.fileNumLimit,
 56             //只允许选择图片
 57             accept: {
 58                 title: ‘Images‘,
 59                 extensions: ‘gif,jpg,jpeg,bmp,png‘,
 60                 mimeTypes: ‘image/*‘
 61             }
 62
 63         });
 64
 65         // 当有文件添加进来的时候
 66         uploader.on(‘fileQueued‘, function (file) {
 67             var $li = $(
 68                     ‘<div id="‘ + file.id + ‘" class="cp_img">‘ +
 69                         ‘<img>‘ +
 70                     ‘<div class="cp_img_jian"></div></div>‘
 71                     ),
 72                 $img = $li.find(‘img‘);
 73
 74
 75             // $list为容器jQuery实例
 76             self.$list.append($li);
 77
 78             // 创建缩略图
 79             // 如果为非图片文件,可以不用调用此方法。
 80             // thumbnailWidth x thumbnailHeight 为 100 x 100
 81             uploader.makeThumb(file, function (error, src) {
 82                 if (error) {
 83                     $img.replaceWith(‘<span>不能预览</span>‘);
 84                     return;
 85                 }
 86
 87                 $img.attr(‘src‘, src);
 88             }, thumbnailWidth, thumbnailHeight);
 89             uploader.upload();
 90         });
 91
 92         // 文件上传过程中创建进度条实时显示。
 93         uploader.on(‘uploadProgress‘, function (file, percentage) {
 94             var $li = $(‘#‘ + file.id),
 95                 $percent = $li.find(‘.progress span‘);
 96
 97             // 避免重复创建
 98             if (!$percent.length) {
 99                 $percent = $(‘<p class="progress"><span></span></p>‘)
100                         .appendTo($li)
101                         .find(‘span‘);
102             }
103
104             $percent.css(‘width‘, percentage * 100 + ‘%‘);
105         });
106
107         // 文件上传成功,给item添加成功class, 用样式标记上传成功。
108         uploader.on(‘uploadSuccess‘, function (file, response) {
109             if (response.Status == 1) {
110
111                 // $(‘#‘ + file.id).children(‘img‘).attr(‘src‘, response.Message);
112             }
113             $(‘#‘ + file.id).addClass(‘upload-state-done‘);
114         });
115
116         // 文件上传失败,显示上传出错。
117         uploader.on(‘uploadError‘, function (file) {
118             var $li = $(‘#‘ + file.id),
119                 $error = $li.find(‘div.error‘);
120
121             // 避免重复创建
122             if (!$error.length) {
123                 $error = $(‘<div class="error"></div>‘).appendTo($li);
124             }
125
126             $error.text(‘上传失败‘);
127         });
128
129         // 完成上传完了,成功或者失败,先删除进度条。
130         uploader.on(‘uploadComplete‘, function (file) {
131             $(‘#‘ + file.id).find(‘.progress‘).remove();
132         });
133
134         //所有文件上传完毕
135         uploader.on("uploadFinished", function () {
136             //提交表单
137
138         });
139
140         //开始上传
141         $("#ctlBtn").click(function () {
142             uploader.upload();
143
144         });
145
146         //显示删除按钮
147
148         $(document).on(‘mouseover‘, ‘.cp_img‘, function () {
149             $(this).children(".cp_img_jian").css(‘display‘, ‘block‘);
150         })
151         //隐藏删除按钮
152         $(document).on(‘mouseout‘, ‘.cp_img‘, function () {
153             $(this).children(".cp_img_jian").css(‘display‘, ‘none‘);
154         })
155
156
157         //执行删除方法
158         self.$list.on("click", ".cp_img_jian", function () {
159             var Id = $(this).parent().attr("id");
160             uploader.removeFile(uploader.getFile(Id, true));
161             $(this).parent().remove();
162         });
163
164     }
165
166
167     return{
168         MyWebUploader: MyWebUploader
169     }
170 })
后面调用就很方便了,不需要每次使用都写一大坨配置项
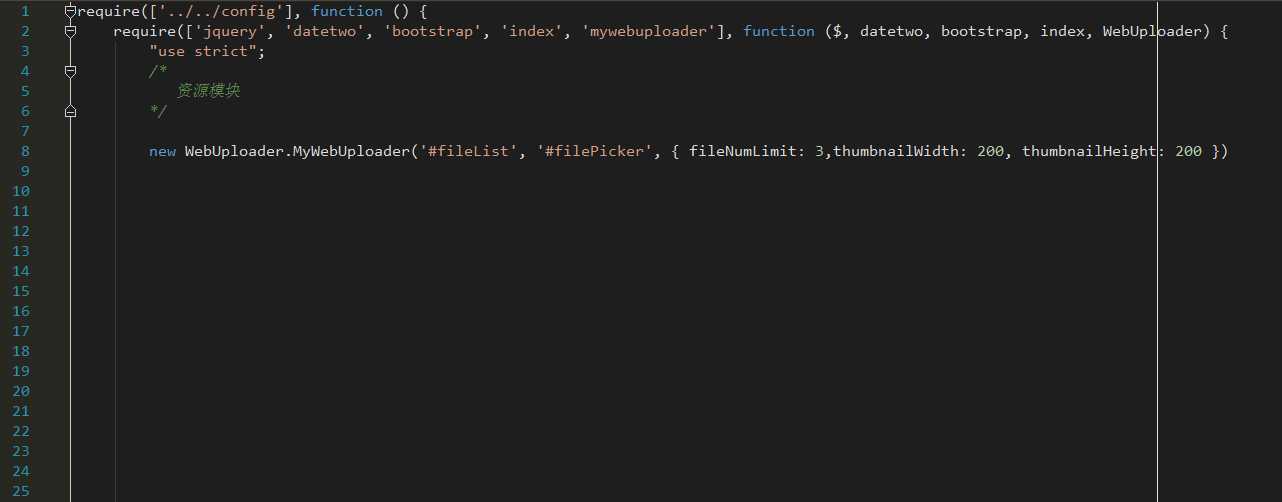
贴上页面代码

标签:如何 retina move 进度 参数 bsp sage extension ict
原文地址:http://www.cnblogs.com/shumin/p/6101707.html