标签:which 删除用户 ctr 第三方 end examples another binding 多任务
一.先安装erlang
1.去erlang官网或百度云盘下载安装包
2.解压 unzip otp-OTP-19.1.zip 到/ 目录下
3.安装依赖环境
yum install -y gcc* ncurses-devel openssl-devel unixODBC-devel (Java编译器,有问题再安装)
4.cd /otp-OTP-19.1
export ERL_TOP = ‘pwd‘
./configure (我的包是在github上下载的,需先执行./otp_build autoconf产生一个configure脚本,再执行./configure)
make
make install
5.测试是否安装成功
[root@bogon ~]#erl
Erlang/OTP 19 [erts-8.1] [source] [64-bit] [async-threads:10] [hipe] [kernel-poll:false]
Eshell V8.1 (abort with ^G)
1> EvenN = lists:filter (fun (N) -> N rem 2 == 0 end, lists:seq(1,100)).
输出:[2,4,6,8,10,12,14,16,18,20,22,24,26,28,30,32,34,36,38,40,42,
44,46,48,50,52,54,56,58|...]
有几种退出Erlang Shell的方法
快捷键方式1:Control+C 然后选a 快捷键方式2:Control+G 然后按q
二、安装rabbitmq
1.下载安装包
去官网或我的分享百度网盘,我下载的是rpm包
2.rpm -ivh --nodeps rabbitmq-server-3.6.5-1.noarch.rpm
3.RPM安装的,启动控制台插件就可以了
cd /usr/lib/rabbimq/bin
./rabbitmq-server –detached 后台启动
./rabbitmqctl status查看状态
./rabbitmqctl stop关闭服务
4.安装web监控界面
启动 控制台插件
1. ./rabbitmq-plugins enable rabbitmq_management
2.然后新建一个用户:
新建用户:./rabbitmqctl add_user 用户名 密码
删除用户: rabbitmqctl delete_user 用户名
改密码: ./rabbimqctl change_password {username} {newpassword}
设置用户角色:./rabbitmqctl set_user_tags {username} {tag ...}
Tag可以为 administrator,monitoring, management
3.重启服务
cd /usr/lib/rabbimq/bin
./rabbitmqctl stop关闭服务
./rabbitmq-server –detached 后台启动
./rabbitmqctl status查看状态
4.关闭防火墙,在浏览器访问192.168.0.107:15672 (ip地址是安装rabbitmq的机器的ip,端口号是固定的15672),输入用户名密码即可。
三、rabbitmq常用命令
./rabbitmq-server start #启动rabbitmq
./rabbitmqctl list_exchanges
./rabbitmqctl list_bindings
./rabbitmqctl list_queues #分别查看当前系统种存在的Exchange和Exchange上绑定的Queue信息。
./rabbitmqctl status #查看运行信息
./rabbitmqctl stop #停止运行rabbitmq
./rabbitmq-plugins enable rabbitmq_management
实现最简单的队列通信
rabbitmq中文文档
http://rabbitmq.mr-ping.com/
收消息端
import pika
username = ‘lwq‘
pwd = ‘111111‘
user_pwd = pika.PlainCredentials(username, pwd)
connection = pika.BlockingConnection(pika.ConnectionParameters(‘192.168.1.15‘,credentials=user_pwd))
channel = connection.channel()
channel.queue_declare(queue=‘hello‘)
def callback(ch,method,properties,body):
    print(ch,method,properties)
    print("[x] Received %r" %body)

channel.basic_consume (callback,queue=‘hello‘,no_ack=True)
print(‘[*] Waiting for message . To exit press ‘)
channel.start_consuming()
发消息端
import pika
username = ‘lwq‘
pwd = ‘111111‘
user_pwd = pika.PlainCredentials(username, pwd)
connection = pika.BlockingConnection(pika.ConnectionParameters(‘192.168.1.15‘,credentials=user_pwd))
#声明
channel = connection.channel()
channel.queue_declare(queue=‘hello‘)
channel.basic_public(exchange=‘‘,routing_key=‘hello‘,body=‘Hello World‘)
print("[X] Sent ‘hello world‘")
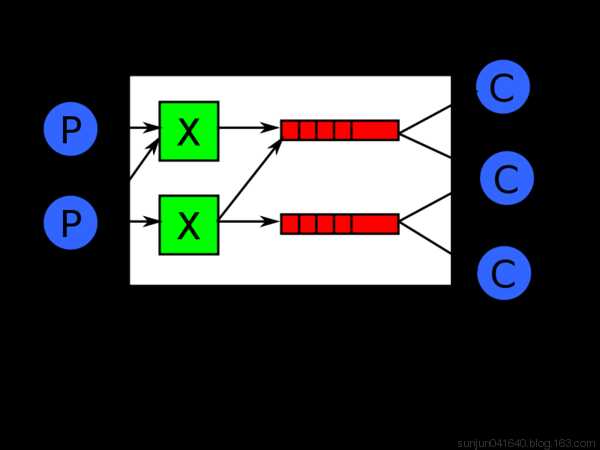
Work Queues
在这种模式下,RabbitMQ会默认把p发的消息依次分发给各个消费者(c),跟负载均衡差不多
import pika
import time
connection = pika.BlockingConnection(pika.ConnectionParameters(
    ‘localhost‘))
channel = connection.channel()
# 声明queue
channel.queue_declare(queue=‘task_queue‘)
# n RabbitMQ a message can never be sent directly to the queue, it always needs to go through an exchange.
import sys
message = ‘ ‘.join(sys.argv[1:]) or "Hello World! %s" % time.time()
channel.basic_publish(exchange=‘‘,
                      routing_key=‘task_queue‘,
                      body=message,
                      properties=pika.BasicProperties(
                          delivery_mode=2,  # make message persistent
                      )
                      )
print(" [x] Sent %r" % message)
connection.close()
消费者代码
|
1
2
3
4
5
6
7
8
9
10
11
12
13
14
15
16
17
18
19
20
21
22
23
24
|
#_*_coding:utf-8_*_import pika, timeconnection = pika.BlockingConnection(pika.ConnectionParameters( ‘localhost‘))channel = connection.channel()def callback(ch, method, properties, body): print(" [x] Received %r" % body) time.sleep(20) print(" [x] Done") print("method.delivery_tag",method.delivery_tag) ch.basic_ack(delivery_tag=method.delivery_tag)channel.basic_consume(callback, queue=‘task_queue‘, no_ack=True )print(‘ [*] Waiting for messages. To exit press CTRL+C‘)channel.start_consuming() |
此时,先启动消息生产者,然后再分别启动3个消费者,通过生产者多发送几条消息,你会发现,这几条消息会被依次分配到各个消费者身上
Doing a task can take a few seconds. You may wonder what happens if one of the consumers starts a long task and dies with it only partly done. With our current code once RabbitMQ delivers message to the customer it immediately removes it from memory. In this case, if you kill a worker we will lose the message it was just processing. We‘ll also lose all the messages that were dispatched to this particular worker but were not yet handled.
But we don‘t want to lose any tasks. If a worker dies, we‘d like the task to be delivered to another worker.
In order to make sure a message is never lost, RabbitMQ supports message acknowledgments. An ack(nowledgement) is sent back from the consumer to tell RabbitMQ that a particular message had been received, processed and that RabbitMQ is free to delete it.
If a consumer dies (its channel is closed, connection is closed, or TCP connection is lost) without sending an ack, RabbitMQ will understand that a message wasn‘t processed fully and will re-queue it. If there are other consumers online at the same time, it will then quickly redeliver it to another consumer. That way you can be sure that no message is lost, even if the workers occasionally die.
There aren‘t any message timeouts; RabbitMQ will redeliver the message when the consumer dies. It‘s fine even if processing a message takes a very, very long time.
Message acknowledgments are turned on by default. In previous examples we explicitly turned them off via the no_ack=True flag. It‘s time to remove this flag and send a proper acknowledgment from the worker, once we‘re done with a task.
|
1
2
3
4
5
6
7
8
|
def callback(ch, method, properties, body): print " [x] Received %r" % (body,) time.sleep( body.count(‘.‘) ) print " [x] Done" ch.basic_ack(delivery_tag = method.delivery_tag)channel.basic_consume(callback, queue=‘hello‘) |
Using this code we can be sure that even if you kill a worker using CTRL+C while it was processing a message, nothing will be lost. Soon after the worker dies all unacknowledged messages will be redelivered
We have learned how to make sure that even if the consumer dies, the task isn‘t lost(by default, if wanna disable use no_ack=True). But our tasks will still be lost if RabbitMQ server stops.
When RabbitMQ quits or crashes it will forget the queues and messages unless you tell it not to. Two things are required to make sure that messages aren‘t lost: we need to mark both the queue and messages as durable.
First, we need to make sure that RabbitMQ will never lose our queue. In order to do so, we need to declare it as durable:
|
1
|
channel.queue_declare(queue=‘hello‘, durable=True) |
Although this command is correct by itself, it won‘t work in our setup. That‘s because we‘ve already defined a queue called hello which is not durable. RabbitMQ doesn‘t allow you to redefine an existing queue with different parameters and will return an error to any program that tries to do that. But there is a quick workaround - let‘s declare a queue with different name, for exampletask_queue:
|
1
|
channel.queue_declare(queue=‘task_queue‘, durable=True) |
This queue_declare change needs to be applied to both the producer and consumer code.
At that point we‘re sure that the task_queue queue won‘t be lost even if RabbitMQ restarts. Now we need to mark our messages as persistent - by supplying a delivery_mode property with a value 2.
|
1
2
3
4
5
6
|
channel.basic_publish(exchange=‘‘, routing_key="task_queue", body=message, properties=pika.BasicProperties( delivery_mode = 2, # make message persistent )) |
如果Rabbit只管按顺序把消息发到各个消费者身上,不考虑消费者负载的话,很可能出现,一个机器配置不高的消费者那里堆积了很多消息处理不完,同时配置高的消费者却一直很轻松。为解决此问题,可以在各个消费者端,配置perfetch=1,意思就是告诉RabbitMQ在我这个消费者当前消息还没处理完的时候就不要再给我发新消息了。
|
1
|
channel.basic_qos(prefetch_count=1) |
带消息持久化+公平分发的完整代码
生产者端
import pika

import sys

connection = pika.BlockingConnection(pika.ConnectionParameters(

    host=‘localhost‘))

channel = connection.channel()

channel.queue_declare(queue=‘task_queue‘, durable=True)

message = ‘ ‘.join(sys.argv[1:]) or "Hello World!"

channel.basic_publish(exchange=‘‘,

                      routing_key=‘task_queue‘,

                      body=message,

                      properties=pika.BasicProperties(

                          delivery_mode=2,  # make message persistent

                      ))

print(" [x] Sent %r" % message)

connection.close()
消费者端
import pika
import time
connection = pika.BlockingConnection(pika.ConnectionParameters(
    host=‘localhost‘))
channel = connection.channel()
channel.queue_declare(queue=‘task_queue‘, durable=True)
print(‘ [*] Waiting for messages. To exit press CTRL+C‘)
def callback(ch, method, properties, body):
    print(" [x] Received %r" % body)
    time.sleep(body.count(b‘.‘))
    print(" [x] Done")
    ch.basic_ack(delivery_tag=method.delivery_tag)
channel.basic_qos(prefetch_count=1)
channel.basic_consume(callback,
                      queue=‘task_queue‘)
channel.start_consuming()
标签:which 删除用户 ctr 第三方 end examples another binding 多任务
原文地址:http://www.cnblogs.com/l-w-q/p/6193741.html