码迷,mamicode.com
首页 > Web开发 > 详细

CKEditor图片上传实现详细步骤(使用Struts 2)

时间:2017-01-09 22:17:27      阅读:346      评论:0      收藏:0      [点我收藏+]

标签:响应   分享   edit   struts2   项目   bsp   output   function   cut   

本人使用的CKEditor版本是3.6.3。CKEditor配置和部署我就不多说。

CKEditor的编辑器工具栏中有一项“图片域”,该工具可以贴上图片地址来在文本编辑器中加入图片,但是没有图片上传。


技术分享


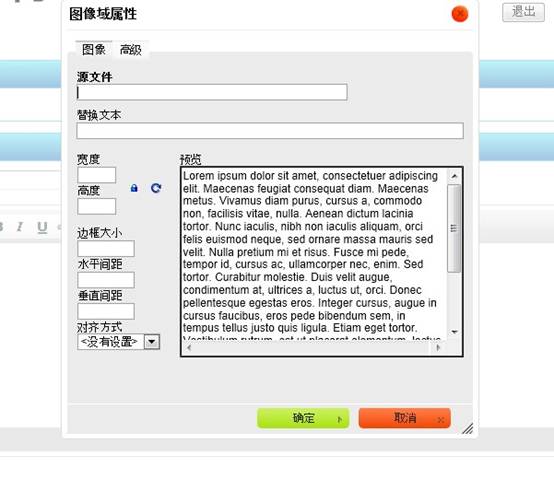
“预览”中有一大堆鸟语,看得很不爽。可以打开ckeditor/plugins/image/dialogs/image.js文件,搜索“b.config.image_previewText”就能找到这段鸟语了,(b.config.image_previewText||‘‘)单引号中的内容全删了,注意别删多了。

扫除这个障碍,下面来研究图片上传。


step 1:

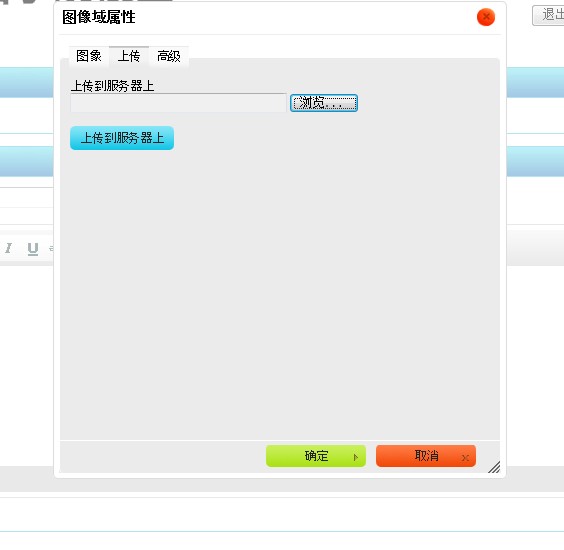
首先,还是image.js这个文件,搜索“upload”可以找到这一段

id:‘Upload‘,hidden:true

实际上上传功能被隐藏了,把上面的true改成false,再打开编辑器,就能找到上传功能了。


技术分享


step 2:

上面的只是一个上传页面。也就相当于一个HTML的form表单,要配置点击“上传到服务器上”按钮后请求的Action。可以在ckeditor/config.js中配置。

加入:

config.filebrowserUploadUrl="actions/ckeditorUpload";

"ckeditorUpload"是请求的URL,也就是点击这个按钮就会post到ckeditorUpload地址进行处理,这里指向的是Struts 2的一个Action。当然,也可以用servlet或者ASP、PHP等来处理请求。


  1. <package name="actions" extends="struts-default" namespace="/actions">  
  2.   <action name="ckeditorUpload" class="com.xxx.CkeditorUpload ">  
  3.   </action>  
  4. </package>  


step 3:

文件上传的控件相当于<input  type="file" name="upload" .../>,其name是”upload”,知道了name那么就可以在Action中获取这个文件。


  1. private File upload;  //文件  
  2. private String uploadContentType;  //文件类型  
  3. private String uploadFileName;   //文件名  


以上三个私有变量都要有set方法。如果不了解的话可以先学习一下Struts 2文件上传。


step 4:

如果上传的图片格式不正确,可以在上传界面进行提示。

技术分享

这个提示不是ckeditor提示的,要在Action中响应。


  1. String callback = ServletActionContext.getRequest().getParameter("CKEditorFuncNum");   
  2. if([判断条件]){  
  3.     out.println("<script type=\"text/javascript\">");    
  4.     out.println("window.parent.CKEDITOR.tools.callFunction(" + callback + ",‘‘," + "‘文件格式不正确(必须为.jpg/.gif/.bmp/.png文件)‘);");   
  5.     out.println("</script>");  
  6.     return null;  
  7. }  


step 5:


  1. InputStream is = new FileInputStream(upload);  
  2. String uploadPath = ServletActionContext.getServletContext().getRealPath("/img/postImg");  
  3. String fileName = java.util.UUID.randomUUID().toString();  //采用UUID的方式随即命名  
  4. fileName += expandedName;  // 加上后缀名  
  5. File toFile = new File(uploadPath, fileName);  
  6. OutputStream os = new FileOutputStream(toFile);     
  7. byte[] buffer = new byte[1024];     
  8. int length = 0;  
  9. while ((length = is.read(buffer)) > 0) {     
  10.     os.write(buffer, 0, length);     
  11. }     
  12. is.close();  
  13. os.close();  

这段代码是Struts 2上传图片的核心代码,把图片上传后保存在项目的某个目录下,并随机重命名。


step 6:

图片上传成功,在目录下也可以看到图片,至此图片上传成功。但是如何将图片发到编辑器中呢?

点“确定”按钮会有以下提示。


技术分享


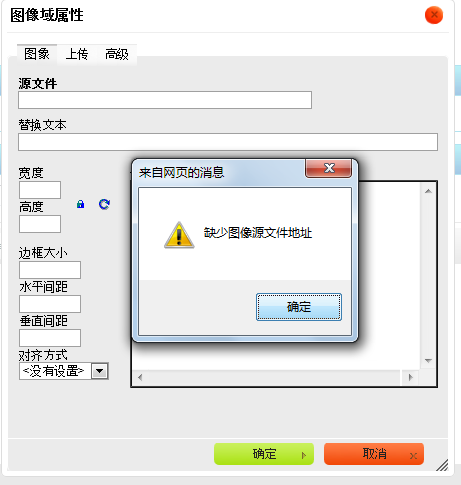
到这里,要在Action中返回一段JS脚本。


  1. String callback =ServletActionContext.getRequest().getParameter("CKEditorFuncNum");   
  2. out.println("<script type=\"text/javascript\">");  
  3. out.println("window.parent.CKEDITOR.tools.callFunction("+ callback + ",‘" +"img/postImg/"+ fileName + "‘,‘‘)");   
  4. out.println("</script>");  


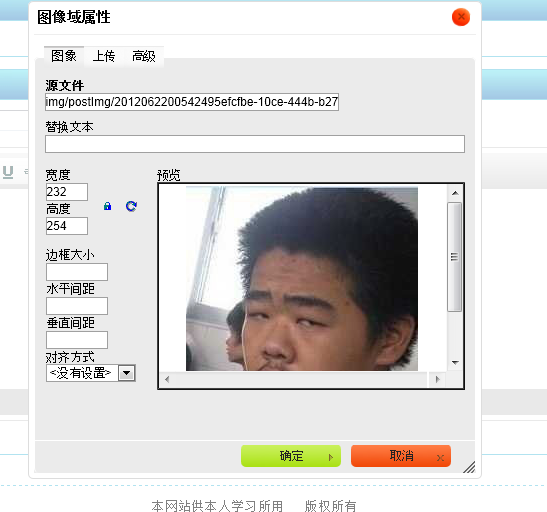
有了这段代码,图片上传成功后,根据这里的

"img/postImg/" + filename

相对地址,就可以使用这个图片,直接转到“图像”页面。

技术分享


附:Struts 2 Action代码


  1. package com.xxg.bbs.action;  
  2.   
  3. import java.io.File;  
  4. import java.io.FileInputStream;  
  5. import java.io.FileOutputStream;  
  6. import java.io.InputStream;  
  7. import java.io.OutputStream;  
  8. import java.io.PrintWriter;  
  9.   
  10. import javax.servlet.http.HttpServletResponse;  
  11.   
  12. import org.apache.struts2.ServletActionContext;  
  13.   
  14. import com.opensymphony.xwork2.ActionSupport;  
  15.   
  16. public class CkeditorUpload extends ActionSupport {  
  17.   
  18.     private File upload;  
  19.     private String uploadContentType;  
  20.     private String uploadFileName;  
  21.   
  22.   
  23.     public File getUpload() {  
  24.         return upload;  
  25.     }  
  26.   
  27.     public void setUpload(File upload) {  
  28.           
  29.         this.upload = upload;  
  30.     }  
  31.   
  32.     public String getUploadContentType() {  
  33.         return uploadContentType;  
  34.     }  
  35.   
  36.     public void setUploadContentType(String uploadContentType) {  
  37.         this.uploadContentType = uploadContentType;  
  38.     }  
  39.   
  40.     public String getUploadFileName() {  
  41.         return uploadFileName;  
  42.     }  
  43.   
  44.     public void setUploadFileName(String uploadFileName) {  
  45.         this.uploadFileName = uploadFileName;  
  46.     }  
  47.   
  48.     public String execute() throws Exception {  
  49.   
  50.         HttpServletResponse response = ServletActionContext.getResponse();  
  51.         response.setCharacterEncoding("GBK");  
  52.         PrintWriter out = response.getWriter();  
  53.   
  54.         // CKEditor提交的很重要的一个参数  
  55.         String callback = ServletActionContext.getRequest().getParameter("CKEditorFuncNum");   
  56.           
  57.         String expandedName = "";  //文件扩展名  
  58.         if (uploadContentType.equals("image/pjpeg") || uploadContentType.equals("image/jpeg")) {  
  59.             //IE6上传jpg图片的headimageContentType是image/pjpeg,而IE9以及火狐上传的jpg图片是image/jpeg  
  60.             expandedName = ".jpg";  
  61.         }else if(uploadContentType.equals("image/png") || uploadContentType.equals("image/x-png")){  
  62.             //IE6上传的png图片的headimageContentType是"image/x-png"  
  63.             expandedName = ".png";  
  64.         }else if(uploadContentType.equals("image/gif")){  
  65.             expandedName = ".gif";  
  66.         }else if(uploadContentType.equals("image/bmp")){  
  67.             expandedName = ".bmp";  
  68.         }else{  
  69.             out.println("<script type=\"text/javascript\">");    
  70.             out.println("window.parent.CKEDITOR.tools.callFunction(" + callback + ",‘‘," + "‘文件格式不正确(必须为.jpg/.gif/.bmp/.png文件)‘);");   
  71.             out.println("</script>");  
  72.             return null;  
  73.         }  
  74.           
  75.         if(upload.length() > 600*1024){  
  76.             out.println("<script type=\"text/javascript\">");    
  77.             out.println("window.parent.CKEDITOR.tools.callFunction(" + callback + ",‘‘," + "‘文件大小不得大于600k‘);");   
  78.             out.println("</script>");  
  79.             return null;  
  80.         }  
  81.           
  82.           
  83.         InputStream is = new FileInputStream(upload);  
  84.         String uploadPath = ServletActionContext.getServletContext()     
  85.                 .getRealPath("/img/postImg");  
  86.         String fileName = java.util.UUID.randomUUID().toString();  //采用时间+UUID的方式随即命名  
  87.         fileName += expandedName;  
  88.         File toFile = new File(uploadPath, fileName);  
  89.         OutputStream os = new FileOutputStream(toFile);     
  90.         byte[] buffer = new byte[1024];     
  91.         int length = 0;  
  92.         while ((length = is.read(buffer)) > 0) {     
  93.             os.write(buffer, 0, length);     
  94.         }     
  95.         is.close();  
  96.         os.close();  
  97.           
  98.         // 返回“图像”选项卡并显示图片  
  99.         out.println("<script type=\"text/javascript\">");    
  100.         out.println("window.parent.CKEDITOR.tools.callFunction(" + callback + ",‘" + "img/postImg/" + fileName + "‘,‘‘)");    
  101.         out.println("</script>");  
  102.           
  103.         return null;  
  104.     }  
  105. }  

CKEditor图片上传实现详细步骤(使用Struts 2)

标签:响应   分享   edit   struts2   项目   bsp   output   function   cut   

原文地址:http://www.cnblogs.com/BrokenIce/p/6266592.html

(0)
(0)
   
举报
评论 一句话评论(0
登录后才能评论!
© 2014 mamicode.com 版权所有  联系我们:gaon5@hotmail.com
迷上了代码!