标签:集群 ges rip 应该 logs 云服务器 apt form pip
otter的介绍就不说了, 自己去看官网https://github.com/alibaba/otter/wiki
本系统中, 中国的服务器部署在阿里云上, 欧洲服务器部署在亚马逊上, 由于阿里云的网络不支持外网回环访问(即在本机上向本机的外网地址发送数据), 所以需要将node与manager部署在不同的主机上。如果只是在虚拟机中调试, 很多服务都可以放在一台主机中。
1. mysql服务, 外网ip 120.x.x.1, 内网ip 10.x.x.1
2. manager服务, 本系统与mysql安装在同一台服务器上
3. node服务, 外网ip 120.x.x.2, 内网ip 10.x.x.2
4. zookeeper服务, 外网ip 120.x.x.3, 内网ip 10.x.x.3
1. mysql服务, 外网ip 59.x.x.1, 内网ip 172.x.x.1
2. node服务,外网ip 59.x.x.2, 内网ip 172.x.x.2
3. zookeeper服务, 外网ip 59.x.x.2, 内网ip 172.x.x.3
已经编译好的压缩包
https://github.com/alibaba/otter/releases
下载manager系统表
下载ddl同步策略表
下载zookeeper
http://www.apache.org/dyn/closer.cgi/zookeeper/
修改两台服务器的mysql配置, /etc/mysql/my.cnf (5.7版本的mysql的配置文件应该是/etc/mysql/mysql.conf.d/mysqld.cnf)
注意: server-id需要和manager上配置的node的id一致
[mysqld]
character-set-server=utf8
collation-server=utf8_general_ci #设置mysql的字符集
#bind-address = 127.0.0.1 这一行要注释掉
server-id = 1
log_bin = /data/lib/mysql/mysql-bin.log
expire_logs_days = 5
max_binlog_size = 200M
binlog_do_db = xxx
binlog_format = ROW
重启mysql
只是server-id不一样
[mysqld]
character-set-server=utf8
collation-server=utf8_general_ci #设置mysql的字符集
#bind-address = 127.0.0.1 这一行要注释掉
server-id = 2
log_bin = /data/lib/mysql/mysql-bin.log
expire_logs_days = 5
max_binlog_size = 200M
binlog_do_db = xxx
binlog_format = ROW
重启mysql
注意修改密码
mysql>source otter-manager-schema.sql
mysql>source otter-system-ddl-mysql.sql
mysql>CREATE USER canal IDENTIFIED BY ‘canal;
mysql>GRANT SELECT, REPLICATION SLAVE, REPLICATION CLIENT ON *.* TO ‘canal‘@‘%‘;
mysql>GRANT ALL PRIVILEGES ON *.* TO ‘canal‘@‘%‘;
mysql>FLUSH PRIVILEGES;
在需要运行node服务器上安装aria2, 它是一个下载工具, otter使用它下载了什么文件, 我也不知道
apt-get install aria2在分别在阿里云和亚马逊的两台服务器上安装zookeeper和运行zookeeper, 这个过程很简单
cd zookeeper-3.4.9/conf/
cp zoo_sample.cfg zoo.cfg
cd ../bin/
./zkServer.sh startcd manager/conf/
vim otter.properties## otter manager domain name
otter.domainName = 120.x.x.1 #修改为当前服务器的公网地址
## otter manager http port
otter.port = 8080
## jetty web config xml
otter.jetty = jetty.xml
## otter manager database config
otter.database.driver.class.name = com.mysql.jdbc.Driver
otter.database.driver.url = jdbc:mysql://127.0.0.1:3306/otter #由于mysql和manager在同一个服务器
otter.database.driver.username = canal
otter.database.driver.password = canal #需要修改为实际的密码
## otter communication port
otter.communication.manager.port = 1099
## otter communication pool size
otter.communication.pool.size = 10
## default zookeeper address
otter.zookeeper.cluster.default = 120.x.x.3:2181 #修改为阿里云上安装的zookeeper
## default zookeeper sesstion timeout = 60s
...
cd manager/bin
./startup.sh
在浏览器中打开manager主页
http://120.x.x.1:8080/
右击右上角的登录按钮, 用户名为admin, 密码也为admin (点击系统管理->权限管理, 然后修改密码)
点击机器管理->zookeeper管理,
点击 机器管理->Node管理
注意: 添加顺序不能改变, manager会为node分配一个id, mysql的server-id要与node id一致
机器名称 : aliyun_node
机器ip: 10.x.x.2
机器端口 : 2088
外部ip: 120.x.x.2
启用外部IP: 是
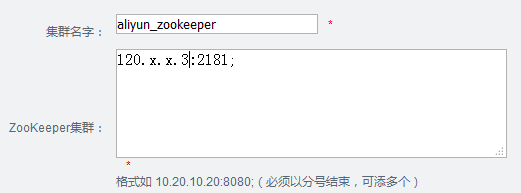
zookeeper集群: aliyun_zookeeper
保存
再添加一次
机器名称 : aws_node
机器ip: 172.x.x.2
机器端口 : 2088
外部ip: 59.x.x.2
启用外部IP: 是
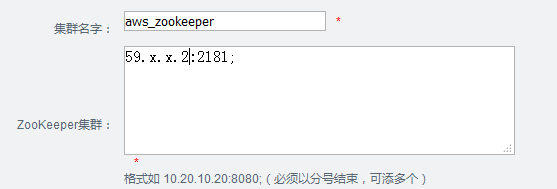
zookeeper集群: aliyun_zookeeper
保存
配置管理 -> 数据源配置
schema name: xxx
table name: test
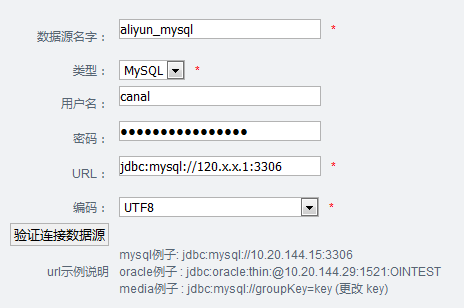
数据源: aliyun_mysql
保存
schema name: xxx
table name: test
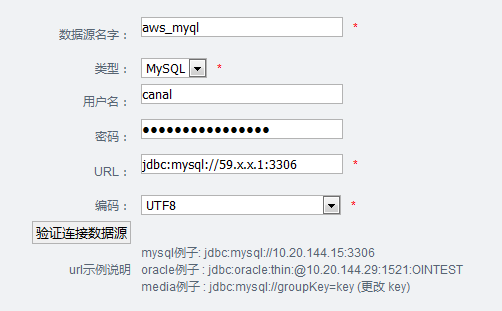
数据源: aws_mysql
保存
canal名称: aliyun_canal
zookeeper集群: aliyun_zookeeper
数据库地址: 120.x.x.1:3306;
数据库账号: canal
数据库密码: canal
保存
canal名称: aws_canal
zookeeper集群: aws_zookeeper
数据库地址: 59.x.x.1:3306;
数据库账号: canal
数据库密码: canal
保存
同步管理 -> 添加
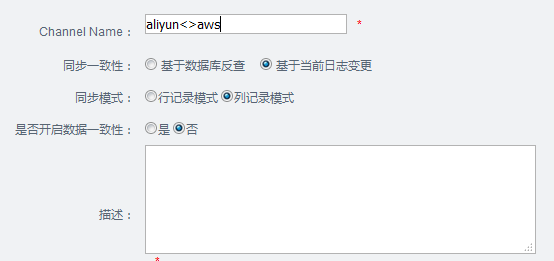
同步管理 -> aliyun<>aws -> 添加
pipeline名字: aliyun->aws
select机器: aliyun_node
load机器: aws_node
主站点: 是
canal名字: aliyun_canal
高级设置: 勾
支持ddl同步: 是
保存
pipeline名字: aws->aliyun
select机器: aws_node
load机器: aliyun_node
主站点: 否
canal名字: aliyun_canal
高级设置: 勾
支持ddl同步: 否
保存
1. 配置aliyun上的node
cd node/conf/
echo 1 > nid
vim otter.properties
...
## otter arbitrate & node connect manager config
otter.manager.address = 120.x.x.1:1099 #填manager的外网地址
1. 配置aws上的node
cd node/conf/
echo 2 > nid
vim otter.properties
...
## otter arbitrate & node connect manager config
otter.manager.address = 120.x.x.1:1099 #填manager的外网地址
然后执行startup.sh
注意: 这个脚本默认配置了很大的内容, 如果内存不够, 可以修改这个文件
打开 机器管理 -> Node管理, 显示两个node状态为运行
打开 同步管理, 点击启用
https://my.oschina.net/u/2343729/blog/826050
mysql数据库同步系统otter部署实践(中国与欧洲同步)
标签:集群 ges rip 应该 logs 云服务器 apt form pip
原文地址:http://www.cnblogs.com/findumars/p/6294542.html