标签:tab 之间 sim 错误处理 包含 turn 解决方案 title 客户
这章介绍了怎样创建一个新的实体来管理图片,怎样使用HTML窗体来上传图片文件和使用多对多关系来使它们与产品相关,并且怎样来保存图片到文件系统中。这章也介绍了更多复杂的错误处理增加客户端错误到模型中为了把它们显示回给用户。在这章中播种数据库使用的产品图片可能在在第六章的从Apress网页站点下载代码中。
注意:如果你想遵从这章的代码,你必须完成第五章的代码或者从www.apress.com下载第五章的源代码作为一个起点。
创建实体保存图片文件名
这个项目,我们正要使用文件系统在Web项目中存储图片文件,数据库将包含与一个或多个产品有关的文件系统名称的图像的数据。开始建模图像存储,就像以下一样在Models文件夹下添加一个新的类命名为ProductImage:

 1   using System.ComponentModel.DataAnnotations;
 2
 3 namespace BabyStore,Models
 4
 5 {
 6
 7      public class ProductImage
 8
 9     {
10
11         public int ID{get;set;}
12
13        [Display(Name="File")]
14
15        public string FileName{get;set;}
16
17     }
18
19 }
你可能疑惑我们为什么添加一个额外的类基本上一个产品应对一个字符串而不是简单地添加一个字符串集合到Product类里。这是一个普遍的问题被开发者提及当使用实体框架时。原因是实体框架不能在数据库里建模一个字符串集合;它需要集合被建模就像我们做过的字符串储存在一个特别的类里。
现在更新DAL\StoreContext.cs文件来添加一个新的ProductImages属性:
 1 using BabyStore.Models;
 2
 3     using System.Data.Entity;
 4
 5    namespace BabyStore.DAL
 6
 7   {
 8
 9           public class StoreContext:DbContext
10
11         {
12
13              public DbSet<Product> Products{get;set;}
14
15             public DbSet<Category> Categories{get;set;}
16
17             public DbSet<ProductImage> ProductImages{get;set;}
18
19         }
20
21   }
接下来,创建一个迁移添加新的ProductImage实体作为一个表通过输入add-migration ProductImages到Package Manager Console中并按返回。然后运行update-database命令来更新数据库并且创建新的ProductImages表。
上传图片
在我们上传任何图片之前,我们需要某个地方来存储它们。就按之前规定的,我们正要存储它们在文件系统而不是数据库所以在更目录下创建一个新的文件夹并且命名为ProductImages,在ProductImages文件夹下,创建一个新的文件夹命名为Thumbnails。
ProductImages文件夹将拥有被上传的图片并且Thumbnails文件夹将含有在轮播特色里使用的小图片来允许一个用户通过每个产品图片来导航。
定义可利用的内容
我们正要通过项目在各种各样的文件里参考这些文件夹;因此,我们需要一种方法来存储每个文件夹的路径以便我们能容易地参考它们。为了做这个,我们要在项目的基础上添加一个新的命名为Constants的静态类并且为了这2个文件路径添加一些内容。为了做这个,在解决浏览器中右击BabyStore项目并选择【添加】->【类】。创建一个新的命名为Constants的类,用以下的代码来更新新的类:
 1 namespace BabyStore
 2
 3 {
 4
 5     public static class Constants
 6
 7    {
 8
 9        public const string ProductImagePath="~/Content/ProductImages/";
10
11        public const string ProductThumbnailPath="~/Content/ProductImages/Thumbnails/";
12
13    }
14
15 }
当我们需要引用储存图片的文件路径时,我们将参考Constants类。这个类被声明为静态的所以它不需要在被使用之前实例化。
既然我们有全局化被定义的常数,添加一个PageItems常量(当前在ProductsController类里定义)就像高亮显示的:
 1 namespace BabyStore
 2
 3   {
 4
 5          public static class Constants
 6
 7        {
 8
 9             public const string ProductImagePath="~/Content/ProductImages/";
10
11             public const string ProductThumbnailPath="~/Content/ProductImages/Thumbnails/";
12
13             public const int PageItems=3;
14
15        }
16
17   }
更新ProductsController类里的Index方法通过从中删除当前的PageItems常量来使用这个新的常量,就像以下:
 1 public ActionResult Index(string category, string search, string sortBy, int? page)
 2 {
 3 //instantiate a new view model
 4 ProductIndexViewModel viewModel = new ProductIndexViewModel();
 5 //select the products
 6 var products = db.Products.Include(p => p.Category);
 7 //perform the search and save the search string to the viewModel
 8 if (!String.IsNullOrEmpty(search))
 9 {
10 products = products.Where(p => p.Name.Contains(search) ||
11 p.Description.Contains(search) ||
12 p.Category.Name.Contains(search));
13 viewModel.Search = search;
14 }
15 //group search results into categories and count how many items in each category
16 viewModel.CatsWithCount = from matchingProducts in products
17 where
18 matchingProducts.CategoryID != null
19 group matchingProducts by
20 matchingProducts.Category.Name into
21 catGroup
22 select new CategoryWithCount()
23 {
24 CategoryName = catGroup.Key,
25 ProductCount = catGroup.Count()
26 };
27 if (!String.IsNullOrEmpty(category))
28 {
29 products = products.Where(p => p.Category.Name == category);
30 viewModel.Category = category;
31 }
32 //sort the results
33 switch (sortBy)
34 {
35 case "price_lowest":
36 products = products.OrderBy(p => p.Price);
37 break;
38 case "price_highest":
39 products = products.OrderByDescending(p => p.Price);
40 break;
41 default:
42 products = products.OrderBy(p => p.Name);
43 break;
44 }
45 int currentPage = (page ?? 1);
46 viewModel.Products = products.ToPagedList(currentPage, Constants.PageItems );
47 viewModel.SortBy = sortBy;
48 viewModel.Sorts = new Dictionary<string, string>
49 {
50 {"Price low to high", "price_lowest" },
51 {"Price high to low", "price_highest" }
52 };
53 return View(viewModel);
54 }
添加一个ProductImage 控制器和视图
接下来,生成解决方案并添加一个ProductImages控制器和与它相关的视图。做这个通过右击Controllers文件夹并随后从菜单选择添加控制器。在选项里选择添加带视图的MVC5控制器,使用实体框架,单击添加按钮。
接下来添加一个命名为ProductImagesControllor的控制器,确认ProductImage作为Model,和使StoreContext类作为数据的上下文。确认所有的视图选项被选中,就像图6-1显示的:
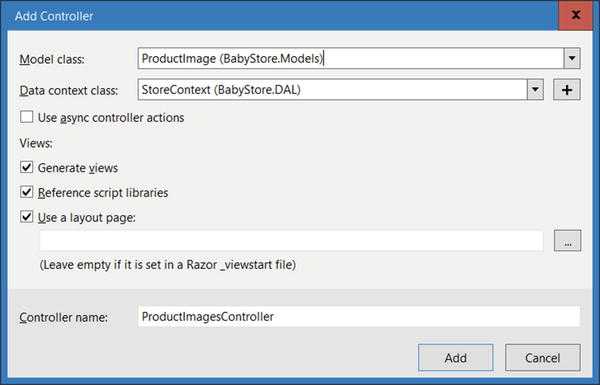
图6-1添加一个ProductImages控制器选项
一旦被创建,一个新的ProductImagesController类应该出现在Controllers文件夹里和与之联系的增删改查视图应该出现在Views\ProductImages文件夹下。
我们首先要修改的是Create方法和与ProductImages相关联的Create视图。如果你开始网页站点并导航到/ProductImages/Create,你将看到一个与类别的Create页很接近的页面,它允许用户输入一个不是很必要的字符串,所必要的东西是一个Create方法和有能力上传一个文件的Create视图,保存它到本地和添加文件名到数据库。
为文件上传更新ProductImagesController类
开始上传文件,我们正要添加许多方法到ProductImagesController类来验证文件大小和上传的格式并调整图片尺寸到合适的大小来显示在网页站点里。这代码常常应该被分离成特别的可用的验证文件的类,但对于这个示例项目,我们正把这些存在ProductImagesController类里,使它更容易地学习。
添加以下的方法到Controllers/ProductsImagesController.cs文件里的Dispose()方法下面:
 1 private bool ValidateFile(HttpPostedFileBase file)
 2 {
 3    string fileExtension=System.IO.Path.GetExtension(file.FileName).ToLower();
 4   string[] allowedFileTypes={".gif",".png",".Jpeg",".jpg"};
 5   if((file.ContentLength>0&&file.ContentLength<2097152)&&allowedFileType.Contains(fileExtension))
 6 {
 7       return true;
 8 }
 9 return false;
10 }
新的方法返回一个布尔值并且带有一个参数,这参数命名为HttpPostedFileBase的file。这个方法包含文件的扩展名并且检查看文件是否是允许的扩展名(GIF,PNG,JPEG和JPG)。它也检查文件的大小是不是在0bytes和2MB之间。如果是,方法返回True(否则,返回false)。有一点要注意,我们使用Linq包含操作符来缩短大量的必要代码,而不是遍及allowedFileTypes数组来循环。
接下来,在ValidateFile()方法下添加一个新的方法,这个方法将被用来调整图片如果有需要的话并且然后保存它们到磁盘,如下:
 1 private void SaveFileToDisk(HttpPostedFileBase file)
 2 {
 3      WebImage img=new WebImage(file.InputStream);
 4     if(img.Width>190)
 5    {
 6        img.Resize(190,img.height);
 7    }
 8  img.Save(Constents.ProductImagePath+file.FileName);
 9    if(img.Width>100)
10   {
11         img.Resize(100,img.Height);
12   }
13  img.Save(Constents.ProductThumbnailPath+file.FileName);
14 }
保证这代码编译,确定你添加了这个using语句在文件的顶部:using System.Web.Helpers;
SaveFileToDisk()方法再次输入一个HttpPostedFileBase类型的输入参数文件。然后它使用WebImage类来调整图像如果宽度大于190像素并且把它保存到ProductImages目录。然后有必要的话它调整图像宽度到100像素以下,并且保存它到thumbnails目录。
既然我们有helper方法在对的地方,我们有必要修改ProductController类的Create()方法来上传文件当Product被创建。首先,重命名Create()方法为Upload()。更新Upload()方法的HttpPost版本,就像粗体光亮的那个:
 1 [HttpPost]
 2 [ValidateAntiForgeryToken]
 3 public ActionResult Upload( HttpPostedFileBase file )
 4 {
 5 //check the user has entered a file
 6 if (file != null)
 7 {
 8 //check if the file is valid
 9 if (ValidateFile(file))
10 {
11 try
12 {
13 SaveFileToDisk(file);
14 }
15 catch (Exception)
16 {
17    ModelState.AddModelError("FileName", "Sorry an error occurred saving the file
18 to disk, please try again");
19 }
20 }
21 else
22 {
23 ModelState.AddModelError("FileName", "The file must be gif, png, jpeg or jpg and
24 less than 2MB in size");
25 }
26 }
27 else
28 {
29 //if the user has not entered a file return an error message
30 ModelState.AddModelError("FileName", "Please choose a file");
31 }
32 if (ModelState.IsValid)
33 {
34 db.ProductImages.Add( new ProductImage { FileName = file.FileName } );
35 db.SaveChanges();
36 return RedirectToAction("Index");
37 }
38 return View();
39 }
我们所做的第一个更改就是完全移除Bind部分因为ID被数据库设置并且我们是正要手动设置FileName属性。我们然后移除ProductImage参数并且添加一个新的输入参数:HttpPostedFileBase[]file。这个参数是一个被用户提交的文件并且在视图中从文件上传控件填充。在这方法中我们通过手动执行数据分配而不依赖模型绑定,所以方法不需要productImage参数。反而在这行代码中,当添加ProductImage到数据库中时,我们创建了一个ProductImage对象:db.ProductImages.Add(new ProductImage{FileName=file.FileName});
然后,我们添加了一个if语句来检查用户是否实际上输入了一个文件。如果他们没有输入,那么我们使用ModelState.AddError()方法来添加一个错误来提醒他们他们需要输入一个文件就如下:
1 //check the user has entered a file
2 if (file != null)
3 {
4 }
5 else
6 {
7 //if the user has not entered a file return an error message
8 ModelState.AddModelError("FileName", "Please choose a file");
9 }
如果用户已经输入一个文件,然后一个检查被运行来确定那个文件是“有效”的,例如,它大小不是大于2MB和是一个允许的格式,如果是的,将使用SaveFileToDisk()方法把文件存入磁盘。如果文件不是“有效的”,然后一个模型错误被添加来提醒用户“文件必须是gif,png,jpeg或者jpg格式并且大小要小于2MB”。所有这些都发生在下面的代码中:
 1 //check if the file is valid
 2 if (ValidateFile(file))
 3 {
 4 try
 5 {
 6 SaveFileToDisk(file);
 7 }
 8 catch (Exception)
 9 {
10 ModelState.AddModelError("FileName", "Sorry an error occurred saving the file to disk,
11 please try again");
12 }
13 }
14 else
15 {
16 ModelState.AddModelError("FileName", "The file must be gif, png, jpeg or jpg and less than
17 2MB in size");
18 }
最终,如果一切都成功了并且ModelState仍旧有效,一个新的带有FileName属性的ProductImage被创建设置为提交文件的文件名并保存到数据库中。用户然后被转向到Index视图;否则,如果有错误在ModelState里,upload视图返回给用户并且显示错误信息用以下的代码:
1 if (ModelState.IsValid)
2 {
3 db.ProductImages.Add(new ProductImage { FileName = file.FileName });
4 db.SaveChanges();
5 return RedirectToAction("Index");
6 }
7 return View();
更新视图
现在我们已经更新了控制器,我们必须更新视图文件以便它包含一个控件提交表单而不是一个字符串。首先重命名\Views\ProductImages\Create.cshtml文件为Upload.cshtml。接下去修改文件来允许用户通过HTML表单来提交文件:
 1 @model BabyStore.Models.ProductImage
 2 @{
 3 ViewBag.Title = " Upload Product Image ";
 4 }
 5 <h2>@ViewBag.Title</h2>
 6 @using (Html.BeginForm("Upload", "ProductImages", FormMethod.Post, new { enctype =
 7 "multipart/form-data" }))
 8 {
 9 @Html.AntiForgeryToken()
10 <div class="form-horizontal">
11 @Html.ValidationSummary(true, "", new { @class = "text-danger" })
12 <div class="form-group">
13 @Html.LabelFor(model => model.FileName, htmlAttributes: new { @class = "controllabel
14 col-md-2" })
15 <div class="col-md-10">
16 <input type="file" name="file" id="file" class="form-control"/>
17 @Html.ValidationMessageFor(model => model.FileName, "", new { @class = "textdanger"
18 })
19 </div>
20 </div>
21 <div class="form-group">
22 <div class="col-md-offset-2 col-md-10">
23 <input type="submit" value=" Upload " class="btn btn-default" />
24 </div>
25 </div>
26 </div>
27 }
28 <div>
29 @Html.ActionLink("Back to List", "Index")
30 </div>
31 @section Scripts {
32 @Scripts.Render("~/bundles/jqueryval")
33 }
更新页面标题的第一个改变前一章更新其他页面的方式相似。然后我们更新表单有enctype="multipart/form-data"的html属性,因为这对于uploading文件是必要的。这是用@using(Html.BeginForm("Upload","ProductImages",FormMethod.Post,new{enctype="multipart/form-data"}))语句获得。
接下来必要的改变就是使用代码:<input type="file" id="file" class="form-control"/>改变一个HTML文件上传控件的表单输入。其他的改变只有改变按钮文字为"Upload"。图6-2显示了结果的HTML页面。

图6-2有上传控件的ProductImages上传HTML页面
最终必要的改变就是添加一些到新视图的链接。修改\View\Shared\_Layout.cshtml文件,添加一个新的到ProductImages Index页面的链接通过修改无序列表(<ul>HTML标签)伴随着nav navbar-nav样式:
1 <ul class="nav navbar-nav">
2 <li>@Html.ActionLink("Home", "Index", "Home")</li>
3 <li>@Html.ActionLink("Shop by Category", "Index", "Categories")</li>
4 <li>@Html.RouteLink("View all our Products", "ProductsIndex")</li>
5 <li>@Html.ActionLink("Manage Images", "Index", "ProductImages")</li>
6 </ul>
跟随这个修改Views\ProductImages\Index.cshtml文件来改变这行代码为了创建一个到新的Upload视图:
1 @Html.ActionLink("Create New", "Create") to @Html.ActionLink("Upload New Image", "Upload")
测试文件上传
开始网页站点并导航到ProductImages Upload页面,然后单击Upload按钮不要输入文件。页面将显示一个错误信息就像图6-3所示:
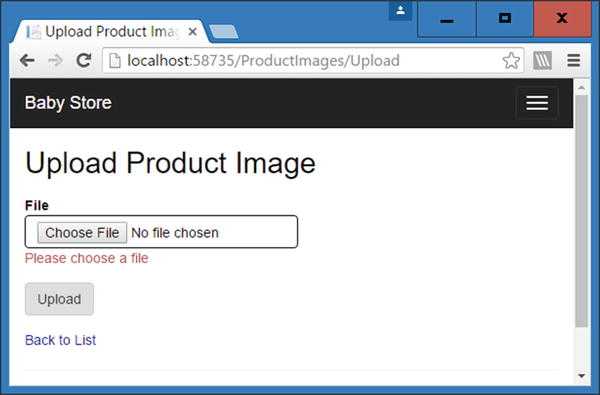
图6-3 当用户不选择一个文件上传时显示的错误信息
接着这个测试,从Apress网页站点下载CH6解决方案。现在试着上传Bitmap01文件从下载下来的解决方案里的ProductImages文件夹里。网页站点应该回应一个错误信息就像图6-4显示的;接下来试着上传大图像文件。这是一个JPG文件超过了2MB,所以网页站点应该回应就像图6-4那样。
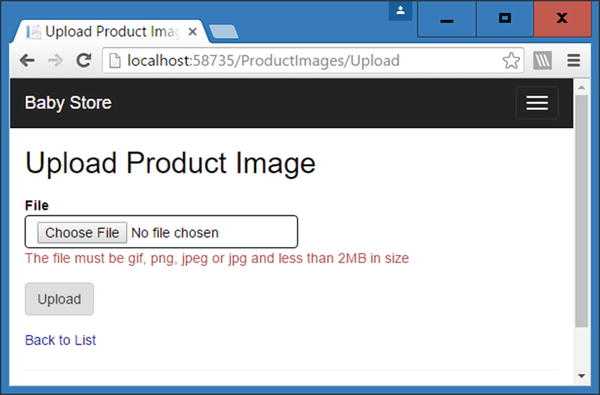
图6-4当企图上传无效文件时显示在用户面前的错误信息
接下来,试着上传Image01文件,上传将被允许。数据库表dbo.ProductImages将包含一条Image1的记录,就像图6-5显示的,并且图片将被重新调整大小如果需要的话并且存储在Web应用程序的Content\ProductImages和Content\ProductImages\Thumbnails文件夹里。图片将出现在解决方案浏览器的这些目录下面,就像图6-6显示的。在Content\ProductImages文件夹里的图片宽度将调整为190像素和在Thumbnails文件夹里的图片宽度为100像素,随着纵横比保持两倍。
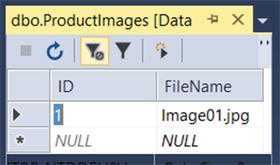
图6-5一个新的Image01记录存储在ProductImages表中
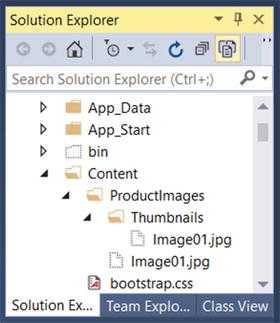
图6-6 Image01.jpg图片存储在Content\ProductImages和Content\ProductImages\Thumbnails目录里
使用实体框架检查唯一记录
文件上传现在工作了,然而用户能够上传相同文件到系统中不止一次。理论上这是不被允许的。所以要阻止它发生,我们正要添加一个不是数据库的唯一约束。为了完成它,我们正要在FileName域上使用一个Index。更新Models\ProductImage.cs文件像以下那样:
 1 using System.ComponentModel.DataAnnotations;
 2 using System.ComponentModel.DataAnnotations.Schema;
 3 namespace BabyStore.Models
 4 {
 5 public class ProductImage
 6 {
 7 public int ID { get; set; }
 8 [Display(Name = "File")]
 9 [StringLength(100)]
10 [Index(IsUnique = true)]
11 public string FileName { get; set; }
12 }
13 }
这代码添加了唯一约束并应用了一个FileName域的最大长度以便它不再设置为nvarchar[MAX]。这是需要的,因为SQL Server为索引关键字提供了一个最大900字节并且没有它的话,应用索引将会失败。
添加一个新的迁移UniqueFileName通过键入以下命令到包管理控制台并且按返回:add-migration UniqueFileName。接着运行update-database命令。
数据库现在将有一个索引应用来确定FileName列为唯一。这个索引将阻止在FileName列里重复输入并且当企图重复输入时SQL Server 将抛出一个错误。
试着再一次上传Image01文件。图6-7显示了网页站点现在怎样响应。
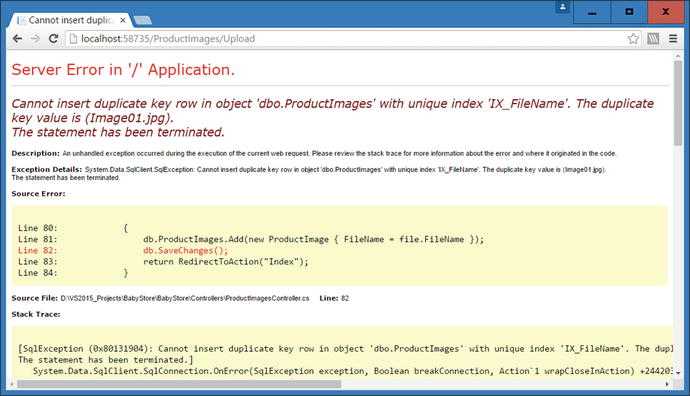
图6-7当试着在SQL Server里添加重复记录到唯一索引列时响应了标准的网页站点错误
为了显示许多更有意义的信息给用户,我们有必要添加许多错误处理以便网页站点能在视图里响应一个错误而不是标准的生成的错误信息,添加错误处理,改变在ProductImagesController类里的Upload方法的HttpPost版本:
 1 [HttpPost]
 2 [ValidateAntiForgeryToken]
 3 public ActionResult Upload(HttpPostedFileBase file)
 4 {
 5 //check the user has entered a file
 6 if (file != null)
 7 {
 8 //check if the file is valid
 9 if (ValidateFile(file))
10 {
11 try
12 {
13 SaveFileToDisk(file);
14 }
15 catch (Exception)
16 {
17 ModelState.AddModelError("FileName", "Sorry an error occurred saving the file
18 to disk, please try again");
19 }
20 }
21 else
22 {
23 ModelState.AddModelError("FileName", "The file must be gif, png, jpeg or jpg
24 and less than 2MB in size");
25 }
26 }
27 else
28 {
29 //if the user has not entered a file return an error message
30 ModelState.AddModelError("FileName", "Please choose a file");
31 }
32 if (ModelState.IsValid)
33 {
34 db.ProductImages.Add(new ProductImage { FileName = file.FileName });
35 try
36 {
37 db.SaveChanges();
38 }
39 catch (DbUpdateException ex)
40 {
41 SqlException innerException = ex.InnerException.InnerException as SqlException;
42 if (innerException != null && innerException.Number == 2601)
43 {
44 ModelState.AddModelError("FileName", "The file " + file.FileName +
45 " already exists in the system. Please delete it and try again if you wish
46 to re-add it");
47 }
48 else
49 {
50 ModelState.AddModelError("FileName", "Sorry an error has occurred saving to
51 the database, please try again");
52 }
53 return View();
54 }
55 return RedirectToAction("Index");
56 }
57 return View();
58 }
也添加下面的2个using语句在类的顶部以便DbUpdateException和SqlException能被发现:
using System.Data.SqlClient;
using System.Data.Entity.Infrastructure;
代码使用了一个try catch语句企图保存数据库更改或者抓住一个DBUpdateException类型的异常。它然后检查exception的InnerException属性检查它是否是2601号异常(这是一个SQL 异常号试着输入一个重复键当一个唯一索引在表中的地方)如果异常号是2601,然后一个错误被添加到ModelState通知用户文件已经存在。如果异常是不同的号,一个更通用的错误被抛出。最终,如果有一个异常,Update视图被返回给用户来显示错误信息。
如果现在试着上传Image01.jpg文件,网页站点响应像图6-8那样,而不是抛出一个标准的错误信息。
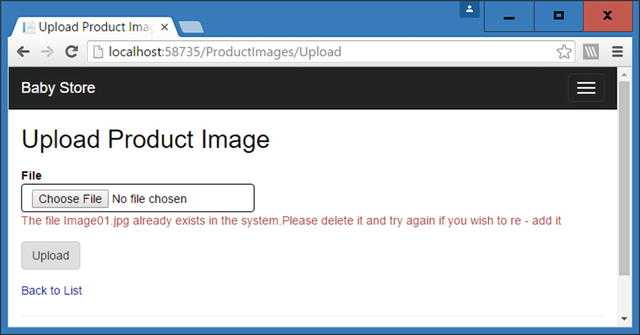
图6-8当试着上传一个重复文件时新的try catch语句创造的错误信息
ASP.NET MVC with Entity Framework and CSS一书翻译系列文章之第六章:管理产品图片:多对多关系(上)
标签:tab 之间 sim 错误处理 包含 turn 解决方案 title 客户
原文地址:http://www.cnblogs.com/Boy-KasnLu/p/6297154.html
