标签:remes 验证 app exports 出图 计算 and spi load
本章的主要内容:
一, 通过Three.js自带的功能来组合和合并已有的几何体,创建出新的几何体
二, 从外部资源中加载网格和几何体
1 前面的章节中,我们学习到,一个几何体创建的网格,想使用多个材质的方法:
var mesh=THREE.SceneUtils.createMultiMaterialObject(geometry,[material1,,material2]);
看似一个网格中有一个几何体,多个材质,其实该网格拥有与材质数量相对应的几何体,每个几何体都对应一种材质,形成一个网格,我们得到的是包含多个网格的组
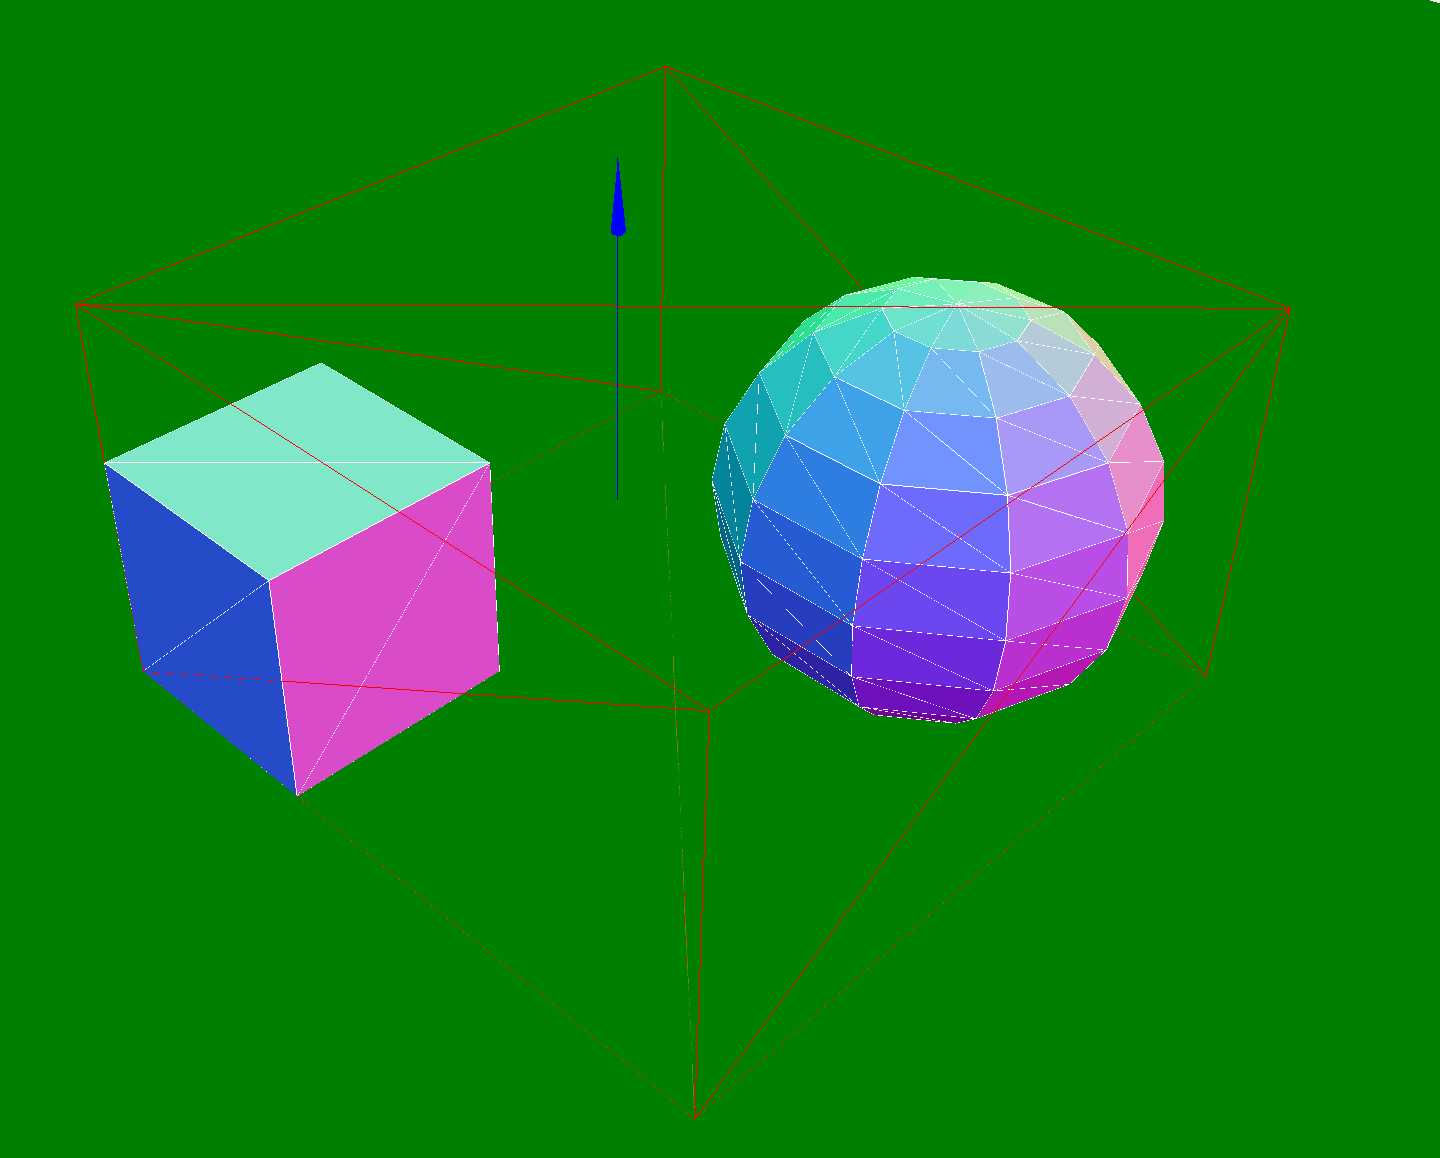
在下面的demo中,我们将创建一个网格组,该组包含多个网格,当这个组进行缩放,移动,旋转,变形的时候,组内的网格都会跟着变化
注意点1:创建组,将球体和立方体都添加到该组中
var group = new THREE.Group();group.add(sphereMesh);group.add(boxMesh)
注意点2:计算组的边界,生成一个边界无限大的立方体,对组以及组内子对象应用矩阵变换,得到组内子对象顶点改变后的坐标,复制子对象的每个顶点坐标,重新设置立方体的边界,参见函数setFromObject
注意点3:辅助线ArrowHelper,其参数的解读,dir:方向,默认是法向量;origin:开始的坐标位置;length:辅助线的长度;color:辅助线的颜色;headLength:头部的长度;headWidth:头部的宽度
<!DOCTYPE html>

<html>

<head>
    <title>Example 08.01 - Grouping</title>
    <script type="text/javascript" src="../libs/three.js"></script>

    <script type="text/javascript" src="../libs/stats.js"></script>
    <script type="text/javascript" src="../libs/dat.gui.js"></script>
    <style>
        body {
            /* set margin to 0 and overflow to hidden, to go fullscreen */
            margin: 0;
            overflow: hidden;
        }
    </style>
</head>
<body>

<div id="Stats-output">
</div>
<!-- Div which will hold the Output -->
<div id="WebGL-output">
</div>

<!-- Javascript code that runs our Three.js examples -->
<script type="text/javascript">

    // once everything is loaded, we run our Three.js stuff.
    function init() {

        var stats = initStats();

        // create a scene, that will hold all our elements such as objects, cameras and lights.
        var scene = new THREE.Scene();

        // create a camera, which defines where we‘re looking at.
        var camera = new THREE.PerspectiveCamera(45, window.innerWidth / window.innerHeight, 0.1, 1000);

        // create a render and set the size
        var webGLRenderer = new THREE.WebGLRenderer();
        webGLRenderer.setClearColor(new THREE.Color(0xEEEEEE, 1.0));
        webGLRenderer.setSize(window.innerWidth, window.innerHeight);
        webGLRenderer.shadowMapEnabled = true;

        // add the sphere to the scene

        // position and point the camera to the center of the scene
        camera.position.x = 30;
        camera.position.y = 30;
        camera.position.z = 30;
        camera.lookAt(new THREE.Vector3(0, 0, 0));

        var ground = new THREE.PlaneGeometry(100, 100, 50, 50);

        var groundMesh = THREE.SceneUtils.createMultiMaterialObject(ground,
                [new THREE.MeshBasicMaterial({wireframe: false, overdraw: true, color: 000000}),
                    new THREE.MeshBasicMaterial({color: 0x00ff00, transparent: true, opacity: 0.5}
                    )
                ]);
        groundMesh.rotation.x = -0.5 * Math.PI;
        scene.add(groundMesh);


        // add the output of the renderer to the html element
        document.getElementById("WebGL-output").appendChild(webGLRenderer.domElement);

        // call the render function
        var step = 0.03;

        var sphere;
        var cube;
        var group;
        var bboxMesh;

        // setup the control gui
        var controls = new function () {
            // we need the first child, since it‘s a multimaterial
            this.cubePosX = 0;
            this.cubePosY = 3;
            this.cubePosZ = 10;

            this.spherePosX = 10;
            this.spherePosY = 5;
            this.spherePosZ = 0;

            this.groupPosX = 10;
            this.groupPosY = 5;
            this.groupPosZ = 0;

            this.grouping = false;
            this.rotate = false;

            this.groupScale = 1;
            this.cubeScale = 1;
            this.sphereScale = 1;


            this.redraw = function () {
                // remove the old plane
                //scene.remove(sphere);
                //scene.remove(cube);
                scene.remove(group);

                // create a new one
                sphere = createMesh(new THREE.SphereGeometry(5, 10, 10));
                cube = createMesh(new THREE.BoxGeometry(6, 6, 6));

                sphere.position.set(controls.spherePosX, controls.spherePosY, controls.spherePosZ);
                cube.position.set(controls.cubePosX, controls.cubePosY, controls.cubePosZ);
                // add it to the scene.

                // also create a group, only used for rotating
                group = new THREE.Group();
                group.add(sphere);
                group.add(cube);

                scene.add(group);
                controls.positionBoundingBox();
                //dir, origin, length, color, headLength, headWidth
                /*ArrowHelper的参数:
                    dir:方向,默认是法向量
                    origin:开始的坐标位置
                    length:辅助线的长度
                    color:辅助线的颜色
                    headLength:头部的长度
                    headWidth:头部的宽度
                */
                var arrow = new THREE.ArrowHelper(new THREE.Vector3(0, 1, 0), group.position, 10, 0x0000ff);
                scene.add(arrow);


            };

            this.positionBoundingBox = function () {
                scene.remove(bboxMesh);
                var box = setFromObject(group);//group中的子对象的坐标变换完毕后,获取到组group的新的边界立方体
                var width = box.max.x - box.min.x;
                var height = box.max.y - box.min.y;
                var depth = box.max.z - box.min.z;
                //得到group立方体边界的宽高和深度,根据这些值,生成一个立方几何体

                var bbox = new THREE.BoxGeometry(width, height, depth);
                bboxMesh = new THREE.Mesh(bbox, new THREE.MeshBasicMaterial({
                    color: "red",
                    vertexColors: THREE.VertexColors,
                    wireframeLinewidth: 2,
                    wireframe: true
                }));
                scene.add(bboxMesh);
                bboxMesh.position.x = ((box.min.x + box.max.x) / 2);
                bboxMesh.position.y = ((box.min.y + box.max.y) / 2);
                bboxMesh.position.z = ((box.min.z + box.max.z) / 2);
            }
        };

        var gui = new dat.GUI();
        var sphereFolder = gui.addFolder("sphere");
        sphereFolder.add(controls, "spherePosX", -20, 20).onChange(function (e) {
            sphere.position.x = e;
            //当球体的坐标发生变化时,应该重新计算组group的范围
            //包含区域的最小矩形,该区域应在最小矩形内部
            controls.positionBoundingBox()
        });
        sphereFolder.add(controls, "spherePosZ", -20, 20).onChange(function (e) {
            sphere.position.z = e;
            controls.positionBoundingBox()
        });
        sphereFolder.add(controls, "spherePosY", -20, 20).onChange(function (e) {
            sphere.position.y = e;
            controls.positionBoundingBox()
        });
        sphereFolder.add(controls, "sphereScale", 0, 3).onChange(function (e) {
            sphere.scale.set(e, e, e);
            controls.positionBoundingBox()
        });

        var cubeFolder = gui.addFolder("cube");
        cubeFolder.add(controls, "cubePosX", -20, 20).onChange(function (e) {
            cube.position.x = e;
            controls.positionBoundingBox()
        });
        cubeFolder.add(controls, "cubePosZ", -20, 20).onChange(function (e) {
            cube.position.z = e;
            controls.positionBoundingBox()
        });
        cubeFolder.add(controls, "cubePosY", -20, 20).onChange(function (e) {
            cube.position.y = e;
            controls.positionBoundingBox()
        });
        cubeFolder.add(controls, "cubeScale", 0, 3).onChange(function (e) {
            cube.scale.set(e, e, e);
            controls.positionBoundingBox()
        });

        var cubeFolder = gui.addFolder("group");
        cubeFolder.add(controls, "groupPosX", -20, 20).onChange(function (e) {
            group.position.x = e;
            controls.positionBoundingBox()
        });
        cubeFolder.add(controls, "groupPosZ", -20, 20).onChange(function (e) {
            group.position.z = e;
            controls.positionBoundingBox()
        });
        cubeFolder.add(controls, "groupPosY", -20, 20).onChange(function (e) {
            group.position.y = e;
            controls.positionBoundingBox()
        });
        cubeFolder.add(controls, "groupScale", 0, 3).onChange(function (e) {
            group.scale.set(e, e, e);
            controls.positionBoundingBox()
        });

        gui.add(controls, "grouping");
        gui.add(controls, "rotate");
        controls.redraw();
        render();

        function createMesh(geom) {

            // assign two materials
            var meshMaterial = new THREE.MeshNormalMaterial();
            meshMaterial.side = THREE.DoubleSide;
            var wireFrameMat = new THREE.MeshBasicMaterial();
            wireFrameMat.wireframe = true;

            // 创建一个多种材质的网格
            var plane = THREE.SceneUtils.createMultiMaterialObject(geom, [meshMaterial, wireFrameMat]);

            return plane;
        }

        function render() {
            stats.update();


            if (controls.grouping && controls.rotate) {
                group.rotation.y += step;
            }

            if (controls.rotate && !controls.grouping) {
                sphere.rotation.y += step;
                cube.rotation.y += step;
            }

//        controls.positionBoundingBox();
            // render using requestAnimationFrame
            requestAnimationFrame(render);
            webGLRenderer.render(scene, camera);
        }

        function initStats() {

            var stats = new Stats();
            stats.setMode(0); // 0: fps, 1: ms

            // Align top-left
            stats.domElement.style.position = ‘absolute‘;
            stats.domElement.style.left = ‘0px‘;
            stats.domElement.style.top = ‘0px‘;

            document.getElementById("Stats-output").appendChild(stats.domElement);

            return stats;
        }


        // http://jsfiddle.net/MREL4/
        function setFromObject(object) {
        //Box3对象的构造函数.用来在三维空间内创建一个立方体边界对象
        //参数min,max,如果没有参数min,max将立方体边界初始化为Infinity,无穷大
            var box = new THREE.Box3();
            var v1 = new THREE.Vector3();
            //设置全局变换,object,即该demo中的group以及子对象都应用矩阵变换.
            object.updateMatrixWorld(true);

            //调用Box3.makeEmpty()方法,将立方体边界设置成无穷大.
            box.makeEmpty();
            //然后遍历组group中的每个子对象
            object.traverse(function (node) {
                //如果该子对象有几何体且几何体有顶点,则复制该几何体的每个顶点,然后对其进行矩阵变换
                //矩阵变换后得到的新的坐标位置,再根据这些新的坐标设置group的边界
                if (node.geometry !== undefined && node.geometry.vertices !== undefined) {
                    var vertices = node.geometry.vertices;
                    for (var i = 0, il = vertices.length; i < il; i++) {
                        v1.copy(vertices[i]);
                        v1.applyMatrix4(node.matrixWorld);
                        //applyMatrix4方法通过传递变换矩阵matrix(旋转,缩放,移动等变换矩阵)
                        //对当前立方体对象的8个角点,应用变换.

                        box.expandByPoint(v1);
                        //调用expandByPoint()方法重新设置立方体边界
                    }
                }
            });
            return box;
        }
    };

    window.onload = init;


</script>
</body>
</html>
2
当页面中网格的数量很大的时候,性能就成了瓶颈
下图讲解:FPS:每秒执行多少次,
左侧的是未使用merge,右侧是使用merge
从图中可以看出,未使用merge的时候,一秒钟执行了23次刷新,使用merge后,一秒钟执行了50次刷新,性能得到了提高
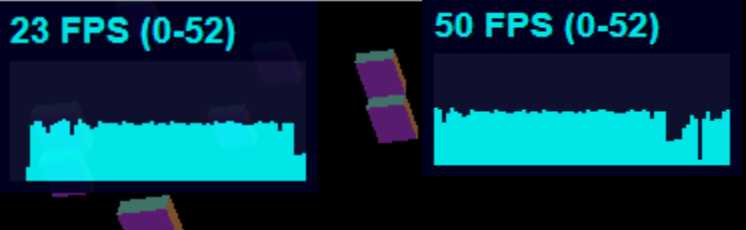
这里使用THREE.GeometryUtils.merge函数,将多个几何体合并起来,创建一个联合体,将会提高性能,
缺点:我们只能得到一个几何体,所以不能为每个几何体添加材质,并且失去了对每个对象的单独控制,想要移动,旋转,删除,缩放某一个几何体是不可能的
<!DOCTYPE html>

<html>

<head>
    <title>Example 08.02 - Merge objects</title>
    <script type="text/javascript" src="../libs/three.js"></script>

    <script type="text/javascript" src="../libs/stats.js"></script>
    <script type="text/javascript" src="../libs/dat.gui.js"></script>
    <style>
        body {
            /* set margin to 0 and overflow to hidden, to go fullscreen */
            margin: 0;
            overflow: hidden;
        }
    </style>
</head>
<body>

<div id="Stats-output">
</div>
<!-- Div which will hold the Output -->
<div id="WebGL-output">
</div>

<!-- Javascript code that runs our Three.js examples -->
<script type="text/javascript">

    // once everything is loaded, we run our Three.js stuff.
    function init() {

        var stats = initStats();

        // create a scene, that will hold all our elements such as objects, cameras and lights.
        var scene = new THREE.Scene();

        // create a camera, which defines where we‘re looking at.
        var camera = new THREE.PerspectiveCamera(45, window.innerWidth / window.innerHeight, 1, 500);

        // create a render and set the size
        var renderer = new THREE.WebGLRenderer();

        renderer.setClearColor(new THREE.Color(0x00000, 1.0));
        renderer.setSize(window.innerWidth, window.innerHeight);
        renderer.shadowMapEnabled = true;

        // position and point the camera to the center of the scene
        camera.position.x = 0;
        camera.position.y = 40;
        camera.position.z = 50;
        camera.lookAt(scene.position);

        // add the output of the renderer to the html element
        document.getElementById("WebGL-output").appendChild(renderer.domElement);

        // call the render function
        var step = 0;

        var cubeMaterial = new THREE.MeshNormalMaterial({color: 0x00ff00, transparent: true, opacity: 0.5});
        var controls = new function () {
            this.cameraNear = camera.near;
            this.cameraFar = camera.far;
            this.rotationSpeed = 0.02;
            this.combined = false;


            this.numberOfObjects = 500;

            this.redraw = function () {
                var toRemove = [];
                scene.traverse(function (e) {
                    if (e instanceof THREE.Mesh) toRemove.push(e);
                });
                toRemove.forEach(function (e) {
                    scene.remove(e)
                });

                // add a large number of cubes
                if (controls.combined) {
                    var geometry = new THREE.Geometry();
                    for (var i = 0; i < controls.numberOfObjects; i++) {
                        var cubeMesh = addcube();
                        cubeMesh.updateMatrix();
                        geometry.merge(cubeMesh.geometry, cubeMesh.matrix);
                    }
                    scene.add(new THREE.Mesh(geometry, cubeMaterial));

                } else {
                    for (var i = 0; i < controls.numberOfObjects; i++) {
                        scene.add(controls.addCube());
                    }
                }
            };


            this.addCube = addcube;

            this.outputObjects = function () {
                console.log(scene.children);
            }
        };

        var gui = new dat.GUI();

        gui.add(controls, ‘numberOfObjects‘, 0, 20000);
        gui.add(controls, ‘combined‘).onChange(controls.redraw);
        gui.add(controls, ‘redraw‘);


        controls.redraw();

        render();

        var rotation = 0;

        function addcube() {

            var cubeSize = 1.0;
            var cubeGeometry = new THREE.BoxGeometry(cubeSize, cubeSize, cubeSize);

            var cube = new THREE.Mesh(cubeGeometry, cubeMaterial);
            cube.castShadow = true;

            // position the cube randomly in the scene
            cube.position.x = -60 + Math.round((Math.random() * 100));
            cube.position.y = Math.round((Math.random() * 10));
            cube.position.z = -150 + Math.round((Math.random() * 175));

            // add the cube to the scene
            return cube;
        }
        function render() {

            rotation += 0.005;

            stats.update();

//            scene.rotation.x+=0.02;

            // rotate the cubes around its axes
//            scene.traverse(function(e) {
//                if (e instanceof THREE.Mesh ) {
//
//                    e.rotation.x+=controls.rotationSpeed;
//                    e.rotation.y+=controls.rotationSpeed;
//                    e.rotation.z+=controls.rotationSpeed;
//                }
//            });

            camera.position.x = Math.sin(rotation) * 50;
            // camera.position.y = Math.sin(rotation) * 40;
            camera.position.z = Math.cos(rotation) * 50;
            camera.lookAt(scene.position);

            // render using requestAnimationFrame
            requestAnimationFrame(render);
            renderer.render(scene, camera);
        }

        function initStats() {

            var stats = new Stats();

            stats.setMode(0); // 0: fps, 1: ms

            // Align top-left
            stats.domElement.style.position = ‘absolute‘;
            stats.domElement.style.left = ‘0px‘;
            stats.domElement.style.top = ‘0px‘;

            document.getElementById("Stats-output").appendChild(stats.domElement);

            return stats;
        }
    }
    window.onload = init;
</script>
</body>
</html>
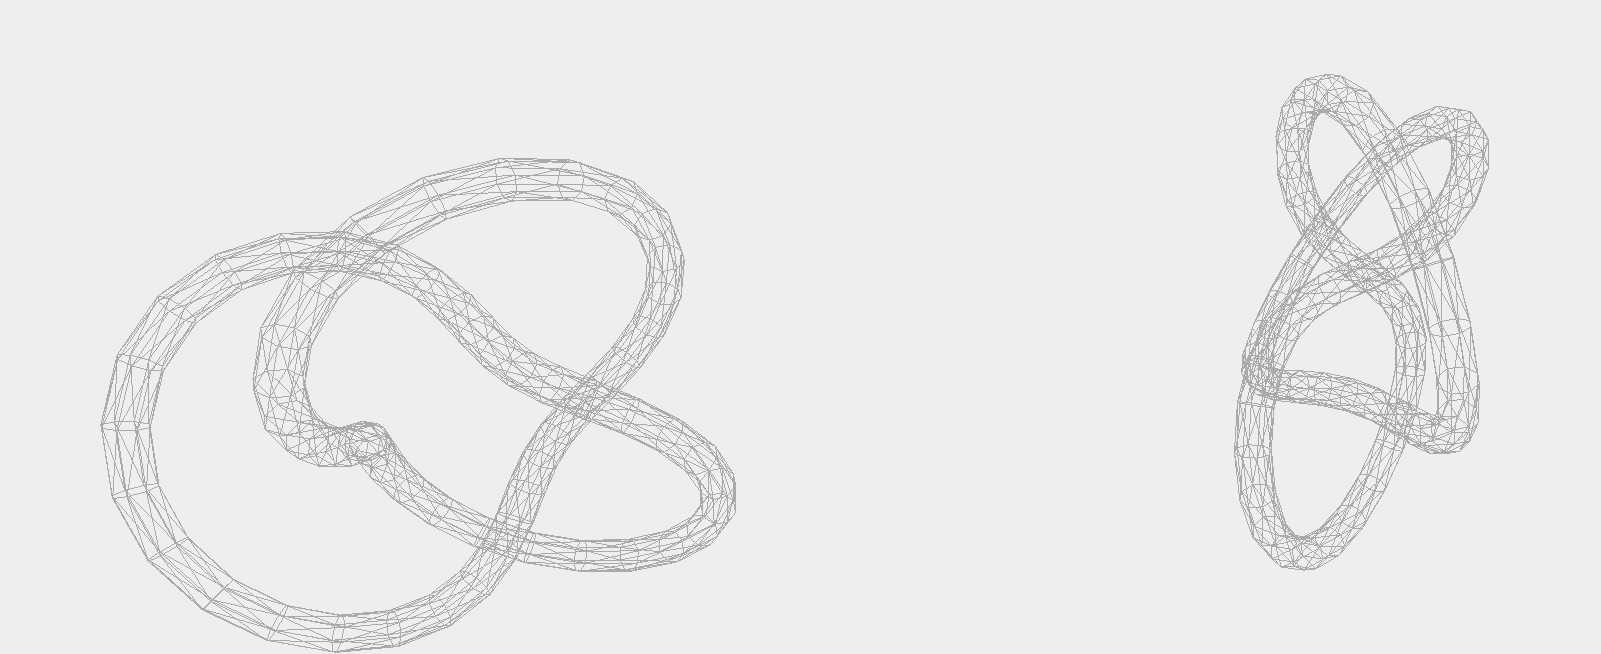
3 从外部引入资源加载几何体---方式一JSON
首先,我们先把我们前面绘制的网格对象保存为JSON格式,然后再在另外一个文件中引入该JSON文件,进行解析绘制
 var mesh=new THREE.Mesh(geo,material);
var json= mesh.toJSON();
//将mesh网格保存为JSON格式

//将json绘制为网格
var loader = new THREE.ObjectLoader();
 loadedMesh = loader.parse(json);
 loadedMesh.position.x -= 50;
 scene.add(loadedMesh);
<!DOCTYPE html>

<html>

<head>
    <title>Example 08.03 - Save & Load</title>
    <script type="text/javascript" src="../libs/three.js"></script>

    <script type="text/javascript" src="../libs/stats.js"></script>
    <script type="text/javascript" src="../libs/dat.gui.js"></script>
    <style>
        body {
            /* set margin to 0 and overflow to hidden, to go fullscreen */
            margin: 0;
            overflow: hidden;
        }
    </style>
</head>
<body>

<div id="Stats-output">
</div>
<!-- Div which will hold the Output -->
<div id="WebGL-output">
</div>

<!-- Javascript code that runs our Three.js examples -->
<script type="text/javascript">

    // once everything is loaded, we run our Three.js stuff.
    function init() {

        var stats = initStats();

        // create a scene, that will hold all our elements such as objects, cameras and lights.
        var scene = new THREE.Scene();

        // create a camera, which defines where we‘re looking at.
        var camera = new THREE.PerspectiveCamera(45, window.innerWidth / window.innerHeight, 0.1, 1000);

        // create a render and set the size
        var webGLRenderer = new THREE.WebGLRenderer();
        webGLRenderer.setClearColor(new THREE.Color(0xEEEEEE, 1.0));
        webGLRenderer.setSize(window.innerWidth, window.innerHeight);
        webGLRenderer.shadowMapEnabled = true;

        var knot = createMesh(new THREE.TorusKnotGeometry(10, 1, 64, 8, 2, 3, 1));
        // add the sphere to the scene
        scene.add(knot);

        // position and point the camera to the center of the scene
        camera.position.x = -30;
        camera.position.y = 40;
        camera.position.z = 50;
        camera.lookAt(new THREE.Vector3(-20, 0, 0));

        // add the output of the renderer to the html element
        document.getElementById("WebGL-output").appendChild(webGLRenderer.domElement);

        // call the render function
        var step = 0;
        var json;

        var loadedMesh;

        // setup the control gui
        var controls = new function () {

            console.log(knot.geometry.parameters);
            // we need the first child, since it‘s a multimaterial
            this.radius = knot.geometry.parameters.radius;
            this.tube = 0.3;
            this.radialSegments = knot.geometry.parameters.radialSegments;
            this.tubularSegments = knot.geometry.parameters.tubularSegments;
            this.p = knot.geometry.parameters.p;
            this.q = knot.geometry.parameters.q;
            this.heightScale = knot.geometry.parameters.heightScale;

            this.redraw = function () {
                // remove the old plane
                scene.remove(knot);
                // create a new one
                knot = createMesh(new THREE.TorusKnotGeometry(controls.radius, controls.tube, Math.round(controls.radialSegments), Math.round(controls.tubularSegments), Math.round(controls.p), Math.round(controls.q), controls.heightScale));
                // add it to the scene.
                scene.add(knot);
            };

            this.save = function () {
                json = knot.toJSON();
            };

            this.load = function () {

                scene.remove(loadedMesh);


                if (json) {
                    var loader = new THREE.ObjectLoader();

                    loadedMesh = loader.parse(json);
                    loadedMesh.position.x -= 50;
                    scene.add(loadedMesh);
                }
            }
        };

        var gui = new dat.GUI();
        var ioGui = gui.addFolder(‘Save & Load‘);
        ioGui.add(controls, ‘save‘).onChange(controls.save);
        ioGui.add(controls, ‘load‘).onChange(controls.load);
        var meshGui = gui.addFolder(‘mesh‘);
        meshGui.add(controls, ‘radius‘, 0, 40).onChange(controls.redraw);
        meshGui.add(controls, ‘tube‘, 0, 40).onChange(controls.redraw);
        meshGui.add(controls, ‘radialSegments‘, 0, 400).step(1).onChange(controls.redraw);
        meshGui.add(controls, ‘tubularSegments‘, 1, 20).step(1).onChange(controls.redraw);
        meshGui.add(controls, ‘p‘, 1, 10).step(1).onChange(controls.redraw);
        meshGui.add(controls, ‘q‘, 1, 15).step(1).onChange(controls.redraw);
        meshGui.add(controls, ‘heightScale‘, 0, 5).onChange(controls.redraw);


        render();

        function createMesh(geom) {

            // assign two materials
            var meshMaterial = new THREE.MeshBasicMaterial({
                vertexColors: THREE.VertexColors,
                wireframe: true,
                wireframeLinewidth: 2,
                color: 0xaaaaaa
            });
            meshMaterial.side = THREE.DoubleSide;

            // create a multimaterial
            var mesh = new THREE.Mesh(geom, meshMaterial);

            return mesh;
        }

        function render() {
            stats.update();

            knot.rotation.y = step += 0.01;

            // render using requestAnimationFrame
            requestAnimationFrame(render);
            webGLRenderer.render(scene, camera);
        }

        function initStats() {

            var stats = new Stats();
            stats.setMode(0); // 0: fps, 1: ms

            // Align top-left
            stats.domElement.style.position = ‘absolute‘;
            stats.domElement.style.left = ‘0px‘;
            stats.domElement.style.top = ‘0px‘;

            document.getElementById("Stats-output").appendChild(stats.domElement);

            return stats;
        }
    }
    window.onload = init;
</script>

</body>
</html>
3.2 将场景保存为JSON格式
注意该demo需要引入SceneExporter.js和SceneLoader.js文件
              //生成一个场景输出对象
                var exporter = new THREE.SceneExporter();
                //该对象将场景进行格式化为JSON格式
                var sceneJson = JSON.stringify(exporter.parse(scene));
    //生成一个场景载入对象
                var sceneLoader = new THREE.SceneLoader();
                //将json格式的场景传递给场景载入对象,格式化为场景
                sceneLoader.parse(JSON.parse(json), function (e) {
                    scene = e.scene;
                }, ‘.‘);
<!DOCTYPE html>

<html>

<head>
    <title>Example 08.04 - Load and save scene</title>
    <script type="text/javascript" src="../libs/three.js"></script>
    <script type="text/javascript" src="../libs/SceneLoader.js"></script>
    <script type="text/javascript" src="../libs/SceneExporter.js"></script>

    <script type="text/javascript" src="../libs/stats.js"></script>
    <script type="text/javascript" src="../libs/dat.gui.js"></script>
    <style>
        body {
            /* set margin to 0 and overflow to hidden, to go fullscreen */
            margin: 0;
            overflow: hidden;
        }
    </style>
</head>
<body>

<div id="Stats-output">
</div>
<!-- Div which will hold the Output -->
<div id="WebGL-output">
</div>

<!-- Javascript code that runs our Three.js examples -->
<script type="text/javascript">

    // once everything is loaded, we run our Three.js stuff.
    function init() {

        var stats = initStats();

        // create a scene, that will hold all our elements such as objects, cameras and lights.
        var scene = new THREE.Scene();

        // create a camera, which defines where we‘re looking at.
        var camera = new THREE.PerspectiveCamera(45, window.innerWidth / window.innerHeight, 0.1, 1000);

        // create a render and set the size
        var renderer = new THREE.WebGLRenderer();

        renderer.setClearColor(new THREE.Color(0xEEEEEE, 1.0));
        renderer.setSize(window.innerWidth, window.innerHeight);
        //    renderer.shadowMapEnabled = true;

        // create the ground plane
        var planeGeometry = new THREE.PlaneGeometry(60, 20, 1, 1);
        var planeMaterial = new THREE.MeshLambertMaterial({color: 0xffffff});
        var plane = new THREE.Mesh(planeGeometry, planeMaterial);
        //  plane.receiveShadow  = true;

        // rotate and position the plane
        plane.rotation.x = -0.5 * Math.PI;
        plane.position.x = 15;
        plane.position.y = 0;
        plane.position.z = 0;

        // add the plane to the scene
        scene.add(plane);

        // create a cube
        var cubeGeometry = new THREE.BoxGeometry(4, 4, 4);
        var cubeMaterial = new THREE.MeshLambertMaterial({color: 0xff0000});
        var cube = new THREE.Mesh(cubeGeometry, cubeMaterial);
        // cube.castShadow = true;

        // position the cube
        cube.position.x = -4;
        cube.position.y = 3;
        cube.position.z = 0;

        // add the cube to the scene
        scene.add(cube);

        var sphereGeometry = new THREE.SphereGeometry(4, 20, 20);
        var sphereMaterial = new THREE.MeshLambertMaterial({color: 0x7777ff});
        var sphere = new THREE.Mesh(sphereGeometry, sphereMaterial);

        // position the sphere
        sphere.position.x = 20;
        sphere.position.y = 0;
        sphere.position.z = 2;
        //  sphere.castShadow=true;

        // add the sphere to the scene
        scene.add(sphere);

        // position and point the camera to the center of the scene
        camera.position.x = -30;
        camera.position.y = 40;
        camera.position.z = 30;
        camera.lookAt(scene.position);

        // add subtle ambient lighting
        var ambientLight = new THREE.AmbientLight(0x0c0c0c);
        scene.add(ambientLight);

        // add spotlight for the shadows
        var spotLight = new THREE.PointLight(0xffffff);
        spotLight.position.set(-40, 60, -10);
        //  spotLight.castShadow = true;
        scene.add(spotLight);

        // add the output of the renderer to the html element
        document.getElementById("WebGL-output").appendChild(renderer.domElement);

        // call the render function
        var step = 0;

        var controls = new function () {
            this.exportScene = function () {
            //生成一个场景输出对象
                var exporter = new THREE.SceneExporter();
                //该对象将场景进行格式化为JSON格式
                var sceneJson = JSON.stringify(exporter.parse(scene));
                localStorage.setItem(‘scene‘, sceneJson);
            };

            this.clearScene = function () {
                scene = new THREE.Scene();
            };

            this.importScene = function () {
                var json = (localStorage.getItem(‘scene‘));
                //生成一个场景载入对象
                var sceneLoader = new THREE.SceneLoader();
                //将json格式的场景传递给场景载入对象,格式化为场景
                sceneLoader.parse(JSON.parse(json), function (e) {
                    scene = e.scene;
                }, ‘.‘);
            }
        };

        var gui = new dat.GUI();
        gui.add(controls, "exportScene");
        gui.add(controls, "clearScene");
        gui.add(controls, "importScene");


        render();

        function render() {
            stats.update();
            // rotate the cube around its axes


            // render using requestAnimationFrame
            requestAnimationFrame(render);
            renderer.render(scene, camera);
        }

        function initStats() {

            var stats = new Stats();

            stats.setMode(0); // 0: fps, 1: ms

            // Align top-left
            stats.domElement.style.position = ‘absolute‘;
            stats.domElement.style.left = ‘0px‘;
            stats.domElement.style.top = ‘0px‘;

            document.getElementById("Stats-output").appendChild(stats.domElement);

            return stats;
        }
    }
    window.onload = init;
</script>
</body>
</html>
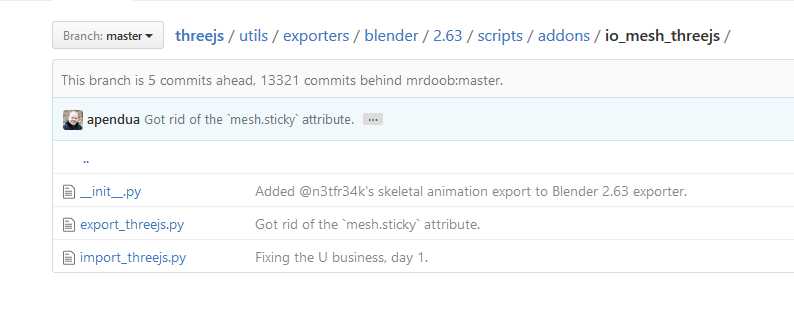
3.3 先使用Blender软件进行建模,建模完成后,将该模型导出成three.js可以识别的js文件格式,然后再将该js引入进行重新绘制
准备工作:
准备工作1:下载安装Blender软件:https://www.blender.org/download/
准备工作2:下载Three.js的发布包:https://github.com/timoxley/threejs,将io_mesh_threejs文件夹复制到Blender的安装目录:C:\Program Files\Blender Foundation\Blender\2.78\scripts\addons
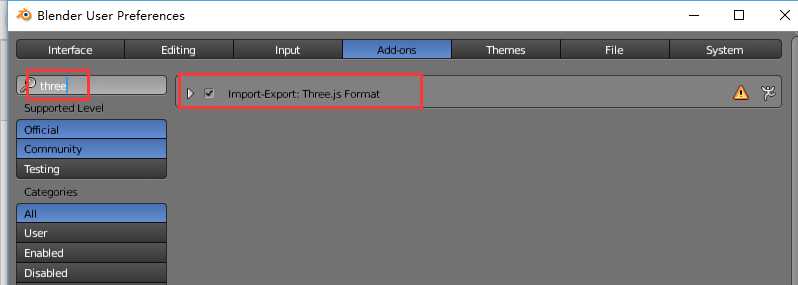
准备工作3:激活导出器
File|User Preferences|搜索框输入three|右侧出现Import-export three.js Format|勾选复选框激活
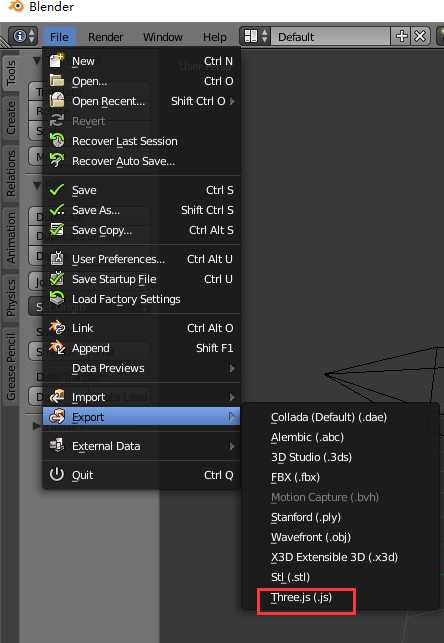
准备工作4:验证three.js导出器是否激活成功:File|Export|Three.js(.js)
准备工作5:使用Blender建模,再将模型保存为*.js
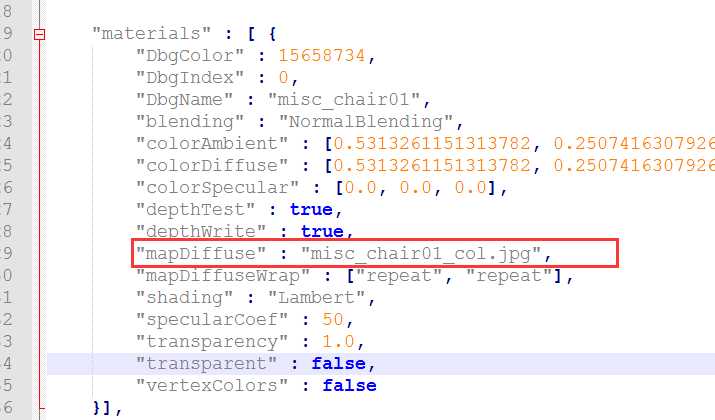
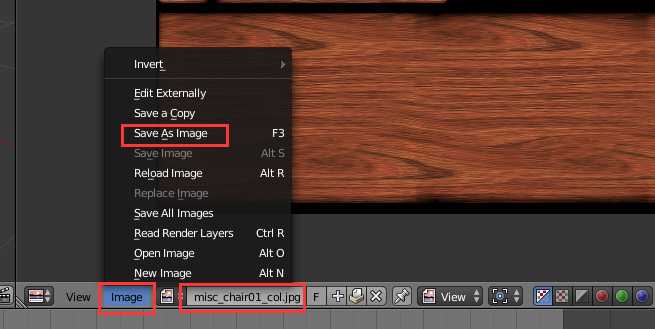
准备工作6:Blender软件导出的js文件中,有些材质是有图片的,所以我们在导出的js文件的同时还要导出图片,并保证图片和js文件里面的路径已经名称一致
准备工作完成,下面我们将使用导出的*.js和*.jpg在网页中绘制图形
代码部分:
<!DOCTYPE html>

<html>

<head>
    <title>Example 08.05 - Load blender model </title>
    <script type="text/javascript" src="../libs/three.js"></script>

    <script type="text/javascript" src="../libs/stats.js"></script>
    <script type="text/javascript" src="../libs/dat.gui.js"></script>
    <style>
        body {
            /* set margin to 0 and overflow to hidden, to go fullscreen */
            margin: 0;
            overflow: hidden;
        }
    </style>
</head>
<body>

<div id="Stats-output">
</div>
<!-- Div which will hold the Output -->
<div id="WebGL-output">
</div>

<!-- Javascript code that runs our Three.js examples -->
<script type="text/javascript">

    // once everything is loaded, we run our Three.js stuff.
    function init() {

        var stats = initStats();

        // create a scene, that will hold all our elements such as objects, cameras and lights.
        var scene = new THREE.Scene();

        // create a camera, which defines where we‘re looking at.
        var camera = new THREE.PerspectiveCamera(45, window.innerWidth / window.innerHeight, 0.1, 1000);

        // create a render and set the size
        var webGLRenderer = new THREE.WebGLRenderer();
        webGLRenderer.setClearColor(new THREE.Color(0xEEEEEE, 1.0));
        webGLRenderer.setSize(window.innerWidth, window.innerHeight);
        webGLRenderer.shadowMapEnabled = true;

        // position and point the camera to the center of the scene
        camera.position.x = -30;
        camera.position.y = 40;
        camera.position.z = 50;
        camera.lookAt(new THREE.Vector3(0, 10, 0));


        // add spotlight for the shadows
        var spotLight = new THREE.SpotLight(0xffffff);
        spotLight.position.set(0, 50, 30);
        spotLight.intensity = 2;
        scene.add(spotLight);

        // add the output of the renderer to the html element
        document.getElementById("WebGL-output").appendChild(webGLRenderer.domElement);

        // call the render function
        var step = 0;


        // setup the control gui
        var controls = new function () {
            // we need the first child, since it‘s a multimaterial


        };

        var gui = new dat.GUI();
        var mesh;

        var loader = new THREE.JSONLoader();
        //loader.load(url,callback);
        loader.load(‘../assets/models/misc_chair01.js‘, function (geometry, mat) {
            mesh = new THREE.Mesh(geometry, mat[0]);
            mesh.scale.x = 15;
            mesh.scale.y = 15;
            mesh.scale.z = 15;

            scene.add(mesh);

        }, ‘../assets/models/‘);


        render();


        function render() {
            stats.update();

            if (mesh) {
                mesh.rotation.y += 0.02;
            }


            // render using requestAnimationFrame
            requestAnimationFrame(render);
            webGLRenderer.render(scene, camera);
        }

        function initStats() {

            var stats = new Stats();
            stats.setMode(0); // 0: fps, 1: ms

            // Align top-left
            stats.domElement.style.position = ‘absolute‘;
            stats.domElement.style.left = ‘0px‘;
            stats.domElement.style.top = ‘0px‘;

            document.getElementById("Stats-output").appendChild(stats.domElement);

            return stats;
        }
    }
    window.onload = init;
</script>
</body>
</html>
3.4 先使用Blender软件进行建模,建模完成后,将该模型导出成three.js可以识别的OBJ和MTL文件格式,然后再将其引入进行重新绘制
理论解释:OBJ格式和MTL格式是相互配合使用的,OBJ文件定义了几何体的格式 ,MTL定义了所使用的材质
准备工作:同Blender导出*.js文件一样,1 安装Blender软件,进行建模;2 导入OBJ/MTL下载包,激活导出器;3 导出模型文件 4 页面中引入OBJLoader和MTLLoader
<!DOCTYPE html>

<html>

<head>
    <title>Example 08.07 - Load OBJ and MTL </title>
    <script type="text/javascript" src="../libs/three.js"></script>
    <script type="text/javascript" src="../libs/OBJLoader.js"></script>
    <script type="text/javascript" src="../libs/MTLLoader.js"></script>
    <script type="text/javascript" src="../libs/OBJMTLLoader.js"></script>

    <script type="text/javascript" src="../libs/stats.js"></script>
    <script type="text/javascript" src="../libs/dat.gui.js"></script>
    <style>
        body {
            /* set margin to 0 and overflow to hidden, to go fullscreen */
            margin: 0;
            overflow: hidden;
        }
    </style>
</head>
<body>

<div id="Stats-output">
</div>
<!-- Div which will hold the Output -->
<div id="WebGL-output">
</div>

<!-- Javascript code that runs our Three.js examples -->
<script type="text/javascript">

    // once everything is loaded, we run our Three.js stuff.
    function init() {

        var stats = initStats();

        // create a scene, that will hold all our elements such as objects, cameras and lights.
        var scene = new THREE.Scene();

        // create a camera, which defines where we‘re looking at.
        var camera = new THREE.PerspectiveCamera(45, window.innerWidth / window.innerHeight, 0.1, 1000);

        // create a render and set the size
        var webGLRenderer = new THREE.WebGLRenderer();
        webGLRenderer.setClearColor(new THREE.Color(0xaaaaff, 1.0));
        webGLRenderer.setSize(window.innerWidth, window.innerHeight);
        webGLRenderer.shadowMapEnabled = true;

        // position and point the camera to the center of the scene
        camera.position.x = -30;
        camera.position.y = 40;
        camera.position.z = 50;
        camera.lookAt(new THREE.Vector3(0, 10, 0));


        // add spotlight for the shadows
        var spotLight = new THREE.SpotLight(0xffffff);
        spotLight.position.set(0, 40, 30);
        spotLight.intensity = 2;
        scene.add(spotLight);

        // add the output of the renderer to the html element
        document.getElementById("WebGL-output").appendChild(webGLRenderer.domElement);

        // call the render function
        var step = 0;


        // setup the control gui
        var controls = new function () {
            // we need the first child, since it‘s a multimaterial


        };

        var gui = new dat.GUI();
        var mesh;

        var loader = new THREE.OBJMTLLoader();

        loader.load(‘../assets/models/butterfly.obj‘, ‘../assets/models/butterfly.mtl‘, function (object) {

            // configure the wings
            var wing2 = object.children[5].children[0];
            var wing1 = object.children[4].children[0];

            wing1.material.opacity = 0.6;
            wing1.material.transparent = true;
            wing1.material.depthTest = false;
            wing1.material.side = THREE.DoubleSide;

            wing2.material.opacity = 0.6;
            wing2.material.depthTest = false;
            wing2.material.transparent = true;
            wing2.material.side = THREE.DoubleSide;

            object.scale.set(140, 140, 140);
            mesh = object;
            scene.add(mesh);

            object.rotation.x = 0.2;
            object.rotation.y = -1.3;
        });


        render();


        function render() {
            stats.update();

            if (mesh) {
                mesh.rotation.y += 0.006;
            }


            // render using requestAnimationFrame
            requestAnimationFrame(render);
            webGLRenderer.render(scene, camera);
        }

        function initStats() {

            var stats = new Stats();
            stats.setMode(0); // 0: fps, 1: ms


            // Align top-left
            stats.domElement.style.position = ‘absolute‘;
            stats.domElement.style.left = ‘0px‘;
            stats.domElement.style.top = ‘0px‘;

            document.getElementById("Stats-output").appendChild(stats.domElement);

            return stats;
        }
    }
    window.onload = init;
</script>
</body>
</html>
3.5 加载Collada模型
理论解释:Collada模型是定义的场景,不仅定义了几何体,定义了材质,还定义了光源
准备工作:1 下载安装Blender软件,如果已经安装忽略此步骤,进行建模;2 激活导出器,如果已经有的话,此步骤省略;3 导出模型文件 4 页面中引入ColladaLoader
关键代码:
var loader = new THREE.ColladaLoader();

        var mesh;
        loader.load("../assets/models/dae/Truck_dae.dae", function (result) {
            mesh = result.scene.children[0].children[0].clone();
            //由于Collada模型定义的是场景,因此不仅包含几何体,材质还有光源等
            //因此此处我们想引入具体的某个网格,需要console.log(result),确定具体网格再添加到场景中
            mesh.scale.set(4, 4, 4);
            scene.add(mesh);
        });
3.6 加载STL,CTM,VTK,PDB,PLY模型
 var loader = new THREE.STLLoader();
        var group = new THREE.Object3D();
        loader.load("../assets/models/SolidHead_2_lowPoly_42k.stl", function (geometry) {
            console.log(geometry);
            var mat = new THREE.MeshLambertMaterial({color: 0x7777ff});
            group = new THREE.Mesh(geometry, mat);
            group.rotation.x = -0.5 * Math.PI;
            group.scale.set(0.6, 0.6, 0.6);
            scene.add(group);
        });
  var loader = new THREE.CTMLoader();
        var group = new THREE.Object3D();

        loader.load("../assets/models/auditt_wheel.ctm", function (geometry) {
            var mat = new THREE.MeshLambertMaterial({color: 0xff8888});
            group = new THREE.Mesh(geometry, mat);
            group.scale.set(20, 20, 20);
            scene.add(group);
        }, {});
var loader = new THREE.VTKLoader();
        var group = new THREE.Object3D();
        loader.load("../assets/models/moai_fixed.vtk", function (geometry) {
            var mat = new THREE.MeshLambertMaterial({color: 0xaaffaa});
            group = new THREE.Mesh(geometry, mat);
            group.scale.set(9, 9, 9);
            scene.add(group);
        });
   var loader = new THREE.PDBLoader();
        var group = new THREE.Object3D();
        loader.load("../assets/models/aspirin.pdb", function (geometry, geometryBonds) {
//geometry是标识原子的位置  geometryBonds定义了原子之间的键
            var i = 0;

            geometry.vertices.forEach(function (position) {
                var sphere = new THREE.SphereGeometry(0.2);
                var material = new THREE.MeshPhongMaterial({color: geometry.colors[i++]});
                var mesh = new THREE.Mesh(sphere, material);
                mesh.position.copy(position);
                group.add(mesh);
            });

            for (var j = 0; j < geometryBonds.vertices.length; j += 2) {
                var path = new THREE.SplineCurve3([geometryBonds.vertices[j], geometryBonds.vertices[j + 1]]);
                var tube = new THREE.TubeGeometry(path, 1, 0.04);
                var material = new THREE.MeshPhongMaterial({color: 0xcccccc});
                var mesh = new THREE.Mesh(tube, material);
                group.add(mesh);
            }

            scene.add(group);
        });
 var loader = new THREE.PLYLoader();//创建粒子系统
        var group = new THREE.Object3D();
        loader.load("../assets/models/test.ply", function (geometry) {
            var material = new THREE.PointCloudMaterial({
                color: 0xffffff,
                size: 0.4,
                opacity: 0.6,
                transparent: true,
                blending: THREE.AdditiveBlending,
                map: generateSprite()
            });

            group = new THREE.PointCloud(geometry, material);
            group.sortParticles = true;

            scene.add(group);
        });
| 模型格式 | 描述 |
| JSON | JSON不是一种正式的格式,但是很好用 |
| OBJ,MTL | OBJ定义的是几何体,MTL定义的是材质 |
| Collada | 使用较为广泛的格式,几乎所有的三维软件和渲染引擎都支持这种格式 |
| STL | 立体成型术,三维打印机的模型文件就是STL |
| CTM | CTM格式用来压缩保存3D网格的三角面片 |
| PDB |
蛋白质数据银行创建的一种格式,用来定义蛋白质的形状, 参数geometry的各个顶点标识的是各个原子的位置,geometryBonds:是各个原子之间的键 |
| PLY | 用来保存3D扫描仪的数据,该模型建立的是一个粒子系统,而不是网格 |
| VTK | vISUALIZATION Toolkit定义的文件格式,three.js支持旧版的ASCII版本的 |
Three.js开发指南---创建,加载高级网格和几何体(第八章)
标签:remes 验证 app exports 出图 计算 and spi load
原文地址:http://www.cnblogs.com/amy2011/p/6358527.html