标签:color set 结束 auto prototype actor cat schema xml配置方式
Spring容器给我们提供了很好的环境,我们只关注主要业务即可,其他的无需关注太多。今天刚学的DI
DI(Dependency Injection):依赖注入
使用XML配置文件完成依赖注入
1.1普通属性的注入
创建实体类:

package cn.spring.entity;

import java.io.Serializable;

/**
 * Created by accp on 2017/3/23.
 */
public class User implements Serializable {
    private String name;
    private String pwd;
    private Integer age;


    //带参构造
    public User(String name, String pwd, Integer age) {
        this.name = name;
        this.pwd = pwd;
        this.age = age;
    }

    public User(String name, String pwd) {
        this.name = name;
        this.pwd = pwd;
    }

    public User(String name, Integer age) {
        this.name = name;
        this.age = age;
    }

    public User() {
    }

    @Override
    public String toString() {
        return "User{" +
                "name=‘" + name + ‘\‘‘ +
                ", pwd=‘" + pwd + ‘\‘‘ +
                ", age=" + age +
                ‘}‘;
    }


    public String getName() {
        return name;
    }

    public void setName(String name) {
        this.name = name;
    }

    public String getPwd() {
        return pwd;
    }

    public void setPwd(String pwd) {
        this.pwd = pwd;
    }

    public Integer getAge() {
        return age;
    }

    public void setAge(Integer age) {
        this.age = age;
    }
}
编写xml文件
<?xml version="1.0" encoding="UTF-8"?>
<beans xmlns="http://www.springframework.org/schema/beans"
       xmlns:xsi="http://www.w3.org/2001/XMLSchema-instance"
       xmlns:aop="http://www.springframework.org/schema/aop"
       xmlns:p="http://www.springframework.org/schema/p"
       xmlns:context="http://www.springframework.org/schema/context"
       xsi:schemaLocation="http://www.springframework.org/schema/beans http://www.springframework.org/schema/beans/spring-beans.xsd
                         http://www.springframework.org/schema/aop http://www.springframework.org/schema/aop/spring-aop.xsd
                        http://www.springframework.org/schema/context http://www.springframework.org/schema/context/spring-context.xsd
">
    <!--属性注入-->
    <bean id="user1" class="cn.spring.entity.User">
        <property name="name" value="张三"></property>
        <property name="age" value="18"></property>
    </bean>

</beans>
测试类:
 @Test
    /*属性注入*/
    public void firstTest(){
        ApplicationContext ctx=new ClassPathXmlApplicationContext("applicationContext.xml");
        User user=(User)ctx.getBean("user1");
        System.out.println(user);
    }
运行结果:

1.1.2域属性的注入
创建实体类
package cn.spring.entity;

import java.io.Serializable;

/**
 * Created by accp on 2017/3/23.
 */
public class User implements Serializable {
    private String name;
    private String pwd;
    private Integer age;

    private Car myCar;

    public User(String name, String pwd, Car myCar) {
        this.name = name;
        this.pwd = pwd;
        this.myCar = myCar;
    }

    public User(String name, String pwd, Integer age, Car myCar) {
        this.name = name;
        this.pwd = pwd;
        this.age = age;
        this.myCar = myCar;
    }


    //带参构造
    public User(String name, String pwd, Integer age) {
        this.name = name;
        this.pwd = pwd;
        this.age = age;
    }

    public User(String name, String pwd) {
        this.name = name;
        this.pwd = pwd;
    }

    public User(String name, Integer age) {
        this.name = name;
        this.age = age;
    }

    public User() {
    }

    @Override
    public String toString() {
        return "User{" +
                "name=‘" + name + ‘\‘‘ +
                ", pwd=‘" + pwd + ‘\‘‘ +
                ", age=" + age +
                ", myCar=" + myCar +
                ‘}‘;
    }

    public Car getMyCar() {
        return myCar;
    }

    public void setMyCar(Car myCar) {
        this.myCar = myCar;
    }
    public String getName() {
        return name;
    }

    public void setName(String name) {
        this.name = name;
    }

    public String getPwd() {
        return pwd;
    }

    public void setPwd(String pwd) {
        this.pwd = pwd;
    }

    public Integer getAge() {
        return age;
    }

    public void setAge(Integer age) {
        this.age = age;
    }
}
package cn.spring.entity;

/**
 * Created by accp on 2017/3/23.
 */
public class Car {
    private String color;

    public Car() {
    }

    public Car(String color) {
        this.color = color;
    }

    @Override
    public String toString() {
        return "Car{" +
                "color=‘" + color + ‘\‘‘ +
                ‘}‘;
    }

    public String getColor() {
        return color;
    }

    public void setColor(String color) {
        this.color = color;
    }
}
编写xml文件
 <!--域属性注入-->
    <bean id="mmCar" class="cn.spring.entity.Car">
        <property name="color" value="green color"></property>
     </bean>

    <bean id="user4" class="cn.spring.entity.User">
        <property name="name" value="王小二"></property>
        <property name="age" value="10"></property>
        <property name="myCar" ref="mmCar"></property>
    </bean>
测试类
 @Test
    /*域属性注入*/
    public void fourTest(){
        ApplicationContext ctx=new ClassPathXmlApplicationContext("applicationContext.xml");
        User user=(User)ctx.getBean("user4");
        System.out.println(user);
    }
运行结果:

1.2构造注入
这个示例还是借用上面创建的实体类,实体类的构造已创建完成,接下来就编写xml文件
xml文件
<!--构造注入-->
    <bean id="user2" class="cn.spring.entity.User">
        <constructor-arg index="0" value="李四"></constructor-arg>
        <constructor-arg index="1" value="123"></constructor-arg>
      <!--  <constructor-arg index="2" value="16"></constructor-arg>-->
    </bean>
编写测试类
 @Test
    /*构造注入*/
    public void secondTest(){
        ApplicationContext ctx=new ClassPathXmlApplicationContext("applicationContext.xml");
        User user=(User)ctx.getBean("user2");
        System.out.println(user);
    }
运行结果
1.2.2构造注入域属性
注入域属性与普通属性注入域属性的方式是一致的,我们只需简单的更改代码即可。
xml文件编写
  <!--构造注入域属性-->
    <bean id="mmCar1" class="cn.spring.entity.Car">
        <property name="color" value="red color"></property>
    </bean>

    <bean id="user5" class="cn.spring.entity.User">
        <constructor-arg index="0" value="小二"></constructor-arg>
        <constructor-arg index="1" value="6375196"></constructor-arg>
        <!--  <constructor-arg index="2" value="16"></constructor-arg>-->
        <constructor-arg index="2" ref="mmCar1"></constructor-arg>
    </bean>
编写测试类
 @Test
    /*构造注入域属性*/
    public void fiveTest(){
        ApplicationContext ctx=new ClassPathXmlApplicationContext("applicationContext.xml");
        User user=(User)ctx.getBean("user5");
        System.out.println(user);
    }

1.3使用p命名空间注入
使用p命名空间注入时,需要注意的是:需要引入

如上图所示的命名空间。
xml文件编写
<!--p空间注入 直接注入值 -->
    <bean id="user3" class="cn.spring.entity.User" p:name="王五" p:age="14" p:myCar="myCar"></bean><!-- p:myCar="red"-->
还有一种方式:
 <!--p空间注入 引用bean -->
    <!--<bean id="user3" class="cn.spring.entity.User" p:name="王五" p:age="14"  p:myCar-ref="mmCar" ></bean>-->
一共两种方式,都可以实现p命名空间的注入。
编写测试类
 @Test
    /*p空间注入*/
    public void thirdTest(){
        ApplicationContext ctx=new ClassPathXmlApplicationContext("applicationContext.xml");
        User user=(User)ctx.getBean("user3");
        System.out.println(user);
    }
运行结果

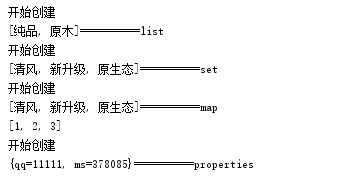
1.4集合注入
集合注入分为:array list set map properties 注入
在这里我们就不举例array的示例了,简单的把其他的实例演示一下。
创建实体类
package cn.spring.entity;

import java.util.List;
import java.util.Map;
import java.util.Properties;
import java.util.Set;

/**
 * Created by accp on 2017/3/23.
 */
public class CollectionBean {

    /**
     * 数组
     * List
     * Map
     * Set
     * properties
     *
     */

    private List<String> list;

    private Set<String> set;

    private Map<String,String> map;

    private Properties properties;

    public Properties getProperties() {
        return properties;
    }

    public void setProperties(Properties properties) {
        this.properties = properties;
    }

    public Map<String, String> getMap() {
        return map;
    }

    public void setMap(Map<String, String> map) {
        this.map = map;
    }

    public Set<String> getSet() {
        return set;
    }

    public void setSet(Set<String> set) {
        this.set = set;
    }

    public List<String> getList() {
        return list;
    }

    public void setList(List<String> list) {
        this.list = list;
    }
}
编写xml文件
    @Test
    /*list集合注入*/
    public void sexTest01(){
        ApplicationContext ctx=new ClassPathXmlApplicationContext("applicationContext.xml");
        CollectionBean bean=(CollectionBean)ctx.getBean("collectionBean");
        System.out.println(bean.getList());

    }

    @Test
    /*set集合注入*/
    public void sexTest02(){
        ApplicationContext ctx=new ClassPathXmlApplicationContext("applicationContext.xml");

        //set集合
        CollectionBean bean=(CollectionBean)ctx.getBean("collectionBean2");
        System.out.println(bean.getSet());
    }

    @Test
    /*map集合注入*/
    public void sexTest03(){
        ApplicationContext ctx=new ClassPathXmlApplicationContext("applicationContext.xml");
        //map集合
        CollectionBean bean=(CollectionBean)ctx.getBean("collectionBean3");
        System.out.println(bean.getMap().values()); //value值
        System.out.println(bean.getMap().keySet()); //key值
    }

    @Test
    /*properties 注入*/
    public void setTest04(){
        ApplicationContext ctx=new ClassPathXmlApplicationContext("applicationContext.xml");
        CollectionBean bean=(CollectionBean)ctx.getBean("properties");
        System.out.println(bean.getProperties());
    }
编写测试类
  @Test
    /*list集合注入*/
    public static void sexTest01(){
        ApplicationContext ctx=new ClassPathXmlApplicationContext("applicationContext.xml");
        CollectionBean bean=(CollectionBean)ctx.getBean("collectionBean");
        System.out.println(bean.getList()+"==========list");

    }

    @Test
    /*set集合注入*/
    public static void sexTest02(){
        ApplicationContext ctx=new ClassPathXmlApplicationContext("applicationContext.xml");

        //set集合
        CollectionBean bean=(CollectionBean)ctx.getBean("collectionBean2");
        System.out.println(bean.getSet()+"==========set");
    }

    @Test
    /*map集合注入*/
    public static void sexTest03(){
        ApplicationContext ctx=new ClassPathXmlApplicationContext("applicationContext.xml");
        //map集合
        CollectionBean bean=(CollectionBean)ctx.getBean("collectionBean3");
        System.out.println(bean.getMap().values()+"==========map"); //value值
        System.out.println(bean.getMap().keySet()); //key值
    }

    @Test
    /*properties 注入*/
    public static void sexTest04(){
        ApplicationContext ctx=new ClassPathXmlApplicationContext("applicationContext.xml");
        CollectionBean bean=(CollectionBean)ctx.getBean("properties");
        System.out.println(bean.getProperties()+"==========properties");
    }
运行结果
1.5使用注解的方式
使用注解方式实现值的注入需要导入命名空间
<?xml version="1.0" encoding="UTF-8"?>
<beans xmlns="http://www.springframework.org/schema/beans"
       xmlns:xsi="http://www.w3.org/2001/XMLSchema-instance"
       xmlns:aop="http://www.springframework.org/schema/aop"
       xmlns:p="http://www.springframework.org/schema/p"
       xmlns:context="http://www.springframework.org/schema/context"
       xsi:schemaLocation="http://www.springframework.org/schema/beans http://www.springframework.org/schema/beans/spring-beans.xsd
                         http://www.springframework.org/schema/aop http://www.springframework.org/schema/aop/spring-aop.xsd
                        http://www.springframework.org/schema/context http://www.springframework.org/schema/context/spring-context.xsd
">
以上的文件约束中的context为注解需要导入的命名空间。
在编写xml文件时只需要加入包扫描器即可。
xml文件编写
 <!--注解配置包扫描器-->
    <context:component-scan base-package="cn.spring.note"></context:component-scan>
创建实体类
package cn.spring.note;

import cn.spring.entity.*;
import org.springframework.beans.factory.annotation.Autowired;
import org.springframework.beans.factory.annotation.Qualifier;
import org.springframework.beans.factory.annotation.Value;
import org.springframework.stereotype.Component;
import org.springframework.stereotype.Controller;
import org.springframework.stereotype.Repository;
import org.springframework.stereotype.Service;

import javax.annotation.Resource;

/**
 * Created by accp on 2017/3/23.
 */
//Component  :不分包
//Service: biz层
//Controller: action
//Repository: biz
@Component("person")
public class Person {
    @Value("张三")
    private String name;
    @Value("18")
    private Integer age;

    @Autowired
    @Qualifier("car")
    private Car myCar;

    @Override
    public String toString() {
        return "Person{" +
                "name=‘" + name + ‘\‘‘ +
                ", age=" + age +
                ", myCar=" + myCar +
                ‘}‘;
    }

    public Person() {
    }

    public Car getMyCar() {
        return myCar;
    }

    public void setMyCar(Car myCar) {
        this.myCar = myCar;
    }

    public String getName() {
        return name;
    }

    public void setName(String name) {
        this.name = name;
    }

    public Integer getAge() {
        return age;
    }

    public void setAge(Integer age) {
        this.age = age;
    }
}
Car编写
package cn.spring.note;

import org.springframework.beans.factory.annotation.Autowired;
import org.springframework.beans.factory.annotation.Value;
import org.springframework.context.annotation.Scope;
import org.springframework.stereotype.Component;

/**
 * Created by accp on 2017/3/23.
 */
@Component("car")
@Scope("prototype")
/*@Scope("singleton")*/
public class Car {

    @Value("red")
    private String color;

    @Override
    public String toString() {
        return "Car{" +
                "color=‘" + color + ‘\‘‘ +
                ‘}‘;
    }

    public Car() {
        System.out.println("开始创建");
    }

    public Car(String color) {
        this.color = color;
    }
}
编写测试类(自身属性注入)
 @Test
    /*注解自身属性*/
    public void sevenTest(){
        ApplicationContext ctx=new ClassPathXmlApplicationContext("applicationContextXml.xml");
        Person person=(Person) ctx.getBean("person");
        System.out.println(person);
    }
运行结果
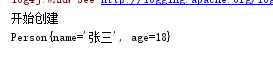
编写测试类(关联属性注入)
@Test
    /*注解关联对象*/
    public void eightTest(){
        ApplicationContext ctx=new ClassPathXmlApplicationContext("applicationContextXml.xml");
        Person person=(Person) ctx.getBean("person");
        System.out.println(person);
    }
运行结果

1.5.1使用注解实现多例
package cn.spring.note;

import org.springframework.beans.factory.annotation.Autowired;
import org.springframework.beans.factory.annotation.Value;
import org.springframework.context.annotation.Scope;
import org.springframework.stereotype.Component;

/**
 * Created by accp on 2017/3/23.
 */
@Component("car")
@Scope("prototype")
/*@Scope("singleton")*/
public class Car {

    @Value("red")
    private String color;

    @Override
    public String toString() {
        return "Car{" +
                "color=‘" + color + ‘\‘‘ +
                ‘}‘;
    }

    public Car() {
        System.out.println("开始创建");
    }

    public Car(String color) {
        this.color = color;
    }
}
编写测试类
 @Test
    /*注解实现多例*/
    public void nineTest(){
        ApplicationContext ctx=new ClassPathXmlApplicationContext("applicationContextXml.xml");
        Car car=(Car) ctx.getBean("car");
        Car car2=(Car) ctx.getBean("car");
        System.out.println(car);
        System.out.println(car2);
    }

1.5.2注解实现增强
创建实体类
package cn.spring.entity;

import java.io.Serializable;

/**
 * Created by accp on 2017/3/23.
 */
public class User implements Serializable {
    private String name;
    private String pwd;
    private Integer age;

    private Car myCar;

    public User(String name, String pwd, Car myCar) {
        this.name = name;
        this.pwd = pwd;
        this.myCar = myCar;
    }

    public User(String name, String pwd, Integer age, Car myCar) {
        this.name = name;
        this.pwd = pwd;
        this.age = age;
        this.myCar = myCar;
    }


    //带参构造
    public User(String name, String pwd, Integer age) {
        this.name = name;
        this.pwd = pwd;
        this.age = age;
    }

    public User(String name, String pwd) {
        this.name = name;
        this.pwd = pwd;
    }

    public User(String name, Integer age) {
        this.name = name;
        this.age = age;
    }

    public User() {
    }

    @Override
    public String toString() {
        return "User{" +
                "name=‘" + name + ‘\‘‘ +
                ", pwd=‘" + pwd + ‘\‘‘ +
                ", age=" + age +
                ", myCar=" + myCar +
                ‘}‘;
    }

    public Car getMyCar() {
        return myCar;
    }

    public void setMyCar(Car myCar) {
        this.myCar = myCar;
    }
    public String getName() {
        return name;
    }

    public void setName(String name) {
        this.name = name;
    }

    public String getPwd() {
        return pwd;
    }

    public void setPwd(String pwd) {
        this.pwd = pwd;
    }

    public Integer getAge() {
        return age;
    }

    public void setAge(Integer age) {
        this.age = age;
    }
}
Car类
package cn.spring.entity;

/**
 * Created by accp on 2017/3/23.
 */
public class Car {
    private String color;

    public Car() {
    }

    public Car(String color) {
        this.color = color;
    }

    @Override
    public String toString() {
        return "Car{" +
                "color=‘" + color + ‘\‘‘ +
                ‘}‘;
    }

    public String getColor() {
        return color;
    }

    public void setColor(String color) {
        this.color = color;
    }
}
创建DAO
package cn.spring.dao;

import cn.spring.entity.User;

/**
 * Created by accp on 2017/3/24.
 */
public interface UserDao {
    public void  save(User user);
}
创建DAOImpl
package cn.spring.dao.impl;

import cn.spring.dao.UserDao;
import cn.spring.entity.User;

/**
 * Created by accp on 2017/3/24.
 */
public class UserDaoImpl implements UserDao {
    public void save(User user) {
        System.out.println("开始保存用户");
    }
}
创建Biz
package cn.spring.biz;

import cn.spring.entity.User;

/**
 * Created by accp on 2017/3/24.
 */
public interface UserBiz {
    public void save(User user);
}
创建BizImpl
package cn.spring.biz.impl;

import cn.spring.biz.UserBiz;
import cn.spring.dao.UserDao;
import cn.spring.entity.User;

/**
 * Created by accp on 2017/3/24.
 */
public class UserBizImpl implements UserBiz {
    private UserDao dao;
    public void save(User user) {
        dao.save(user);
    }

    public UserDao getDao() {
        return dao;
    }

    public void setDao(UserDao dao) {
        this.dao = dao;
    }
}
创建拦截类
package cn.spring.noteen;

import org.aspectj.lang.annotation.AfterReturning;
import org.aspectj.lang.annotation.Aspect;
import org.aspectj.lang.annotation.Before;

/**
 * Created by accp on 2017/3/24.
 * 注解增强
 */
@Aspect
public class UserBizLogger {
    @Before("execution(* *..biz.*.*(..))")
    public void before(){
        System.out.println("注解方法增强开始");
    }
    @AfterReturning("execution(* *..biz.*.*(..))")
    public void after(){
        System.out.println("注解方法增强结束");
    }


}
xml配置文件
<!--注解方式的方法增强-->
    <bean id="userDao" class="cn.spring.dao.impl.UserDaoImpl"></bean>

    <bean id="userBiz" class="cn.spring.biz.impl.UserBizImpl">
        <property name="dao" ref="userDao"></property>
    </bean>
    <aop:aspectj-autoproxy/>
    <bean class="cn.spring.noteen.UserBizLogger"/>
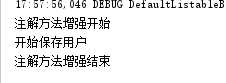
测试类
 @Test
    /*使用注解方式定义方法增强*/
    public void tenTest(){
        ApplicationContext ctx=new ClassPathXmlApplicationContext("applicationContext.xml");
        UserBiz biz=(UserBiz)ctx.getBean("userBiz");
        biz.save(new User());
    }
运行结果
标签:color set 结束 auto prototype actor cat schema xml配置方式
原文地址:http://www.cnblogs.com/wl0000-03/p/6622677.html
