标签:efault state attr initial pat create term control defaults
SpringMVC源码学习笔记(一)
前言----
最近花了些时间看了《Spring源码深度解析》这本书,算是入门了Spring的源码吧。打算写下系列文章,回忆一下书的内容,总结代码的运行流程。推荐那些和我一样没接触过SSH框架源码又想学习的,阅读郝佳编著的《Spring源码深度解析》这本书,会是个很好的入门。
进入正文,首先贴上SpringMVC的图片(来自https://docs.spring.io/spring/docs/current/spring-framework-reference/html/mvc.html)
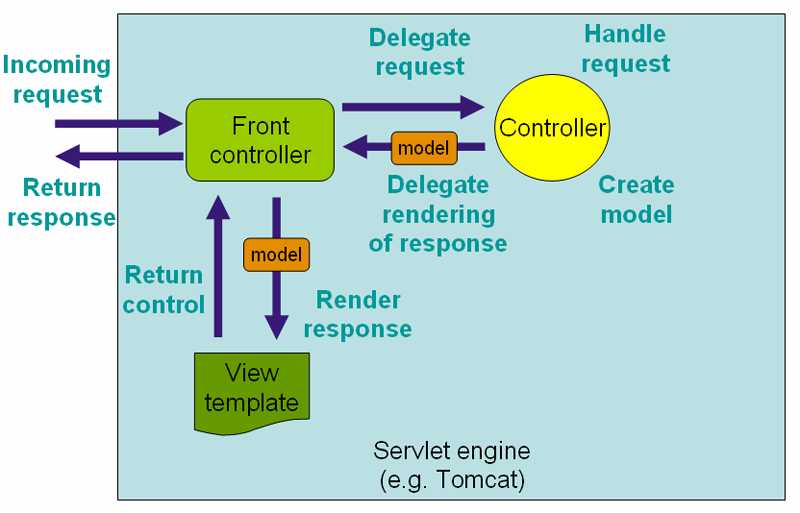
SpringMVC的大致流程就是 request -> DispatcherServlet -> HandlerMapping -> Controller -> ModelAndView -> ViewResolver ->
View, 稍微学习过的同学应该都很熟悉了,源码的学习也是根据SpringMVC的流程一步步深入的。
使用SpringMVC的标配: web.xml 文件中 DispatcherServlet 和 contextConfigLocation 和 ContextLoaderListener 的配置
 1     <!-- 配置启动 IOC 容器的 Listener -->
 2     <context-param>
 3         <param-name>contextConfigLocation</param-name>
 4         <param-value>classpath:applicationContext.xml</param-value>
 5     </context-param>
 6
 7     <listener>
 8         <listener-class>org.springframework.web.context.ContextLoaderListener</listener-class>
 9     </listener>
10
11     <!-- 配置 SpringMVC 的 DispatcherServlet -->
12     <servlet>
13         <servlet-name>springDispatcherServlet</servlet-name>
14         <servlet-class>org.springframework.web.servlet.DispatcherServlet</servlet-class>
15         <load-on-startup>1</load-on-startup>
16     </servlet>
17
18     <servlet-mapping>
19         <servlet-name>springDispatcherServlet</servlet-name>
20         <url-pattern>/</url-pattern>
21     </servlet-mapping>
其中,ContextLoaderListener 实现了 ServletContextListener , 重写了contextInitialized() 方法。
 1 public class ContextLoaderListener extends ContextLoader implements ServletContextListener {
 2     public ContextLoaderListener() {
 3     }
 4
 5     public ContextLoaderListener(WebApplicationContext context) {
 6         super(context);
 7     }
 8
 9     public void contextInitialized(ServletContextEvent event) {
10         this.initWebApplicationContext(event.getServletContext());    //初始化 WebApplicationContext
11     }
12
13     public void contextDestroyed(ServletContextEvent event) {
14         this.closeWebApplicationContext(event.getServletContext());
15         ContextCleanupListener.cleanupAttributes(event.getServletContext());
16     }
17 }
在父类 ContextLoader 中有 initWebApplicationContext() 该方法的定义。
 1    public WebApplicationContext initWebApplicationContext(ServletContext servletContext) {
 2         if(servletContext.getAttribute(WebApplicationContext.ROOT_WEB_APPLICATION_CONTEXT_ATTRIBUTE) != null) {  // 第一步: 存在性验证
 3             throw new IllegalStateException("Cannot initialize context because there is already a root application context present - check whether you have multiple ContextLoader* definitions in your web.xml!");
 4         } else {
 5             Log logger = LogFactory.getLog(ContextLoader.class);
 6             servletContext.log("Initializing Spring root WebApplicationContext");
 7             if(logger.isInfoEnabled()) {
 8                 logger.info("Root WebApplicationContext: initialization started");
 9             }
10
11             long startTime = System.currentTimeMillis();
12
13             try {
14                 if(this.context == null) {              // 第二步:初始化context
15                     this.context = this.createWebApplicationContext(servletContext);
16                 }
17
18                 if(this.context instanceof ConfigurableWebApplicationContext) {
19                     ConfigurableWebApplicationContext cwac = (ConfigurableWebApplicationContext)this.context;
20                     if(!cwac.isActive()) {
21                         if(cwac.getParent() == null) {
22                             ApplicationContext parent = this.loadParentContext(servletContext);
23                             cwac.setParent(parent);
24                         }
25
26                         this.configureAndRefreshWebApplicationContext(cwac, servletContext);
27                     }
28                 }
29          // 第三步: 记录在servletContext中
30                 servletContext.setAttribute(WebApplicationContext.ROOT_WEB_APPLICATION_CONTEXT_ATTRIBUTE, this.context);
31                 ClassLoader ccl = Thread.currentThread().getContextClassLoader();
32                 if(ccl == ContextLoader.class.getClassLoader()) {
33                     currentContext = this.context;
34                 } else if(ccl != null) {
35                     currentContextPerThread.put(ccl, this.context);    //第四步: 放到当前线程中
36                 }
37            }
38
39                 return this.context;
在第二步中, createWebApplicationContext() 方法创建了 WebApplicationContext实例。
1     protected WebApplicationContext createWebApplicationContext(ServletContext sc) {
2         Class<?> contextClass = this.determineContextClass(sc);                //第一步: 获取Class 的类型
3         if(!ConfigurableWebApplicationContext.class.isAssignableFrom(contextClass)) {         //第二步: 判断类型
4             throw new ApplicationContextException("Custom context class [" + contextClass.getName() + "] is not of type [" + ConfigurableWebApplicationContext.class.getName() + "]");
5         } else {
6             return (ConfigurableWebApplicationContext)BeanUtils.instantiateClass(contextClass);   //第三步: 反射创建实例
7         }
8     }
在第一步中, determineContextClass() 获取了 WebApplicationContext 的Class类型。
    protected Class<?> determineContextClass(ServletContext servletContext) {
        String contextClassName = servletContext.getInitParameter("contextClass");             //第一步: 获取属性
        if(contextClassName != null) {
            try {
                return ClassUtils.forName(contextClassName, ClassUtils.getDefaultClassLoader());        //第二步: 属性不为空, 反射创建
            } catch (ClassNotFoundException var4) {
                throw new ApplicationContextException("Failed to load custom context class [" + contextClassName + "]", var4);
            }
        } else {
            contextClassName = defaultStrategies.getProperty(WebApplicationContext.class.getName());  //第三步: 属性为空,则从配置文件中加载

            try {
                return ClassUtils.forName(contextClassName, ContextLoader.class.getClassLoader());
            } catch (ClassNotFoundException var5) {
                throw new ApplicationContextException("Failed to load default context class [" + contextClassName + "]", var5);
            }
        }
    }
代码比较简单, 主要是 defaultStrategies.getProperty() 的来源。 在 ContextLoader 中 静态代码块中,初始化了 该属性, 并加载了配置文件。
    static {
        try {
            ClassPathResource resource = new ClassPathResource("ContextLoader.properties", ContextLoader.class);
            defaultStrategies = PropertiesLoaderUtils.loadProperties(resource);
        } catch (IOException var1) {
            throw new IllegalStateException("Could not load ‘ContextLoader.properties‘: " + var1.getMessage());
        }

        currentContextPerThread = new ConcurrentHashMap(1);
    }
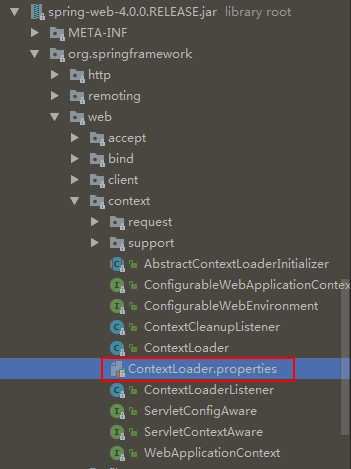
ContextLoader.properties 位置。
经过以上步骤, SpringMVC 已经初始化完 WebApplicationContext 并设置在 ServletContext 中, 并放入当前线程。 接下来下一篇进入DispatcherServlet 的处理中。
本来想只粘贴关键的代码, 但觉得少了那些准备的代码, 整个逻辑看起来会很揪心, 所以还是复制所有的代码吧。 整体知识来自《Spring源码深度解析》内容, 只是在到 IntelliJ IDEA 中查找代码,把逻辑复制粘贴过来, 作为回顾和笔记。 欢迎交流!!!
标签:efault state attr initial pat create term control defaults
原文地址:http://www.cnblogs.com/forwrader/p/6673042.html