标签:一个个 视图 填充 handler ppa service sep request 学习
Spring源码学习笔记(三)
前言----
最近花了些时间看了《Spring源码深度解析》这本书,算是入门了Spring的源码吧。打算写下系列文章,回忆一下书的内容,总结代码的运行流程。推荐那些和我一样没接触过SSH框架源码又想学习的,阅读郝佳编著的《Spring源码深度解析》这本书,会是个很好的入门。
DispatcherServlet 实现核心功能
和普通的 Servelt 类一样, DispatcherServlet 中的 doGet() 和 doPost() 方法是实现其核心逻辑的方法, 在其父类 FrameworkServlet 中有该函数的实现。
1     protected final void doGet(HttpServletRequest request, HttpServletResponse response) throws ServletException, IOException {
2         this.processRequest(request, response);
3     }
4
5     protected final void doPost(HttpServletRequest request, HttpServletResponse response) throws ServletException, IOException {
6         this.processRequest(request, response);
7     }
实现逻辑全部交给 processRequest() 方法, 继续跟踪~~~~
 1     protected final void processRequest(HttpServletRequest request, HttpServletResponse response) throws ServletException, IOException {
 2         //第一步:  记录时间
 3         long startTime = System.currentTimeMillis();
 4         Throwable failureCause = null;
 5         //第二步:  记录当前线程的 LocaleContext 以及 RequestAttributes
 6         LocaleContext previousLocaleContext = LocaleContextHolder.getLocaleContext();
 7         //第三步:  根据当前的 request 生成 LocaleContext 和 RequestAttributes
 8         LocaleContext localeContext = this.buildLocaleContext(request);
 9         RequestAttributes previousAttributes = RequestContextHolder.getRequestAttributes();
10         ServletRequestAttributes requestAttributes = this.buildRequestAttributes(request, response, previousAttributes);
11         WebAsyncManager asyncManager = WebAsyncUtils.getAsyncManager(request);
12         asyncManager.registerCallableInterceptor(FrameworkServlet.class.getName(), new FrameworkServlet.RequestBindingInterceptor(null));
13         this.initContextHolders(request, localeContext, requestAttributes);
14
15         try {
16             //第四步:  核心 doService()  方法
17             this.doService(request, response);
18         } catch (ServletException var17) {
19             failureCause = var17;
20             throw var17;
21         } finally {
22             //第五步:  恢复 LocaleContext 以及 RequestAttributes
23             this.resetContextHolders(request, previousLocaleContext, previousAttributes);
24             if(requestAttributes != null) {
25                 requestAttributes.requestCompleted();
26             }
27             //第六步:  无论成功失败, 发布事件
28             this.publishRequestHandledEvent(request, startTime, (Throwable)failureCause);
29         }
30
31     }
在 processRequest() 方法中, 操作了 LocaleContext 和 RequestAttributes 外, 并没做什么, 核心逻辑在 doService() 方法中。 欲知后事, 烧香倒酒~~·
 1     protected void doService(HttpServletRequest request, HttpServletResponse response) throws Exception {
 2
 3         Map<String, Object> attributesSnapshot = null;
 4         if(WebUtils.isIncludeRequest(request)) {
 5             this.logger.debug("Taking snapshot of request attributes before include");
 6             attributesSnapshot = new HashMap();
 7             //第一步: 生成迭代器,为当前的 request 的属性做快照
 8             Enumeration attrNames = request.getAttributeNames();
 9
10             label113:
11             while(true) {
12                 String attrName;
13                 do {
14                     if(!attrNames.hasMoreElements()) {
15                         break label113;
16                     }
17
18                     attrName = (String)attrNames.nextElement();
19                 } while(!this.cleanupAfterInclude && !attrName.startsWith("org.springframework.web.servlet"));
20
21                 attributesSnapshot.put(attrName, request.getAttribute(attrName));
22             }
23         }
24
25         //第二步:  给当前 Request 设置 已获取到的属性 request.setAttribute(WEB_APPLICATION_CONTEXT_ATTRIBUTE, this.getWebApplicationContext());
26         request.setAttribute(LOCALE_RESOLVER_ATTRIBUTE, this.localeResolver);
27         request.setAttribute(THEME_RESOLVER_ATTRIBUTE, this.themeResolver);
28         request.setAttribute(THEME_SOURCE_ATTRIBUTE, this.getThemeSource());
29         FlashMap inputFlashMap = this.flashMapManager.retrieveAndUpdate(request, response);
30         if(inputFlashMap != null) {
31             request.setAttribute(INPUT_FLASH_MAP_ATTRIBUTE, Collections.unmodifiableMap(inputFlashMap));
32         }
33
34         request.setAttribute(OUTPUT_FLASH_MAP_ATTRIBUTE, new FlashMap());
35         request.setAttribute(FLASH_MAP_MANAGER_ATTRIBUTE, this.flashMapManager);
36
37         try {
38             //第三步:  准备工作后的真正逻辑处理
39             this.doDispatch(request, response);
40         } finally {
41             if(WebAsyncUtils.getAsyncManager(request).isConcurrentHandlingStarted()) {
42                 return;
43             }
44             //第四步:  从快照当中恢复属性
45             if(attributesSnapshot != null) {
46                 this.restoreAttributesAfterInclude(request, attributesSnapshot);
47             }
48
49         }
50
51     }
一步一步似爪牙, 是魔鬼的步伐, 是。。。。。 这个 doDispatch() 方法真正进入了核心 <( ̄︶ ̄)↗[GO!]
 1     protected void doDispatch(HttpServletRequest request, HttpServletResponse response) throws Exception {
 2         HttpServletRequest processedRequest = request;
 3         HandlerExecutionChain mappedHandler = null;
 4         boolean multipartRequestParsed = false;
 5         WebAsyncManager asyncManager = WebAsyncUtils.getAsyncManager(request);
 6
 7         try {
 8             try {
 9                 ModelAndView mv = null;
10                 Exception dispatchException = null;
11
12                 try {
13                     //第一步:  检测 MultipartContent 类型的 request
14                     processedRequest = this.checkMultipart(request);
15                     multipartRequestParsed = processedRequest != request;
16                     //第二步:  根据当前的 request 获取对应的 handler
17                     mappedHandler = this.getHandler(processedRequest);
18                     if(mappedHandler == null || mappedHandler.getHandler() == null) {
19                         //第三步:  没有 对应的 handler 则报异常
20                         this.noHandlerFound(processedRequest, response);
21                         return;
22                     }
23                     //第四步:  根据 handler 获取对应的 handlerAdapter
24                     HandlerAdapter ha = this.getHandlerAdapter(mappedHandler.getHandler());
25                     //第五步:  这里是对 http 的Last-Modified 头的处理, 相当于缓存策略
26                     String method = request.getMethod();
27                     boolean isGet = "GET".equals(method);
28                     if(isGet || "HEAD".equals(method)) {
29                         long lastModified = ha.getLastModified(request, mappedHandler.getHandler());
30                         if(this.logger.isDebugEnabled()) {
31                             String requestUri = urlPathHelper.getRequestUri(request);
32                             this.logger.debug("Last-Modified value for [" + requestUri + "] is: " + lastModified);
33                         }
34
35                         if((new ServletWebRequest(request, response)).checkNotModified(lastModified) && isGet) {
36                             return;
37                         }
38                     }
39                     //第六步:  调用拦截器的 preHandler 方法
40                     if(!mappedHandler.applyPreHandle(processedRequest, response)) {
41                         return;
42                     }
43
44                     try {
45                         //第七步:  调用 HandlerAdapter 的方法, 返回视图
46                         mv = ha.handle(processedRequest, response, mappedHandler.getHandler());
47                     } finally {
48                         if(asyncManager.isConcurrentHandlingStarted()) {
49                             return;
50                         }
51
52                     }
53
54                     this.applyDefaultViewName(request, mv);
55                     //第八步:  调用拦截器的 postHandler 方法
56                     mappedHandler.applyPostHandle(processedRequest, response, mv);
57                 } catch (Exception var28) {
58                     dispatchException = var28;
59                 }
60                 //第九步:  进行返回视图的跳转  以及  激活触发器
61                 this.processDispatchResult(processedRequest, response, mappedHandler, mv, dispatchException);
62             } catch (Exception var29) {
63                 this.triggerAfterCompletion(processedRequest, response, mappedHandler, var29);
64             } catch (Error var30) {
65                 this.triggerAfterCompletionWithError(processedRequest, response, mappedHandler, var30);
66             }
67
68         } finally {
69             if(asyncManager.isConcurrentHandlingStarted()) {
70                 mappedHandler.applyAfterConcurrentHandlingStarted(processedRequest, response);
71                 return;
72             } else {
73                 if(multipartRequestParsed) {
74                     this.cleanupMultipart(processedRequest);
75                 }
76
77             }
78         }
79     }
复杂的逻辑, 分成一个个步骤, 接下来详解 doDispatch() 方法的每个步骤。 另开新篇~~~~ ( ﹁ ﹁ ) ~→
doDispatch( HttpServletRequest request, HttpServletResponse response )
一, 检测 MutipartContent 类型的 request
 1     protected HttpServletRequest checkMultipart(HttpServletRequest request) throws MultipartException {
 2         //第一步:  判断类型
 3         if(this.multipartResolver != null && this.multipartResolver.isMultipart(request)) {
 4             if(!(request instanceof MultipartHttpServletRequest)) {
 5                 //第二步:  调用方法
 6                 return this.multipartResolver.resolveMultipart(request);
 7             }
 8
 9             this.logger.debug("Request is already a MultipartHttpServletRequest - if not in a forward, this typically results from an additional MultipartFilter in web.xml");
10         }
11         //第三步: 直接返回
12         return request;
13     }
二, 根据 Request 获取 Handler
 1     protected HandlerExecutionChain getHandler(HttpServletRequest request) throws Exception {
 2         //第一步:  遍历所有的 HandlerMapping
 3         Iterator var2 = this.handlerMappings.iterator();
 4
 5         HandlerExecutionChain handler;
 6         do {
 7             if(!var2.hasNext()) {
 8                 return null;
 9             }
10
11             HandlerMapping hm = (HandlerMapping)var2.next();
12             if(this.logger.isTraceEnabled()) {
13                 this.logger.trace("Testing handler map [" + hm + "] in DispatcherServlet with name ‘" + this.getServletName() + "‘");
14             }
15             //第二步:  调用 HandlerMapping 的方法
16             handler = hm.getHandler(request);
17         } while(handler == null);
18
19         return handler;
20     }
在 getHandler() 方法中, 第二步调用 HandlerMapping 的 getHandler() 方法, 其实现是在父类 AbstractHandlerMapping 中
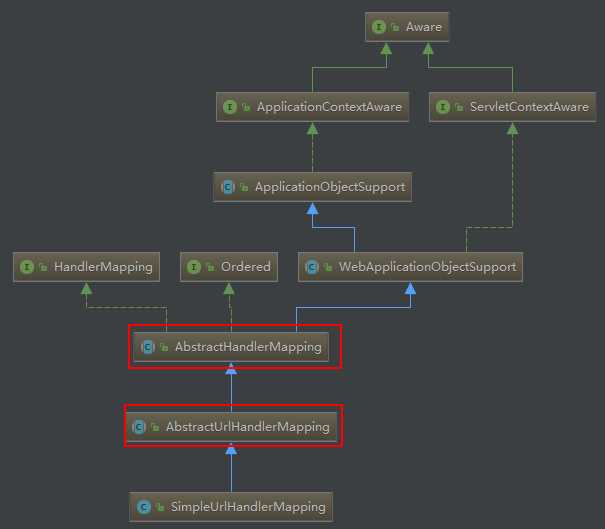
AbstractHandlerMapping 的 getHandler() 实现 :
 1     public final HandlerExecutionChain getHandler(HttpServletRequest request) throws Exception {
 2         //第一步:  根据 request 获取对应的 handler
 3         Object handler = this.getHandlerInternal(request);
 4         if(handler == null) {
 5             //第二步:  使用默认的 handler
 6             handler = this.getDefaultHandler();
 7         }
 8
 9         if(handler == null) {
10             return null;
11         } else {
12             if(handler instanceof String) {
13                 //第三步:  若为 String 类型, 实例化它
14                 String handlerName = (String)handler;
15                 handler = this.getApplicationContext().getBean(handlerName);
16             }
17             //第四步:  封装类型
18             return this.getHandlerExecutionChain(handler, request);
19         }
20     }
getHandler() 第一步中的 getHandlerInternal() 方法, 其实现是在 AbstractUrlHandlerMapping 类中:
 1    protected Object getHandlerInternal(HttpServletRequest request) throws Exception {
 2         //第一步:  截取 url 的有效路径
 3         String lookupPath = this.getUrlPathHelper().getLookupPathForRequest(request);
 4         //第二步:  根据路径获取 handler
 5         Object handler = this.lookupHandler(lookupPath, request);
 6         if(handler == null) {
 7             Object rawHandler = null;
 8             //第三步:  路径为 “/” 的情况
 9             if("/".equals(lookupPath)) {
10                 rawHandler = this.getRootHandler();
11             }
12             //第四步:  路径为 null 的情况, 使用默认 handler
13             if(rawHandler == null) {
14                 rawHandler = this.getDefaultHandler();
15             }
16
17             if(rawHandler != null) {
18                 if(rawHandler instanceof String) {
19                     //第五步:  根据 name 获取对应的 bean
20                     String handlerName = (String)rawHandler;
21                     rawHandler = this.getApplicationContext().getBean(handlerName);
22                 }
23                 //第六步:  模板方法 (往后看)
24                 this.validateHandler(rawHandler, request);
25                 handler = this.buildPathExposingHandler(rawHandler, lookupPath, lookupPath, (Map)null);
26             }
27         }
28
29         return handler;
30     }
绝望的感觉, 对方不想和你说话,并又双叒叕向你扔了一大堆代码。。。 (ノ?益?)ノ彡┻━┻
在 getHandlerInternal() 方法中, 第二步 lookupHandler() 的实现:
 1     protected Object lookupHandler(String urlPath, HttpServletRequest request) throws Exception {
 2         Object handler = this.handlerMap.get(urlPath);
 3         //第一步:  缓存 handlerMap 中存在的情况
 4         if(handler != null) {
 5             if(handler instanceof String) {
 6                 String handlerName = (String)handler;
 7                 handler = this.getApplicationContext().getBean(handlerName);
 8             }
 9
10             this.validateHandler(handler, request);
11             return this.buildPathExposingHandler(handler, urlPath, urlPath, (Map)null);
12         } else {
13             //第二步:  同配符匹配的情况
14             List<String> matchingPatterns = new ArrayList();
15             Iterator var5 = this.handlerMap.keySet().iterator();
16
17             while(var5.hasNext()) {
18                 String registeredPattern = (String)var5.next();
19                 //第三步:  添加所有的要匹配的 Handler
20                 if(this.getPathMatcher().match(registeredPattern, urlPath)) {
21                     matchingPatterns.add(registeredPattern);
22                 }
23             }
24
25             String bestPatternMatch = null;
26             Comparator<String> patternComparator = this.getPathMatcher().getPatternComparator(urlPath);
27             if(!matchingPatterns.isEmpty()) {
28                 //第四步:  根据 Comparator 排序所有的 Handler
29                 Collections.sort(matchingPatterns, patternComparator);
30                 if(this.logger.isDebugEnabled()) {
31                     this.logger.debug("Matching patterns for request [" + urlPath + "] are " + matchingPatterns);
32                 }
33                 //第五步:  获取匹配的 Handler
34                 bestPatternMatch = (String)matchingPatterns.get(0);
35             }
36
37             if(bestPatternMatch != null) {
38                 handler = this.handlerMap.get(bestPatternMatch);
39                 String pathWithinMapping;
40                 //第六步:  若是 String 类型, 则实例化
41                 if(handler instanceof String) {
42                     pathWithinMapping = (String)handler;
43                     handler = this.getApplicationContext().getBean(pathWithinMapping);
44                 }
45
46                 this.validateHandler(handler, request);
47                 pathWithinMapping = this.getPathMatcher().extractPathWithinPattern(bestPatternMatch, urlPath);
48                 //第七步:  若存在多个 最佳匹配, 在这些匹配中选出正确的 URI template variables
49                 Map<String, String> uriTemplateVariables = new LinkedHashMap();
50                 Iterator var9 = matchingPatterns.iterator();
51
52                 while(var9.hasNext()) {
53                     String matchingPattern = (String)var9.next();
54                     if(patternComparator.compare(bestPatternMatch, matchingPattern) == 0) {
55                         Map<String, String> vars = this.getPathMatcher().extractUriTemplateVariables(matchingPattern, urlPath);
56                         Map<String, String> decodedVars = this.getUrlPathHelper().decodePathVariables(request, vars);
57                         uriTemplateVariables.putAll(decodedVars);
58                     }
59                 }
60                 //第八步: 封装
61                 return this.buildPathExposingHandler(handler, bestPatternMatch, pathWithinMapping, uriTemplateVariables);
62             } else {
63                 return null;
64             }
65         }
66     }
其实在 lookupHandler() 方法当中, 只是一个 if-else 语句判断了 是直接匹配的情况 还是 同配符匹配的情况,最后把获取的 handler 封装成 HandlerExecutionChain 类。
 1     protected Object buildPathExposingHandler(Object rawHandler, String bestMatchingPattern, String pathWithinMapping, Map<String, String> uriTemplateVariables) {
 2         //第一步:   封装成 HandlerExecutionChain 类型
 3         HandlerExecutionChain chain = new HandlerExecutionChain(rawHandler);
 4         //第二步:   为 chain 添加两个拦截器
 5         chain.addInterceptor(new AbstractUrlHandlerMapping.PathExposingHandlerInterceptor(bestMatchingPattern, pathWithinMapping));
 6         if(!CollectionUtils.isEmpty(uriTemplateVariables)) {
 7             chain.addInterceptor(new AbstractUrlHandlerMapping.UriTemplateVariablesHandlerInterceptor(uriTemplateVariables));
 8         }
 9
10         return chain;
11     }
在 getHandler() 方法中,第四步封装类型 getHandlerExecutionChain() 方法的实现:
 1     protected HandlerExecutionChain getHandlerExecutionChain(Object handler, HttpServletRequest request) {
 2         HandlerExecutionChain chain = handler instanceof HandlerExecutionChain?(HandlerExecutionChain)handler:new HandlerExecutionChain(handler);
 3         chain.addInterceptors(this.getAdaptedInterceptors());
 4         String lookupPath = this.urlPathHelper.getLookupPathForRequest(request);
 5         Iterator var5 = this.mappedInterceptors.iterator();
 6         //第一步:  封装过程, 就是为 chain 添加拦截器
 7         while(var5.hasNext()) {
 8             MappedInterceptor mappedInterceptor = (MappedInterceptor)var5.next();
 9             if(mappedInterceptor.matches(lookupPath, this.pathMatcher)) {
10                 chain.addInterceptor(mappedInterceptor.getInterceptor());
11             }
12         }
13
14         return chain;
15     }
三,处理没找到 Handler 的情况
 1     protected void noHandlerFound(HttpServletRequest request, HttpServletResponse response) throws Exception {
 2         if(pageNotFoundLogger.isWarnEnabled()) {
 3             String requestUri = urlPathHelper.getRequestUri(request);
 4             pageNotFoundLogger.warn("No mapping found for HTTP request with URI [" + requestUri + "] in DispatcherServlet with name ‘" + this.getServletName() + "‘");
 5         }
 6
 7         if(this.throwExceptionIfNoHandlerFound) {
 8             ServletServerHttpRequest req = new ServletServerHttpRequest(request);
 9             throw new NoHandlerFoundException(req.getMethod().name(), req.getServletRequest().getRequestURI(), req.getHeaders());
10         } else {
11             //第一步:  直接往 response 里写错误信息
12             response.sendError(404);
13         }
14     }
四,根据 Handler 获取对应的 HandlerAdapter
 1    protected HandlerAdapter getHandlerAdapter(Object handler) throws ServletException {
 2         Iterator var2 = this.handlerAdapters.iterator();
 3
 4         HandlerAdapter ha;
 5         do {
 6             //第一步:  遍历所有的 HandlerAdapter , 判断是否匹配,并返回
 7             if(!var2.hasNext()) {
 8                 throw new ServletException("No adapter for handler [" + handler + "]: The DispatcherServlet configuration needs to include a HandlerAdapter that supports this handler");
 9             }
10
11             ha = (HandlerAdapter)var2.next();
12             if(this.logger.isTraceEnabled()) {
13                 this.logger.trace("Testing handler adapter [" + ha + "]");
14             }
15         } while(!ha.supports(handler));
16
17         return ha;
18     }
举例 SimpleControllerHandlerAdapter 中的 supports() 方法, 别想为什么选这个, 简单!(*╯3╰)
1 public boolean supports(Object handler) { return handler instanceof Controller; }
五,调用拦截器的方法
preHandle() 方法 :
 1     boolean applyPreHandle(HttpServletRequest request, HttpServletResponse response) throws Exception {
 2         if(this.getInterceptors() != null) {
 3             for(int i = 0; i < this.getInterceptors().length; this.interceptorIndex = i++) {
 4                 HandlerInterceptor interceptor = this.getInterceptors()[i];
 5                 if(!interceptor.preHandle(request, response, this.handler)) {
 6                     this.triggerAfterCompletion(request, response, (Exception)null);
 7                     return false;
 8                 }
 9             }
10         }
11
12         return true;
13     }
postHandle() 方法 :
1     void applyPostHandle(HttpServletRequest request, HttpServletResponse response, ModelAndView mv) throws Exception {
2         if(this.getInterceptors() != null) {
3             for(int i = this.getInterceptors().length - 1; i >= 0; --i) {
4                 HandlerInterceptor interceptor = this.getInterceptors()[i];
5                 interceptor.postHandle(request, response, this.handler, mv);
6             }
7
8         }
9     }
六,适配器的方法
Spring 默认使用 SimpleControllerHandlerAdapter 处理, 调用 SimpleControllerHandlerAdapter 的 handle() 方法。
1     public ModelAndView handle(HttpServletRequest request, HttpServletResponse response, Object handler) throws Exception {
2         return ((Controller)handler).handleRequest(request, response);
3     }
 1     public ModelAndView handleRequest(HttpServletRequest request, HttpServletResponse response) throws Exception {
 2         this.checkAndPrepare(request, response, this instanceof LastModified);
 3         if(this.synchronizeOnSession) {
 4             HttpSession session = request.getSession(false);
 5             if(session != null) {
 6                 Object mutex = WebUtils.getSessionMutex(session);
 7                 synchronized(mutex) {
 8                     //第一步:  session 同步之后调用 用户逻辑
 9                     return this.handleRequestInternal(request, response);
10                 }
11             }
12         }
13         //第二步:  session 不同步, 还是调用 用户逻辑
14         return this.handleRequestInternal(request, response);
15     }
七,异常处理和视图跳转
 1     private void processDispatchResult(HttpServletRequest request, HttpServletResponse response, HandlerExecutionChain mappedHandler, ModelAndView mv, Exception exception) throws Exception {
 2         boolean errorView = false;
 3         if(exception != null) {
 4             if(exception instanceof ModelAndViewDefiningException) {
 5                 this.logger.debug("ModelAndViewDefiningException encountered", exception);
 6                 mv = ((ModelAndViewDefiningException)exception).getModelAndView();
 7             } else {
 8                 Object handler = mappedHandler != null?mappedHandler.getHandler():null;
 9                 //第一步:  异常视图的处理
10                 mv = this.processHandlerException(request, response, handler, exception);
11                 errorView = mv != null;
12             }
13         }
14
15         if(mv != null && !mv.wasCleared()) {
16             //第二步:  根据视图跳转页面
17             this.render(mv, request, response);
18             if(errorView) {
19                 WebUtils.clearErrorRequestAttributes(request);
20             }
21         } else if(this.logger.isDebugEnabled()) {
22             this.logger.debug("Null ModelAndView returned to DispatcherServlet with name ‘" + this.getServletName() + "‘: assuming HandlerAdapter completed request handling");
23         }
24
25         if(!WebAsyncUtils.getAsyncManager(request).isConcurrentHandlingStarted()) {
26             if(mappedHandler != null) {
27                 //第三步:  激活处理器 (什么鬼, 然而并不知道o(* ̄3 ̄)o)
28                 mappedHandler.triggerAfterCompletion(request, response, (Exception)null);
29             }
30
31         }
32     }
在 processDispatchResult() 方法中,在第一步 processHandlerException() 方法中,异常视图的处理的逻辑。
 1     protected ModelAndView processHandlerException(HttpServletRequest request, HttpServletResponse response, Object handler, Exception ex) throws Exception {
 2         ModelAndView exMv = null;
 3         //第一步:  遍历所有的 HandlerExceptionResolver
 4         Iterator var6 = this.handlerExceptionResolvers.iterator();
 5
 6         while(var6.hasNext()) {
 7             HandlerExceptionResolver handlerExceptionResolver = (HandlerExceptionResolver)var6.next();
 8             //第二步:  调用 HandlerExceptionResolver 的方法
 9        exMv = handlerExceptionResolver.resolveException(request, response, handler, ex);
10             if(exMv != null) {
11                 break;
12             }
13         }
14
15         if(exMv != null) {
16             if(exMv.isEmpty()) {
17                 return null;
18             } else {
19                 if(!exMv.hasView()) {
20                     exMv.setViewName(this.getDefaultViewName(request));
21                 }
22
23                 if(this.logger.isDebugEnabled()) {
24                     this.logger.debug("Handler execution resulted in exception - forwarding to resolved error view: " + exMv, ex);
25                 }
26
27                 WebUtils.exposeErrorRequestAttributes(request, ex, this.getServletName());
28                 return exMv;
29             }
30         } else {
31             throw ex;
32         }
33     }
在 processDispatchResult() 方法中,第二步的渲染视图的 render() 方法
 1     protected void render(ModelAndView mv, HttpServletRequest request, HttpServletResponse response) throws Exception {
 2         //第一步:  为 response 对象 设置 locale 属性
 3         Locale locale = this.localeResolver.resolveLocale(request);
 4         response.setLocale(locale);
 5         View view;
 6         if(mv.isReference()) {
 7             //第二步:  解析视图名字
 8             view = this.resolveViewName(mv.getViewName(), mv.getModelInternal(), locale, request);
 9             if(view == null) {
10                 throw new ServletException("Could not resolve view with name ‘" + mv.getViewName() + "‘ in servlet with name ‘" + this.getServletName() + "‘");
11             }
12         } else {
13             //第三步:  返回视图   (天啦噜, 返回 jsp 啦啦啦啦!!)
14             view = mv.getView();
15             if(view == null) {
16                 throw new ServletException("ModelAndView [" + mv + "] neither contains a view name nor a " + "View object in servlet with name ‘" + this.getServletName() + "‘");
17             }
18         }
19
20         try {
21             //第四步:  渲染视图
22             view.render(mv.getModelInternal(), request, response);
23         } catch (Exception var7) {
24             if(this.logger.isDebugEnabled()) {
25                 this.logger.debug("Error rendering view [" + view + "] in DispatcherServlet with name ‘" + this.getServletName() + "‘", var7);
26             }
27
28             throw var7;
29         }
30     }
在 render() 方法中, 第二步解析视图名字 resolveViewName() 方法的处理逻辑, 选择合适的视图来进行渲染。
 1     protected View resolveViewName(String viewName, Map<String, Object> model, Locale locale, HttpServletRequest request) throws Exception {
 2         //第一步:  遍历所有的 ViewResolver
 3         Iterator var5 = this.viewResolvers.iterator();
 4
 5         View view;
 6         do {
 7             if(!var5.hasNext()) {
 8                 return null;
 9             }
10             //第二步:  调用 ViewResolver 的方法, 返回视图
11             ViewResolver viewResolver = (ViewResolver)var5.next();
12             view = viewResolver.resolveViewName(viewName, locale);
13         } while(view == null);
14
15         return view;
16     }
在 resolveViewName() 方法中, 第二步调用 ViewResolver 的 resolveViewName() 方法, 解析视图名称的逻辑, 其实现在 AbstractCachingViewResolver 中实现的。
 1     public View resolveViewName(String viewName, Locale locale) throws Exception {
 2         if(!this.isCache()) {
 3             //第一步:  不存在缓存, 直接创建视图
 4             return this.createView(viewName, locale);
 5         } else {
 6             //第二步:  从缓存中提取
 7             Object cacheKey = this.getCacheKey(viewName, locale);
 8             View view = (View)this.viewAccessCache.get(cacheKey);
 9             if(view == null) {
10                 Map var5 = this.viewCreationCache;
11                 synchronized(this.viewCreationCache) {
12                     view = (View)this.viewCreationCache.get(cacheKey);
13                     if(view == null) {
14                         view = this.createView(viewName, locale);
15                         if(view == null && this.cacheUnresolved) {
16                             view = UNRESOLVED_VIEW;
17                         }
18
19                         if(view != null) {
20                             this.viewAccessCache.put(cacheKey, view);
21                             this.viewCreationCache.put(cacheKey, view);
22                             if(this.logger.isTraceEnabled()) {
23                                 this.logger.trace("Cached view [" + cacheKey + "]");
24                             }
25                         }
26                     }
27                 }
28             }
29
30             return view != UNRESOLVED_VIEW?view:null;
31         }
32     }
在 resolveViewName() 方法中,创建视图 createView() 的实现逻辑, 实现在 UrlBasedViewResolver 重写了实现。
 1     protected View createView(String viewName, Locale locale) throws Exception {
 2         if(!this.canHandle(viewName, locale)) {
 3             return null;
 4         } else {
 5             String forwardUrl;
 6             //第一步:  处理 “redirect:” 的情况
 7             if(viewName.startsWith("redirect:")) {
 8                 forwardUrl = viewName.substring("redirect:".length());
 9                 RedirectView view = new RedirectView(forwardUrl, this.isRedirectContextRelative(), this.isRedirectHttp10Compatible());
10                 return this.applyLifecycleMethods(viewName, view);
11                //第二步:  处理 “forward:” 的情况
12             } else if(viewName.startsWith("forward:")) {
13                 forwardUrl = viewName.substring("forward:".length());
14                 return new InternalResourceView(forwardUrl);
15             } else {
16                 //第三步:  创建视图
17                 return super.createView(viewName, locale);
18             }
19         }
20     }
在 createView() 方法中, 第三步创建视图 createView() 方法的实现逻辑:
1     protected View createView(String viewName, Locale locale) throws Exception {
2         //第一步:  调用方法
3         return this.loadView(viewName, locale);
4     }
1     protected View loadView(String viewName, Locale locale) throws Exception {
2         //第一步: 构建视图
3         AbstractUrlBasedView view = this.buildView(viewName);
4         View result = this.applyLifecycleMethods(viewName, view);
5         return view.checkResource(locale)?result:null;
6     }
 1     protected AbstractUrlBasedView buildView(String viewName) throws Exception {
 2         //第一步:  封装 Class 类型
 3         AbstractUrlBasedView view = (AbstractUrlBasedView)BeanUtils.instantiateClass(this.getViewClass());
 4         //第二步:  填充 view 的属性
 5         view.setUrl(this.getPrefix() + viewName + this.getSuffix());
 6         String contentType = this.getContentType();
 7         if(contentType != null) {
 8             view.setContentType(contentType);
 9         }
10
11         view.setRequestContextAttribute(this.getRequestContextAttribute());
12         view.setAttributesMap(this.getAttributesMap());
13         if(this.exposePathVariables != null) {
14             view.setExposePathVariables(this.exposePathVariables.booleanValue());
15         }
16
17         return view;
18     }
在 doDispatch() 中的 render() 方法中的 render() 方法, 有点晕, 同名方法太多了 (╥╯^╰╥) ,这个方法的实现是在 AbstractView 中:
 1     public void render(Map<String, ?> model, HttpServletRequest request, HttpServletResponse response) throws Exception {
 2         if(this.logger.isTraceEnabled()) {
 3             this.logger.trace("Rendering view with name ‘" + this.beanName + "‘ with model " + model + " and static attributes " + this.staticAttributes);
 4         }
 5         //第一步:  封装所有在 View 层可能会用到的属性
 6         Map<String, Object> mergedModel = this.createMergedOutputModel(model, request, response);
 7         this.prepareResponse(request, response);
 8         //第二步:  封装的属性设置到 request 并进行页面的跳转
 9         this.renderMergedOutputModel(mergedModel, request, response);
10     }
 1     protected Map<String, Object> createMergedOutputModel(Map<String, ?> model, HttpServletRequest request, HttpServletResponse response) {
 2         //第一步:  提取 request 中的属性
 3         Map<String, Object> pathVars = this.exposePathVariables?(Map)request.getAttribute(View.PATH_VARIABLES):null;
 4         int size = this.staticAttributes.size();
 5         size += model != null?model.size():0;
 6         size += pathVars != null?pathVars.size():0;
 7         //第二步:  把属性封装成一个 Map 集合
 8         Map<String, Object> mergedModel = new LinkedHashMap(size);
 9         mergedModel.putAll(this.staticAttributes);
10         if(pathVars != null) {
11             mergedModel.putAll(pathVars);
12         }
13
14         if(model != null) {
15             mergedModel.putAll(model);
16         }
17
18         if(this.requestContextAttribute != null) {
19             mergedModel.put(this.requestContextAttribute, this.createRequestContext(request, response, mergedModel));
20         }
21
22         return mergedModel;
23     }
在 InternalResourceView 类中有 renderMergedOutputModel() 方法的实现:
 1     protected void renderMergedOutputModel(Map<String, Object> model, HttpServletRequest request, HttpServletResponse response) throws Exception {
 2         //第一步:  获取要使用的 request
 3         HttpServletRequest requestToExpose = this.getRequestToExpose(request);
 4         //第二步:  把 model 的数据 设置到 request 中
 5         this.exposeModelAsRequestAttributes(model, requestToExpose);
 6         this.exposeHelpers(requestToExpose);
 7         String dispatcherPath = this.prepareForRendering(requestToExpose, response);
 8         //第三步: 获取页面跳转所需的 RequestDispatcher
 9         RequestDispatcher rd = this.getRequestDispatcher(requestToExpose, dispatcherPath);
10         if(rd == null) {
11             throw new ServletException("Could not get RequestDispatcher for [" + this.getUrl() + "]: Check that the corresponding file exists within your web application archive!");
12         } else {
13             if(this.useInclude(requestToExpose, response)) {
14                 response.setContentType(this.getContentType());
15
16                 rd.include(requestToExpose, response);
17             } else {
18
19                 //第四步: 页面跳转
20                 rd.forward(requestToExpose, response);
21             }
22
23         }
24     }
天!!! 啦!!! 噜 !!!
到此 SpringMVC 基本流程图就基本走了一遍, SpringMVC 的源码感觉还是比较容易看的, 方法嵌套方法, 一步步的跟踪进去, 都能找到最原始的方法的调用, 中间只是多了许多判断还有必备的准备工作。 到此 SpringMVC 的内容就结束, 以后需要补充的在慢慢学吧。 加油!!!\(^o^)/
标签:一个个 视图 填充 handler ppa service sep request 学习
原文地址:http://www.cnblogs.com/forwrader/p/6675978.html