标签:业务 ebs ant 技术 sed view ring 不能 shiro

1. 下载
在Maven项目中的依赖配置如下:
<!-- shiro配置 -->
<dependency>
  <groupId>org.apache.shiro</groupId>
   <artifactId>shiro-core</artifactId>
   <version>${version.shiro}</version>
</dependency>
<!-- Enables support for web-based applications. -->
<dependency>
  <groupId>org.apache.shiro</groupId>
   <artifactId>shiro-web</artifactId>
   <version>${version.shiro}</version>
</dependency>
<!-- Enables AspectJ support for Shiro AOP and Annotations. -->
<dependency>
  <groupId>org.apache.shiro</groupId>
   <artifactId>shiro-aspectj</artifactId>
   <version>${version.shiro}</version>
</dependency>
<!-- Enables Ehcache-based famework caching. -->
<dependency>
  <groupId>org.apache.shiro</groupId>
   <artifactId>shiro-ehcache</artifactId>
   <version>${version.shiro}</version>
</dependency>
<!-- Enables Spring Framework integration. -->
<dependency>
  <groupId>org.apache.shiro</groupId>
   <artifactId>shiro-spring</artifactId>
   <version>${version.shiro}</version>
</dependency>
特别地!Shiro使用了日志框架slf4j,因此需要对应配置指定的日志实现组件,如:log4j,logback等。
在此,以使用log4j为日志实现为例:
<!-- 日志工具 -->
<!--
shiro使用slf4j作为日志框架,所以必需配置slf4j。
同时,使用log4j作为底层的日志实现框架。
-->
<dependency>
  <groupId>org.slf4j</groupId>
  <artifactId>slf4j-api</artifactId>
  <version>1.7.25</version>
</dependency>
<dependency>
  <groupId>org.slf4j</groupId>
  <artifactId>slf4j-log4j12</artifactId>
  <version>1.7.25</version>
</dependency>
<dependency>
  <groupId>log4j</groupId>
  <artifactId>log4j</artifactId>
  <version>1.2.17</version>
</dependency>
2.集成Shiro
在Spring框架中集成Shiro,本质上是与Spring IoC容器和Spring MVC框架集成,所以应该分为2部分来说。
(1)与Spring IoC容器集成
Spring IoC容器提供了一个非常重要的功能,就是依赖注入,将Bean的定义以及Bean之间关系的耦合通过容器来处理。
也就是说,在Spring中集成Shiro时,Shiro中的相应Bean的定义以及他们的关系也需要通过Spring IoC容器实现,配置如下:
<bean id="shiroFilter" class="org.apache.shiro.spring.web.ShiroFilterFactoryBean">
  <property name="securityManager" ref="securityManager"/>
  <property name="loginUrl" value="/index"/>
  <property name="successUrl" value="/home"/>
  <property name="unauthorizedUrl" value="/unauthorized.jsp"/>
  <!-- The ‘filters‘ property is not necessary since any declared javax.servlet.Filter bean  -->
  <!-- defined will be automatically acquired and available via its beanName in chain        -->
  <!-- definitions, but you can perform instance overrides or name aliases here if you like: -->
  <!-- <property name="filters">
      <util:map>
          <entry key="logout" value-ref="logoutFilter" />
      </util:map>
  </property> -->
  <property name="filterChainDefinitions">
      <value>
          # some example chain definitions:
          # /admin/** = authc, roles[admin]
          # /docs/** = authc, perms[document:read]
          /login = anon
          /logout = anon
          /error = anon
          /** = user
          # more URL-to-FilterChain definitions here
      </value>
  </property>
</bean>
<bean id="securityManager" class="org.apache.shiro.web.mgt.DefaultWebSecurityManager">
  <!-- Single realm app.  If you have multiple realms, use the ‘realms‘ property instead. -->
  <property name="realm" ref="myRealm" />
  <!-- By default the servlet container sessions will be used.  Uncomment this line
       to use shiro‘s native sessions (see the JavaDoc for more): -->
  <!-- <property name="sessionMode" value="native"/> -->
</bean>
<bean id="lifecycleBeanPostProcessor" class="org.apache.shiro.spring.LifecycleBeanPostProcessor"/>

<!-- Define the Shiro Realm implementation you want to use to connect to your back-end -->
<!-- security datasource: -->
<bean id="myRealm" class="org.apache.shiro.realm.jdbc.JdbcRealm">
  <property name="dataSource" ref="dataSource"/>
  <property name="permissionsLookupEnabled" value="true"/>
</bean>

<!-- Enable Shiro Annotations for Spring-configured beans.  Only run after -->
<!-- the lifecycleBeanProcessor has run: -->
<bean class="org.springframework.aop.framework.autoproxy.DefaultAdvisorAutoProxyCreator" depends-on="lifecycleBeanPostProcessor"/>
<bean class="org.apache.shiro.spring.security.interceptor.AuthorizationAttributeSourceAdvisor">
  <property name="securityManager" ref="securityManager"/>
</bean>
(2)与Spring MVC集成
跟在普通Java Web应用中使用Shiro一样,集成Shiro到Spring MVC时,实际上就是通过在web.xml中添加指定Filter实现。配置如下:
<!-- The filter-name matches name of a ‘shiroFilter‘ bean inside applicationContext.xml -->
<filter>
    <filter-name>shiroFilter</filter-name>
    <filter-class>org.springframework.web.filter.DelegatingFilterProxy</filter-class>
    <init-param>
        <param-name>targetFilterLifecycle</param-name>
        <param-value>true</param-value>
    </init-param>
</filter>

<!-- Make sure any request you want accessible to Shiro is filtered. /* catches all -->
<!-- requests.  Usually this filter mapping is defined first (before all others) to -->
<!-- ensure that Shiro works in subsequent filters in the filter chain:             -->
<filter-mapping>
    <filter-name>shiroFilter</filter-name>
    <url-pattern>/*</url-pattern>
</filter-mapping>
也就是说,其实在Spring中集成Shiro的原理就是:通过在web.xml中配置的Shiro Filter与Spring IoC中定义的相应的Shiro Bean定义建立关系,从而实现在Spring框架集成Shiro。
实际上,通常就是在web.xml添加的Filter与某个Shiro Spring Bean的定义name是相同的,参见示例。
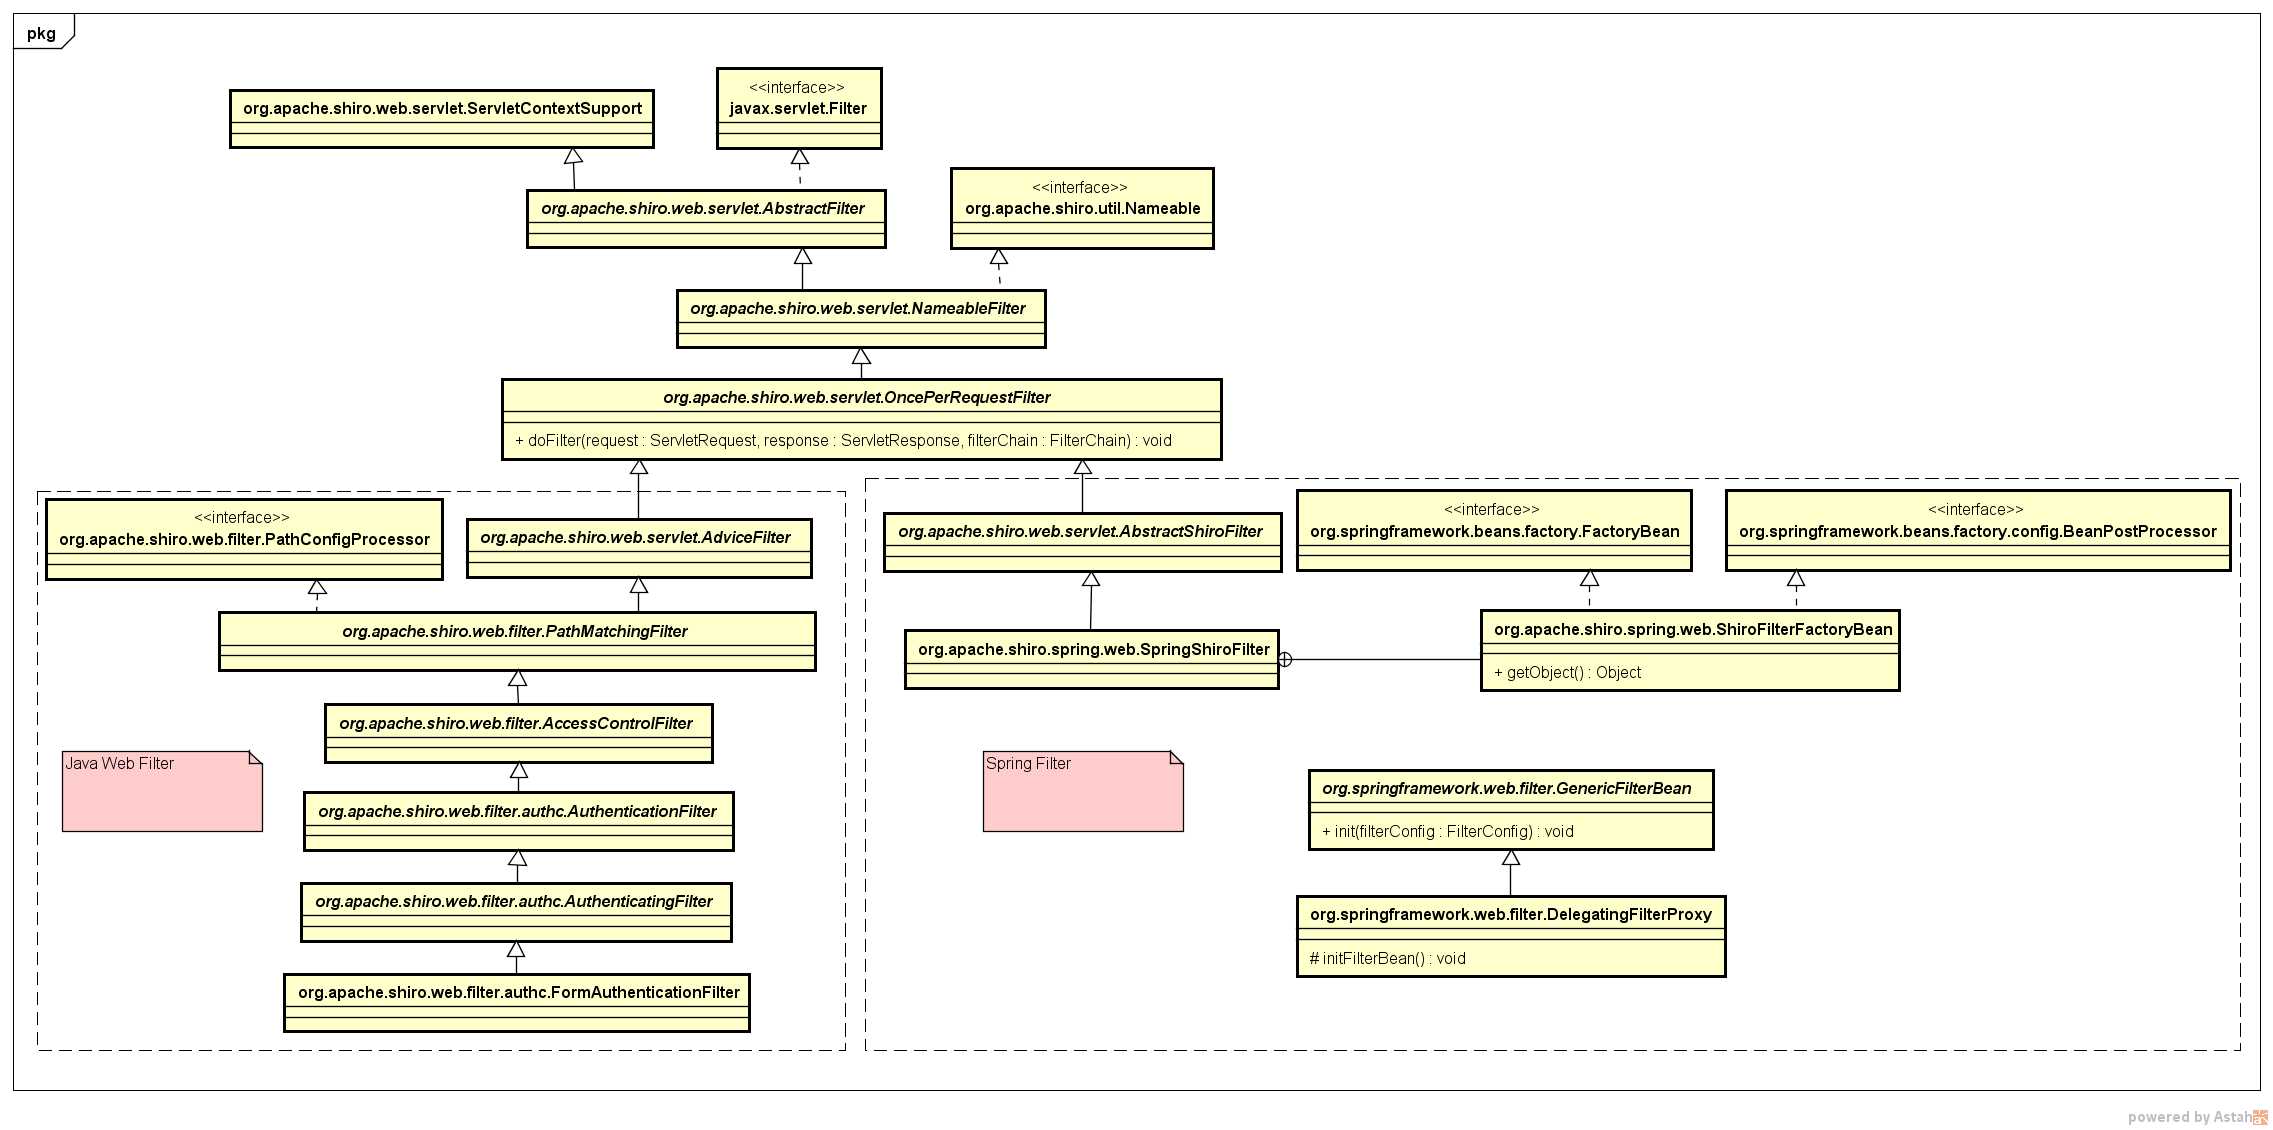
Shiro Filter类图:
3. 数据源配置
在Shiro中,Realm定义了访问数据的方式,用来连接不同的数据源,如:LDAP,关系数据库,配置文件等等。
Realm类图: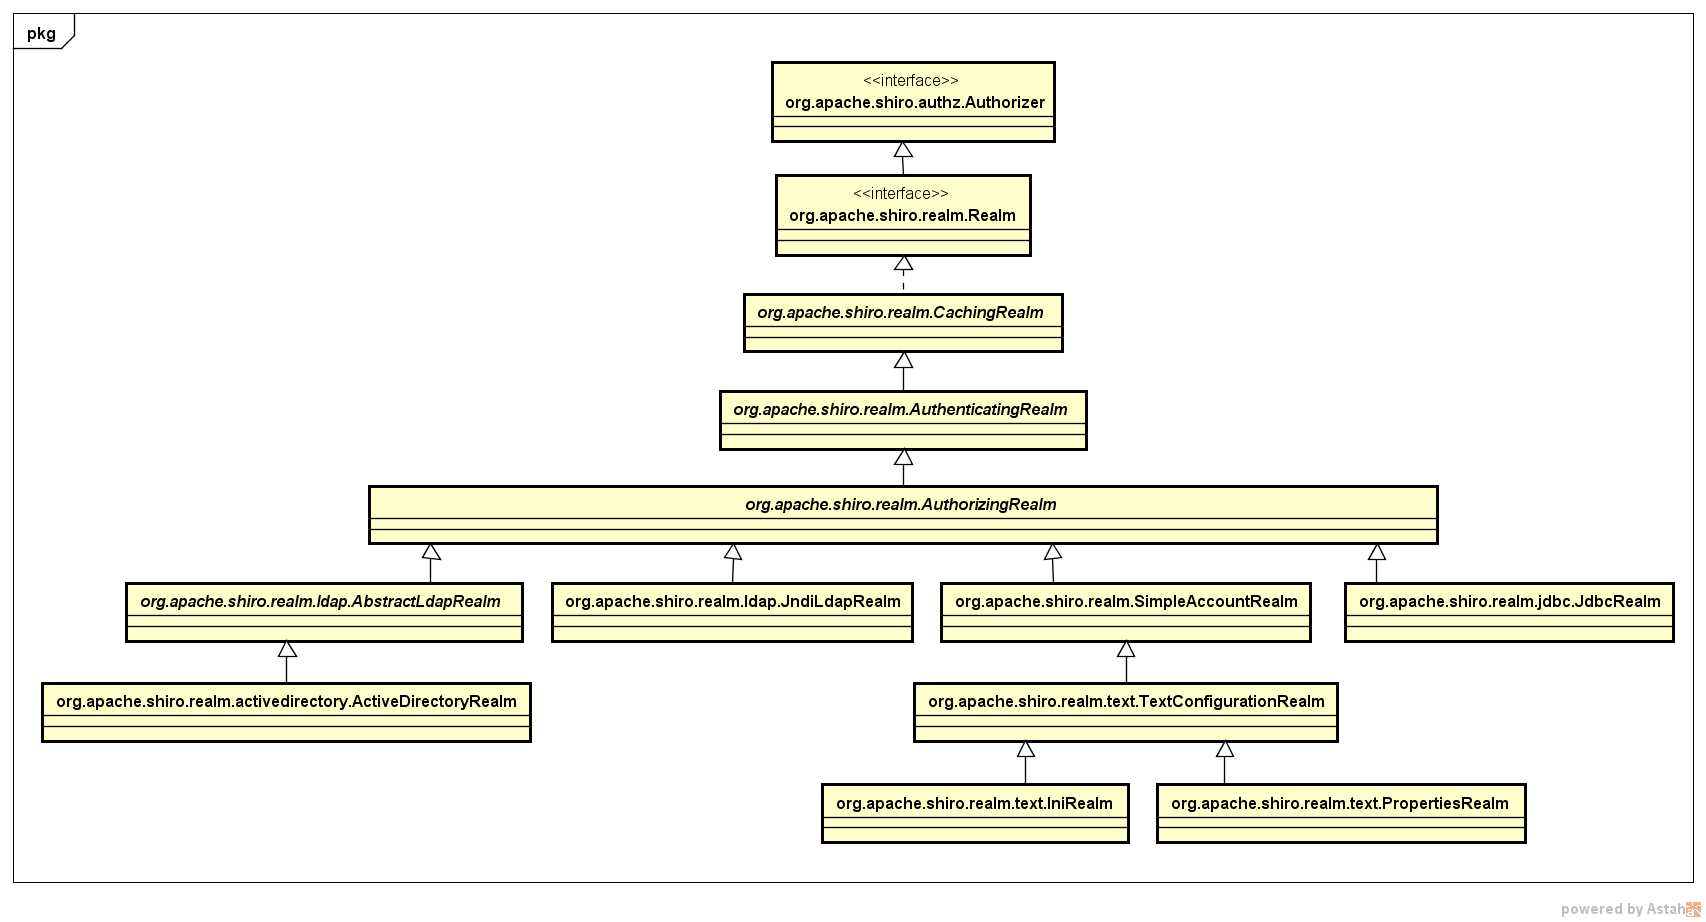
也就是说,可以根据实际需求及应用的权限管理复杂度灵活选择指定数据源。
在此,以org.apache.shiro.realm.jdbc.JdbcRealm为例,将用户信息存放在关系型数据库中。
在使用org.apache.shiro.realm.jdbc.JdbcRealm时,必须要在关系型数据库中存在3张表,分别是:
(1)users表,存放认证用户基本信息,在该表中必须存在2个字段:username,password。
(2)roles_permissions表,存放角色和权限定义,在该表中必须存在2个字段:role_name,permission。
(3)user_roles表,存放用户角色对应关系,在该表中必须存在2个字段:username,role_name。
实际上,在更加复杂的应用场景下,通常需要扩展org.apache.shiro.realm.jdbc.JdbcRealm。
4. 认证
在Shiro中,认证即执行用户登录,读取指定Realm连接的数据源,以验证用户身份的有效性与合法性。
关于Shiro在Web应用中的认证流程,与Shiro在非Web环境的独立应用中的认证流程一样,都需要执行用户登录,即:
Subject currentUser = SecurityUtils.getSubject();
if(!currentUser.isAuthenticated()) {
  UsernamePasswordToken token = new UsernamePasswordToken(name, password);
  try {
    currentUser.login(token);
  } catch (UnknownAccountException e) {
    logger.error(String.format("user not found: %s", name), e);
  } catch(IncorrectCredentialsException e) {
    logger.error(String.format("user: %s pwd: %s error", name, password), e);
  } catch (ConcurrentAccessException e) {
    logger.error(String.format("user has been authenticated: %s", name), e);
  } catch (AuthenticationException e) {
    logger.error(String.format("account except: %s", name), e);
  }
}
唯一的区别就是,在Java Web环境中,用户名和密码参数是通过前端页面进行传递。
5. 授权
需要再三强调!!!Shiro作为权限框架,仅仅只能控制对资源的操作权限,并不能完成对数据权限的业务需求。
而对于Java Web环境下Shiro授权,包含个方面的含义。
其一,对于前端来说,用户只能看到他对应访问权限的元素。
其二,当用户执行指定操作(即:访问某个uri资源)时,需要验证用户是否具备对应权限。
对于第一点,在Java Web环境下,通过Shiro提供的JSP标签实现。
<shiro:hasRole name="admin">
  <a>用户管理</a>
</shiro:hasRole>
<shiro:hasPermission name="winnebago:drive:eagle5">
  <a>操作审计</a>
</shiro:hasPermission>
必须在jsp页面中引入shiro标签库:
<%@ taglib prefix="shiro" uri="http://shiro.apache.org/tags" %>
对于第二点,与在非Java Web环境下一样,需要在后端调用API进行权限(或者角色)检验。
api调用:
String roleAdmin = "admin";
Subject currentUser = SecurityUtils.getSubject();
if(!currentUser.hasRole(roleAdmin)) {
  //todo something
}
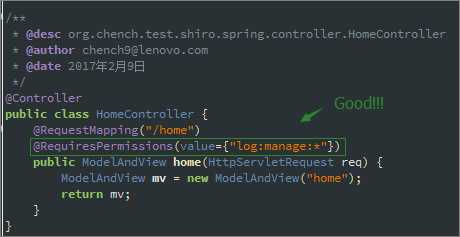
在Spring框架中集成Shiro,还可以直接通过Java注解方式实现:
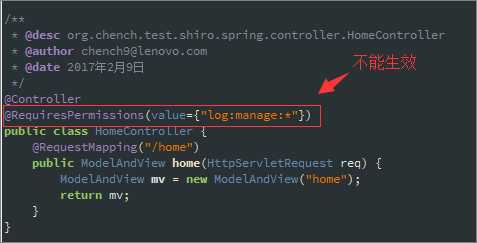
@Controller
public class HomeController {
  @RequestMapping("/home")
  @RequiresPermissions(value={"log:manage:*"})
  public ModelAndView home(HttpServletRequest req) {
    ModelAndView mv = new ModelAndView("home");
    return mv;
  }
}
6.Spring集成Shiro注意事项
假设存在如下几个配置文件,分别是:
springDAO.xml:数据源定义
springMVC.xml:Spring MVC配置
springService.xml:其他Spring组件配置
springShiro.xml:Shiro相关Bean配置
第一,在不同版本的Spring中集成Shiro,实现方式不同。
(1)在Spring 4.2.0 RELEASE+版本中集成Shiro:
web.xml:
<servlet>
  <servlet-name>SpringMVC</servlet-name>
  <servlet-class>org.springframework.web.servlet.DispatcherServlet</servlet-class>
  <init-param>
    <param-name>contextConfigLocation</param-name>
    <param-value>classpath:/spring*.xml</param-value>
  </init-param>
  <load-on-startup>1</load-on-startup>
</servlet>
<servlet-mapping>
  <servlet-name>SpringMVC</servlet-name>
  <url-pattern>/</url-pattern>
</servlet-mapping>
(2)在Spring 4.1.9 RELEASE-版本中集成Shiro:
web.xml:
<listener>
  <listener-class>org.springframework.web.context.ContextLoaderListener</listener-class>
</listener>
<context-param>
  <param-name>contextConfigLocation</param-name>
  <param-value>classpath:/springDAO.xml,classpath:/springService.xml,classpath:/springShiro.xml</param-value>
</context-param>
<servlet>
  <servlet-name>SpringMVC</servlet-name>
  <servlet-class>org.springframework.web.servlet.DispatcherServlet</servlet-class>
  <init-param>
    <param-name>contextConfigLocation</param-name>
    <param-value>classpath:/springMVC.xml</param-value>
  </init-param>
  <load-on-startup>1</load-on-startup>
</servlet>
<servlet-mapping>
  <servlet-name>SpringMVC</servlet-name>
  <url-pattern>/</url-pattern>
</servlet-mapping>
同时,还需要将在springShiro.xml中配置的org.springframework.aop.framework.autoproxy.DefaultAdvisorAutoProxyCreator放到springMVC.xml中,即:
<!-- 解决在spring 4.1.9 RELEASE及以下版本,集成shiro时注解不生效的问题 -->
<bean class="org.springframework.aop.framework.autoproxy.DefaultAdvisorAutoProxyCreator"
depends-on="lifecycleBeanPostProcessor"/>
第二,虽然shiro的注解定义是在Class级别的,但是实际验证只能支持方法级别:
@RequiresAuthentication
@RequiresPermissions
@RequiresRoles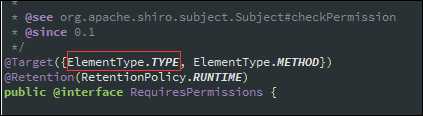
7. 完整示例
详见:https://git.oschina.net/cchanghui/test-shirospring.git
标签:业务 ebs ant 技术 sed view ring 不能 shiro
原文地址:http://www.cnblogs.com/nuccch/p/6790408.html