标签:.com because ranch append 其他 requests pid 完整 cer
消息中间件 --->就是消息队列
异步方式:不需要立马得到结果,需要排队
同步方式:需要实时获得数据,坚决不能排队
subprocess 的Q也提供不同进程之间的沟通
应用场景:
买票,抢购
堡垒机批量发送文件
[root@rabbitmq ~]# cat /etc/redhat-release
CentOS release 6.6 (Final)
[root@rabbitmq ~]# uname -r
2.6.32-504.el6.x86_64
1、安装依赖包:
yum install gcc ncurses ncurses-base ncurses-devel ncurses-libs ncurses-static ncurses-term ocaml-curses ocaml-curses-devel openssl-devel zlib-devel
openssl-devel perl xz xmlto m4 kernel-devel -y

2、下载otp_src_19.3.tar.gz
   wget http://erlang.org/download/otp_src_19.3.tar.gz

3、tar xvf otp_src_19.3.tar.gz

4、cd otp_src_19.3

5、./configure --prefix=/usr/local/erlang --with-ssl --enable-threads --enable-smp-support --enable-kernel-poll --enable-hipe --without-javac

6、make && make install

7、配置erlang环境:
   echo "export PATH=$PATH:/usr/local/erlang/bin" >>/etc/profile

   #使环境变量配置生效
   source /etc/profile

7、配置解析
[root@rabbitmq otp_src_19.3]#
echo "127.0.0.1 rabbitmq" >>/etc/hosts    #rabbitmq改成你自己主机名

备注:
启动rabbitmq报错:
[root@rabbitmq ~]# hostname
rabbitmq
然后再执行下面这步
echo "127.0.0.1 rabbitmq" >>/etc/hosts
1、下载rabbitmq-server-generic-unix-3.6.5.tar.xz
2、tar xvf rabbitmq-server-generic-unix-3.6.5.tar.xz
3、mv rabbitmq_server-3.6.5/ /usr/local/rabbitmq
4、启动:
    #启动rabbitmq服务
    /usr/local/rabbitmq/sbin/rabbitmq-server
    #后台启动
    /usr/local/rabbitmq/sbin/rabbitmq-server -detached
    #关闭rabbitmq服务
    /usr/local/rabbitmq/sbin/rabbitmqctl stop
    或
    ps -ef | grep rabbit 和 kill -9 xxx

    #开启插件管理页面
    /usr/local/rabbitmq/sbin/rabbitmq-plugins enable rabbitmq_management

    #创建用户
    /usr/local/rabbitmq/sbin/rabbitmqctl add_user rabbitadmin 123456
    /usr/local/rabbitmq/sbin/rabbitmqctl set_user_tags rabbitadmin administrator

  #给用户授权
  #[root@rabbitmq sbin]# rabbitmqctl set_permissions -p / nulige ".*" ".*" ".*"
    Setting permissions for user "nulige" in vhost "/" ...
四、登录RabbitMQ_web页面
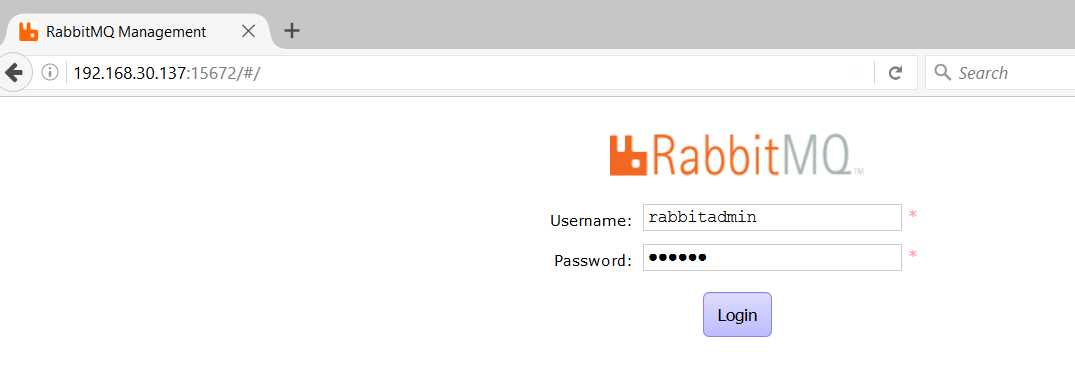
登录账号信息
 #WEB登录
  http://IP:15672
  用户名:rabbitadmin
  密码:123456
1、系统环境
[root@rabbitmq sbin]# cat /proc/version
Linux version 3.10.0-327.el7.x86_64 (builder@kbuilder.dev.centos.org) (gcc version 4.8.3 20140911 (Red Hat 4.8.3-9) (GCC) ) #1 SMP Thu Nov 19 22:10:57 UTC 2015
1.1、Centos7.x关闭防火墙
1 [root@rabbitmq /]# systemctl stop firewalld.service
2
3 [root@rabbitmq /]# systemctl disable firewalld.service
4 Removed symlink /etc/systemd/system/dbus-org.fedoraproject.FirewallD1.service.
5 Removed symlink /etc/systemd/system/basic.target.wants/firewalld.service.
如果不想关闭防火墙,可以通过如下方法处理:
1 开放5672端口:
2
3 firewall-cmd --zone=public --add-port=5672/tcp --permanent
4 firewall-cmd --reload
2、下载erlang和rabbitmq-server的rpm
http://www.rabbitmq.com/releases/erlang/erlang-19.0.4-1.el7.centos.x86_64.rpm
http://www.rabbitmq.com/releases/rabbitmq-server/v3.6.6/rabbitmq-server-3.6.6-1.el7.noarch.rpm
3、安装erlang
[root@rabbitmq ~]# cd /server/scripts/
[root@rabbitmq scripts]# ll
total 23508
-rw-r--r--. 1 root root 18580960 Jan 28 10:04 erlang-19.0.4-1.el7.centos.x86_64.rpm
-rw-r--r--. 1 root root 5487706 Jan 28 10:04 rabbitmq-server-3.6.6-1.el7.noarch.rpm
[root@rabbitmq scripts]# rpm -ivh erlang-19.0.4-1.el7.centos.x86_64.rpm
测试erlang是否安装成功:
[root@rabbitmq scripts]# erl
Erlang/OTP 19 [erts-8.0.3] [source] [64-bit] [smp:2:2] [async-threads:10] [hipe] [kernel-poll:false]
Eshell V8.0.3 (abort with ^G)
1> 5+6.
11
2> halt(). #退出
4、安装socat (备注:安装RabbitMQ必须先安装socat依赖,否则会报错)
[root@rabbitmq scripts]# yum install socat
5、安装RabbitMQ
[root@rabbitmq scripts]# rpm -ivh rabbitmq-server-3.6.6-1.el7.noarch.rpm
启动和关闭:
/sbin/service rabbitmq-server start #启动服务
/sbin/service rabbitmq-server stop #关闭服务
/sbin/service rabbitmq-server status #查看服务状态
示例:
 1 [root@rabbitmq ~]# service rabbitmq-server status
 2 Redirecting to /bin/systemctl status  rabbitmq-server.service
 3 ● rabbitmq-server.service - RabbitMQ broker
 4    Loaded: loaded (/usr/lib/systemd/system/rabbitmq-server.service; disabled; vendor preset: disabled)
 5    Active: active (running) since Sat 2017-01-28 20:20:46 CST; 8h ago
 6  Main PID: 2892 (beam.smp)
 7    Status: "Initialized"
 8    CGroup: /system.slice/rabbitmq-server.service
 9            ├─2892 /usr/lib64/erlang/erts-8.0.3/bin/beam.smp -W w -A 64 -P 1048576 -t 5000000 -st...
10            ├─3027 /usr/lib64/erlang/erts-8.0.3/bin/epmd -daemon
11            ├─3143 erl_child_setup 1024
12            ├─3153 inet_gethost 4
13            └─3154 inet_gethost 4
14
15 Jan 28 20:20:43 rabbitmq rabbitmq-server[2892]: RabbitMQ 3.6.6. Copyright (C) 2007-2016 Pivot...nc.
16 Jan 28 20:20:43 rabbitmq rabbitmq-server[2892]: ##  ##      Licensed under the MPL.  See http...om/
17 Jan 28 20:20:43 rabbitmq rabbitmq-server[2892]: ##  ##
18 Jan 28 20:20:43 rabbitmq rabbitmq-server[2892]: ##########  Logs: /var/log/rabbitmq/rabbit@ra...log  #日志存放地址
19 Jan 28 20:20:43 rabbitmq rabbitmq-server[2892]: ######  ##        /var/log/rabbitmq/rabbit@ra...log
20 Jan 28 20:20:43 rabbitmq rabbitmq-server[2892]: ##########
21 Jan 28 20:20:43 rabbitmq rabbitmq-server[2892]: Starting broker...
22 Jan 28 20:20:45 rabbitmq rabbitmq-server[2892]: systemd unit for activation check: "rabbitmq-...ce"
23 Jan 28 20:20:46 rabbitmq systemd[1]: Started RabbitMQ broker.
24 Jan 28 20:20:46 rabbitmq rabbitmq-server[2892]: completed with 0 plugins.
25 Hint: Some lines were ellipsized, use -l to show in full.
#查看端口
1 [root@rabbitmq sbin]# ps -ef|grep rabbitmq
2 rabbitmq  2892     1  0 Jan28 ?        00:01:39 /usr/lib64/erlang/erts-8.0.3/bin/beam.smp -W w -A 64 -P 1048576 -t 5000000 -stbt db -zdbbl 32000 -K true -- -root /usr/lib64/erlang -progname erl -- -home /var/lib/rabbitmq -- -pa /usr/lib/rabbitmq/lib/rabbitmq_server-3.6.6/ebin -noshell -noinput -s rabbit boot -sname rabbit@rabbitmq -boot start_sasl -kernel inet_default_connect_options [{nodelay,true}] -sasl errlog_type error -sasl sasl_error_logger false -rabbit error_logger {file,"/var/log/rabbitmq/rabbit@rabbitmq.log"} -rabbit sasl_error_logger {file,"/var/log/rabbitmq/rabbit@rabbitmq-sasl.log"} -rabbit enabled_plugins_file "/etc/rabbitmq/enabled_plugins" -rabbit plugins_dir "/usr/lib/rabbitmq/lib/rabbitmq_server-3.6.6/plugins" -rabbit plugins_expand_dir "/var/lib/rabbitmq/mnesia/rabbit@rabbitmq-plugins-expand" -os_mon start_cpu_sup false -os_mon start_disksup false -os_mon start_memsup false -mnesia dir "/var/lib/rabbitmq/mnesia/rabbit@rabbitmq" -kernel inet_dist_listen_min 25672 -kernel inet_dist_listen_max 25672
3 rabbitmq  3027     1  0 Jan28 ?        00:00:00 /usr/lib64/erlang/erts-8.0.3/bin/epmd -daemon
4 rabbitmq  3143  2892  0 Jan28 ?        00:00:01 erl_child_setup 1024
5 rabbitmq  3153  3143  0 Jan28 ?        00:00:00 inet_gethost 4
6 rabbitmq  3154  3153  0 Jan28 ?        00:00:00 inet_gethost 4
7 root     24739 21359  0 03:18 pts/0    00:00:00 grep --color=auto rabbitmq
[root@rabbitmq scripts]# cd /sbin/

[root@rabbitmq sbin]# ./rabbitmq-plugins list
Configured: E = explicitly enabled; e = implicitly enabled
| Status: * = running on rabbit@rabbitmq
|/
[ ] amqp_client 3.6.6
[ ] cowboy 1.0.3
[ ] cowlib 1.0.1
[ ] mochiweb 2.13.1
[ ] rabbitmq_amqp1_0 3.6.6
[ ] rabbitmq_auth_backend_ldap 3.6.6
[ ] rabbitmq_auth_mechanism_ssl 3.6.6
[ ] rabbitmq_consistent_hash_exchange 3.6.6
[ ] rabbitmq_event_exchange 3.6.6
[ ] rabbitmq_federation 3.6.6
[ ] rabbitmq_federation_management 3.6.6
[ ] rabbitmq_jms_topic_exchange 3.6.6
[ ] rabbitmq_management 3.6.6
[ ] rabbitmq_management_agent 3.6.6
[ ] rabbitmq_management_visualiser 3.6.6
[ ] rabbitmq_mqtt 3.6.6
[ ] rabbitmq_recent_history_exchange 1.2.1
[ ] rabbitmq_sharding 0.1.0
[ ] rabbitmq_shovel 3.6.6
[ ] rabbitmq_shovel_management 3.6.6
[ ] rabbitmq_stomp 3.6.6
[ ] rabbitmq_top 3.6.6
[ ] rabbitmq_tracing 3.6.6
[ ] rabbitmq_trust_store 3.6.6
[ ] rabbitmq_web_dispatch 3.6.6
[ ] rabbitmq_web_stomp 3.6.6
[ ] rabbitmq_web_stomp_examples 3.6.6
[ ] sockjs 0.3.4
[ ] webmachine 1.10.3
#查看状态
#查看状态

[root@rabbitmq sbin]# ./rabbitmqctl status
Status of node rabbit@rabbitmq ...
[{pid,2892},
{running_applications,[{rabbit,"RabbitMQ","3.6.6"},
{mnesia,"MNESIA CXC 138 12","4.14"},
{rabbit_common,[],"3.6.6"},
{xmerl,"XML parser","1.3.11"},
{os_mon,"CPO CXC 138 46","2.4.1"},
{ranch,"Socket acceptor pool for TCP protocols.",
"1.2.1"},
{sasl,"SASL CXC 138 11","3.0"},
{stdlib,"ERTS CXC 138 10","3.0.1"},
{kernel,"ERTS CXC 138 10","5.0.1"}]},
{os,{unix,linux}},
{erlang_version,"Erlang/OTP 19 [erts-8.0.3] [source] [64-bit] [smp:2:2] [async-threads:64] [hipe] [kernel-poll:true]\n"},
{memory,[{total,39981872},
{connection_readers,0},
{connection_writers,0},
{connection_channels,0},
{connection_other,0},
{queue_procs,2832},
{queue_slave_procs,0},
{plugins,0},
{other_proc,13381568},
{mnesia,60888},
{mgmt_db,0},
{msg_index,45952},
{other_ets,952928},
{binary,13072},
{code,17760058},
{atom,752561},
{other_system,7012013}]},
{alarms,[]},
{listeners,[{clustering,25672,"::"},{amqp,5672,"::"}]},
{vm_memory_high_watermark,0.4},
{vm_memory_limit,768666828},
{disk_free_limit,50000000},
{disk_free,17276772352},
{file_descriptors,[{total_limit,924},
{total_used,2},
{sockets_limit,829},
{sockets_used,0}]},
{processes,[{limit,1048576},{used,138}]},
{run_queue,0},
{uptime,1060},
{kernel,{net_ticktime,60}}]
#查看队列消息

[root@rabbitmq sbin]# rabbitmqctl list_queues
Listing queues ...

hello 1

...done.
#新增用户命令,并设置用户名和密码

语法:

rabbitmqctl  add_user  Username  Password

示例:

增加用户名:admin,密码:admin

[root@rabbitmq sbin]# ./rabbitmqctl add_user admin admin
Creating user "admin" ...


#设置用户权限命令(权限:超级管理员)
[root@rabbitmq sbin]# ./rabbitmqctl set_user_tags admin administraotr
Setting tags for user "admin" to [administraotr] ...


#查看用户列表命令
[root@rabbitmq sbin]# ./rabbitmqctl list_users
Listing users ...
admin    [administraotr]
guest    [administrator]


#删除用户命令

rabbitmqctl  delete_user  Username


#修改用户的密码命令

rabbitmqctl  change_password  Username  Newpassword


#启用web管理

[root@rabbitmq sbin]# ./rabbitmq-plugins enable rabbitmq_management
The following plugins have been enabled:
mochiweb
webmachine
rabbitmq_web_dispatch
amqp_client
rabbitmq_management_agent
rabbitmq_management
Applying plugin configuration to rabbit@rabbitmq... started 6 plugins.
查看rabbitmq安装目录
[root@rabbitmq sbin]# whereis rabbitmq
rabbitmq: /usr/lib/rabbitmq /etc/rabbitmq
#出于安全考虑,guest这个默认用户只能通过http://localhost:15672来登录,其他的IP无法直接用这个guest帐号访问。
我们可以通过修改配置文件来实现远程登录管理界面。
#添加配置文件rabbitmq.config
[root@rabbitmq ~]# cd /etc/rabbitmq/
[root@rabbitmq rabbitmq]# vi rabbitmq.config #默认没有这个文件,需要自己创建
[
{rabbit, [{tcp_listeners, [5672]}, {loopback_users, ["nulige"]}]}
].
#添加用户为:nulige ,密码:123456
[root@rabbitmq /]# cd /sbin/
[root@rabbitmq sbin]# rabbitmqctl add_user nulige 123456
Creating user "nulige" ...
#用户设置为administrator才能远程访问
[root@rabbitmq sbin]# rabbitmqctl set_user_tags nulige administrator
Setting tags for user "nulige" to [administrator] ...
[root@rabbitmq sbin]# rabbitmqctl set_permissions -p / nulige ".*" ".*" ".*"
Setting permissions for user "nulige" in vhost "/" ...
语法:
|
1
|
set_permissions [-p <vhost>] <user> <conf> <write> <read> |
#设置完成,重启服务生效
service rabbitmq-server stop
service rabbitmq-server start
此时就可以从外部访问了,但此时再看log文件,发现内容还是原来的,还是显示没有找到配置文件,可以手动删除这个文件再重启服务,不过这不影响使用。
1 rm rabbit\@mythsky.log  #删除日志文件再重启服务
2 service rabbitmq-server stop
3 service rabbitmq-server start
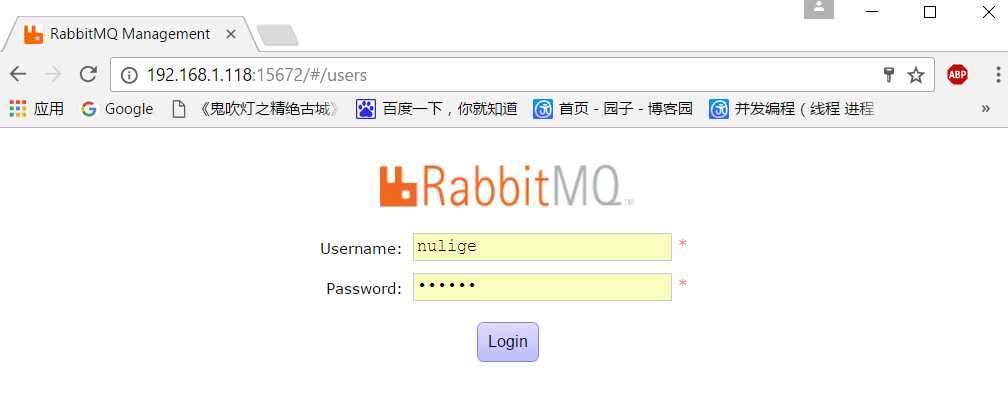
访问网站方法:
http://ip:15672/#/users
7、用户角色
按照个人理解,用户角色可分为五类,超级管理员, 监控者, 策略制定者, 普通管理者以及其他。
(1) 超级管理员(administrator)
可登陆管理控制台(启用management plugin的情况下),可查看所有的信息,并且可以对用户,策略(policy)进行操作。
(2) 监控者(monitoring)
可登陆管理控制台(启用management plugin的情况下),同时可以查看rabbitmq节点的相关信息(进程数,内存使用情况,磁盘使用情况等)
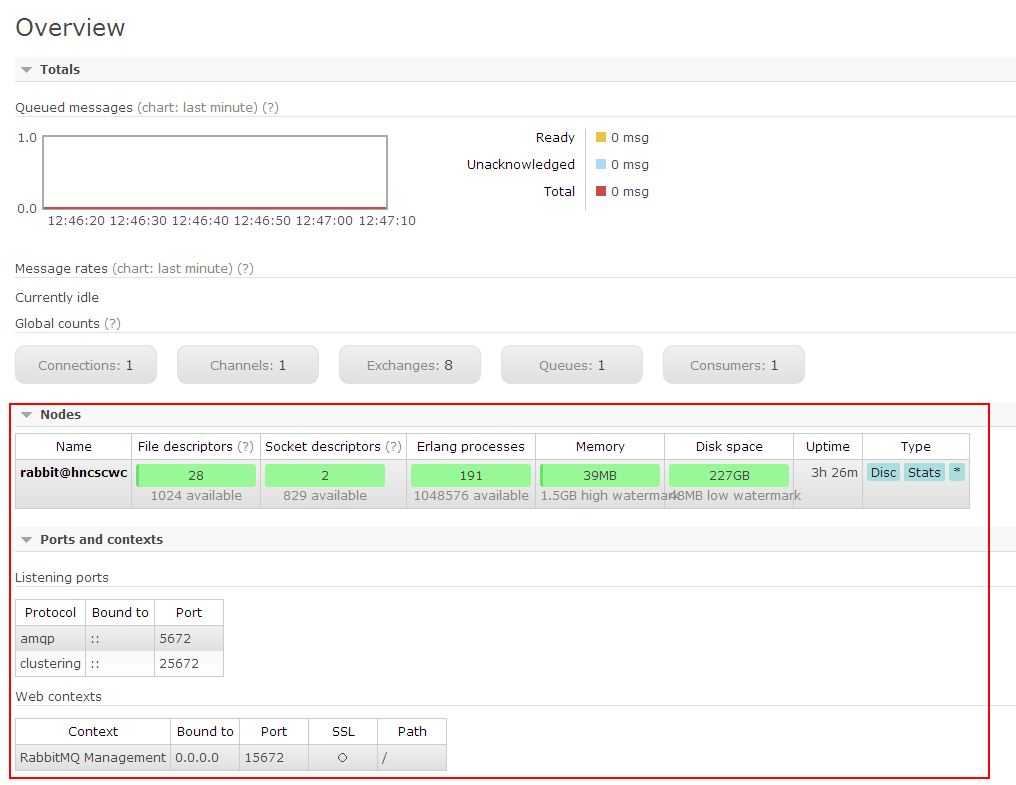
(3) 策略制定者(policymaker)
可登陆管理控制台(启用management plugin的情况下), 同时可以对policy进行管理。但无法查看节点的相关信息(上图红框标识的部分)。

与administrator的对比,administrator能看到这些内容

(4) 普通管理者(management)
仅可登陆管理控制台(启用management plugin的情况下),无法看到节点信息,也无法对策略进行管理。
(5) 其他
无法登陆管理控制台,通常就是普通的生产者和消费者。
了解了这些后,就可以根据需要给不同的用户设置不同的角色,以便按需管理。
设置用户角色的命令为:
rabbitmqctl set_user_tags User Tag
User为用户名, Tag为角色名(对应于上面的administrator,monitoring,policymaker,management,或其他自定义名称)。
也可以给同一用户设置多个角色,例如
rabbitmqctl set_user_tags hncscwc monitoring policymaker
8、用户权限
用户权限指的是用户对exchange,queue的操作权限,包括配置权限,读写权限。配置权限会影响到exchange,queue的声明和删除。读写权限影响到从queue里取消息,向exchange发送消息以及queue和exchange的绑定(bind)操作。
例如: 将queue绑定到某exchange上,需要具有queue的可写权限,以及exchange的可读权限;向exchange发送消息需要具有exchange的可写权限;从queue里取数据需要具有queue的可读权限。详细请参考官方文档中"How permissions work"部分。
相关命令为:
(1) 设置用户权限
rabbitmqctl set_permissions -p VHostPath User ConfP WriteP ReadP
(2) 查看(指定hostpath)所有用户的权限信息
rabbitmqctl list_permissions [-p VHostPath]
(3) 查看指定用户的权限信息
rabbitmqctl list_user_permissions User
(4) 清除用户的权限信息
rabbitmqctl clear_permissions [-p VHostPath] User
命令详细参考官方文档:rabbitmqctl
安装参考文章:http://www.cnblogs.com/liaojie970/p/6138278.html
RabbitMQ系统优化参考:http://www.blogjava.net/qbna350816/archive/2016/08/02/431415.aspx
官网优化参考地址:http://www.rabbitmq.com/configure.html
mac系统安装
参考: http://www.rabbitmq.com/install-standalone-mac.html
9、安装python rabbitMQ module (在windows系统上面安装)
|
1
2
3
4
5
6
7
|
pip install pikaoreasy_install pikaor源码 https://pypi.python.org/pypi/pika |
10、几种典型的使用场景,参考官网:
https://www.rabbitmq.com/tutorials/tutorial-one-python.html
send端
 1 #!/usr/bin/env python
 2 import pika
 3
 4 connection = pika.BlockingConnection(pika.ConnectionParameters(
 5                ‘localhost‘))      #localhost改成:192.168.1.118
 6 channel = connection.channel()    #建立了rabbit协议的通道
 7
 8 #声明queue
 9 channel.queue_declare(queue=‘hello‘)
10
11 #n RabbitMQ a message can never be sent directly to the queue, it always needs to go through an exchange.
12 channel.basic_publish(exchange=‘‘,
13                       routing_key=‘hello‘,
14                       body=‘Hello World!‘)
15 print(" [x] Sent ‘Hello World!‘")
16 connection.close()
receive端
 1 #!/usr/bin/env python
 2 # -*- coding:utf-8 -*-
 3 #Author: nulige
 4
 5 import pika
 6
 7 connection = pika.BlockingConnection(pika.ConnectionParameters(
 8     ‘localhost‘))
 9 channel = connection.channel()
10
11 # You may ask why we declare the queue again ? we have already declared it in our previous code.
12 # We could avoid that if we were sure that the queue already exists. For example if send.py program
13 # was run before. But we‘re not yet sure which program to run first. In such cases it‘s a good
14 # practice to repeat declaring the queue in both programs.
15 #通道的实例
    channel.queue_declare(queue=‘hello‘)
16
17
18 def callback(ch, method, properties, body):
19     print(" [x] Received %r" % body)
20
21 #收到消息就调用这个
22 channel.basic_consume(callback,
23                       queue=‘hello‘,
24                       no_ack=True)
25
26 print(‘ [*] Waiting for messages. To exit press CTRL+C‘)
27 channel.start_consuming()    #开始消息,是个死循环,一直监听收消息
在linux系统中,通过: rabbitmqctl list_queues 查看消息。

在这种模式下,RabbitMQ会默认把p发的消息依次分发给各个消费者(c),跟负载均衡差不多。
消息提供者代码
 1 import pika
 2 import time
 3 connection = pika.BlockingConnection(pika.ConnectionParameters(
 4     ‘localhost‘))
 5 channel = connection.channel()
 6
 7 # 声明queue
 8 channel.queue_declare(queue=‘task_queue‘)
 9
10 # n RabbitMQ a message can never be sent directly to the queue, it always needs to go through an exchange.
11 import sys
12
13 message = ‘ ‘.join(sys.argv[1:]) or "Hello World! %s" % time.time()
14 channel.basic_publish(exchange=‘‘,
15                       routing_key=‘task_queue‘,
16                       body=message,
17                       properties=pika.BasicProperties(
18                           delivery_mode=2,  # make message persistent(就是消息持久化)
19                       )
20                       )
21 print(" [x] Sent %r" % message)
22 connection.close()
消费者代码
 1 #_*_coding:utf-8_*_
 2
 3 import pika, time
 4
 5 connection = pika.BlockingConnection(pika.ConnectionParameters(
 6     ‘localhost‘))
 7 channel = connection.channel()
 8
 9
10 def callback(ch, method, properties, body):
11     print(" [x] Received %r" % body)
12     time.sleep(20)
13     print(" [x] Done")
14     print("method.delivery_tag",method.delivery_tag)
15     ch.basic_ack(delivery_tag=method.delivery_tag)   #消息者端吃完包子,返回包子标识符
16
17
18 channel.basic_consume(callback,
19                       queue=‘task_queue‘,
20                       no_ack=True  #no_ack=True消息不需要确认,默认no_ack=false,消息需要确认
21                       )
22
23 print(‘ [*] Waiting for messages. To exit press CTRL+C‘)
24 channel.start_consuming()
此时,先启动消息生产者,然后再分别启动3个消费者,通过生产者多发送几条消息,你会发现,这几条消息会被依次分配到各个消费者身上
Doing a task can take a few seconds. You may wonder what happens if one of the consumers starts a long task and dies with it only partly done. With our current code once RabbitMQ delivers message to the customer it immediately removes it from memory. In this case, if you kill a worker we will lose the message it was just processing. We‘ll also lose all the messages that were dispatched to this particular worker but were not yet handled.
But we don‘t want to lose any tasks. If a worker dies, we‘d like the task to be delivered to another worker.
In order to make sure a message is never lost, RabbitMQ supports message acknowledgments. An ack(nowledgement) is sent back from the consumer to tell RabbitMQ that a particular message had been received, processed and that RabbitMQ is free to delete it.
If a consumer dies (its channel is closed, connection is closed, or TCP connection is lost) without sending an ack, RabbitMQ will understand that a message wasn‘t processed fully and will re-queue it. If there are other consumers online at the same time, it will then quickly redeliver it to another consumer. That way you can be sure that no message is lost, even if the workers occasionally die.
There aren‘t any message timeouts; RabbitMQ will redeliver the message when the consumer dies. It‘s fine even if processing a message takes a very, very long time.
Message acknowledgments are turned on by default. In previous examples we explicitly turned them off via the no_ack=True flag. It‘s time to remove this flag and send a proper acknowledgment from the worker, once we‘re done with a task.
1 def callback(ch, method, properties, body):
2     print " [x] Received %r" % (body,)
3     time.sleep( body.count(‘.‘) )
4     print " [x] Done"
5     ch.basic_ack(delivery_tag = method.delivery_tag)
6
7 channel.basic_consume(callback,
8                       queue=‘hello‘)
Using this code we can be sure that even if you kill a worker using CTRL+C while it was processing a message, nothing will be lost. Soon after the worker dies all unacknowledged messages will be redelivered。
We have learned how to make sure that even if the consumer dies, the task isn‘t lost(by default, if wanna disable use no_ack=True). But our tasks will still be lost if RabbitMQ server stops.
When RabbitMQ quits or crashes it will forget the queues and messages unless you tell it not to. Two things are required to make sure that messages aren‘t lost: we need to mark both the queue and messages as durable.
First, we need to make sure that RabbitMQ will never lose our queue. In order to do so, we need to declare it as durable:
|
1
|
channel.queue_declare(queue=‘hello‘, durable=True) |
Although this command is correct by itself, it won‘t work in our setup. That‘s because we‘ve already defined a queue called hello which is not durable. RabbitMQ doesn‘t allow you to redefine an existing queue with different parameters and will return an error to any program that tries to do that. But there is a quick workaround - let‘s declare a queue with different name, for exampletask_queue:
|
1
|
channel.queue_declare(queue=‘task_queue‘, durable=True) |
This queue_declare change needs to be applied to both the producer and consumer code.
At that point we‘re sure that the task_queue queue won‘t be lost even if RabbitMQ restarts. Now we need to mark our messages as persistent - by supplying a delivery_mode property with a value 2.
|
1
2
3
4
5
6
|
channel.basic_publish(exchange=‘‘, routing_key="task_queue", body=message, properties=pika.BasicProperties( delivery_mode = 2, # make message persistent )) |
如果Rabbit只管按顺序把消息发到各个消费者身上,不考虑消费者负载的话,很可能出现,一个机器配置不高的消费者那里堆积了很多消息处理不完,同时配置高的消费者却一直很轻松。为解决此问题,可以在各个消费者端,配置perfetch=1,意思就是告诉RabbitMQ在我这个消费者当前消息还没处理完的时候就不要再给我发新消息了。

1 channel.basic_qos(prefetch_count=1)
生产者端带消息持久化+公平分发的完整代码
 1 #!/usr/bin/env python
 2 import pika
 3 import sys
 4
 5 connection = pika.BlockingConnection(pika.ConnectionParameters(
 6         host=‘localhost‘))
 7 channel = connection.channel()
 8 #队列持久化
 9 channel.queue_declare(queue=‘task_queue‘, durable=True)
10
11 message = ‘ ‘.join(sys.argv[1:]) or "Hello World!"
12 #消息持久化
   channel.basic_publish(exchange=‘‘,
13                       routing_key=‘task_queue‘,
14                       body=message,
15                       properties=pika.BasicProperties(
16                          delivery_mode = 2, # make message persistent
17                       ))
18 print(" [x] Sent %r" % message)
19 connection.close()
消费者端
 1 #!/usr/bin/env python
 2 import pika
 3 import time
 4
 5 connection = pika.BlockingConnection(pika.ConnectionParameters(
 6         host=‘localhost‘))
 7 channel = connection.channel()
 8
 9 channel.queue_declare(queue=‘task_queue‘, durable=True)
10 print(‘ [*] Waiting for messages. To exit press CTRL+C‘)
11
12 def callback(ch, method, properties, body):
13     print(" [x] Received %r" % body)
14     time.sleep(body.count(b‘.‘))
15     print(" [x] Done")
16     ch.basic_ack(delivery_tag = method.delivery_tag)
17
18 channel.basic_qos(prefetch_count=1)
19 channel.basic_consume(callback,
20                       queue=‘task_queue‘)
21
22 channel.start_consuming()
示例:
rabbit.py (发送消息)
 1 import pika
 2
 3 credentials = pika.PlainCredentials(‘nulige‘, ‘123456‘)
 4 # connection = pika.BlockingConnection(pika.ConnectionParameters(host=url_1,
 5 #                                      credentials=credentials, ssl=ssl, port=port))
 6 connection = pika.BlockingConnection(pika.ConnectionParameters(
 7     host=‘192.168.1.118‘,credentials=credentials))
 8
 9 channel = connection.channel()
10
11 # 声明queue
12 channel.queue_declare(queue=‘nulige‘,durable=True)
13
14 # n RabbitMQ a message can never be sent directly to the queue, it always needs to go through an exchange.
15 channel.basic_publish(exchange=‘‘,
16                       routing_key=‘nulige‘, #send msg to this queue
17                       body=‘Hello World!23‘,
18                       properties=pika.BasicProperties(
19                           delivery_mode=2,  # make message persistent
20                       )
21                       )
22
23
24 print(" [x] Sent ‘Hello World!2‘")
25 connection.close()
rabbit_recv.py (接收消息)
 1 import pika
 2 import time
 3 credentials = pika.PlainCredentials(‘nulige‘, ‘123456‘)
 4 connection = pika.BlockingConnection(pika.ConnectionParameters(
 5     host=‘192.168.1.118‘,credentials=credentials))
 6
 7 channel = connection.channel()
 8 # You may ask why we declare the queue again ? we have already declared it in our previous code.
 9 # We could avoid that if we were sure that the queue already exists. For example if send.py program
10 # was run before. But we‘re not yet sure which program to run first. In such cases it‘s a good
11 # practice to repeat declaring the queue in both programs.
12 channel.queue_declare(queue=‘nulige‘,durable=True)
13
14
15 def callback(ch, method, properties, body):
16     print(ch, method, properties)
17
18     print(" [x] Received %r" % body)
19     time.sleep(1)
20
21
22 channel.basic_consume(callback,
23                       queue=‘nulige‘,
24                       #no_ack=True
25                       )
26 channel.basic_qos(prefetch_count=1)
27 print(‘ [*] Waiting for messages. To exit press CTRL+C‘)
28 channel.start_consuming()
执行结果:
 View Code
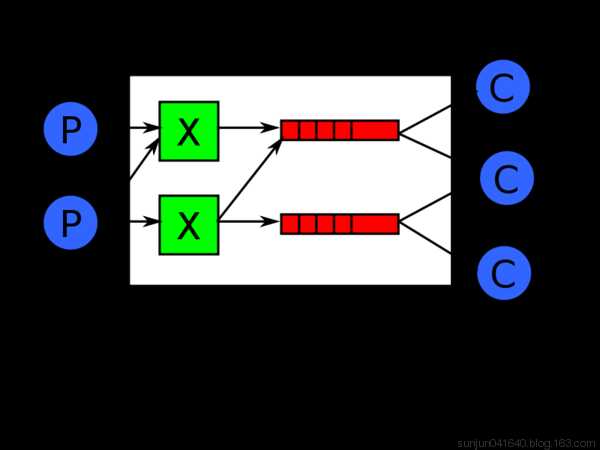
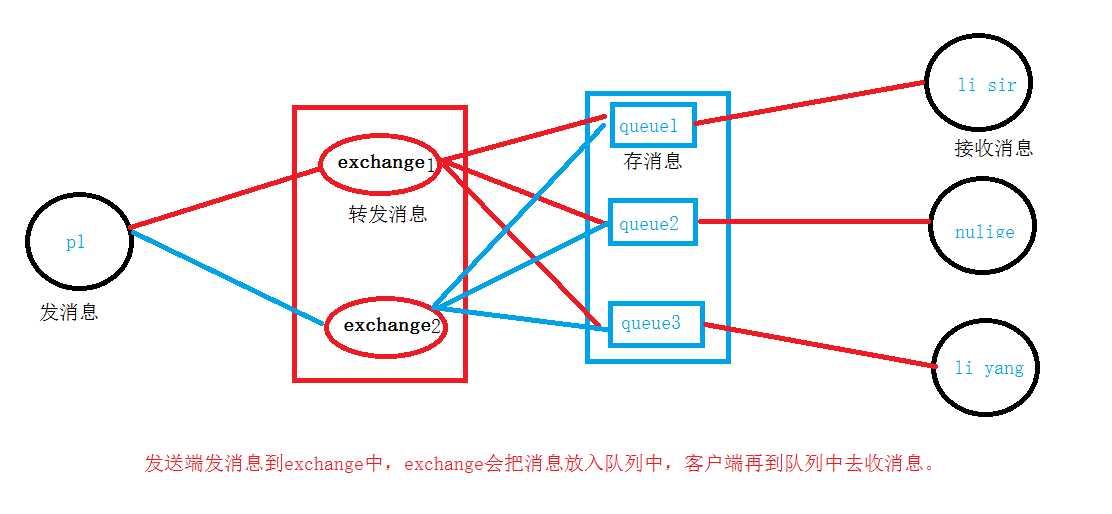
之前的例子都基本都是1对1的消息发送和接收,即消息只能发送到指定的queue里,但有些时候你想让你的消息被所有的Queue收到,类似广播的效果,这时候就要用到exchange了,
An exchange is a very simple thing. On one side it receives messages from producers and the other side it pushes them to queues. The exchange must know exactly what to do with a message it receives. Should it be appended to a particular queue? Should it be appended to many queues? Or should it get discarded. The rules for that are defined by the exchange type.
译:
交换是件很简单的事。在一端从生产者那里收消息,并将它们推送到queue中。Exchange必须非常清楚的知道。他从生产者那里收到的消息,要发给谁? 他是应该被追加到一个具体的queue里,还是发送到多个queue里,或者它应该被丢弃。该规则由Exchange类型定义。
Exchange的作用就是转发消息,给订阅者发消息。
Exchange在定义的时候是有类型的,以决定到底是哪些Queue符合条件,可以接收消息。(一共有四种类型)
1、fanout: 所有bind到此exchange的queue都可以接收消息 (给所有人发消息)
2、direct: 通过routingKey和exchange决定的那个唯一的queue可以接收消息 (给指定的一些queue发消息)
3、topic(话题):所有符合routingKey(此时可以是一个表达式)的routingKey所bind的queue可以接收消息 (给订阅话题的人发消息)
表达式符号说明:#代表一个或多个字符,*代表任何字符
示例:#.a会匹配a.a,aa.a,aaa.a等
*.a会匹配a.a,b.a,c.a等
备注:使用RoutingKey为#,Exchange Type为topic的时候相当于使用fanout
4、headers: 通过headers 来决定把消息发给哪些queue (通过消息头,决定发送给哪些队列)

应用场景:
例如:视频直播
例如:新浪微博
一个明星,他有几千万的订阅用户,粉丝们想要收到他发送的微博消息(这里指:微博订阅的在线用户发送消息,不发给不在线的用户,发送消息)
rabbit_fanout_send.py(发送端)
 1 import pika
 2 import sys
 3
 4 credentials = pika.PlainCredentials(‘nulige‘, ‘123456‘)
 5 connection = pika.BlockingConnection(pika.ConnectionParameters(
 6     host=‘192.168.1.118‘,credentials=credentials))
 7
 8 channel = connection.channel()
 9 channel.exchange_declare(exchange=‘logs‘, type=‘fanout‘) #发送消息类型为fanout,就是给所有人发消息
10
11 #如果等于空,就输出hello world!
12 message = ‘ ‘.join(sys.argv[1:]) or "info: Hello World!"
13
14
15 channel.basic_publish(exchange=‘logs‘,
16                       routing_key=‘‘,
17                       body=message)
18
19 print(" [x] Sent %r" % message)
20 connection.close()
rabbit_fanout_send.py(接收端)
 1 import pika
 2
 3 credentials = pika.PlainCredentials(‘nulige‘, ‘123456‘)
 4 connection = pika.BlockingConnection(pika.ConnectionParameters(
 5     host=‘192.168.1.118‘,credentials=credentials))
 6
 7 channel = connection.channel()
 8
 9 channel.exchange_declare(exchange=‘logs‘,type=‘fanout‘)#指定发送类型
10 #必须能过queue来收消息
11 result = channel.queue_declare(exclusive=True)  # 不指定queue名字,rabbit会随机分配一个名字,exclusive=True会在使用此queue的消费者断开后,自动将queue删除
12
13 queue_name = result.method.queue
14
15 channel.queue_bind(exchange=‘logs‘,queue=queue_name)  #随机生成的Q,绑定到exchange上面。
16
17 print(‘ [*] Waiting for logs. To exit press CTRL+C‘)
18
19 def callback(ch, method, properties, body):
20     print(" [x] %r" % body)
21
22
23 channel.basic_consume(callback,
24                       queue=queue_name,
               #no_ack=True,
25                       )
26 channel.start_consuming()
执行结果:
View CodeRabbitMQ还支持根据关键字发送,即:队列绑定关键字,发送者将数据根据关键字发送到消息exchange,exchange根据 关键字 判定应该将数据发送至指定队列。

示例:
rabbit_direct_send.py(发送端)
 1 import pika
 2 import sys
 3
 4 credentials = pika.PlainCredentials(‘nulige‘, ‘123456‘)
 5 connection = pika.BlockingConnection(pika.ConnectionParameters(
 6     host=‘192.168.1.118‘,credentials=credentials))
 7
 8 channel = connection.channel()
 9
10 channel.exchange_declare(exchange=‘direct_logs‘,type=‘direct‘) #指定类型
11
12 severity = sys.argv[1] if len(sys.argv) > 1 else ‘info‘  #严重程序,级别;判定条件到底是info,还是空,后面接消息
13
14 message = ‘ ‘.join(sys.argv[2:]) or ‘Hello World!‘  #消息
15
16 channel.basic_publish(exchange=‘direct_logs‘,
17                       routing_key=severity, #绑定的是:error  指定关键字(哪些队列绑定了,这个级别,那些队列就可以收到这个消息)
18                       body=message)
19
20 print(" [x] Sent %r:%r" % (severity, message))
21 connection.close()
rabbit_direct_recv.py(接收端)
 1 import pika
 2 import sys
 3
 4 credentials = pika.PlainCredentials(‘nulige‘, ‘123456‘)
 5 connection = pika.BlockingConnection(pika.ConnectionParameters(
 6     host=‘192.168.1.118‘,credentials=credentials))
 7 channel = connection.channel()
 8
 9 channel.exchange_declare(exchange=‘direct_logs‘,type=‘direct‘)
10 result = channel.queue_declare(exclusive=True)
11 queue_name = result.method.queue
12
13 severities = sys.argv[1:]   #接收那些消息(指info,还是空),没写就报错
14 if not severities:
15     sys.stderr.write("Usage: %s [info] [warning] [error]\n" % sys.argv[0]) #定义了三种接收消息方式info,warning,error
16     sys.exit(1)
17
18 for severity in severities: #[error  info  warning],循环severities
19     channel.queue_bind(exchange=‘direct_logs‘,
20                        queue=queue_name,
21                        routing_key=severity)  #循环绑定关键字
22 print(‘ [*] Waiting for logs. To exit press CTRL+C‘)
23
24 def callback(ch, method, properties, body):
25     print(" [x] %r:%r" % (method.routing_key, body))
26
27 channel.basic_consume(callback,queue=queue_name,)
28 channel.start_consuming()
执行结果:
 1 首先,设置接收类型为:info、warning、 error 三个中的其中一种或多种类型,再从发送端指定发送给那种类型,后面再接要发送的消息。
 2
 3 #接收端
 4 D:\python\day42>python3 rabbit_direct_recv.py info error  #指定接收类型为info、erron
 5
 6  [*] Waiting for logs. To exit press CTRL+C
 7  [x] ‘error‘:b‘err_hpappend‘  #接收到的消息
 8
 9 D:\python\day42>python3 rabbit_direct_recv.py info warning  #指定接收类型为warning
10
11  [*] Waiting for logs. To exit press CTRL+C
12  [x] ‘warning‘:b‘nulige‘  #接收到的消息
13
14
15 #发送端                                        发送类型   消息
16 D:\python\day42>python3 rabbit_direct_send.py error err_hpappend
17  [x] Sent ‘error‘:‘err_hpappend‘
18 D:\python\day42>python3 rabbit_direct_send.py warning nulige
19 [x] Sent ‘warning‘:‘nulige‘
Although using the direct exchange improved our system, it still has limitations - it can‘t do routing based on multiple criteria.
In our logging system we might want to subscribe to not only logs based on severity, but also based on the source which emitted the log. You might know this concept from the syslog unix tool, which routes logs based on both severity (info/warn/crit...) and facility (auth/cron/kern...).
That would give us a lot of flexibility - we may want to listen to just critical errors coming from ‘cron‘ but also all logs from ‘kern‘.

topi: 意思是话题
To receive all the logs run:
python receive_logs_topic.py "#" #绑定#号,就是收所有消息,相当于广播
To receive all logs from the facility "kern":
python receive_logs_topic.py "kern.*" #以kern开头
Or if you want to hear only about "critical" logs:
python receive_logs_topic.py "*.critical" #以critical结尾
You can create multiple bindings:
python receive_logs_topic.py "kern.*" "*.critical" #收kern开头并且以critical结尾(相当于收两个)
And to emit a log with a routing key "kern.critical" type:
python emit_log_topic.py "kern.critical" "A critical kernel error" #发消息到kern.critical里,内容是:
A critical kernel error
示例:
rabbit_topic_send.py (生产者是发送端)
 1 import pika
 2 import sys
 3
 4 credentials = pika.PlainCredentials(‘nulige‘, ‘123456‘)
 5 connection = pika.BlockingConnection(pika.ConnectionParameters(
 6     host=‘192.168.1.118‘,credentials=credentials))
 7
 8 channel = connection.channel()
 9
10 channel.exchange_declare(exchange=‘topic_logs‘,type=‘topic‘) #指定类型
11
12 routing_key = sys.argv[1] if len(sys.argv) > 1 else ‘anonymous.info‘
13
14 message = ‘ ‘.join(sys.argv[2:]) or ‘Hello World!‘  #消息
15
16 channel.basic_publish(exchange=‘topic_logs‘,
17                       routing_key=routing_key,
18                       body=message)
19 print(" [x] Sent %r:%r" % (routing_key, message))
20 connection.close()
rabbit_topic_recv.py (消费者是接收端)单向的
 1 import pika
 2 import sys
 3
 4 credentials = pika.PlainCredentials(‘nulige‘, ‘123456‘)
 5 connection = pika.BlockingConnection(pika.ConnectionParameters(
 6     host=‘192.168.1.118‘,credentials=credentials))
 7
 8 channel = connection.channel()
 9 channel.exchange_declare(exchange=‘topic_logs‘,type=‘topic‘)
10
11 result = channel.queue_declare(exclusive=True)
12 queue_name = result.method.queue
13
14 binding_keys = sys.argv[1:]
15 if not binding_keys:
16     sys.stderr.write("Usage: %s [binding_key]...\n" % sys.argv[0])
17     sys.exit(1)
18
19 for binding_key in binding_keys:
20     channel.queue_bind(exchange=‘topic_logs‘,
21                        queue=queue_name,
22                        routing_key=binding_key)
23
24 print(‘ [*] Waiting for logs. To exit press CTRL+C‘)
25
26 def callback(ch, method, properties, body):
27     print(" [x] %r:%r" % (method.routing_key, body))
28
29 channel.basic_consume(callback,queue=queue_name)
30
31 channel.start_consuming()
执行结果:
 1 #接收端
 2 D:\python\day42>python3 rabbit_topic_recv.py error
 3  [*] Waiting for logs. To exit press CTRL+C
 4  [x] ‘error‘:b‘mysql has error‘
 5
 6
 7 D:\python\day42>python3 rabbit_topic_recv.py *.warning mysql.*
 8  [*] Waiting for logs. To exit press CTRL+C
 9  [x] ‘mysql.error‘:b‘mysql has error‘
10
11
12 D:\python\day42>python3 rabbit_topic_send.py mysql.info "mysql has error"
13  [x] Sent ‘mysql.info‘:‘mysql has error‘
14
15
16 D:\python\day42>python3 rabbit_topic_recv.py *.error.*
17  [*] Waiting for logs. To exit press CTRL+C
18  [x] ‘mysql.error.‘:b‘mysql has error‘
19
20
21 #发送端                                指定类型:error      消息内容
22 D:\python\day42>python3 rabbit_topic_send.py error "mysql has error"
23  [x] Sent ‘error‘:‘mysql has error‘
24
25
26 D:\python\day42>python3 rabbit_topic_send.py mysql.error "mysql has error"
27  [x] Sent ‘mysql.error‘:‘mysql has error‘
28  [x] ‘mysql.info‘:b‘mysql has error‘
29
30
31 D:\python\day42>python3 rabbit_topic_send.py mysql.error. "mysql has error"
32  [x] Sent ‘mysql.error.‘:‘mysql has error‘
To illustrate how an RPC service could be used we‘re going to create a simple client class. It‘s going to expose a method named call which sends an RPC request and blocks until the answer is received:
|
1
2
3
|
fibonacci_rpc = FibonacciRpcClient()result = fibonacci_rpc.call(4)print("fib(4) is %r" % result) |

应用场景:
示例:实现RPC服务功能

代码:
rabbit_rpc_send.py(生产者是发送端)
 1 import pika
 2 import uuid
 3
 4 class SSHRpcClient(object):
 5     def __init__(self):
 6         credentials = pika.PlainCredentials(‘nulige‘, ‘123456‘)
 7         self.connection = pika.BlockingConnection(pika.ConnectionParameters(
 8                             host=‘192.168.1.118‘,credentials=credentials))
 9
10         self.channel = self.connection.channel()
11
12         result = self.channel.queue_declare(exclusive=True) #客户端的结果必须要返回到这个queue
13         self.callback_queue = result.method.queue
14
15         self.channel.basic_consume(self.on_response,queue=self.callback_queue) #声明从这个queue里收结果
16
17     def on_response(self, ch, method, props, body):
18         if self.corr_id == props.correlation_id: #任务标识符
19             self.response = body
20             print(body)
21
22     # 返回的结果,放在callback_queue中
23     def call(self, n):
24         self.response = None
25         self.corr_id = str(uuid.uuid4()) #唯一标识符
26         self.channel.basic_publish(exchange=‘‘,
27                                    routing_key=‘rpc_queue3‘,  #声明一个Q
28                                    properties=pika.BasicProperties(
29                                        reply_to=self.callback_queue,
30                                        correlation_id=self.corr_id,
31                                    ),
32                                    body=str(n))
33
34         print("start waiting for cmd result ")
35         count = 0
36         while self.response is None: #如果命令没返回结果
37             print("loop ",count)
38             count +=1
39             self.connection.process_data_events() #以不阻塞的形式去检测有没有新事件
40             #如果没事件,那就什么也不做, 如果有事件,就触发on_response事件
41         return self.response
42
43 ssh_rpc = SSHRpcClient()
44
45 print(" [x] sending cmd")
46 response = ssh_rpc.call("ipconfig")
47
48 print(" [.] Got result ")
49 print(response.decode("gbk"))
rabbit_rpc_recv.py(消费端是接收端)
 1 import pika
 2 import time
 3 import subprocess
 4
 5 credentials = pika.PlainCredentials(‘nulige‘, ‘123456‘)
 6 connection = pika.BlockingConnection(pika.ConnectionParameters(
 7     host=‘192.168.1.118‘, credentials=credentials))
 8
 9 channel = connection.channel()
10 channel.queue_declare(queue=‘rpc_queue3‘)
11
12 def SSHRPCServer(cmd):
13
14     print("recv cmd:",cmd)
15     cmd_obj = subprocess.Popen(cmd.decode(),shell=True,stdout=subprocess.PIPE,stderr=subprocess.PIPE)
16
17     result = cmd_obj.stdout.read() or cmd_obj.stderr.read()
18     return result
19
20 def on_request(ch, method, props, body):
21
22     print(" [.] fib(%s)" % body)
23     response = SSHRPCServer(body)
24
25     ch.basic_publish(exchange=‘‘,
26                      routing_key=props.reply_to,
27                      properties=pika.BasicProperties(correlation_id= 28                                                          props.correlation_id),
29                      body=response)
30
31 channel.basic_consume(on_request, queue=‘rpc_queue3‘)
32 print(" [x] Awaiting RPC requests")
33 channel.start_consuming()
执行结果:
先启动接收端,再发送消息,直接会返回结果
View Code
标签:.com because ranch append 其他 requests pid 完整 cer
原文地址:http://www.cnblogs.com/honglingjin/p/6833401.html