标签:sage basic 第三方 diff fas rac name nbsp sid
https://www.sencha.com/blog/integrating-ext-js-with-3rd-party-libraries-2/
Introduction
Ext JS provides a lot of built-in components right out of the box that are highly customizable. If it‘s not in the framework, you can easily extend the classes or even browse Sencha Market for anything you might need. That works great most of the time, but sometimes you might want to use a 3rd party library that is not built using the Ext JS component system. There are a number of ways you can address this situation, but the easiest one is to create a custom wrapper component to handle your library, which can be reused across any of your apps.
Implementation Overview
The goal of your wrapper component is to encapsulate the logic required by the 3rd party library to set itself up and interact with the Ext JS framework. You have the freedom over how much of that 3rd party API is available to use in your application. There are a few options for how you handle this. If the library is relatively simple and you want to control access to the API, you could wrap each of the API methods with a corresponding method in your wrapper. This allows you to hide methods you don‘t want exposed or intercept method calls where you want to introduce additional custom logic. Another option would be to expose some of the root objects in the API, so other controls are free to call any of the API methods directly on the object. In most cases, this would probably be the approach you‘d end up with, but all projects are different.
To demonstrate this idea, we‘ll create a wrapper component around Leaflet, an open source mapping JavaScript library created by Vladimir Agafonkin. We‘ll use that wrapper component in an app that shows us a map and provides a button to move the map to a specified location.
Leaflet can integrate with mapping tiles from many different mapping services which gives you great flexibility in how your maps look. In this example, we‘ll use some map tiles provided by CloudMade. You can register for a free account there, where you‘ll get an API key to use in your requests (we‘ll use it later in this example). For more information about map tiles, visit the Leaflet site.
Add Library References
The first thing you‘ll need to do in your app is add the library references to your HTML file, so the library will be available for you to use. In our example, we‘ll add two lines to the head per the Leaflet docs. You can get more details on the Leaflet setup in the Leaflet Quick Start Guide.
<link rel="stylesheet" href="http://cdn.leafletjs.com/leaflet-0.5/leaflet.css" />
<script src="http://cdn.leafletjs.com/leaflet-0.5/leaflet.js"></script>
Build the Custom Component
The next thing we‘ll want to do is extend Ext.Component to create the wrapper component for Leaflet. Ext.Component will give us a bare bones control with an empty UI, but it has all the framework methods needed for it to play nice in any of the layouts.
When integrating with a third party library, we typically need to configure and initialize it to match our needs. For our example, we‘re going to handle our Leaflet initialization in an override of the ‘afterRender‘ method. This method runs when our custom component has been rendered to the DOM and is ready for us to interact with. We‘ll also add a class alias and a config variable for our map reference.
Ext.define(‘Ext.ux.LeafletMapView‘, {
extend: ‘Ext.Component‘,
alias: ‘widget.leafletmapview‘,
config:{
map: null
},
afterRender: function(t, eOpts){
this.callParent(arguments);
var leafletRef = window.L;
if (leafletRef == null){
this.update(‘No leaflet library loaded‘);
} else {
var map = L.map(this.getId());
map.setView([42.3583, -71.0603], 13);
this.setMap(map);
L.tileLayer(‘http://{s}.tile.cloudmade.com/{key}/{styleId}/256/{z}/{x}/{y}.png‘, {
key: ‘YOUR_API_KEY‘,
styleId: 997,
maxZoom: 18
}).addTo(map);
}
}
});
Stepping through the ‘afterRender‘ code:
var leafletRef = window.L;
if (leafletRef == null){
this.update(‘No leaflet library loaded‘);
} else {
....
}
We try to get access to the Leaflet library which is loaded in the window.L namespace. If we can‘t get a reference to the library, we‘ll update the component html with a message stating there was an error loading the library.
var map = L.map(this.getId());
Here we create a Leaflet map object passing in the ID of the Ext JS component. By default, the HTML tag created by Ext.Component will be a div, which is what Leaflet requires to initialize the map control. Rather than hard code an ID to reference the div, we‘ll use the ID generated by the Ext framework when it renders the control. This will allow us to have multiple instances of the control in our application.
map.setView([42.3583, -71.0603], 13);
This will set the map to the latitude/longitude of the Boston, MA area using a zoom level of 13. There are many online tools for looking up lat/lon‘s for different locations.
this.setMap(map);
Sets the map reference to our map variable so we can access it later.
L.tileLayer(‘http://{s}.tile.cloudmade.com/{key}/{styleId}/256/{z}/{x}/{y}.png‘, {
key: ‘YOUR_API_KEY‘,
styleId: 997,
maxZoom: 18
}).addTo(map);
This will configure Leaflet to use CloudMade‘s map tiles. Assuming you created an account with them and registered your application, you‘ll get an API key that you will provide in place of ‘YOUR_API_KEY‘. Don‘t worry about the confusing URL, that is how Leaflet will dynamically load your tiles when you move around the map. For additional info, I‘d recommend reviewing the Leaflet API docs.
At this point, you‘ll have a basic mapping control you can use in your applications. However, we‘re not quite done. If you use it as-is, you might not see what you expect. The sizing will not fit your layout. Leaflet requires us to call a method named ‘invalidateSize()‘ any time the map size changes, and it then renders to that size. This is an easy problem to solve in our wrapper component. We can override the ‘onResize‘ method, which gets called anytime the size is changed in the layout, and call the ‘invalidateSize‘ method on the map.
We‘ll add this to our control:
onResize: function(w, h, oW, oH){
this.callParent(arguments);
var map = this.getMap();
if (map){
map.invalidateSize();
}
}
This will get called anytime the layout changes, and we‘ll see if we have a valid map reference. If we do, then we‘ll tell Leaflet to ‘invalidateSize‘.
Now we can use the component in our layout, and you can see that it‘ll respect the layout dimensions we‘re providing for it. If the layout changes due to a browser re-size or a slider, you‘ll see the new size get applied. With just a couple lines of code in our custom wrapper component, we‘ve made the third party Leaflet control play nice with the Ext JS layout system.
Sample Usage
Let‘s build a simple Ext JS app that uses this new wrapper component.
Ext.Loader.setConfig({
enabled: true,
paths:{
‘Ext.ux‘:‘ux‘
}
});
Ext.require([‘Ext.ux.LeafletMapView‘]);
Ext.onReady(function() {
Ext.create(‘Ext.container.Viewport‘, {
layout: ‘vbox‘,
items: [
{
xtype: ‘leafletmapview‘,
flex: 1,
width: ‘100%‘
}
]
})
});
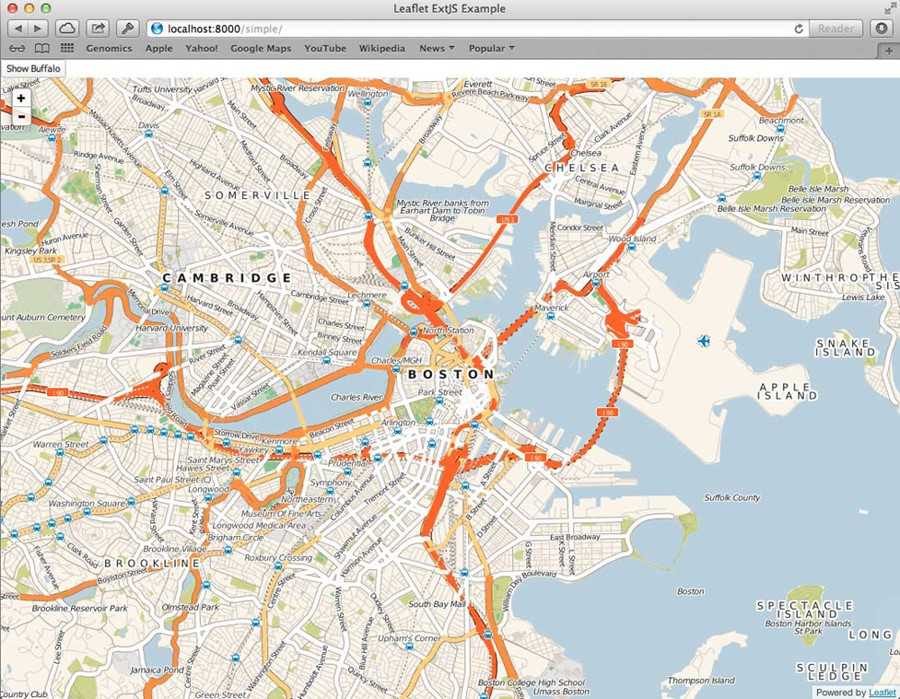
This will create a viewport to use the browser‘s full size and render out our map to use the whole view. You should see a large map of the Boston area with some simple zoom controls.
The next thing we‘ll want to do is handle interacting with the map from some outside controls. Let‘s add a button and have it zoom to a location on the map when clicked. According to the Leaflet docs, all you need to do is call ‘setView‘ on the map object, passing in a coordinate array of the latitude/longitude and a zoom level. So all we have to do is have our wrapper component expose the map object we created in ‘afterRender‘, and then we can have the button access that object and call that method on it.
Place this control above our map control in the viewport items array:
{
xtype: ‘button‘,
text: ‘Show Buffalo‘,
listeners:{
click: function(){
var map = Ext.ComponentQuery.query("viewport leafletmapview")[0];
map.getMap().setView([42.8864, -78.8786], 13);
}
}
}
The above code will display a button where when it‘s clicked will try to get a reference to the map object and update it‘s view to a new location. There are many ways to reference a component in an Ext JS application, including Controller refs, Ext.ComponentQuery(), etc. For convenience in this example, we‘ll use a component query to find our map component in this viewport. Once we have the reference, we can call ‘getMap‘ to get the Leaflet map instance and call any Leaflet API methods directly on it.
From here, you can be as fancy as you‘d like your component to get. You can add config properties for all the required setup parameters so you could customize each instance of the component using Ext JS configuration parameters instead of the third party library‘s conventions. You could also add new properties to toggle library features. For example, you could add a property to enable Leaflet‘s ‘locate‘ ability, which will attempt to use your browser‘s Geolocation API to find your location. You can see a more complete example in my GitHub repository.
Conclusion
All libraries are different, and may present additional challenges, but this concept will help you get your Ext JS or Sencha Touch apps integrated with them. There are a number of wrapper components available in the Sencha Market and GitHub already, so you may not need to create your own. But if one doesn‘t exist for a library you need, now you know how to create your own and share it with the rest of the Sencha developer community.
Written by Kevin Kazmierczak
来自 <https://www.sencha.com/blog/integrating-ext-js-with-3rd-party-libraries-2/>
翻译:
http://blog.csdn.net/tianxiaode/article/details/9178861
说明:
官网论坛上描述如下
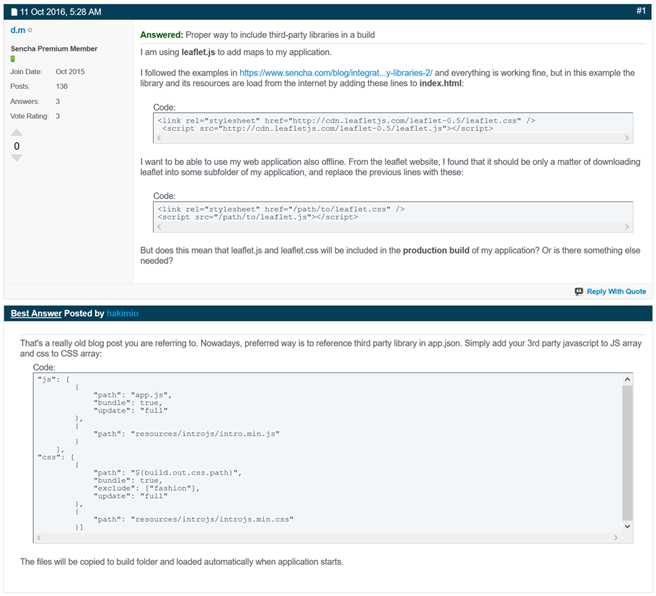
That‘s a really old blog post you are referring to. Nowadays, preferred way is to reference third party library in app.json. Simply add your 3rd party javascript to JS array and css to CSS array:
Code:
"js": [
{
"path": "app.js",
"bundle": true,
"update": "full"
},
{
"path": "resources/introjs/intro.min.js"
}
],
"css": [
{
"path": "${build.out.css.path}",
"bundle": true,
"exclude": ["fashion"],
"update": "full"
},
{
"path": "resources/introjs/introjs.min.css"
}]
The files will be copied to build folder and loaded automatically when application starts.
来自 <https://www.sencha.com/forum/showthread.php?330047>
标签:sage basic 第三方 diff fas rac name nbsp sid
原文地址:http://www.cnblogs.com/ningth/p/6914584.html