标签:ntc nat ati 16px 注解 返回值 size aop cut
1 使用 API 实现 AOP
新建一个用户接口:UserService
1 package com.cqvie.aop.api;
2
3 public interface UserService {
4
5     public void add(String name);
6     public void update(String name);
7     public void delete(String name);
8     public void select(String name);
9 }
实现接口类:UserServiceImpl
 1 package com.cqvie.aop.api;
 2
 3 public class UserServiceImpl implements UserService {
 4
 5     @Override
 6     public void add(String name) {
 7         System.out.println("Add User " + name + " SUCCESS!");
 8     }
 9
10     @Override
11     public void update(String name) {
12         System.out.println("Update User " + name + " SUCCESS!");
13     }
14
15     @Override
16     public void delete(String name) {
17         System.out.println("Delete User " + name + " SUCCESS!");
18     }
19
20     @Override
21     public void select(String name) {
22         System.out.println("Select User " + name + " SUCCESS!");
23     }
24
25 }
写一个日志类,包括前置通知和后置通知:Log
 1 package com.cqvie.aop.api;
 2
 3 import java.lang.reflect.Method;
 4
 5 import org.springframework.aop.AfterReturningAdvice;
 6 import org.springframework.aop.MethodBeforeAdvice;
 7
 8 public class Log implements MethodBeforeAdvice, AfterReturningAdvice {
 9
10     /**
11      * 前置通知
12      * @param method 被调用方法对象
13      * @param args 被调用的方法参数
14      * @param target 被调用的方法的目标对象
15      */
16     @Override
17     public void before(Method method, Object[] args, Object target) throws Throwable {
18         System.out.println(target.getClass().getName() + " 的 " +
19                 method.getName() + "方法被执行···");
20     }
21
22     /**
23      * 后置通知
24      * @param returnValue 返回值
25      * @param method 被调用的方法对象
26      * @param args 被调用的方法对象的参数
27      * @param target 被调用的方法对象的目标对象
28      */
29     @Override
30     public void afterReturning(Object returnValue, Method method, Object[] args, Object target) throws Throwable {
31         System.out.println(target.getClass().getName() + " 的 " +
32                 method.getName() + "方法已成功执行!返回值为:" + returnValue);
33         System.out.println();
34     }
35 }
配置 Spring 的配置文件:applicationContext01.xml
 1 <?xml version="1.0" encoding="UTF-8"?>
 2 <beans xmlns="http://www.springframework.org/schema/beans"
 3      xmlns:xsi="http://www.w3.org/2001/XMLSchema-instance"
 4      xmlns:context="http://www.springframework.org/schema/context"
 5      xmlns:aop="http://www.springframework.org/schema/aop"
 6      xsi:schemaLocation="http://www.springframework.org/schema/beans
 7          http://www.springframework.org/schema/beans/spring-beans.xsd
 8          http://www.springframework.org/schema/context
 9          http://www.springframework.org/schema/context/spring-context.xsd
10          http://www.springframework.org/schema/aop
11          http://www.springframework.org/schema/aop/spring-aop.xsd">
12
13     <bean id="userService" class="com.cqvie.aop.api.UserServiceImpl"></bean>
14     <bean id="log" class="com.cqvie.aop.api.Log"></bean>
15     <aop:config>
16         <aop:pointcut expression="execution(* com.cqvie.aop.api.UserServiceImpl.*(..))" id="pointcut"/>
17         <aop:advisor advice-ref="log" pointcut-ref="pointcut"/>
18     </aop:config>
19
20 </beans>
添加一个测试类:Test
 1 package com.cqvie.aop.api;
 2
 3 import org.springframework.context.ApplicationContext;
 4 import org.springframework.context.support.ClassPathXmlApplicationContext;
 5
 6 public class Test {
 7
 8     public static void main(String[] args) {
 9
10         @SuppressWarnings("resource")
11         ApplicationContext ac = new ClassPathXmlApplicationContext("applicationContext01.xml");
12         UserService userService = (UserService) ac.getBean("userService");
13         userService.update("AngeYu");
14         userService.delete("AngeYu");
15
16     }
17
18 }
运行结果:
2 自定义类实现 AOP
接口和接口的实现类不变,依旧是上面所提到的 UserService 和 UserServiceIpml
自己写一个日志类 Log,包含前置通知和后置通知
 1 package com.cqvie.aop.custom;
 2
 3 public class Log {
 4
 5     public void before() {
 6         System.out.println("----- method start -----");
 7     }
 8
 9     public void after() {
10         System.out.println("----- method end -----");
11     }
12
13 }
配置 Spring 的配置文件:applicationContext02.xml
 1 <?xml version="1.0" encoding="UTF-8"?>
 2 <beans xmlns="http://www.springframework.org/schema/beans"
 3      xmlns:xsi="http://www.w3.org/2001/XMLSchema-instance"
 4      xmlns:context="http://www.springframework.org/schema/context"
 5      xmlns:aop="http://www.springframework.org/schema/aop"
 6      xsi:schemaLocation="http://www.springframework.org/schema/beans
 7          http://www.springframework.org/schema/beans/spring-beans.xsd
 8          http://www.springframework.org/schema/context
 9          http://www.springframework.org/schema/context/spring-context.xsd
10          http://www.springframework.org/schema/aop
11          http://www.springframework.org/schema/aop/spring-aop.xsd">
12
13     <bean id="userService" class="com.cqvie.aop.custom.UserServiceImpl"></bean>
14     <bean id="log" class="com.cqvie.aop.custom.Log"></bean>
15     <aop:config>
16         <aop:aspect ref="log">
17             <aop:pointcut expression="execution(* com.cqvie.aop.custom.UserServiceImpl.*(..))" id="pointcut"/>
18             <aop:before method="before" pointcut-ref="pointcut"/>
19             <aop:after method="after" pointcut-ref="pointcut"/>
20         </aop:aspect>
21     </aop:config>
22
23 </beans>
添加一个测试类:Test
 1 package com.cqvie.aop.custom;
 2
 3 import org.springframework.context.ApplicationContext;
 4 import org.springframework.context.support.ClassPathXmlApplicationContext;
 5
 6 public class Test {
 7
 8     public static void main(String[] args) {
 9
10         @SuppressWarnings("resource")
11         ApplicationContext ac = new ClassPathXmlApplicationContext("applicationContext02.xml");
12         UserService userService = (UserService) ac.getBean("userService");
13         userService.update("AngeYu");
14
15     }
16
17 }
运行结果: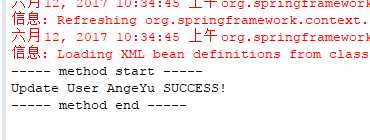
3 使用注解实现 AOP
接口和接口的实现类不变,依旧是上面所提到的 UserService 和 UserServiceIpml
自己写一个日志类 Log,包含前置通知、后置通知、环绕通知
 1 package com.cqvie.aop.annotation;
 2
 3 import org.aspectj.lang.ProceedingJoinPoint;
 4 import org.aspectj.lang.annotation.After;
 5 import org.aspectj.lang.annotation.Around;
 6 import org.aspectj.lang.annotation.Aspect;
 7 import org.aspectj.lang.annotation.Before;
 8
 9 @Aspect
10 public class Log {
11
12     @Before("execution(* com.cqvie.aop.annotation.UserServiceImpl.*(..))")
13     public void before() {
14         System.out.println("----- method start -----");
15     }
16
17     @After("execution(* com.cqvie.aop.annotation.UserServiceImpl.*(..))")
18     public void after() {
19         System.out.println("----- method end -----");
20     }
21
22     @Around("execution(* com.cqvie.aop.annotation.UserServiceImpl.*(..))")
23     public Object around(ProceedingJoinPoint pj) throws Throwable {
24         System.out.println("--- around start ---");
25         System.out.println("方法签名:" + pj.getSignature());
26         Object result = pj.proceed();
27         System.out.println("--- around end ---");
28         return result;
29     }
30
31 }
配置 Spring 的配置文件:applicationContext03.xml
 1 <?xml version="1.0" encoding="UTF-8"?>
 2 <beans xmlns="http://www.springframework.org/schema/beans"
 3      xmlns:xsi="http://www.w3.org/2001/XMLSchema-instance"
 4      xmlns:context="http://www.springframework.org/schema/context"
 5      xmlns:aop="http://www.springframework.org/schema/aop"
 6      xsi:schemaLocation="http://www.springframework.org/schema/beans
 7          http://www.springframework.org/schema/beans/spring-beans.xsd
 8          http://www.springframework.org/schema/context
 9          http://www.springframework.org/schema/context/spring-context.xsd
10          http://www.springframework.org/schema/aop
11          http://www.springframework.org/schema/aop/spring-aop.xsd">
12
13     <bean id="userService" class="com.cqvie.aop.annotation.UserServiceImpl"></bean>
14     <bean id="log" class="com.cqvie.aop.annotation.Log"></bean>
15     <aop:aspectj-autoproxy></aop:aspectj-autoproxy>
16
17 </beans>
添加一个测试类:Test
 1 package com.cqvie.aop.annotation;
 2
 3 import org.springframework.context.ApplicationContext;
 4 import org.springframework.context.support.ClassPathXmlApplicationContext;
 5
 6 public class Test {
 7
 8     public static void main(String[] args) {
 9
10         @SuppressWarnings("resource")
11         ApplicationContext ac = new ClassPathXmlApplicationContext("applicationContext03.xml");
12         UserService userService = (UserService) ac.getBean("userService");
13         userService.update("AngeYu");
14
15     }
16
17 }
运行结果: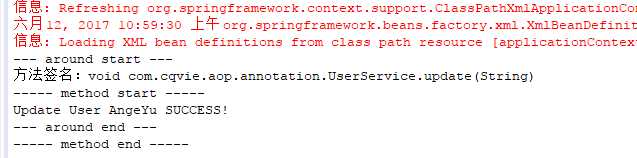
标签:ntc nat ati 16px 注解 返回值 size aop cut
原文地址:http://www.cnblogs.com/yjq520/p/6991865.html