标签:面向 sch mon play modules 多少 获取 共享 注释
上课第七天,打卡:
时间的高效利用;
前言:
今天egon老师补充了下 is 和 == 的区别,整理如下:Python中变量的属性以及判断方法
核心是过程,过程就是解决问题的步骤;流水线、机械式;
优点:复杂的问题简单化,分成多个功能单元;
缺点:可扩展性差
应用:Linux内核、httpd、git
核心是对象;
要理解对象,应该把自己当做上帝,在上帝眼里一切存在的事物都是对象,不存在的也可以创建出来;
对象是 特征(变量)和技能(函数)的结合体;
优点:可扩展性强
缺点:无法像面向过程一样知道什么阶段发生什么事情、会有什么结果
应用场景:与用户层交互较多的、游戏领域、互联网软件
- 对象是特征(变量)和技能(函数)的结合体;
- 类是一系列对象共有的特征与技能的结合体;
1 现实生活中:先有对象,再总结归纳出类;而程序中:先定义类,再实例化对象;
2
3 在python中,用变量表示特征,用函数表示技能;
4
5 因而类是变量与函数的结合体,对象是变量与方法(指向类的函数)的结合体;
6
7 Python中,一切皆对象;
8
9 Python3中,统一了类和类型的概念;
- 类的语法结构
1 class 类名():
2     ‘‘‘
3     类的注释
4     ‘‘‘
5     类体
 1 class People():                        # 定义了一个类 People
 2     country = ‘China‘
 3     def __init__(self,name):
 4         self.name = name
 5     def talk(self):
 6         print(‘%s comes from %s‘ % (self.name,self.country))
 7
 8 p1 = People(‘standby‘)                 # 实例化了一个对象 p1
 9 p1.talk()                              # 对象p1 调用了People类的talk()函数,称之为向 p1 对象发送了一个消息,让p1去执行 talk()这个函数;
10
11 ---
12 standby comes from China
- 类有两种属性:数据属性和函数属性;
- 类的数据属性是共享给所有对象的;
- 类的函数属性是绑定到所有对象的;
 1 C:\Users\Administrator>python
 2 Python 3.5.2 (v3.5.2:4def2a2901a5, Jun 25 2016, 22:18:55) [MSC v.1900 64 bit (AM
 3 D64)] on win32
 4 Type "help", "copyright", "credits" or "license" for more information.
 5 >>>
 6 >>> class People():
 7 ...     country = ‘China‘
 8 ...     def __init__(self,name):
 9 ...         self.name = name
10 ...     def talk(self):
11 ...         print(‘%s comes from %s‘ % (self.name,self.country))
12 ...
13 >>>
14 >>> p1 = People(‘standby‘)          # 实例化一个对象 p1
15 >>> p2 = People(‘kunkun‘)           # 实例化第二个对象 p2
16 >>>
17 >>> print(id(People.country))       # 类的数据属性是共享给所有对象的
18 11690984
19 >>> print(id(p1.country))           # p1.country 的id he p2.country 是同一个
20 11690984
21 >>> print(id(p2.country))
22 11690984
23 >>>
24 >>> print(People.talk)              # 类的函数属性
25 <function People.talk at 0x0000000000B1F510>
26 >>> print(p1.talk)                  # 类的函数属性是绑定(bond)到类对象的
27 <bound method People.talk of <__main__.People object at 0x0000000000B26550>>    # 注意:p1对象的talk()方法的内存地址 和p2对象的talk()方法地址不是一个;
28 >>> print(p2.talk)
29 <bound method People.talk of <__main__.People object at 0x0000000000B265F8>>
30 >>>
31 >>> print(id(People.talk))
32 11662608
33 >>> print(id(p1.talk))              # 虽然内存地址不是一个,但是用id()查看的时候有的时候是一样的,有的时候不一样;这是有id()做了一些内部的设置;
34 3590536
35 >>> print(id(p2.talk))
36 3590536
37 >>>
38 >>> id(People.talk)
39 11662608
40 >>> id(p1.talk)
41 3590536
42 >>> id(p2.talk)
43 3590536
44 >>>
- 关于 id() 的补充:
1 def id(*args, **kwargs): # real signature unknown
2     """
3     Return the identity of an object.
4
5     This is guaranteed to be unique among simultaneously existing objects.
6     (CPython uses the object‘s memory address.)
7     """
8     pass
- 数据属性
上例中的 country 就是类People的数据属性;
- 函数属性
talk 和 __init__ 就是类People的函数属性;
 1 class People():
 2     country = ‘China‘
 3     def __init__(self,name):
 4         self.name = name
 5     def talk(self):
 6         print(‘%s comes from %s‘ % (self.name,self.country))
 7
 8 print(type(People.country))
 9 print(People.talk)
10 print(People.__init__)
11
12 ---
13 <class ‘str‘>
14 <function People.talk at 0x000000000071C488>
15 <function People.__init__ at 0x000000000071C400>
- 类属性的补充
 1 一:我们定义的类的属性到底存到哪里了?有两种方式查看
 2 dir(类名):查出的是一个名字列表
 3 类名.__dict__:查出的是一个字典,key为属性名,value为属性值
 4
 5 二:特殊的类属性
 6 类名.__name__# 类的名字(字符串)
 7 类名.__doc__# 类的文档字符串
 8 类名.__base__# 类的第一个父类(在讲继承时会讲)
 9 类名.__bases__# 类所有父类构成的元组(在讲继承时会讲)
10 类名.__dict__# 类的字典属性
11 类名.__module__# 类定义所在的模块
12 类名.__class__# 实例对应的类(仅新式类中)
- 关于名称空间的补充
1 名称空间是名称(标识符)到对象的映射;
2
3 向名称空间添加名称的操作过程涉及到绑定标识符到指定对象的操作(以及给该对象的引用计数加 1 );
4
5 改变一个名字的绑定叫做重新绑定;
6
7 删除一个名字叫做解除绑定;
8
9 类和对象,要查看自己的命名空间,用 类名.__dict__ 和 对象名.__dict__
- 创建一个类就会创建一个类的名称空间,用来存储类中定义的所有名字,这些名字称为类的属性;
- 创建一个对象/实例就会创建一个对象/实例的名称空间,存放对象/实例的名字,称为对象/实例的属性;
 1 class Chinese:
 2     country = ‘China‘
 3     def __init__(self,name,age):
 4         self.name = name
 5         self.age = age
 6     def talk(self):
 7         print(‘Say chinese...‘)
 8
 9 p1 = Chinese(‘egon‘,18)
10 print(Chinese.__dict__)    # 类的名称空间包含 talk 和 __init__ (函数属性)、包含 country(数据属性);
11 print(p1.__dict__)         # 对象的名称空间只包含 name 和 age (只有数据属性)
12
13 ---
14 {‘__module__‘: ‘__main__‘, ‘__dict__‘: <attribute ‘__dict__‘ of ‘Chinese‘ objects>, ‘talk‘: <function Chinese.talk at 0x0000000000A1C488>, ‘__init__‘: <function Chinese.__init__ at 0x0000000000A1C400>, ‘country‘: ‘China‘, ‘__doc__‘: None, ‘__weakref__‘: <attribute ‘__weakref__‘ of ‘Chinese‘ objects>}
15 {‘name‘: ‘egon‘, ‘age‘: 18}
- 实例化
类名加括号就是实例化,会自动触发__init__函数的运行,可以用它来为每个实例定制自己的特征;
 1 class People():
 2     country = ‘China‘
 3     def __init__(self,name):
 4         self.name = name
 5     def talk(self):
 6         print(‘%s comes from %s‘ % (self.name,self.country))
 7
 8 p1 = People(‘standby‘)   # 这一步实质上就是在执行: People.__init__(p1,‘standby‘);然后执行People类里的__init__函数里的赋值语句: p1.name = name (即:standby)
 9 p1.talk()
10
11 ---
12 standby comes from China
- 属性引用
 1 class People():
 2     country = ‘China‘
 3     def __init__(self,name):
 4         self.name = name
 5     def talk(self):
 6         print(‘%s comes from %s‘ % (self.name,self.country))
 7
 8 print(People.country)         # 引用类的数据属性,该属性与所有对象共享;
 9 print(People.talk)            # 引用类的函数属性;
10
11 ---
12 China
13 <function People.talk at 0x0000000000A6C488>
- 示例扩展
 1 class People():
 2     country = ‘China‘
 3     def __init__(self,name):
 4         self.name = name
 5     def talk(self):
 6         print(‘%s comes from %s‘ % (self.name,self.country))
 7
 8 print(People.country)
 9 print(People.__dict__)               # 查看类的属性字典,或者说是名称空间
10 print(People.__dict__[‘country‘])
11
12 ---
13 China
14 {‘talk‘: <function People.talk at 0x0000000000B4C488>, ‘country‘: ‘China‘, ‘__init__‘: <function People.__init__ at 0x0000000000B4C400>, ‘__doc__‘: None, ‘__dict__‘: <attribute ‘__dict__‘ of ‘People‘ objects>, ‘__weakref__‘: <attribute ‘__weakref__‘ of ‘People‘ objects>, ‘__module__‘: ‘__main__‘}
15 China
- 只有属性引用
- 对象/实例本身只有数据属性,但是python的class机制会将类的函数绑定到对象上,称为对象的方法,或者叫绑定方法;
- 绑定方法唯一绑定一个对象,同一个类的方法绑定到不同的对象上,属于不同的方法,内存地址都不会一样;
 1 class People():
 2     country = ‘China‘
 3     def __init__(self,name):
 4         self.name = name
 5     def talk(self):
 6         print(‘%s comes from %s‘ % (self.name,self.country))
 7
 8 p1 = People(‘standby‘)
 9 print(p1.__dict__)               # 查看对象的属性字典,或者说是名称空间
10 print(p1.name)
11 print(p1.__dict__[‘name‘])
12
13 ---
14 {‘name‘: ‘standby‘}
15 standby
16 standby
- 补充
1 定义在类内部的变量,是所有对象共有的,id全一样
2
3 定义在类内部的函数,是绑定到所有对象的,是给对象来用,obj.func() 会把obj本身当做第一个参数出入
4
5 绑定方法:绑定到谁身上,就是给谁用的,谁来调用就会自动把自己当做第一个参数传入
6
7 print(p1.x) #先从p1.__dict__,找不到再找People.__dict__,然后是父类,再找不到就会报错;
- 练习1:
 1 # 统计一共实例化了多少个对象
 2 class Chinese:
 3     count = 0
 4     def __init__(self,name):
 5         Chinese.count += 1
 6     def talk(self):
 7         print(‘--->> %d‘ % Chinese.count)
 8
 9 p1 = Chinese(‘alex‘)
10 p2 = Chinese(‘egon‘)
11 print(Chinese.count)
12 print(p1.count)
13 print(p2.count)
14
15 ---
16 2
17 2
18 2
- 练习2
 1 # 定义学生类
 2 class Student:
 3     tag = 666
 4     def __init__(self,ID,name,age,gender):
 5         self.id = ID
 6         self.name = name
 7         self.age = age
 8         self.gender = gender
 9     def wailking(self):
10         print(‘{} is walking...‘.format(self.name))
11
12 s1 = Student(1,‘egon‘,18,‘male‘)
13 s2 = Student(2,‘alex‘,19,‘female‘)
14 print(s1.id)
15 print(s1.name)
16 print(s1.age)
17 print(s1.gender)
18 print(s1.tag)
19 s1.wailking()
20 s2.wailking()
21
22 ---
23 1
24 egon
25 18
26 male
27 666
28 egon is walking...
29 alex is walking...
 1 #对象之间的交互
 2 class Egon:
 3     camp=‘London‘
 4     def __init__(self,nickname,life_value=200,aggressivity=100):
 5         self.nickname=nickname
 6         self.life_value=life_value
 7         self.aggressivity=aggressivity
 8     def attack(self,enemy):
 9         enemy.life_value-=self.aggressivity
10
11 class Alex:
12     camp = ‘Florence‘
13     def __init__(self, nickname, life_value=100, aggressivity=200):
14         self.nickname = nickname
15         self.life_value = life_value
16         self.aggressivity = aggressivity
17     def attack(self, enemy):
18         enemy.life_value -= self.aggressivity
19
20 e1 = Egon(‘egon1‘)
21 a1 = Alex(‘alex1‘)
22 print(a1.life_value)
23 e1.attack(a1)  #发送了一条消息,称为向g发送了attack指令
24 print(a1.life_value)
25
26 ---
27 100
28 0
- 一种创建新的类的方式;在python中,新建的类可以继承一个或多个父类,父类又可称为基类或超类,新建的类称为派生类或子类;
- 通过继承可以在一个一般的类的基础上建立新的类,被继承的类称为基类,在基类的基础上建立的新类成为派生类;
- 继承可以减少冗余代码;
- 子类继承父类,则继承了父类的数据属性和函数属性,可以通过 子类名.属性名 的方式来调用;
 1 class ParentClass1:
 2     pass
 3 class ParentClass2:
 4     pass
 5 class SubClass1(ParentClass1):
 6     pass
 7 class SubClass2(ParentClass1,ParentClass2):
 8     pass
 9
10 print(SubClass1.__bases__)      # 单继承
11 print(SubClass2.__bases__)      # Python中允许继承多个类,即多继承
12
13 ---
14 (<class ‘__main__.ParentClass1‘>,)
15 (<class ‘__main__.ParentClass1‘>, <class ‘__main__.ParentClass2‘>)
- 如果没有指定父类/基类,python的类会默认继承object类,object是所有python类的基类,它提供了一些常见方法(如__str__)的实现;
1 print(ParentClass1.__bases__)
2 print(ParentClass2.__bases__)
3
4 ---
5 (<class ‘object‘>,)
6 (<class ‘object‘>,)
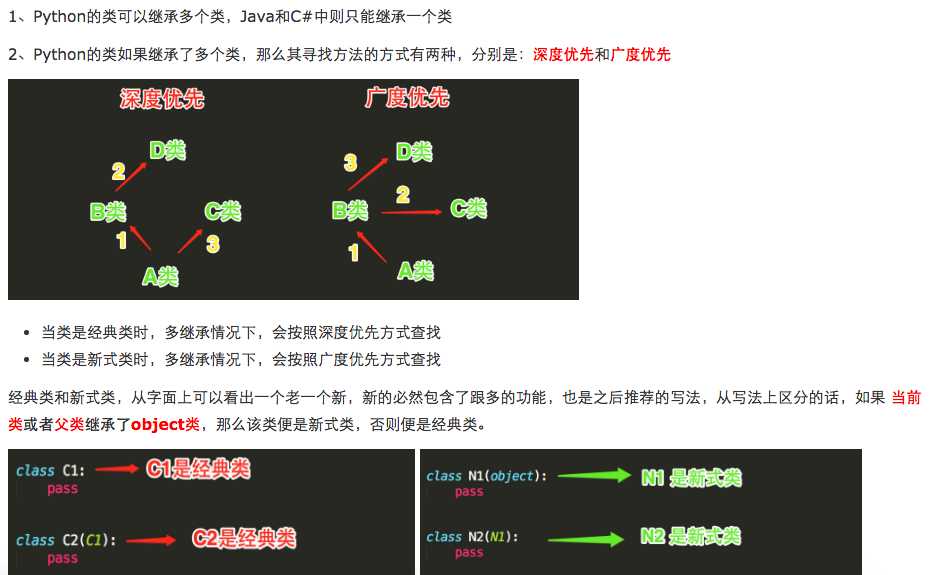
- Python2 分两种
- 新式类
1 class Foo(object):
2     pass
- 经典类
1 class Bar:
2     pass
- Python3 只有新式类
1 class Foo:
2     pass
3
4 print(Foo.__bases__)     # 类名称.__bases__ 可以查看这个类的父类是什么; Python3 里面,默认就给经典类加上了 object父类/基类
5
6 ---
7 (<class ‘object‘>,)
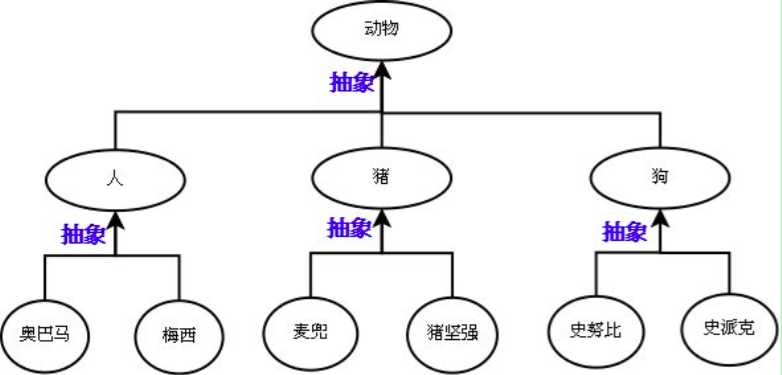
- 抽象
抽象即抽取类似或者说比较像的部分。

抽象分成两个层次:

    1.将奥巴马和梅西这俩对象比较像的部分抽取成类;

    2.将人,猪,狗这三个类比较像的部分抽取成父类。

抽象最主要的作用是划分类别(可以隔离关注点,降低复杂度)

抽象只是分析和设计的过程中,一个动作或者说一种技巧,通过抽象可以得到类;
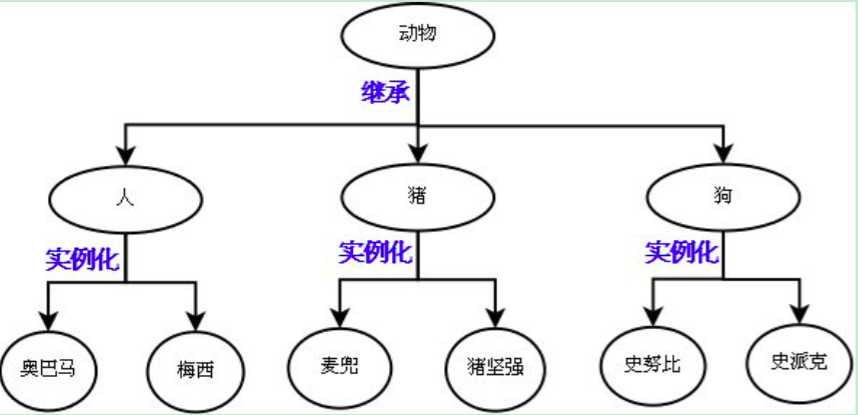
- 继承:
      是基于抽象的结果,通过编程语言去实现它;

      肯定是先经历抽象这个过程,才能通过继承的方式去表达出抽象的结构;
- 子类继承了父类,在子类定义新的属性,覆盖掉父类的属性,称为派生;
- 练习1:
 1 class Animal:                                       # 定义父类/基类
 2     def __init__(self,name,age,sex):                # 父类初始/实例化函数
 3         self.name = name                            # 初始化父类的三个数据属性
 4         self.age = age
 5         self.sex = sex
 6
 7     def talk(self):                                 # 定义父类的函数属性
 8         print("%s 发出奇怪的声音..." % self.name)
 9     def eat(self):
10         print("%s eatting..." % self.name)
11
12 class People(Animal):                               # 定义第一个子类,继承Animal父类
13     def __init__(self,name,age,sex,education):      # 定义子类的初始化函数(重写了子类的初始化函数),覆盖了父类/基类的初始化函数
14         Animal.__init__(self,name,age,sex)          # 先调用父类的初始化函数初始化 name age sex 这三个共有的属性
15         self.education = education                  # 再初始化子类私有的数据属性:education
16     def talk(self):                                 # 定义子类的 talk() 函数,覆盖了父类的 talk() 函数
17         print("%s say hello" % self.name)
18
19 class Pig(Animal):                                  # 定义第二个子类:Pig
20     pass
21 class Dog(Animal):                                  # 定义第三个子类:Dog
22     pass
23
24 people1 = People(‘standby‘,23,‘male‘,‘Bachelor‘)    # 初始化 People的实例;等价于:People.__init__(people1,‘standby‘,23,‘male‘,‘Bachelor‘);   派生
25 pig1 = Pig(‘alex‘,99,‘female‘)                      # 初始化 Pig实例;等价于:Pig.__init__(pig1,‘alex‘,99,‘female‘)
26 dog1 = Dog(‘egon‘,18,‘male‘)                        # 初始化 Dog实例
27 people1.talk()                                      # People类对象people1调用talk()方法;注意:这个talk是子类的talk,而非父类的talk;
28 pig1.talk()                                         # Pig类对象pig1调用talk()方法;Pig类没有重写 talk()函数,所以这个talk就是父类的talk;
29 dog1.talk()
30
31 ---
32 standby say hello
33 alex 发出奇怪的声音...
34 egon 发出奇怪的声音...
# obj.name 的搜索顺序:
#
# 1.先找 obj.__dict__
#
# 2.再找obj所归属的类的属性字典,即:类名.__dict__
#
# 3.然后再找父类的属性字典,即:父类名.__dict__
#
# 父类也找不到的话就报错:AttributeError
- 练习2:
 1 class Parent:
 2     def foo(self):
 3         print(‘Parent.foo‘)
 4         self.bar() #s.bar()
 5     def bar(self):
 6         print(‘Parent.bar‘)
 7
 8 class Sub(Parent):
 9     def bar(self):
10         print(‘Sub.bar‘)
11
12 sub1 = Sub()
13 sub1.foo()              # 等价于 foo(sub1) ,所以会去执行Sub类的 bar() 函数,也是一种派生;
14 print(sub1.__dict__)
15 print(Sub.__dict__)
16 print(Parent.__dict__)
17
18 ---
19 Parent.foo
20 Sub.bar
21 {}
22 {‘__module__‘: ‘__main__‘, ‘bar‘: <function Sub.bar at 0x000000000110C598>, ‘__doc__‘: None}
23 {‘__module__‘: ‘__main__‘, ‘foo‘: <function Parent.foo at 0x000000000110C488>, ‘__doc__‘: None, ‘__weakref__‘: <attribute ‘__weakref__‘ of ‘Parent‘ objects>, ‘__dict__‘: <attribute ‘__dict__‘ of ‘Parent‘ objects>, ‘bar‘: <function Parent.bar at 0x000000000110C510>}
- 所谓重用,就是代码的复用,避免大量重复的代码
- 示例1,没有通过继承重用的代码:
 1 class Cat():
 2     def __init__(self,name):
 3         self.name = name
 4     def eat(self):
 5         print("%s eatting..." % self.name)
 6     def run(self):
 7         print("%s running..." % self.name)
 8     def talk(self):
 9         print(‘Cat 喵喵喵...‘)
10
11 class Dog():
12     def __init__(self, name):
13         self.name = name
14     def eat(self):
15         print("%s eatting..." % self.name)
16     def run(self):
17         print("%s running..." % self.name)
18     def talk(self):
19         print(‘Dog 汪汪汪...‘)
20
21 cat = Cat(‘cat1‘)
22 dog = Dog(‘dog1‘)
23 cat.eat()
24 cat.run()
25 cat.talk()
26 dog.eat()
27 dog.run()
28 dog.talk()
29
30 ---
31 cat1 eatting...
32 cat1 running...
33 Cat 喵喵喵...
34 dog1 eatting...
35 dog1 running...
36 Dog 汪汪汪...
- 由于cat类和dog类都有相同的eat()函数和run()函数,所以可以尝试抽象出一个Animal类,通过继承Animal,就可以减少冗余代码:
 1 class Animal():
 2     def __init__(self,name):
 3         self.name = name
 4     def eat(self):
 5         print("%s eatting..." % self.name)
 6     def run(self):
 7         print("%s running..." % self.name)
 8
 9 class Cat(Animal):
10     def talk(self):
11         print(‘Cat 喵喵喵...‘)
12 class Dog(Animal):
13     def talk(self):
14         print(‘Dog 汪汪汪...‘)
15
16 cat = Cat(‘cat1‘)
17 dog = Dog(‘dog1‘)
18 cat.eat()
19 cat.run()
20 cat.talk()
21 dog.eat()
22 dog.run()
23 dog.talk()
24
25 ---
26 cat1 eatting...
27 cat1 running...
28 Cat 喵喵喵...
29 dog1 eatting...
30 dog1 running...
31 Dog 汪汪汪...
- 继承反映的是一种什么是什么的关系;本例中cat是动物,dog也是动物;
- 组合也可以解决代码冗余问题,但是组合反映是一种什么有什么的关系;
- 类的组合:在一个类中以另外一个类的对象作为数据属性;
- 示例1:
 1 class People():
 2     def __init__(self,name,age,sex):
 3         self.name = name
 4         self.age = age
 5         self.sex = sex
 6
 7 class Date:
 8     def __init__(self,year,mon,day):
 9         self.year=year
10         self.mon=mon
11         self.day=day
12     def tell(self):
13         print(‘%s-%s-%s‘ %(self.year,self.mon,self.day))
14
15 class Teacher(People):
16     def __init__(self,name,age,sex,salary,year,mon,day):
17         # self.name=name                            # 第一种方式
18         # self.age=age
19         # self.sex=sex
20         # People(name,age,sex)                      # 第二种方式
21         People.__init__(self,name,age,sex)          # 第三种方式
22         self.salary=salary
23         self.birth=Date(year,mon,day)               # Date类的对象作为 Teacher类的数据属性,成为类的组合;反映的是有的关系,即老师有生日;
24                                                     # 如果再有学生类、家长类等,都可以通过组合的方式实现  有 的关系,减少代码的冗余;
25 t=Teacher(‘egon‘,18,‘male‘,3000,1995,12,31)
26 t.birth.tell()
27
28 ---
29 1995-12-31
- 接口,可以理解为接口继承;(Java 语言中的接口很好的实现了接口的含义)
- 接口类包含一组功能的集合,但是只定义函数,并没有函数体(即没有去实现);
- 这些接口函数由子类继承并实现具体的功能;
1 继承有两种用途:
2 一:继承基类的方法,并且做出自己的改变或者扩展(代码重用);
3
4 二:声明某个子类兼容于某基类,定义一个接口类Interface,接口类中定义了一些接口名(就是函数名)且并未实现接口的功能,子类继承接口类,并且实现接口中的功能;
- 示例1:模拟Java中的接口
 1 class File:                       # 定义接口Interface类来模仿接口的概念,python中压根就没有interface关键字来定义一个接口。
 2     def read(self):               # 定接口函数read
 3         raise TypeError(‘类型错误‘)
 4     def write(self):              # 定义接口函数write
 5         raise TypeError(‘类型错误‘)
 6
 7 class Txt(File):                  #文本,具体实现read和write
 8     def read(self):
 9         print(‘文本数据的读取方法‘)
10     def write(self):
11         print(‘文本数据的写入方法‘)
12 class Sata(File):                 #磁盘,具体实现read和write
13     def read(self):
14         print(‘硬盘数据的读取方法‘)
15     def write(self):
16         print(‘硬盘数据的写入方法‘)
17 class Process(File):              # 进程,具体实现read和write
18     def read(self):
19         print(‘进程数据的读取方法‘)
20     def write(self):
21         print(‘进程数据的写入方法‘)
22 p=Process()
23 t=Txt()
24 d=Sata()
25
26 print(isinstance(t,File))         # 判断 t/p/d 这些对象是否是 File类的实例化对象;
27 print(isinstance(p,File))
28 print(isinstance(d,File))
29
30 t.read()
31 p.read()
32 d.read()
33
34 ---
35 True
36 True
37 True
38 文本数据的读取方法
39 进程数据的读取方法
40 硬盘数据的读取方法
- 补充,可以通过 raise + error 的方式进一步模拟 【只定义函数,没有函数体的形式】
1 class File:
2     def read(self):
3         raise TypeError(‘类型错误‘)
4     def write(self):
5         raise TypeError(‘类型错误‘)
- 归一化
接口继承实质上是要求 “做出一个良好的抽象,这个抽象规定了一个兼容接口,
使得外部调用者无需关心具体细节,可一视同仁的处理实现了特定接口的所有对象”
                                     ——这在程序设计上,叫做归一化。

归一化使得高层的外部使用者可以不加区分的处理所有接口兼容的对象集合;
就好象linux的泛文件概念一样,所有东西都可以当文件处理,不必关心它是内存、磁盘、网络还是屏幕
当然,对底层设计者,当然也可以区分出“字符设备”和“块设备”,然后做出针对性的设计:细致到什么程度,视需求而定;
- 抽象类是一个特殊的类,它的特殊之处在于只能被继承,不能被实例化;
- 为什么要有抽象类?
- 如果说类是从一堆对象中抽取相同的内容而来的,那么抽象类就是从一堆类中抽取相同的内容而来的,内容包括数据属性和函数属性。
从设计角度去看,如果类是从现实对象抽象而来的,那么抽象类就是基于类抽象而来的。

从实现角度来看,抽象类与普通类的不同之处在于:
    抽象类中只能有抽象方法(没有实现功能),该类不能被实例化,只能被继承,
    且子类必须实现抽象方法。
- 继续接口的归一化问题,但是如果子类并没有去实现父类的read和write,或者是定义其他的函数名字,这样不就又不统一了吗?
 1 class File:
 2     def read(self):
 3         raise TypeError(‘类型错误‘)
 4     def write(self):
 5         raise TypeError(‘类型错误‘)
 6
 7 class Process(File):               # 类似于这样,Process子类继承了File父类,但是也可以不去实现File父类里的read和write方法;
 8     def du(self):                  # 这样在示例话Process对象的时候也是可以的,并不报错;
 9         print(‘进程数据的读取方法‘)
10     def xie(self):
11         print(‘进程数据的写入方法‘)
12
13 p=Process()
- 如何避免这种情况呢?换句话说,如何强制子类必须去实例化 父类里的定义的接口函数呢?
 1 # 抽象类;   使用abc模块强制子类必须实现父类里定义的接口函数;
 2 import abc
 3 class File(metaclass=abc.ABCMeta):
 4     @abc.abstractmethod                # 定义抽象方法,无需实现功能;
 5     def read(self):                    # 子类必须要实现这个抽象方法;
 6         pass
 7     @abc.abstractmethod                # 定义抽象方法,无需实现功能
 8     def write(self):                   # 子类必须要实现这个抽象方法
 9         pass
10
11 class Process(File):
12     def xie(self):     # 如果子类没有实现父类定义的接口函数,就报出异常;
13         pass
14     def du(self):
15         pass
16 p=Process()
17
18 ---
19 Traceback (most recent call last):
20   File "D:/soft/work/Python_17/day07/blog.py", line 185, in <module>
21     p=Process()
22 TypeError: Can‘t instantiate abstract class Process with abstract methods read, write
- 这样大家就都归一化了;即让使用者无需关心对象的类是什么,只需要的知道这些对象都具备某些功能就可以了,这极大地降低了使用者的使用难度;
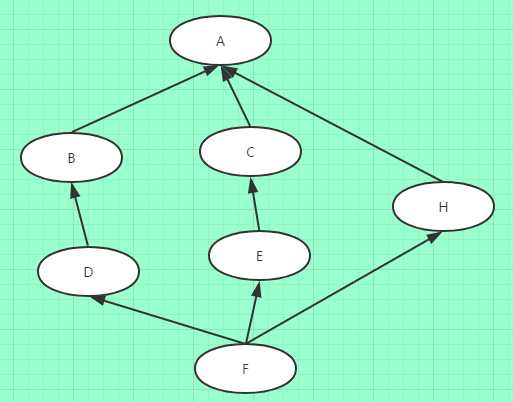
- 例如有如下几个类:
- 示例代码:
 1 class A:
 2     def test(self):
 3         print(‘from A‘)
 4     pass
 5 class B(A):
 6     def test(self):
 7         print(‘from B‘)
 8     pass
 9 class C(A):
10     def test(self):
11         print(‘from C‘)
12     pass
13 class D(B):
14     def test(self):
15         print(‘from D‘)
16     pass
17 class E(C):
18     def test(self):
19         print(‘from E‘)
20     pass
21 class H(A):
22     def test(self):
23         print(‘from H‘)
24     pass
25 class F(D,E,H):
26     def test(self):
27         print(‘from F‘)
28     pass
29 f=F()
30 f.test()
31 print(F.mro())    # 可以通过 子类.mro() 的形式查看继承的顺序
32
33 ---
34 from F
35 [<class ‘__main__.F‘>, <class ‘__main__.D‘>, <class ‘__main__.B‘>, <class ‘__main__.E‘>, <class ‘__main__.C‘>, <class ‘__main__.H‘>, <class ‘__main__.A‘>, <class ‘object‘>]
1 # 经典类:深度优先,F->D->B->A->E->C->H
2 # 新式类:广度优先,F->D->B->E->C->H->A   (Python3 都是新式类)
- 第一种方法:
 1 class Foo1:
 2     def test(self):
 3         print(‘from foo1.test‘)
 4     pass
 5 class Foo2:
 6     def test(self):
 7         print(‘from foo2.test‘)
 8 class Bar(Foo1,Foo2):
 9     def test(self):
10         Foo1.test(self)    # 在子类中,使用 父类名.父类函数名 的方法调用父类;这种跟父类的耦合性太强,如果父类名字改了,就不能调用了;
11         Foo2.test(self)
12         print(‘bar‘)
13 print(Bar.mro())
14 b=Bar()
15 b.test()
16
17 ---
18 [<class ‘__main__.Bar‘>, <class ‘__main__.Foo1‘>, <class ‘__main__.Foo2‘>, <class ‘object‘>]
19 from foo1.test
20 from foo2.test
21 bar
- 第二种方法:
 1 class Foo1:
 2     def test(self):
 3         print(‘from foo1.test‘)
 4     pass
 5 class Foo2:
 6     def test(self):
 7         print(‘from foo2.test‘)
 8 class Bar(Foo1,Foo2):
 9     def test(self):
10         super().test()       # 通过super()替代父类的名字;
11         print(‘bar‘)
12 print(Bar.mro())
13 b=Bar()
14 b.test()
15
16 ---
17 [<class ‘__main__.Bar‘>, <class ‘__main__.Foo1‘>, <class ‘__main__.Foo2‘>, <class ‘object‘>]
18 from foo1.test
19 bar
 1 class Foo1:
 2     pass
 3 class Foo2:
 4     def test(self):
 5         print(‘from foo2.test‘)
 6 class Bar(Foo1,Foo2):
 7     def test(self):
 8         # Foo1.test(self)
 9         # Foo2.test(self)
10         super().test()             # 继承了2个父类,如果第一个父类没有要调用的名字,就会去找第二个父类;
11         print(‘bar‘)
12 print(Bar.mro())                   # Bar.mro()  等价于  Bar.__mro__
13 b=Bar()
14 b.test()
15
16 ---
17 [<class ‘__main__.Bar‘>, <class ‘__main__.Foo1‘>, <class ‘__main__.Foo2‘>, <class ‘object‘>]
18 from foo2.test
19 bar
- 多态是同一种事物的多种形态;
- 一个抽象类有多个子类,因而多态的概念依赖于继承;
- 示例:
 1 import abc
 2 class Animal(metaclass=abc.ABCMeta):     # 同一类事物:动物
 3     @abc.abstractmethod
 4     def talk(self):
 5         pass
 6
 7 class Cat(Animal):                       # 动物形态之一:猫
 8     def talk(self):
 9         print(‘喵喵喵‘)
10 class Dog(Animal):                       # 动物形态之二:狗
11     def talk(self):
12         print(‘汪汪汪‘)
13 class Pig(Animal):                       # 动物形态之三:诸
14     def talk(self):
15         print(‘哼哼哼‘)
- 指具有不同功能的函数,可以具有相同的函数名;
- obj.func() --> 是调用了obj的方法func,又称为向obj发送了一条消息func;
- 多态性指的是具有不同功能的函数可以使用相同的函数名,这样就可以用一个函数名调用不同功能的函数;
在面向对象方法中一般是这样表述多态性:
    向不同的对象发送同一条消息(obj.func():是调用了obj的方法func,又称为向obj发送了一条消息func)
    不同的对象在接收时会产生不同的行为(即方法)。

也就是说,每个对象可以用自己的方式去响应共同的消息。

所谓消息,就是调用函数,不同的行为就是指不同的实现,即执行不同的函数。
- 示例:
 1 import abc
 2 class Animal(metaclass=abc.ABCMeta):
 3     @abc.abstractmethod
 4     def talk(self):
 5         pass
 6
 7 class Cat(Animal):
 8     def talk(self):
 9         print(‘喵喵喵‘)
10 class Dog(Animal):
11     def talk(self):
12         print(‘汪汪汪‘)
13 class Pig(Animal):
14     def talk(self):
15         print(‘哼哼哼‘)
16
17 cat1 = Cat()
18 dog1 = Dog()
19 pig1 = Pig()
20
21 def func(x):
22     x.talk()
23
24 func(cat1)
25 func(dog1)
26 func(pig1)
27
28 ---
29 喵喵喵
30 汪汪汪
31 哼哼哼
1.增加了程序的灵活性
以不变应万变,不论对象如何变化,使用者都用同一种方式去调用,如func(animal)

2.增加了程序的可扩展性
- 数据的封装
- 函数/方法的封装
- 封装数据:保护隐私
- 封装函数/方法:隔离复杂度;(只需要提供一个最简单的操作方法给用户,把内部的实现隐藏起来)
封装其实分为两个层面,但无论哪种层面的封装,都要对外界提供好访问你内部隐藏内容的接口;

接口可以理解为入口,有了这个入口,使用者无需且不能够直接访问到内部隐藏的细节,只能走接口;

并且我们可以在接口的实现上附加更多的处理逻辑,从而严格控制使用者的访问;
- 第一种封装:创建类和对象会分别创建二者的名称空间,我们只能用类名.或者obj.的方式去访问里面的名字,这本身就是一种封装;
 1 class demo():
 2     x = 10
 3     def test(self):
 4         print(‘from demo -> test‘)
 5 d = demo()
 6 print(demo.x)
 7 print(d.x)
 8
 9 ---
10 10
11 10
- 对于这一层面的封装(隐藏),类名. 和 实例名. 就是访问隐藏属性的接口;
- 第二中封装:类中把某些属性和方法隐藏起来(或者说定义成私有的),只在类的内部使用、外部无法访问,或者留下少量接口(函数)供外部访问;
在python中用双下划线开头的方式实现隐藏属性(设置成私有的);

类中所有双下划线开头的名称如__x都会自动变形成:_类名__x的形式;

类中定义的__x只能在内部使用,如self.__x,引用的就是变形的结果;

这种变形其实正是针对外部的变形,在外部是无法通过__x这个名字访问到的;

在子类定义的__x不会覆盖在父类定义的__x,因为子类中变形成了:_子类名__x,而父类中变形成了:_父类名__x,即双下滑线开头的属性在继承给子类时,子类是无法覆盖的;

对于这一层面的封装(隐藏),我们需要在类中定义一个函数(接口函数)在它内部访问被隐藏的属性,然后外部就可以使用了;
- 属性没有隐藏的例子
 1 class demo():
 2     x = 10
 3     def test(self):
 4         print(‘from demo -> test‘)
 5
 6 print(demo.x)
 7 print(demo.__dict__)
 8 print(demo.__dict__[‘x‘])
 9
10 ---
11 10
12 {‘__dict__‘: <attribute ‘__dict__‘ of ‘demo‘ objects>, ‘__weakref__‘: <attribute ‘__weakref__‘ of ‘demo‘ objects>, ‘test‘: <function demo.test at 0x00000000007CC400>, ‘__module__‘: ‘__main__‘, ‘__doc__‘: None, ‘x‘: 10}
13 10
- 属性隐藏的例子: __x 在类的属性字典里变成了 _demo__x
 1 class demo():
 2     __x = 10
 3     def test(self):
 4         print(‘from demo -> test‘)
 5
 6 # print(demo.__x)        # 报错:AttributeError: type object ‘demo‘ has no attribute ‘__x‘
 7 print(demo.__dict__)
 8 print(demo.__dict__[‘_demo__x‘])
 9
10 ---
11 {‘test‘: <function demo.test at 0x000000000109C400>, ‘__module__‘: ‘__main__‘, ‘__dict__‘: <attribute ‘__dict__‘ of ‘demo‘ objects>, ‘_demo__x‘: 10, ‘__weakref__‘: <attribute ‘__weakref__‘ of ‘demo‘ objects>, ‘__doc__‘: None}
12 10
- 函数/方法的没有隐藏的例子:
 1 class Parent():
 2     def foo(self):
 3         print(‘from Parent.foo‘)
 4         self.bar()                     # 调用的是子类的方法
 5     def bar(self):
 6         print(‘from Parent.bar‘)
 7
 8 class Son(Parent):
 9     def bar(self):
10         print(‘from Son.bar‘)
11
12 s = Son()
13 s.foo()
14
15 ---
16 from Parent.foo
17 from Son.bar
- 函数/方法的隐藏的例子:
 1 class Parent():
 2     def foo(self):
 3         print(‘from Parent.foo‘)
 4         self.__bar()                   # 只有在类内部才可以通过 .__bar() 访问到;因为这行在定义的阶段就会变形成: self._Parent__bar()
 5     def __bar(self):                   # 调用的是父类的方法 ;   定义阶段就会变形成:def _Parent__bar()
 6         print(‘from Parent.bar‘)
 7
 8 class Son(Parent):
 9     def __bar(self):
10         print(‘from Son.bar‘)
11
12 s = Son()
13 s.foo()
14
15 ---
16 from Parent.foo
17 from Parent.bar
- 注意
这种机制也并没有真正意义上限制我们从外部直接访问属性;
知道了类名和属性名就可以拼出名字:_类名__属性,然后就可以访问了,如a._A__N;

变形的过程只在类的定义时发生一次;在定义后的赋值操作,不会变形;

在继承中,父类如果不想让子类覆盖自己的方法,可以将方法定义为私有的;
- 示例补充:
 1 class Parent():
 2     def foo(self):
 3         print(‘from Parent.foo‘)
 4         self.__bar()                  # 在定义的时候就会变形成:  self._Parent__bar()
 5     def __bar(self):                  # def _Parent__bar()
 6         print(‘from Parent.bar‘)
 7
 8 class Son(Parent):
 9     def __bar(self):                  # 在定义的时候就会变形:def _Son__bar()
10         print(‘from Son.bar‘)
11
12 s = Son()
13 print(s.__dict__)
14 print(Son.__dict__)
15 print(Parent.__dict__)
16 s._Son__bar()
17 Son.__dict__[‘_Son__bar‘](s)
18 s._Parent__bar()
19 Parent.__dict__[‘_Parent__bar‘](s)
20
21 ---
22 {}
23 {‘_Son__bar‘: <function Son.__bar at 0x000000000110C510>, ‘__module__‘: ‘__main__‘, ‘__doc__‘: None}
24 {‘__weakref__‘: <attribute ‘__weakref__‘ of ‘Parent‘ objects>, ‘__dict__‘: <attribute ‘__dict__‘ of ‘Parent‘ objects>, ‘_Parent__bar‘: <function Parent.__bar at 0x000000000110C488>, ‘__module__‘: ‘__main__‘, ‘foo‘: <function Parent.foo at 0x000000000110C400>, ‘__doc__‘: None}
25 from Son.bar
26 from Son.bar
27 from Parent.bar
28 from Parent.bar
- 示例:在父类中定义接口函数,供外部调用,从而访问父类的私有属性
 1 # 私有属性的查看和更改 + raise使用
 2 class People():
 3     def __init__(self,name,age):
 4         self.__name = name
 5         self.__age = age
 6
 7     def get_info(self):
 8         print(‘Name is %s, age is %s‘ % (self.__name,self.__age))
 9
10     def set_info(self,name,age):
11         if not isinstance(name,str):              # Python没有类型检查一说,所以需要自己提供类型检查;
12             raise TypeError(‘名字必须是字符串‘)     # 如果用户输入的名字不是 str 类型就抛出类型错误;
13         if not isinstance(age,int):
14             raise TypeError(‘年龄必须是整数‘)       # 如果用户输入的年龄不是 int 类型就抛出类型错误;
15         self.__name = name
16         self.__age = age
17
18 p1 = People(‘Alex‘,18)
19 p1.get_info()
20 p1.set_info(‘egon‘,20)
21 p1.get_info()
22 p1.set_info(‘standby‘,21)
23 p1.get_info()
24
25 ---
26 Name is Alex, age is 18
27 Name is egon, age is 20
28 Name is standby, age is 21
装饰器本身可以是任意可调用对象(包括函数、类...)
- property是一种特殊的属性,访问它时会执行一段功能(函数)然后返回值;
- 正常的样子:
 1 class Foo():
 2     def test(self):
 3         print(‘from Foo.test‘)
 4     # test = property(test)
 5
 6 f = Foo()
 7 f.test()
 8
 9 ---
10 from Foo.test
- 使用property的样子:
- 示例1:
 1 class Foo():
 2     def test(self):
 3         print(‘from Foo.test‘)
 4     test = property(test)           # property是一个类
 5
 6 f = Foo()
 7 f.test                              # 不用加 () 执行
 8
 9 ---
10 from Foo.test
- 示例2:装饰器形式
 1 class Foo():
 2     @property                       # 属性装饰器
 3     def test(self):
 4         print(‘from Foo.test‘)
 5
 6 f = Foo()
 7 f.test                              # 不用加 () 执行
 8
 9 ---
10 from Foo.test
- 练习:计算圆的周长和面积
 1 import math
 2 class Circle():
 3     def __init__(self,radius):
 4         self.radius = radius
 5     @property
 6     def perimeter(self):
 7         return math.pi * self.radius * 2
 8     @property
 9     def area(self):
10         return math.pi * self.radius ** 2
11
12 c = Circle(5)
13 print(c.perimeter)       # 可以向访问数据属性一样去访问perimeter,会触发一个函数的执行,动态计算出一个值;
14 print(c.area)            # 同上
15
16 ---
17 31.41592653589793
18 78.53981633974483
- property扩展用法:封装+提供接口
 1 class People():
 2     def __init__(self,name,permmission=False):
 3         self.__name = name
 4         self.permmission = permmission
 5
 6     @property
 7     def name(self):                                   # 属性装饰器,让对象可以像访问数据属性一样去访问name,实际上访问的是 _Peopel__name
 8         return self.__name                            # 可以理解为 _People__name 的get方法
 9     @name.setter
10     def name(self,name):                              # 设置针对 _People__name 的set方法
11         if not isinstance(name,str):
12             raise TypeError(‘名字必须是字符串类型‘)
13         self.__name = name
14     @name.deleter
15     def name(self):                                   # 设置 _People__name 的del方法
16         if not self.permmission:
17             raise PermissionError(‘不允许的操作!‘)
18         del self.__name
19
20 p1 = People(‘standby‘)
21 print(p1.name)
22 p1.name = ‘alex‘
23 print(p1.name)
24 del p1.name
25
26 ---
27 standby
28 alex
29 Traceback (most recent call last):
30   File "D:/soft/work/Python_17/day07/blog.py", line 326, in <module>
31     del p1.name
32   File "D:/soft/work/Python_17/day07/blog.py", line 319, in name
33     raise PermissionError(‘不允许的操作!‘)
34 PermissionError: 不允许的操作!
 1 class People():
 2     def __init__(self,name,permmission=False):
 3         self.__name = name
 4         self.permmission = permmission
 5
 6     @property
 7     def name(self):
 8         return self.__name
 9     @name.setter
10     def name(self,name):
11         if not isinstance(name,str):
12             raise TypeError(‘名字必须是字符串类型‘)
13         self.__name = name
14     @name.deleter
15     def name(self):
16         if not self.permmission:
17             raise PermissionError(‘不允许的操作!‘)
18         del self.__name
19
20 p1 = People(‘standby‘)
21 print(p1.name)
22 p1.name = ‘alex‘
23 print(p1.name)
24 p1.permmission = True                        # 设置删除权限为 True
25 del p1.name                                  # 删除操作
26 print(p1.name)
27
28 ---
29 standby
30 alex
31 Traceback (most recent call last):
32   File "D:/soft/work/Python_17/day07/blog.py", line 328, in <module>
33     print(p1.name)
34   File "D:/soft/work/Python_17/day07/blog.py", line 310, in name
35     return self.__name
36 AttributeError: ‘People‘ object has no attribute ‘_People__name‘
- 另一种写法:
 1 class People():
 2     def __init__(self,name,permmission=False):
 3         self.__name = name
 4         self.permmission = permmission
 5
 6     def get_name(self):
 7         return self.__name
 8     def set_name(self,name):
 9         if not isinstance(name,str):
10             raise TypeError(‘名字必须是字符串类型‘)
11         self.__name = name
12     def del_name(self):
13         if not self.permmission:
14             raise PermissionError(‘不允许的操作!‘)
15         del self.__name
16     name = property(get_name,set_name,del_name)             # 按照顺序;   与上面的例子是同样的效果;
17
18 p1 = People(‘standby‘)
19 print(p1.name)
20 p1.name = ‘alex‘
21 print(p1.name)
22 p1.permmission = True
23 del p1.name
24 print(p1.name)
于明确区分内外,使得类实现者可以修改封装内的东西而不影响外部调用者的代码;

而外部使用用者只知道一个接口(函数),只要接口(函数)名、参数不变,使用者的代码永远无需改变。

这就提供一个良好的合作基础——或者说,只要接口这个基础约定不变,则代码改变不足为虑。
- 绑定到对象的方法
- 在类中定义的,没有被任何装饰器装饰的函数都是绑定到对象的方法;
- 对象的自动传值(把自己当做第一个参数传进去);
- 示例1:
 1 class Foo():
 2     def test1(self):
 3         print(‘test1, ‘,self)
 4
 5 f = Foo()
 6 print(Foo.test1)    # test1 对于类 Foo来说就是一个函数
 7 print(f.test1)      # 对于对象f来说就是一个 绑定方法(bound method)
 8 f.test1()           # test1函数绑定到对象 f上,f 在调用的时候就会自动把自己当做第一个参数传进去;
 9
10 ---
11 <function Foo.test1 at 0x00000000010CC400>
12 <bound method Foo.test1 of <__main__.Foo object at 0x00000000010CA908>>
13 test1,  <__main__.Foo object at 0x00000000010CA908>
- 示例2:
 1 class Foo():
 2     def test1():           # 类Foo中定义的函数没有参数
 3         print(‘test1, ‘)
 4
 5 f = Foo()
 6 f.test1()                  # 根据绑定方法的定义,对象 f 在调用的时候就会把自己当做第一个参数传进去;所以会报错;
 7
 8 ---
 9 Traceback (most recent call last):
10   File "D:/soft/work/Python_17/day07/blog.py", line 396, in <module>
11     f.test1()
12 TypeError: test1() takes 0 positional arguments but 1 was given
- 绑定到类的方法
- 在类中定义的,被 @classmethod 修饰的函数就是绑定到类的方法;
- 类的自动传值(把自己当做第一个参数传进去);
 1 class Foo:
 2     @classmethod           # 定义绑定到类的方法
 3     def test(cls):
 4         print(cls)
 5
 6 print(Foo)
 7 Foo.test()                 # 绑定到类的方法,类在调用的时候就会把自己当做第一个参数传进去;
 8
 9 ---
10 <class ‘__main__.Foo‘>
11 <class ‘__main__.Foo‘>
- 在类中定义的,既不绑定到对象,也不绑定到类的函数;被 @staticmethod 修饰的函数;
- 不管谁来调用都没有自动传值一说;
- 就是类内部定义的一个 "普通工具";
 1 class Foo:
 2     @staticmethod
 3     def test():
 4         print(‘test...‘)
 5
 6 f = Foo()
 7 print(Foo)
 8 print(f)
 9 Foo.test()
10 f.test()
11 print(Foo.test)
12 print(f.test)
13 print(Foo.__dict__)
14
15 ---
16 <class ‘__main__.Foo‘>
17 <__main__.Foo object at 0x00000000010F2390>
18 test...
19 test...
20 <function Foo.test at 0x00000000010EC400>
21 <function Foo.test at 0x00000000010EC400>
22 {‘test‘: <staticmethod object at 0x00000000010EA860>, ‘__doc__‘: None, ‘__module__‘: ‘__main__‘, ‘__dict__‘: <attribute ‘__dict__‘ of ‘Foo‘ objects>, ‘__weakref__‘: <attribute ‘__weakref__‘ of ‘Foo‘ objects>}
- 扩展示例:
 1 class Foo:
 2     def test1(self):
 3         pass
 4     @classmethod
 5     def test2(cls):
 6         print(cls)
 7     @staticmethod
 8     def test3():
 9         pass
10
11 f=Foo()
12 print(f.test1)               # 绑定到对象的方法
13 print(Foo.test2)             # 绑定到类的方法
14 print(Foo.test3)             # 谁也不绑定的方法,只是类的函数属性
15 print(f.test3)               # 谁也不绑定的方法,只是类的函数属性
16
17 ---
18 <bound method Foo.test1 of <__main__.Foo object at 0x0000000000A32470>>
19 <bound method Foo.test2 of <class ‘__main__.Foo‘>>
20 <function Foo.test3 at 0x0000000000A2C510>
21 <function Foo.test3 at 0x0000000000A2C510>
- 示例1:绑定到对象
 1 class MySQL:
 2     def __init__(self,host,port):
 3         self.host=host
 4         self.port=port
 5         print(‘conneting...‘)
 6     def select(self): #绑定到对象的方法
 7         print(self)
 8         print(‘select function‘)
 9
10 conn=MySQL(‘192.168.1.3‘,3306)
11 conn.select()
12
13 ---
14 conneting...
15 <__main__.MySQL object at 0x0000000000B2A860>
16 select function
- 示例2:绑定到类
 1 # settings.py
 2 HOST=‘127.0.0.1‘
 3 PORT=3306
 4
 5 # 执行文件
 6 import settings
 7 class MySQL:
 8     def __init__(self,host,port):
 9         self.host=host
10         self.port=port
11         print(‘conneting...‘)
12     @classmethod
13     def from_conf(cls):
14         return cls(settings.HOST,settings.PORT) # 等价于 MySQL(‘127.0.0.1‘,3306),即间接调用类的 __init__()函数
15     def select(self): #绑定到对象的方法
16         print(self)
17         print(‘select function‘)
18
19 conn = MySQL.from_conf()                        # 等价于把 MySQL当做第一个参数传给类的方法 from_conf()
20 conn.select()
21
22 ---
23 conneting...
24 <__main__.MySQL object at 0x00000000010E2470>
25 select function
- 示例3:谁也不绑定的普通函数

1 def time(): # real signature unknown; restored from __doc__
2     """
3     time() -> floating point number
4
5     Return the current time in seconds since the Epoch.
6     Fractions of a second may be present if the system clock provides them.
7     """
8     return 0.0
1 def clock(): # real signature unknown; restored from __doc__
2     """
3     clock() -> floating point number
4
5     Return the CPU time or real time since the start of the process or since
6     the first call to clock().  This has as much precision as the system
7     records.
8     """
9     return 0.0
 1 # 生成一个唯一的id
 2 import time, hashlib
 3
 4 def create_id():
 5     m = hashlib.md5(str(time.time()).encode(‘utf-8‘))
 6     return m.hexdigest()
 7 print(create_id())
 8 print(create_id())
 9 print(create_id())
10
11 ---
12 23e5f91da003f794b3e0b35681f0e91e
13 23e5f91da003f794b3e0b35681f0e91e
14 23e5f91da003f794b3e0b35681f0e91e
 1 import time, hashlib
 2
 3 def create_id():
 4     m = hashlib.md5(str(time.clock()).encode(‘utf-8‘))
 5     return m.hexdigest()
 6 print(create_id())
 7 print(create_id())
 8 print(create_id())
 9
10 ---
11 362dc18e003ee03d1c64f35aef957966
12 0069e3d295dd493495db0adfd8008df1
13 31dded025da89a196a05a40db3d50e5f
- 在示例2的基础上,给每次实例化连接都附加一个id属性
 1 # settings.py
 2 HOST=‘127.0.0.1‘
 3 PORT=3306
 4
 5 # 执行文件
 6 import hashlib
 7 import time
 8 import settings
 9 class MySQL:
10     def __init__(self,host,port):
11         self.id=self.create_id()
12         self.host=host
13         self.port=port
14         print(‘conneting...‘)
15
16     @staticmethod
17     def create_id(): #非绑定方法,就是类中的普通工具包
18         m=hashlib.md5(str(time.clock()).encode(‘utf-8‘))
19         return m.hexdigest()
20     @classmethod
21     def from_conf(cls):
22         return cls(settings.HOST,settings.PORT) #MySQL(‘127.0.0.1‘,3306)
23     def select(self): #绑定到对象的方法
24         print(‘%s --> select function‘ % self.id)
25
26 conn1=MySQL.from_conf()
27 conn2=MySQL.from_conf()
28 conn3=MySQL.from_conf()
29 conn4=MySQL.from_conf()
30 conn1.select()
31 conn2.select()
32 conn3.select()
33 conn4.select()
34
35 ---
36 conneting...
37 conneting...
38 conneting...
39 conneting...
40 362dc18e003ee03d1c64f35aef957966 --> select function
41 7067177e6221914604cc0711d39524b2 --> select function
42 daef6092a8bfdbed7c6ebae5d8991c50 --> select function
43 e035b6f811ff8e7604f25d2f637fa08d --> select function
- 示例4:classmethod 和 staticmethod 的区别,以及 __str__() 的使用
 1 class Foo():
 2     def __init__(self):
 3         print(‘Foo.__init__ function...‘)
 4     def __str__(self):                         # 重写 __str__ 函数
 5         return ‘Foo.__str__ function...‘
 6
 7 f = Foo()  # 等价于:Foo.__init__(f)
 8 print(f)
 9 print(f.__str__())
10 print(Foo.__str__)
11
12 ---
13 Foo.__init__ function...
14 Foo.__str__ function...
15 Foo.__str__ function...
16 <function Foo.__str__ at 0x00000000006EC488>
 1 class People:
 2     def __init__(self,name,age):
 3         self.name=name
 4         self.age=age
 5     def __str__(self):
 6         # print(‘run __str__‘)
 7         return ‘name:%s age:%s‘ %(self.name,self.age)
 8
 9 p1=People(‘egon1‘,18)
10 p2=People(‘egon2‘,28)
11 print(p1)
12 print(p2)
13
14 ---
15 name:egon1 age:18
16 name:egon2 age:28
- staticmethod
 1 import settings
 2 class MySql():
 3     def __init__(self,host,port):
 4         self.host = host
 5         self.port = port
 6         print(‘Connecting...‘)
 7     @staticmethod
 8     def from_conf():
 9         return MySql(settings.HOST, settings.PORT)
10     def __str__(self):                                # 重写 __str__ 函数
11         print(‘from MySql.__str__()‘)
12         return (‘MySql...‘)
13 class Mariadb(MySql):
14     def __str__(self):
15         print(‘from Mariadb.__str__()‘)
16         return ‘Host: %s, Port: %s‘ % (self.host, self.port)
17
18 conn = Mariadb.from_conf()               # 子类没有 from_conf() 函数,所以去父类找,父类的from_conf是一个staticmethod,并且返回了一个 MySQL对象
19 print(conn)                              # 所以conn实际上是父类的对象,即执行父类里的 __str__函数
20
21 ---
22 Connecting...
23 from MySql.__str__()
24 MySql...
- classmethod
 1 import settings
 2 class MySql():
 3     def __init__(self,host,port):
 4         self.host = host
 5         self.port = port
 6         print(‘Connecting...‘)
 7     @classmethod
 8     def from_conf(cls):
 9         return cls(settings.HOST,settings.PORT)
10     def __str__(self):                            # 重写 __str__ 函数
11         print(‘from MySql.__str__()‘)
12         return (‘MySql...‘)
13 class Mariadb(MySql):
14     def __str__(self):
15         print(‘from Mariadb.__str__()‘)
16         return ‘Host: %s, Port: %s‘ % (self.host, self.port)
17
18 conn = Mariadb.from_conf()                        # 继承父类的from_conf函数,但父类的from_conf是一个绑定到类的方法,是子类在调用,所以传进去的参数是子类;
19 print(conn)                                       # 所以conn是子类的对象,故执行的是子类的 __str__函数;
20
21 ---
22 Connecting...
23 from Mariadb.__str__()
24 Host: 127.0.0.1, Port: 3306
- 练习5:
练习2(学生自己写):定义MySQL类

  1.对象有id、host、port三个属性

  2.定义工具create_id,在实例化时为每个对象随机生成id,保证id唯一

  3.提供两种实例化方式,方式一:用户传入host和port 方式二:从配置文件中读取host和port进行实例化

  4.为对象定制方法,save和get,save能自动将对象序列化到文件中,文件名为id号,文件路径为配置文件中DB_PATH;get方法用来从文件中反序列化出对象
- 代码实现:
 1 # settings
 2 HOST = ‘127.0.0.1‘
 3 PORT = 3306
 4 DB_PATH = r"D:\soft\work\Python_17\day07\MySql\account"
 5
 6 # MySql.py
 7 import settings
 8 import pickle
 9 import os,time,hashlib
10
11 class MySql():
12     def __init__(self,host,port):
13         self.id = self.create_id()
14         self.host = host
15         self.port = port
16         print(‘Connecting...‘)
17     @classmethod
18     def from_conf(cls):
19         return cls(settings.HOST,settings.PORT)
20     @staticmethod
21     def create_id():
22         m = hashlib.md5(str(time.clock()).encode(‘utf-8‘))
23         return m.hexdigest()
24     def save(self):
25         file_path = r"%s%s%s" % (settings.DB_PATH, os.sep, self.id)
26         pickle.dump(self,open(file_path,‘wb‘))
27     def get(self):
28         file_path = r"%s%s%s" % (settings.DB_PATH, os.sep, self.id)
29         return pickle.load(open(file_path,‘rb‘))
30
31 conn1 = MySql(‘10.0.0.2‘,‘22‘)
32 conn2 = MySql.from_conf()
33 print(conn1,conn1.id,conn1.host,conn1.port)
34 print(conn2,conn2.id,conn2.host,conn2.port)
35 conn1.save()
36 conn2.save()
37 res1 = conn1.get()
38 res2 = conn2.get()
39 print(res1,res1.id,res1.host,res1.port)
40 print(res2,res2.id,res2.host,res2.port)
41
42 ---
43 Connecting...
44 Connecting...
45 <__main__.MySql object at 0x00000000011B8CC0> 437656776fa5cd96c6a670bef33e81e4 10.0.0.2 22
46 <__main__.MySql object at 0x00000000011AC208> 5b18e65260ecafe8aa8d34881721f166 127.0.0.1 3306
47 <__main__.MySql object at 0x00000000011AC668> 437656776fa5cd96c6a670bef33e81e4 10.0.0.2 22
48 <__main__.MySql object at 0x00000000011AC3C8> 5b18e65260ecafe8aa8d34881721f166 127.0.0.1 3306
1.__init__      # 初始化,不能有返回值
2.__str__       # 必须有返回值,且必须是 str类型
__doc__
__bases__
- python面向对象中的反射:通过字符串的形式操作对象相关的属性。python中的一切事物都是对象(都可以使用反射);
- 通过类名获得类的实例对象;
- 通过方法名得到方法,实现调用;
- 示例1:通过字符串的方式去寻找一些属性
 1 class Chinese:
 2     country=‘China‘
 3     def __init__(self,name,age):
 4         self.name=name
 5         self.age=age
 6
 7 print(Chinese.country)    # Chinese.__dict__[‘country‘]
 8
 9 p=Chinese(‘egon‘,18)
10 print(p.name)             # p.__dict__[‘name‘]
11
12 ---
13 China
14 egon
- 示例2:反射模块
 1 import sys
 2 class Chinese:
 3     country=‘China‘
 4     def __init__(self,name,age):
 5         self.name=name
 6         self.age=age
 7
 8 m = sys.modules[__name__]           # 获取并打印当前模块
 9 print(m)
10 if hasattr(m,‘Chinese‘):            # 判断当前模块是否包含 ‘Chinese‘ 名字
11     res = getattr(m,‘Chinese‘)      # 有的话就获取该属性;
12     print(res)
13     obj = res(‘standby‘,‘23‘)       # 获取的是一个类,所以就可以实例化一个对象
14     print(obj.name,obj.age)         # 打印该对象的名字和年纪
15
16 ---
17 <module ‘__main__‘ from ‘D:/soft/work/Python_17/day07/blog.py‘>
18 <class ‘__main__.Chinese‘>
19 standby 23
- 应用:模拟ftp长传下载小程序
 1 class FtpCLient:
 2     def __init__(self,host):
 3         self.host=host
 4         print(‘Connecting...‘)
 5     def run(self):
 6         while True:
 7             inp=input(‘>>>: ‘).strip()
 8             inp_l=inp.split()
 9             if ‘Q‘ == inp_l[0].upper():
10                 print(‘Bye...‘)
11                 break
12             if hasattr(self,inp_l[0]):
13                 func=getattr(self,inp_l[0])
14                 func(inp_l)
15     def get(self,arg):
16         print(‘download file‘,arg[1])
17     def put(self,arg):
18         print(‘Upload file: %s‘ % arg[1])
19
20 f=FtpCLient(‘10.0.0.9‘)
21 f.run()
p.name                  # 本质就是 p.__dict__[‘name‘]

getattr(p,‘name‘)    # 本质就是 p.__dict__[‘name‘]
自省也称作反射,这个性质展示了某对象是如何在运行期取得自身信息的。

如果传一个对象给你,你可以查出它有什么能力,这是一项强大的特性。

如果Python不支持某种形式的自省功能,dir和type内建函数,将很难正常工作。

还有那些特殊属性,像__dict__,__name__及__doc__
hasattr(object,name):用于判断一个对象里中是否存在name这一特性.

setattr(object, name, value):该函数给对象中的属性赋值,该属性若不存在,则会在对象里创建新的属性

getattr(object, name[, default]),object为对象名,name为对象属性(必须是字符串),
	default为name属性不存在时指定的返回内容(可以是字符串,也可以是部分指令),
	若对象中存在该属性,则函数返回object.name,
	否则返回default中的内容,若省略default,则返回 AttributeError.

delattr(object, name):删除指定对象的属性,可以配合hasattr使用
1 def setattr(x, y, v): # real signature unknown; restored from __doc__
2     """
3     Sets the named attribute on the given object to the specified value.
4
5     setattr(x, ‘y‘, v) is equivalent to ``x.y = v‘‘
6     """
7     pass
1 def delattr(x, y): # real signature unknown; restored from __doc__
2     """
3     Deletes the named attribute from the given object.
4
5     delattr(x, ‘y‘) is equivalent to ``del x.y‘‘
6     """
7     pass
1 def hasattr(*args, **kwargs): # real signature unknown
2     """
3     Return whether the object has an attribute with the given name.
4
5     This is done by calling getattr(obj, name) and catching AttributeError.
6     """
7     pass
1 def getattr(object, name, default=None): # known special case of getattr
2     """
3     getattr(object, name[, default]) -> value
4
5     Get a named attribute from an object; getattr(x, ‘y‘) is equivalent to x.y.
6     When a default argument is given, it is returned when the attribute doesn‘t
7     exist; without it, an exception is raised in that case.
8     """
9     pass
class Foo(object):
    def __init__(self):
        self.name = ‘abc‘

    def func(self):
        return ‘ok‘
obj = Foo()
ret = getattr(obj, ‘func‘)  # 获取的是个对象
print(type(ret),ret)
res = ret()
print(res)
ret = hasattr(obj, ‘func‘)  # 因为有func方法所以返回True
print(ret)
print(obj.name)
ret = setattr(obj, ‘name‘, ‘standby‘)
print(obj.name)
delattr(obj, ‘name‘)        # 删除指定属性
# print(obj.name)  # 报错:AttributeError: ‘Foo‘ object has no attribute ‘name‘

---
<class ‘method‘> <bound method Foo.func of <__main__.Foo object at 0x00000000010D34E0>>
ok
True
abc
standby
#!/usr/bin/python
# -*- coding:utf-8 -*-


# class Foo:
#     pass
#
# class Bar(Foo):
#     pass
#
# print(issubclass(Bar,Foo))


#反射
class Chinese:
    country=‘China‘
    def __init__(self,name,age):
        self.name=name
        self.age=age

# print(Chinese.county) #Chinese.__dict__[‘country‘]

p=Chinese(‘egon‘,18)
# print(p.name) #p.__dict__[‘name‘]
#
# print(hasattr(p,‘name‘))                     # 判断对象p是否有name属性
# print(hasattr(Chinese,‘country‘))            # 判断类Chinese是否有country属性


# p.x=1
# print(p.__dict__)
# print(p.x)
# setattr(p,‘x‘,1231231231231)                 # 设置对象p的x属性的值为 1231231231231
# print(p.__dict__)
# print(p.x)


# print(getattr(p,‘x‘,‘not exist‘))
# print(getattr(p,‘name‘,‘not exist‘))         # 获取对象p的name属性,如果不存在则返回 ‘not exist‘

# setattr(p,‘x‘,123123123123123)
# if hasattr(p,‘x‘):
#     res=getattr(p,‘x‘)
#     print(res)

# print(Chinese.country)
# delattr(Chinese,‘country‘)                   # 删除类的country属性
# print(Chinese.country)
# print(p.country)
# p1=Chinese(‘aaaaa‘,18)
# print(p1.country)

# import sys
# m=sys.modules[__name__]
# # print(m)
#
# if hasattr(m,‘Chinese‘):
#     res=getattr(m,‘Chinese‘)
#     # print(res)
#     obj=res(‘egon‘,18)
#     print(obj.name)


p.name #p.__dict__[‘name‘]
getattr(p,‘name‘) #p.__dict__[‘name‘]
- 参考:http://www.cnblogs.com/linhaifeng/articles/6204014.html#_label2
- 1.导入模块的多种方式
- 正常导入
import sys
- 以字符串方式导入
1 以字符串的形式导入对应模块:
2 m = __import__(‘sys‘)
3 print(m)
4
5 import importlib
6 importlib.import_module(‘sys‘)
os.sep

os.listdir

sys.models
- os.getcwd() 和 os.listdir() 示例:
1 import os
2
3 print(os.getcwd())                # 获取当前路径
4 res = os.listdir(os.getcwd())     # 获取当前路径下所有的文件
5 print(res)
6
7 ---
8 D:\soft\work\Python_17\day07
9 [‘blog.py‘, ‘exercise.py‘, ‘homework‘, ‘id.txt‘, ‘MySql‘, ‘s1.py‘, ‘settings.py‘, ‘__pycache__‘, ‘上节课回顾‘, ‘本节内容‘]
题目要求:
代码实现:
‘‘‘
关联:一对多、多对多

school  course      一对多
school  teacher     一对多
school  student     一对多
course  teacher     多对多
course  student     多对多

class   course      多对多
class   student     多对多
class   teacher     多对多

# 可以用 中间类 的形式实现多对多


学校
课程 -> 学校
班级 -> 学校 -> 课程
学生 -> 学校 -> 课程 -> 班级
老师 -> 学校 -> 课程 -> 班级

‘‘‘
1 # 代码整理中...
标签:面向 sch mon play modules 多少 获取 共享 注释
原文地址:http://www.cnblogs.com/standby/p/6986670.html
