标签:chm i++ section rgb 图像 cell div else 删除
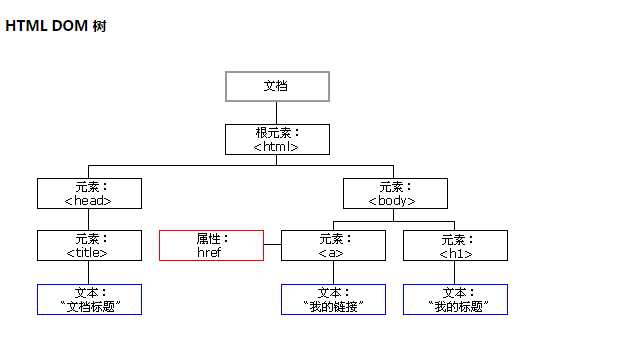
什么叫DOM?
DOM是文档对象模型(Document Object Model,是基于浏览器编程(在本教程中,可以说就是DHTML编程)的一套API接口,W3C出台的推荐标准,每个浏览器都有一些细微的差别,其中以Mozilla的浏览器最与标准接近。
DOM属于浏览器,而不是JavaScript语言规范里的规定的核心内容。
查找元素
1、直接查找
| 方法名 | 描述 |
| getElementById(id) (document) | 获取有指定惟一ID属性值文档中的元素 |
| getElementsByTagName_r(name) | 返回当前元素中有指定标记名的子元素的数组 |
| document.getElementsByClassName | 根据属性获取标签集合 |
| getAttribute(name) | 返回元素的属性值,属性由name指定 |
1>document.getElementById(‘id‘)
|
1
2
3
4
5
6
7
8
9
10
|
<body> <div id="zhang"> 不帅 </div> <script type="text/javascript"> var i = document.getElementById(‘zhang‘); //查找指定的id i.innerText = ‘很帅‘; //innerText修改指定的字符串 </script></body> |
显示效果,当我们打开IE的时候不帅就会被修改为很帅
2>getElementsByTagName_r(name)
|
1
2
3
4
5
6
7
8
9
10
|
<body> <div name="zhang"> 不帅 </div> <script type="text/javascript"> var i = document.getElementByTagNmae(‘zhang‘); //查找指定的name名 i.innerText = ‘很帅‘; //innerText修改指定的字符串 </script></body> |
其显示效果一样
3>document.getElementsByClassName
|
1
2
3
4
5
6
7
8
9
10
|
<body> <div class="zhang"> 不帅 </div> <script type="text/javascript"> var i = document.getElementClassName(‘zhang‘); //查找指定的class名 i.innerText = ‘很帅‘; //innerText修改指定的字符串 </script></body> |
2、间接查找
| 属性名 | 描述 |
| childNodes | 返回当前元素所有子元素的数组 |
| childNodes | 返回当前元素的所有子元素 |
| firstChild | 返回当前元素的第一个下级子元素 |
| lastChild | 返回当前元素的最后一个子元素 |
| nextSibling | 返回紧跟在当前元素后面的元素 |
| previousSibling | 返回紧跟在当前元素前面的元素 |
| parentElement | 返回其父节点标签元素 |
| children | 返回其所有子标签 |
| firstElementChild | 返回第一个子标签元素 |
| lastElementChild | 返回最后一个子标签元素 |
| nextElementtSibling | 返回下一个兄弟标签元素 |
| previousElementSibling | 返回上一个兄弟标签元素 |
利用XML的强大功能和灵活性,将XML作为浏览器和服务器之间的通信介质。
操作元素
1、动态创建内容时所用的W3C DOM属性和方法
| 属性/方法 | 描述 |
| document.createElement_x(tagName) | 文档对象上的createElement_x方法可以创建由tagName指定的元素。如果以串div作为方法参数,就会生成一个div元素 |
| document.createTextNode(text) | 文档对象的createTextNode方法会创建一个包含静态文本的节点 |
| <element>.appendChild(childNode) | appendChild方法将指定的节点增加到当前元素的子节点列表(作为一个新的子节点)。 |
| <element>.setAttribute(name, value) | 这些方法分别获得和设置元素中name属性的值 |
| <element>.insertBefore(newNode, targetNode) | 将节点newNode作为当前元素的子节点插到targetNode元素前面 |
| <element>.removeAttribute(name) | 这个方法从元素中删除属性name |
| <element>.removeChild(childNode) | 这个方法从元素中删除子元素childNode |
| <element>.replaceChild(newNode, oldNode) | 这个方法将节点oldNode替换为节点newNode |
| <element>.hasChildnodes() | 这个方法返回一个布尔值,指示元素是否有子元素 |
2、标签内容
|
1
2
3
|
innerText 获取标签文本内容innerHTML 获取HTML内容value 获取值,即form提交表单的值 |
即实例如下:
|
1
2
3
4
5
6
7
8
|
<div class="zhang">1111</div><div class="yan">2222</div><input class="lin" type="text" value="张岩林"><script> document.getElementsByClassName("zhang").innertext = 123; // 获取类名为zhang的标签并把内容改为123 document.getElementsByClassName("yan").innerHTML = 456; //获取类名为yan的标签并把内容改为456 document.getElementsByClassName("lin").value = "张岩林很帅"; //获取类名为lin的标签并把内容改为张岩林很帅</script> |
3、属性
|
1
2
3
|
attributes // 获取所有标签属性setAttribute(key,value) // 设置标签属性getAttribute(key) // 获取指定标签属性 |
通过自定义属性可以做一个全选,反选,取消选择的案例,代码如下:
|
1
2
3
4
5
6
7
8
9
10
11
12
13
14
15
16
17
18
19
20
21
22
23
24
25
26
27
28
29
30
31
32
33
34
35
36
37
38
39
40
41
42
43
44
45
46
47
48
49
50
51
52
|
<!DOCTYPE html><html lang="en"><head> <meta charset="UTF-8"> <title>Title</title></head><body><div> <input type="button" value="全选" onclick="Checkall();"> <input type="button" value="取消" onclick="Cancleall();"> <input type="button" value="反选" onclick="recvall();"></div><div id = "i1"> <ul> <li><input type="checkbox" value="1" class="c1">篮球</li> <li><input type="checkbox" value="2" class="c1">足球</li> <li><input type="checkbox" value="3" class="c1">排球</li> </ul></div><script> function Checkall() { var b = document.getElementsByClassName("c1"); for (var i = 0 ;i < b.length;i++){ var check = b[i]; check.checked = true } } function Cancleall() { var b = document.getElementsByClassName("c1"); for (var i = 0 ;i < b.length;i++){ var check = b[i]; check.checked = false } } function recvall() { var b = document.getElementsByClassName("c1"); for (var i = 0 ;i < b.length;i++){ var check = b[i]; if (check.checked){ check.checked = false }else { check.checked = true } } }</script></body></html>全选、反选、取消案例 |
注:onclick是属于点击事件,后面会提到
4、class操作
|
1
2
3
|
className // 获取所有类名classList.remove(cls) // 删除指定类classList.add(cls) // 添加类 |
当我们鼠标放到全部商品的时候,下面就出现好多商品,其商品是属于隐藏的,触发事件以后他才显示出来,其中间的操作就是定义了一个css隐藏属性,鼠标放上去后,移除CSS隐藏属性;鼠标移走又把隐藏属性给添加上去。
|
1
2
3
4
5
6
7
8
9
10
11
12
13
14
15
16
17
18
19
20
21
22
23
24
25
26
|
<!DOCTYPE html><html><head lang="en"> <meta charset="UTF-8"> <title>隐藏</title> <style> .hide{ display: none; } </style></head><body><span onmouseover="mouOver();" onmouseout="mouOut();">放这上面有东西出来,不放东西又消失</span><div class="hide" id = "zhangyanlin" style="font-size: 60px">张岩林好帅</div><script> function mouOver() { document.getElementById("zhangyanlin").classList.remove("hide"); } function mouOut() { document.getElementById("zhangyanlin").classList.add("hide"); }</script></body></html>来个案例醒醒脑 |
5、标签操作
dom创建标签,添加到指定位置
|
1
2
3
4
5
6
7
8
9
10
11
|
// 方式一var zhang = "<input type=‘text‘ />";xxx.insertAdjacentHTML("beforeEnd",zhang);xxx.insertAdjacentElement(‘afterBegin‘,document.createElement(‘a‘)) //注意:第一个参数只能是‘beforeBegin‘、 ‘afterBegin‘、 ‘beforeEnd‘、 ‘afterEnd‘ // 方式二var tag = document.createElement(‘div‘)xxx.appendChild(tag) //往后追加一个div元素xxx.insertBefore(tag,xxx[1]) //插到指定位置,可根据索引 |
|
1
2
3
4
5
6
7
8
9
10
11
12
13
14
15
16
17
18
19
20
21
22
23
24
25
26
27
28
29
30
31
32
33
34
35
36
37
38
39
40
41
42
43
44
45
46
47
|
<!DOCTYPE html><html lang="en"><head> <meta charset="UTF-8"> <title>Title</title></head><body> <div> <div> <input type="text" /> <input type="button" value="添加" onclick="AddElement(this);" /> </div> <div style="position: relative;"> <ul id="commentList"> <li>alex</li> <li>eric</li> </ul> </div> </div> <script> function AddElement(ths) { // 获取输入的值 var val = ths.previousElementSibling.value; ths.previousElementSibling.value = ""; var commentList = document.getElementById(‘commentList‘); //第一种形式,字符串方式 //var str = "<li>" + val + "</li>"; // ‘beforeBegin‘、 ‘afterBegin‘、 ‘beforeEnd‘、 ‘afterEnd‘ // beforeEnd内部最后 // beforeBegin 外部上边 //afterBegin 内部贴身 //afterEnd 外部贴墙 //commentList.insertAdjacentHTML("beforeEnd",str); //第二种方式,元素的方式 var tag = document.createElement(‘li‘); tag.innerText = val; var temp = document.createElement(‘a‘); temp.innerText = ‘百度‘; tag.appendChild(temp); // commentList.appendChild(tag); commentList.insertBefore(tag,commentList.children[1]); } </script></body></html>添加标签操作案例 |
6、样式操作
|
1
2
3
4
5
6
7
8
|
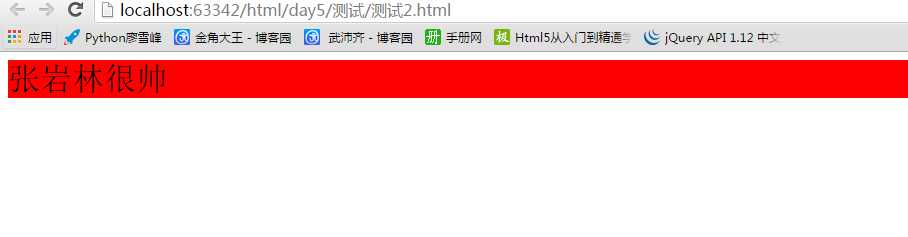
<body><div id = i1>张岩林很帅</div><script>var obj = document.getElementById(‘i1‘);obj.style.fontSize = "32px";obj.style.backgroundColor = "red";</script></body> |
效果如下:
|
1
2
3
4
5
6
7
8
9
10
11
12
13
14
15
16
17
18
19
20
21
22
23
24
25
26
27
28
29
30
31
32
33
34
35
|
<!DOCTYPE html><html lang="en"><head> <meta charset="UTF-8"> <title>Title</title> <style> .bb{ color: #9a9a9a; } .aa{ color: black; } </style></head><body> <input class="bb" value="请输入内容" onfocus="inpAtu(this);" onblur="onBtu(this);"> <script> function inpAtu(ths) { ths.className = "aa"; var text = ths.value; if (text == "请输入内容"){ ths.value = ""; } } function onBtu(ths) { var text = ths.value; if (text == "请输入内容" || text.trim().length == 0){ ths.className = "bb"; ths.value = "请输入内容"; } } </script></body></html>input输入框提示 |
7、位置操作
|
1
2
3
4
5
6
7
8
9
10
11
12
13
14
15
16
17
|
总文档高度document.documentElement.offsetHeight 当前文档占屏幕高度document.documentElement.clientHeight 自身高度tag.offsetHeight 距离上级定位高度tag.offsetTop 父定位标签tag.offsetParent 滚动高度tag.scrollTop |
网页右下角有个返回顶部,一点就返回到上面了,其实就是计算这些高度;还有当你鼠标往下拉的时候,左边菜单栏相对应的样式都会变。
|
1
2
3
4
5
6
7
8
9
10
11
12
13
14
15
16
17
18
19
20
21
22
23
24
25
26
27
28
29
30
31
32
33
34
35
36
37
38
39
40
41
42
43
44
45
46
47
48
49
50
51
52
53
54
55
56
57
58
59
60
61
62
63
64
65
66
67
68
69
70
71
72
73
74
75
76
77
78
79
80
81
82
83
84
85
86
87
88
89
90
91
92
93
94
95
96
97
98
99
100
101
102
103
104
105
106
107
108
109
110
111
112
113
114
115
116
117
118
119
120
121
122
123
124
125
126
127
128
129
130
131
132
133
134
135
136
137
138
139
140
141
142
143
144
145
146
147
148
149
150
151
152
153
154
155
156
157
158
159
160
161
162
163
164
165
166
167
168
169
170
171
172
173
174
175
176
177
178
179
180
181
182
183
184
185
186
187
188
189
190
191
192
193
194
|
<!DOCTYPE html><html><head lang="en"> <meta charset="UTF-8"> <title></title></head><style> body{ margin: 0px; } img { border: 0; } ul{ padding: 0; margin: 0; list-style: none; } h1{ padding: 0; margin: 0; } .clearfix:after { content: "."; display: block; height: 0; clear: both; visibility: hidden; } .wrap{ width: 980px; margin: 0 auto; } .pg-header{ padding: 0px 0px 0px 5px; background-image: initial; background-position: initial; background-size: initial; background-repeat: initial; background-attachment: initial; background-origin: initial; background-clip: initial; border-left: 3px solid rgb(108, 226, 108); line-height: 20px; width: 640px; clear: both; border-radius: 0px !important; border-top: 0px !important; border-right: 0px !important; border-bottom: 0px !important; border-image: initial !important; bottom: auto !important; float: none !important; height: auto !important; left: auto !important; outline: 0px !important; overflow: visible !important; position: static !important; right: auto !important; top: auto !important; vertical-align: baseline !important; box-sizing: content-box !important; font-family: Consolas, "Bitstream Vera Sans Mono", "Courier New", Courier, monospace !important; min-height: auto !important; color: gray !important;">#303a40; -webkit-box-shadow: 0 2px 5px rgba(0,0,0,.2); -moz-box-shadow: 0 2px 5px rgba(0,0,0,.2); box-shadow: 0 2px 5px rgba(0,0,0,.2); } .pg-header .logo{ float: left; padding:5px 10px 5px 0px; } .pg-header .logo img{ vertical-align: middle; width: 110px; height: 40px; } .pg-header .nav{ line-height: 50px; } .pg-header .nav ul li{ float: left; } .pg-header .nav ul li a{ display: block; color: #ccc; padding: 0 20px; text-decoration: none; font-size: 14px; } .pg-header .nav ul li a:hover{ color: #fff; padding: 0px 0px 0px 5px; background-image: initial; background-position: initial; background-size: initial; background-repeat: initial; background-attachment: initial; background-origin: initial; background-clip: initial; border-left: 3px solid rgb(108, 226, 108); line-height: 20px; width: 640px; clear: both; border-radius: 0px !important; border-top: 0px !important; border-right: 0px !important; border-bottom: 0px !important; border-image: initial !important; bottom: auto !important; float: none !important; height: auto !important; left: auto !important; outline: 0px !important; overflow: visible !important; position: static !important; right: auto !important; top: auto !important; vertical-align: baseline !important; box-sizing: content-box !important; font-family: Consolas, "Bitstream Vera Sans Mono", "Courier New", Courier, monospace !important; min-height: auto !important; color: gray !important;">#425a66; } .pg-body{ } .pg-body .catalog{ position: absolute; top:60px; width: 200px; padding: 0px 0px 0px 5px; background-image: initial; background-position: initial; background-size: initial; background-repeat: initial; background-attachment: initial; background-origin: initial; background-clip: initial; border-left: 3px solid rgb(108, 226, 108); line-height: 20px; width: 640px; clear: both; border-radius: 0px !important; border-top: 0px !important; border-right: 0px !important; border-bottom: 0px !important; border-image: initial !important; bottom: auto !important; float: none !important; height: auto !important; left: auto !important; outline: 0px !important; overflow: visible !important; position: static !important; right: auto !important; top: auto !important; vertical-align: baseline !important; box-sizing: content-box !important; font-family: Consolas, "Bitstream Vera Sans Mono", "Courier New", Courier, monospace !important; min-height: auto !important; color: gray !important;">#fafafa; bottom: 0px; } .pg-body .catalog.fixed{ position: fixed; top:10px; } .pg-body .catalog .catalog-item.active{ color: #fff; padding: 0px 0px 0px 5px; background-image: initial; background-position: initial; background-size: initial; background-repeat: initial; background-attachment: initial; background-origin: initial; background-clip: initial; border-left: 3px solid rgb(108, 226, 108); line-height: 20px; width: 640px; clear: both; border-radius: 0px !important; border-top: 0px !important; border-right: 0px !important; border-bottom: 0px !important; border-image: initial !important; bottom: auto !important; float: none !important; height: auto !important; left: auto !important; outline: 0px !important; overflow: visible !important; position: static !important; right: auto !important; top: auto !important; vertical-align: baseline !important; box-sizing: content-box !important; font-family: Consolas, "Bitstream Vera Sans Mono", "Courier New", Courier, monospace !important; min-height: auto !important; color: gray !important;">#425a66; } .pg-body .content{ position: absolute; top:60px; width: 700px; margin-left: 210px; padding: 0px 0px 0px 5px; background-image: initial; background-position: initial; background-size: initial; background-repeat: initial; background-attachment: initial; background-origin: initial; background-clip: initial; border-left: 3px solid rgb(108, 226, 108); line-height: 20px; width: 640px; clear: both; border-radius: 0px !important; border-top: 0px !important; border-right: 0px !important; border-bottom: 0px !important; border-image: initial !important; bottom: auto !important; float: none !important; height: auto !important; left: auto !important; outline: 0px !important; overflow: visible !important; position: static !important; right: auto !important; top: auto !important; vertical-align: baseline !important; box-sizing: content-box !important; font-family: Consolas, "Bitstream Vera Sans Mono", "Courier New", Courier, monospace !important; min-height: auto !important; color: gray !important;">#fafafa; overflow: auto; } .pg-body .content .section{ height: 500px; border: 1px solid red; }</style><body onscroll="ScrollEvent();"><div class="pg-header"> <div class="wrap clearfix"> <div class="logo"> <a href="#"> </a> </div> <div class="nav"> <ul> <li> <a href="#">首页</a> </li> <li> <a href="#">功能一</a> </li> <li> <a href="#">功能二</a> </li> </ul> </div> </div></div><div class="pg-body"> <div class="wrap"> <div class="catalog" id="catalog"> <div class="catalog-item" auto-to="function1"><a>第1张</a></div> <div class="catalog-item" auto-to="function2"><a>第2张</a></div> <div class="catalog-item" auto-to="function3"><a>第3张</a></div> </div> <div class="content" id="content"> <div menu="function1" class="section"> <h1>第一章</h1> </div> <div menu="function2" class="section"> <h1>第二章</h1> </div> <div menu="function3" class="section"> <h1>第三章</h1> </div> </div> </div></div> <script> function ScrollEvent(){ var bodyScrollTop = document.body.scrollTop; if(bodyScrollTop>50){ document.getElementsByClassName(‘catalog‘)[0].classList.add(‘fixed‘); }else{ document.getElementsByClassName(‘catalog‘)[0].classList.remove(‘fixed‘); } var content = document.getElementById(‘content‘); var sections = content.children; for(var i=0;i<sections.length;i++){ var current_section = sections[i]; // 当前标签距离顶部绝对高度 var scOffTop = current_section.offsetTop + 60; // 当前标签距离顶部,相对高度 var offTop = scOffTop - bodyScrollTop; // 当前标签高度 var height = current_section.scrollHeight; if(offTop<0 && -offTop < height){ // 当前标签添加active // 其他移除 active var menus = document.getElementById(‘catalog‘).children; var current_menu = menus[i]; current_menu.classList.add(‘active‘); for(var j=0;j<menus.length;j++){ if(menus[j] == current_menu){ }else{ menus[j].classList.remove(‘active‘); } } break; } } } </script></body></html>滚动菜单 |
|
1
2
3
4
5
6
7
8
9
10
11
12
13
14
15
16
17
18
19
20
21
22
23
24
25
26
27
28
29
30
31
32
33
34
35
36
37
38
39
40
41
42
43
44
|
<!DOCTYPE html><html lang="en"><head> <meta charset="UTF-8"> <title>Title</title> <style> .pg-top{ position: fixed; padding: 0px 0px 0px 5px; background-image: initial; background-position: initial; background-size: initial; background-repeat: initial; background-attachment: initial; background-origin: initial; background-clip: initial; border-left: 3px solid rgb(108, 226, 108); line-height: 20px; width: 640px; clear: both; border-radius: 0px !important; border-top: 0px !important; border-right: 0px !important; border-bottom: 0px !important; border-image: initial !important; bottom: auto !important; float: none !important; height: auto !important; left: auto !important; outline: 0px !important; overflow: visible !important; position: static !important; right: auto !important; top: auto !important; vertical-align: baseline !important; box-sizing: content-box !important; font-family: Consolas, "Bitstream Vera Sans Mono", "Courier New", Courier, monospace !important; min-height: auto !important; color: gray !important;">#0095bb; height: 40px; width: 40px; bottom: 50px; right: 40px; color: whitesmoke; } .hide{ display: none; } </style></head><body onscroll="Func();"> <div style="height: 3000px;" id = "i1"> <h1>张岩林</h1> </div> <div class="pg-top hide" id = "i2"> <a href="javascript:void(0);" onclick="GoTop();">返回顶部</a> </div><script> function Func() { var scrollTop = document.body.scrollTop; var i1 = document.getElementById("i2"); if (scrollTop>20){ i1.classList.remove("hide") }else { i1.classList.add("hide") } } function GoTop() { document.body.scrollTop = 0; }</script></body></html>返回顶部 |
8、其他操作
|
1
2
3
4
5
6
7
8
9
10
11
12
13
14
|
console.log 输出框alert 弹出框confirm 确认框 // URL和刷新location.href 获取URLlocation.href = "url" 重定向location.reload() 重新加载 // 定时器setInterval 多次定时器clearInterval 清除多次定时器setTimeout 单次定时器clearTimeout 清除单次定时器 |
给说下定时器吧,定时器比较有用,比如当我们删除一个邮件的时候,会发现弹出一段对话,邮件已删除,这个是单次定时器,多次定时器在自己特定需求的时候,可以用到
|
1
2
3
4
5
6
7
8
9
10
11
12
13
14
15
16
|
// 多次定时器案例<input type="button" value="Interval" onclick="Interval();"><input type="button" value="StopInterval" onclick="StopInterval();"> <script> function Interval() { s1 = setInterval(function () { console.log(123) //持续输出123 },500); s1 = setInterval(function () { console.log(123) },500); } function StopInterval() { clearInterval(s1); //清除一个多次定时器 } </script> |
单次定时器
|
1
2
3
4
5
6
7
8
9
10
11
12
13
14
15
16
17
|
<div> <input type="button" value="删除" onclick="Delete();"> <input type="button" value="保留当前状态" onclick="UnDelete();"> <div id = "status"></div> </div> <script> function Delete() { document.getElementById("status").innerText = "已删除"; t1 = setTimeout(Clearstatus,1500); } function Clearstatus() { document.getElementById("status").innerText = ""; } function UnDelete() { clearTimeout(t1); //清除完定时器,他会一直显示 } </script> |
事件
|
1
2
3
4
5
6
7
8
9
10
11
12
13
14
15
16
17
18
19
20
21
22
23
24
25
26
27
28
29
30
31
32
33
34
35
36
37
38
39
40
41
42
43
44
45
46
47
48
49
50
51
52
53
54
55
56
57
58
59
60
61
62
|
<!DOCTYPE html><html lang="en"><head> <meta charset="UTF-8"> <title>Title</title></head><body> // 普通事件 <button id = "btn1" onclick="func();">按钮</button> <script> var btn = document.getElementById("btn1"); function func() { alert("普通时间处理") } </script> // 0级处理事件 <button id = "btn2">0级处理按钮</button> <script> var btn = document.getElementById("btn2"); btn.onclick = function () { alert("0级处理按钮") };// btn.onclick = null; // 清除事件处理, 多个事件会被覆盖掉,只剩下最后一个事件 </script> // 2级处理事件 <button id = "btn3">2级处理按钮</button> <script> var btn = document.getElementById("btn3").addEventListener("click",function () { alert("二级处理事件1") }); var btn1= document.getElementById("btn3").addEventListener("click",function () { alert("二级处理事件2") }); //不会被覆盖 </script> <button id = "btn4">完整兼容按钮</button> <script> var btn = document.getElementById("btn4"); if (btn.addEventListener){ btn.addEventListener("click",demo); }else if(btn.attachEvent){ btn.attachEvent("onclick",demo); }else { btn.onclick = demo; } function demo() { alert("整合兼容事件处理") } </script></body></html> |
事件列表:
| 属性 | 此事件什么时候发生(什么时候被触发) |
| onabort | 图象的加载被中断 |
| onblur | 元素失去焦点 |
| onchange | 区域的内容被修改 |
| onclick | 当用户点击某个对象时调用的事件句柄(比点击input标签时执行上面的代码例子) |
| ondblclick | 当用户双击某个对象时调用的事件句柄 |
| onerror | 在加载文档或图像时发生错误 |
| onfocus | 元素获得焦点 |
| onkeydown | 某个键盘按键被按下 |
| onkeypress | 某个键盘按键被按下并松开 |
| onkeyup | 某个键盘被松开 |
| onload | 一张页面或一副图片完成加载 |
| onmousedown | 鼠标按钮被按下 |
| onmousemove | 鼠标移动过来后 |
| onmouseout | 鼠标从某个元素移开 |
| onmouseover | 鼠标移动到某个元素之上 |
| onmouseup | 鼠标按键被松开 |
| onreset | 重置按钮被点击 |
| onresize | 窗口或框架被重新调整大小 |
| onselect | 文本被选中 |
| onsubmit | 确认按钮被点击 |
| onunload | 用户退出页面 |
注:一个标签可以绑定多个事件,this标签当前正在操作的标签,event封装了当前事件的内容。
|
1
2
3
4
5
6
7
8
9
10
11
12
13
14
15
16
17
18
19
20
21
22
23
24
25
26
27
28
29
30
31
32
33
34
35
36
37
38
39
40
41
42
43
44
45
46
47
48
49
50
51
52
53
54
55
56
57
58
59
60
61
62
63
64
65
66
67
68
69
70
71
72
73
74
75
76
77
78
79
80
81
82
83
84
85
86
87
88
89
|
<!DOCTYPE html><html lang="en"><head> <meta charset="UTF-8"> <title>Title</title> <style> ul{ list-style: none; padding: 0; margin: 0; } ul li{ float: left; padding: 0px 0px 0px 5px; background-image: initial; background-position: initial; background-size: initial; background-repeat: initial; background-attachment: initial; background-origin: initial; background-clip: initial; border-left: 3px solid rgb(108, 226, 108); line-height: 20px; width: 640px; clear: both; border-radius: 0px !important; border-top: 0px !important; border-right: 0px !important; border-bottom: 0px !important; border-image: initial !important; bottom: auto !important; float: none !important; height: auto !important; left: auto !important; outline: 0px !important; overflow: visible !important; position: static !important; right: auto !important; top: auto !important; vertical-align: baseline !important; box-sizing: content-box !important; font-family: Consolas, "Bitstream Vera Sans Mono", "Courier New", Courier, monospace !important; min-height: auto !important; color: gray !important;">#038CAE; color: white; padding: 15px 20px; } .clearfix:after{ display: block; content: ‘.‘; height: 0; visibility: hidden; clear: both; } .hide{ display: none; } .tab-menu{ border: 1px solid #dddddd; } .tab-menu .title{ padding: 0px 0px 0px 5px; background-image: initial; background-position: initial; background-size: initial; background-repeat: initial; background-attachment: initial; background-origin: initial; background-clip: initial; border-left: 3px solid rgb(108, 226, 108); line-height: 20px; width: 640px; clear: both; border-radius: 0px !important; border-top: 0px !important; border-right: 0px !important; border-bottom: 0px !important; border-image: initial !important; bottom: auto !important; float: none !important; height: auto !important; left: auto !important; outline: 0px !important; overflow: visible !important; position: static !important; right: auto !important; top: auto !important; vertical-align: baseline !important; box-sizing: content-box !important; font-family: Consolas, "Bitstream Vera Sans Mono", "Courier New", Courier, monospace !important; min-height: auto !important; color: gray !important;">#dddddd; } .tab-menu .title .active{ color: black; border-top: 2px solid red; } .tab-menu .content{ border: 1px solid #dddddd; min-height: 150px; } </style></head><body> <div style="width: 960px;margin: 0;padding: 0"> <div class="tab-menu"> <div class="title clearfix"> <ul> <li target = "h1" class="active" onclick="Show(this);">价格趋势</li> <li target = "h2" onclick="Show(this);">市场分布</li> <li target = "h3" onclick="Show(this);">其他</li> </ul> </div> <div id = "content" class="content"> <div con = "h1">content1</div> <div con = "h2" class="hide">content2</div> <div con = "h3" class="hide">content3</div> </div> </div> </div><script> function Show(ths) { var target = ths.getAttribute(‘target‘); ths.className = ‘active‘; var brother = ths.parentElement.children; for (var i=0;i<brother.length;i++){ if (ths == brother[i]){ }else { brother[i].removeAttribute("class"); } } var content = document.getElementById("content").children; for (var j=0;j<content.length;j++){ var current_content = content[j]; var con = current_content.getAttribute("con"); if (con == target){ current_content.classList.remove("hide"); }else { current_content.className = "hide"; } } }</script></body></html>标签菜单案例 |
|
1
2
3
4
5
6
7
8
9
10
11
12
13
14
15
16
17
18
19
20
21
22
23
24
25
26
27
28
29
30
31
32
33
34
35
36
37
38
39
40
41
42
43
|
<!DOCTYPE html><html lang="en"><head> <meta charset="UTF-8"> <title>Title</title></head><body> <input type="button" onclick="Func();" value="点我啊" /> <div id="i1" > <div class="c1">123</div> <div class="c1" alex="sb">123</div> <div class="c1">123</div> <div class="c1" alex="sb">123</div> <div class="c1" alex="sb">123</div> <div class="c1">123</div> <div class="c1" alex="sb">123</div> <div class="c1">123</div> <!--<input type="text">--> <!--<input type="password">--> <!----> </div> <script> function Func() { // i1 // i1所有孩子,循环每一个孩子,判断如果alex=‘sb‘ var i1 = document.getElementById(‘i1‘); var divs = i1.children; for(var i=0;i<divs.length;i++){ var current_div = divs[i]; var result = current_div.getAttribute(‘alex‘); // console.log(result); if(result == "sb"){ current_div.innerText = "456"; } } } </script></body></html>通过自定义属性改变元素值 |
标签:chm i++ section rgb 图像 cell div else 删除
原文地址:http://www.cnblogs.com/Chenghao-He/p/7056394.html