标签:ever images stat add blog java abs 输出流 上进
概要
最近项目需要用java实现输出随机验证码图片到前台,正好有机会接触下java的绘图类,完成需求后也有时间做个总结,写篇随笔记录下也希望能帮助到有同样需求的人!
需求流程图
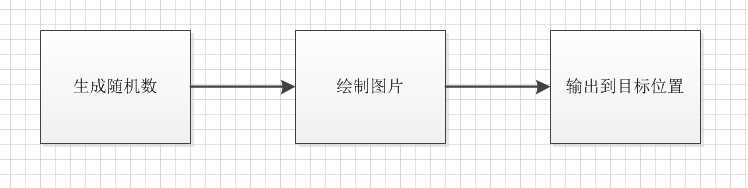
1.生成随机数
在java中生成随机数无非就是调用Random的api,但为了后续更好的实用,应该分成多种组合以适应需求的变化,应将生成随机数的个数和类型组合还有排除字符抽取成参数,这个也比较简单,没有什么难度,就直接贴上代码
 1 /**
 2      * 生成随机验证码
 3      * @param type  类型
 4      * @param length   长度
 5      * @param exChars  排除的字符
 6      * @return
 7      */
 8     public static String getRandomCode(int type,int length,String exChars){
 9       case TYPE_NUM_CHAR://数字+(大小写)字母
10             while(i<length){
11                 int t=random.nextInt(123);
12                 if((t>=97||(t>=65&&t<=90)||(t>=48&&t<=57))&&(exChars==null||exChars.indexOf((char)t)<0)){
13                     sb.append((char)t);
14                     i++;
15                 }
16             }
17             break;
18
19 }
2.绘制图片
绘制图片是重点也是难点,老实说我之前都没用过BufferedImage、Graphics、Color等对象,都是从度娘处脑补并结合帖子写出来的输出图片
1)创建BufferedImage对象
如果把BufferedImage比作是画板,那么Graphics就是画纸,这样比较好理解,后续的操作都是在这画纸上进行的
1     BufferedImage image = new BufferedImage(width,height,BufferedImage.TYPE_INT_RGB);
2     Graphics g = image.getGraphics();
3     //随机操作对象
4     Random r=new Random();
2)绘制背景
Graphics有个setColor()方法,可理解为画笔,在绘制任何东西前要选好画笔,即颜色,然后调用fillRect()进行轮廓的绘制,后续的绘制范围不会超过这个轮廓
1         g.setColor(backColor==null?getRandomColor():backColor);
2         g.fillRect(0,0,width,height);
3)绘制干扰线
调用drawLine画直线,绘制不超过interLine条干扰线
 1       if(interLine>0){
 3             int x=r.nextInt(4),y=0;
 4             int x1=width-r.nextInt(4),y1=0;
 5             for(int i=0;i<interLine;i++){
 6                 g.setColor(lineColor==null?getRandomColor():lineColor);
 7                 y=r.nextInt(height-r.nextInt(4));
 8                 y1=r.nextInt(height-r.nextInt(4));
 9                 g.drawLine(x,y,x1,y1);
10             }
11         }
4)写验证码
写验证码时调用drawString()方法,为了不整整齐齐而且重叠的写,应将每个字符的高度和水平位置随机,重点在于每绘制完一个字符后,需将画笔的水平坐标往右边移动一定的位置,这里我用了依据宽度浮动,可不必照搬这里的,有合适的算法就行
 1      int fsize=(int)(height*0.8);//字体大小为图片高度的80%
 2         int fx=0;
 3         int fy=fsize;
 4         g.setFont(new Font(Font.SANS_SERIF,Font.PLAIN,fsize));
 5         //写字符
 6         for(int i=0;i<textCode.length();i++){
 7             fy=randomLocation?(int)((Math.random()*0.3+0.6)*height):fy;//每个字符高低是否随机
 8             g.setColor(foreColor==null?getRandomColor():foreColor);
 9             g.drawString(textCode.charAt(i)+"",fx,fy);
10             fx+=(width / textCode.length()) * (Math.random() * 0.3 + 0.8); //依据宽度浮动
11        }
5)扭曲图片
图片的扭曲就是将图片水平和垂直按不同比例平移,copyArea()方法简单明了,直接是复制区域,也是同个意识
 1      //扭曲图片
 2          shearX(g, width, height, backColor);
 3          shearY(g, width, height, backColor);
 4          private static void shearX(Graphics g, int w1, int h1, Color color) {
 5          Random random=new Random();
 6          int period = 2;
 7
 8          boolean borderGap = true;
 9          int frames = 1;
10         int phase = random.nextInt(2);
11
12         for (int i = 0; i < h1; i++) {
13             double d = (double) (period >> 1)* Math.sin((double) i / (double) period
14           + (2.2831853071795862D * (double) phase)/ (double) frames);
15             g.copyArea(0, i, w1, 1, (int) d, 0);
16             if (borderGap) {
17                 g.setColor(color);
18                 g.drawLine((int) d, i, 0, i);
19                 g.drawLine((int) d + w1, i, w1, i);
20             }
21         }
22
23     }
24
25     private static void shearY(Graphics g, int w1, int h1, Color color) {
26         Random random=new Random();
27         int period = random.nextInt(40) + 10; // 50;
28
29         boolean borderGap = true;
30         int frames = 20;
31         int phase = random.nextInt(2);
32         for (int i = 0; i < w1; i++) {
33             double d = (double) (period >> 1)
34                     * Math.sin((double) i / (double) period
35                             + (2.2831853071795862D * (double) phase)/ (double) frames);
36             g.copyArea(i, 0, 1, h1, 0, (int) d);
37             if (borderGap) {
38                 g.setColor(color);
39                 g.drawLine(i, (int) d, i, 0);
40                 g.drawLine(i, (int) d + h1, i, h1);
41             }
42
43         }
44
45     }
6)添加噪点
噪点的添加实质上就是在画纸上没有规律的点点点...,所以用随机颜色随机位置来执行image.setRGB()方法最合适了
1      float yawpRate = 0.05f;// 噪声率
2         int area = (int) (yawpRate * width * height);//噪点数量
3         for (int i = 0; i < area; i++) {
4             int xxx = r.nextInt(width);
5             int yyy = r.nextInt(height);
6             int rgb = getRandomColor().getRGB();
7             image.setRGB(xxx, yyy, rgb);
8         }
7)封笔
以上一切画完之后,下一步就是封笔了,思来想去这样表达最合适,绘制完之后就是放好笔,收起画纸,这里就是返回BufferedImage对象
1         g.dispose();
2         return image;
输出目标位置
1)输出文件
这里写了一个简单的测试类,将图片输出成文件
 1 public static void main(String[] args) {
 2         String randomCode = CodeUtils.getRandomCode(CodeUtils.TYPE_NUM_CHAR, 4, null);
 3         System.out.println(randomCode);
 4         BufferedImage imageFromCode = ImageUtils.getImageFromCode(randomCode, 100, 50, 3, true, Color.WHITE, Color.BLACK, null);
 5          try {
 6             File file = new File("d:/test01.jpg");
 7             ImageIO.write(imageFromCode,"jpg",file);
 8             System.out.println("成功保存到:"+file.getAbsolutePath());
 9         } catch (IOException e) {
10             System.out.println("保存失败");
11             e.printStackTrace();
12         }
13
14     }
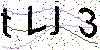
效果图:
2)输出流
输出到流中也是用到和到文件中的方法,根据业务保存到目标位置即可
 1     public static void outputStream(HttpServletRequest request,HttpServletResponse response){
 2         try {
 3             // 设置浏览器不缓存本页
 4             response.addHeader("Pragma", "no-cache");
 5             response.addHeader("Cache-Control", "no-cache");
 6             response.addHeader("Expires", "0");
 7             // 生成验证码,写入用户session
 8             String verifyCode = CodeUtils.getRandomCode(CodeUtils.TYPE_NUM_CHAR, 4, null);
 9             request.getSession().setAttribute("imageVerify", verifyCode);
10             // 输出验证码给客户端
11             response.setContentType("image/jpeg");
12             BufferedImage bim = ImageUtils
13                     .getImageFromCode(verifyCode, 47, 18, 3, true,
14                             Color.WHITE, Color.BLACK, null);
15             ImageIO.write(bim, "JPEG", response.getOutputStream());
16
17         } catch (Exception e) {
18         }
19         return null;
20     }
总结
也没有比较深入的去分析绘制类,只是简单的把实现的代码贴出来下面贴出生成随机数和绘制图片的工具类,有需求可以通过调整位置参数来实现自己要的效果
随机数工具类

  1 package veritfcode;
  2
  3 import java.util.Random;
  4
  5 public class CodeUtils {
  6
  7     public static final int TYPE_ONLYNUM = 1; //纯数字
  8
  9     public static final int TYPE_NUM_CHAR = 2; //数字+(大小写)字母
 10
 11     public static final int TYPE_ONLYCHAR = 3; //纯(大小写)字母
 12
 13     public static final int TYPE_LOWERCASE_LETTER = 4; //纯(小写)字母
 14
 15     public static final int TYPE_UPPERCASE_LETTERS = 5; //纯(大写)字母
 16
 17     public static final int TYPE_NUM_LOWER = 6; //数字 + 小写字母
 18
 19     public static final int TYPE_NUM_UPPER = 7; //数字 + 大写字母
 20
 21     /**
 22      * 生成随机验证码
 23      * @param type  类型
 24      * @param length   长度
 25      * @param exChars  排除的字符
 26      * @return
 27      */
 28     public static String getRandomCode(int type,int length,String exChars){
 29         if(length<=0||type<0)return "";
 30         StringBuffer sb = new StringBuffer();
 31         Random random = new Random();
 32         int i=0;
 33         switch (type) {
 34         case TYPE_ONLYNUM://纯数字
 35             while(i<length){
 36                  int t=random.nextInt(10);
 37                  if(exChars==null||exChars.indexOf(t+"")<0){//排除特殊字符
 38                      sb.append(t);
 39                      i++;
 40                  }
 41             }
 42             break;
 43         case TYPE_NUM_CHAR://数字+(大小写)字母
 44             while(i<length){
 45                 int t=random.nextInt(123);
 46                 if((t>=97||(t>=65&&t<=90)||(t>=48&&t<=57))&&(exChars==null||exChars.indexOf((char)t)<0)){
 47                     sb.append((char)t);
 48                     i++;
 49                 }
 50             }
 51             break;
 52         case TYPE_ONLYCHAR://纯(大小写)字母
 53             while(i<length){
 54                  int t=random.nextInt(123);
 55                  if((t>=97||(t>=65&&t<=90))&&(exChars==null||exChars.indexOf((char)t)<0)){
 56                     sb.append((char)t);
 57                     i++;
 58                  }
 59             }
 60             break;
 61         case TYPE_LOWERCASE_LETTER://纯(小写)字母
 62             while(i<length){
 63                  int t=random.nextInt(123);
 64                     if((t>=97)&&(exChars==null||exChars.indexOf((char)t)<0)){
 65                         sb.append((char)t);
 66                         i++;
 67                     }
 68             }
 69             break;
 70         case TYPE_UPPERCASE_LETTERS://纯(大写)字母
 71             while(i<length){
 72                  int t=random.nextInt(123);
 73                  if((t>=97||(t>=65&&t<=90))&&(exChars==null||exChars.indexOf((char)t)<0)){
 74                     sb.append((char)t);
 75                     i++;
 76                  }
 77             }
 78             break;
 79         case TYPE_NUM_UPPER: //数字 + 大写字母
 80             while(i<length){
 81                 int t=random.nextInt(91);
 82                 if((t>=65||(t>=48&&t<=57))&&(exChars==null||exChars.indexOf((char)t)<0)){
 83                     sb.append((char)t);
 84                     i++;
 85                 }
 86             }
 87             break;
 88
 89         case TYPE_NUM_LOWER: //数字 + 小写字母
 90             while(i<length){
 91                 int t=random.nextInt(123);
 92                 if((t>=97||(t>=48&&t<=57))&&(exChars==null||exChars.indexOf((char)t)<0)){
 93                     sb.append((char)t);
 94                     i++;
 95                 }
 96             }
 97             break;
 98         default:
 99             break;
100         }
101         return sb.toString();
102     }
103 }
绘制图片工具类(代码太长,分三部分粘贴)
第一部分
public class ImageUtils {
     /**
     * 参数说明
     * @param textCode 文本验证码
     * @param width 图片宽度
     * @param height 图片高度
     * @param interLine 图片中干扰线的条数
     * @param randomLocation 每个字符的高低位置是否随机
     * @param backColor 图片颜色,若为null,则采用随机颜色
     * @param foreColor 字体颜色,若为null,则采用随机颜色
     * @param lineColor 干扰线颜色,若为null,则采用随机颜色
     * @return 图片缓存对象
     */
    public static BufferedImage getImageFromCode(String textCode,int width,int height,int interLine,boolean randomLocation,Color backColor,Color foreColor,Color lineColor){
        BufferedImage image = new BufferedImage(width,height,BufferedImage.TYPE_INT_RGB);
        Graphics g = image.getGraphics();
        //画背景图
        g.setColor(backColor==null?getRandomColor():backColor);
        g.fillRect(0,0,width,height);


        //画干扰线
        Random r=new Random();
        if(interLine>0){
            int x=r.nextInt(4),y=0;
            int x1=width-r.nextInt(4),y1=0;
            for(int i=0;i<interLine;i++){
                g.setColor(lineColor==null?getRandomColor():lineColor);
                y=r.nextInt(height-r.nextInt(4));
                y1=r.nextInt(height-r.nextInt(4));
                g.drawLine(x,y,x1,y1);
            }
        }

        //写验证码
        int fsize=(int)(height*0.8);//字体大小为图片高度的80%
        int fx=0;
        int fy=fsize;
        g.setFont(new Font(Font.SANS_SERIF,Font.PLAIN,fsize));
        //写字符
        for(int i=0;i<textCode.length();i++){
            fy=randomLocation?(int)((Math.random()*0.3+0.6)*height):fy;//每个字符高低是否随机
            g.setColor(foreColor==null?getRandomColor():foreColor);
            g.drawString(textCode.charAt(i)+"",fx,fy);
            fx+=(width / textCode.length()) * (Math.random() * 0.3 + 0.8); //依据宽度浮动
        }
第二部分
 1 //扭曲图片
 2         shearX(g, width, height, backColor);
 3         shearY(g, width, height, backColor);
 4
 5         // 添加噪点
 6         float yawpRate = 0.05f;// 噪声率
 7         int area = (int) (yawpRate * width * height);//噪点数量
 8         for (int i = 0; i < area; i++) {
 9             int xxx = r.nextInt(width);
10             int yyy = r.nextInt(height);
11             int rgb = getRandomColor().getRGB();
12             image.setRGB(xxx, yyy, rgb);
13         }
14         g.dispose();
15         return image;
16
17     }
18
19      /**
20      * 产生随机颜色
21      * @return
22      */
23     private static Color getRandomColor(){
24         Random r=new Random();
25         Color c=new Color(r.nextInt(256),r.nextInt(256),r.nextInt(256));
26         return c;
27     }
第三部分
 1  private static void shearX(Graphics g, int w1, int h1, Color color) {
 2         Random random=new Random();
 3         int period = 2;
 4
 5         boolean borderGap = true;
 6         int frames = 1;
 7         int phase = random.nextInt(2);
 8
 9         for (int i = 0; i < h1; i++) {
10             double d = (double) (period >> 1)
11                     * Math.sin((double) i / (double) period
12                             + (2.2831853071795862D * (double) phase)
13                             / (double) frames);
14             g.copyArea(0, i, w1, 1, (int) d, 0);
15             if (borderGap) {
16                 g.setColor(color);
17                 g.drawLine((int) d, i, 0, i);
18                 g.drawLine((int) d + w1, i, w1, i);
19             }
20         }
21
22     }
23
24     private static void shearY(Graphics g, int w1, int h1, Color color) {
25         Random random=new Random();
26         int period = random.nextInt(40) + 10; // 50;
27
28         boolean borderGap = true;
29         int frames = 20;
30         int phase = random.nextInt(2);
31         for (int i = 0; i < w1; i++) {
32             double d = (double) (period >> 1)
33                     * Math.sin((double) i / (double) period
34                             + (2.2831853071795862D * (double) phase)
35                             / (double) frames);
36             g.copyArea(i, 0, 1, h1, 0, (int) d);
37             if (borderGap) {
38                 g.setColor(color);
39                 g.drawLine(i, (int) d, i, 0);
40                 g.drawLine(i, (int) d + h1, i, h1);
41             }
42
43         }
44
45     }
46 }
标签:ever images stat add blog java abs 输出流 上进
原文地址:http://www.cnblogs.com/maixiaodou/p/7305729.html
