码迷,mamicode.com
首页 > 编程语言 > 详细

SpringBoot 入门学习(HelloWord)

时间:2017-10-19 15:05:09      阅读:168      评论:0      收藏:0      [点我收藏+]

标签:测试的   configure   1.4   create   tab   settings   ase   main   建立   

前置知识

1.会利用 maven 构建项目

2.了解 Spring 注解

3.了解 RESTful API 的基本理论

4.SpringBoot 是 SpringMVC 的升级版,但两者没有必然的联系


settings.xml 配置

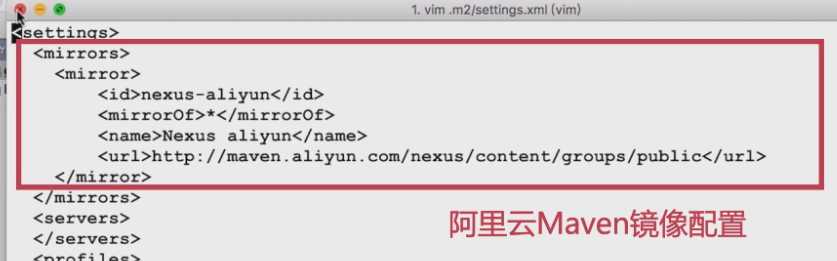
使用国外的 maven 网站下载jar包会很慢,所以建议使用阿里云的镜像网站

技术分享


正式开始我的第一个 SpringBoot HelloWord!

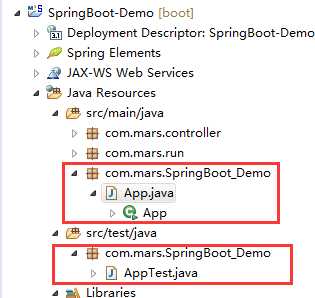
先建立一个普通的 maven 项目,我的命名是 SpringBoot-Demo

pom.xml 配置


<project xmlns="http://maven.apache.org/POM/4.0.0" xmlns:xsi="http://www.w3.org/2001/XMLSchema-instance"
xsi:schemaLocation="http://maven.apache.org/POM/4.0.0 http://maven.apache.org/xsd/maven-4.0.0.xsd">
  <modelVersion>4.0.0</modelVersion>

  <groupId>com.mars</groupId>
  <artifactId>SpringBoot-Demo</artifactId>
  <version>0.0.1-SNAPSHOT</version>
  <packaging>war</packaging>

  <name>SpringBoot-Demo</name>
  <url>http://maven.apache.org</url>

  <properties>

    <!-- 项目源的字符编码 -->
    <project.build.sourceEncoding>UTF-8</project.build.sourceEncoding>
    <maven.compiler.source>1.8</maven.compiler.source>
    <maven.compiler.target>1.8</maven.compiler.target>
  </properties>

  <build>
    <plugins>
      <plugin>
        <groupId>org.apache.maven.plugins</groupId>
        <artifactId>maven-compiler-plugin</artifactId>
        <configuration>
          <source>${maven.compiler.source}</source>
          <target>${maven.compiler.target}</target>
        </configuration>
      </plugin>
      <plugin>
        <groupId>org.springframework.boot</groupId>
        <artifactId>spring-boot-maven-plugin</artifactId>
      </plugin>
    </plugins>
  </build>

  <!-- SpringBoot 父容器,这里引入之后,后面的包都不需要添加 version 配置,SpringBoot会自动选择最适合的版本 -->
  <parent>
    <groupId>org.springframework.boot</groupId>
    <artifactId>spring-boot-starter-parent</artifactId>
    <version>1.4.2.RELEASE</version>
  </parent>

  <!--
    scope 的作用域
    1、test范围指的是测试范围有效,在编译和打包时都不会使用这个依赖
    2、compile范围指的是编译范围有效,在编译和打包时都会将依赖存储进去
    3、provided依赖:在编译和测试的过程有效,最后生成war包时不会加入,诸如:servlet-api,因为servlet-api,tomcat等web服务器已经存在了,如果再打包会冲突
    4、runtime在运行的时候依赖,在编译的时候不依赖
  -->
  <dependencies>
    <!-- SpringBoot 核心包 -->
    <dependency>
      <groupId>org.springframework.boot</groupId>
      <artifactId>spring-boot-starter-web</artifactId>
      <scope>compile</scope>
    </dependency>

    <!-- SpringBoot 依赖的测试包 -->
    <dependency>
      <groupId>junit</groupId>
      <artifactId>junit</artifactId>
      <scope>test</scope>
    </dependency>
    <dependency>
      <groupId>org.springframework.boot</groupId>
      <artifactId>spring-boot-starter-test</artifactId>
    </dependency>
  </dependencies>
</project>


配置好之后发现多了两个类。然而这并不重要

技术分享


新建一个 Controller 命名为 HelloController

package com.mars.controller;

import java.util.HashMap;
import java.util.Map;

import org.springframework.boot.autoconfigure.EnableAutoConfiguration;
import org.springframework.web.bind.annotation.RequestMapping;
import org.springframework.web.bind.annotation.RequestMethod;
import org.springframework.web.bind.annotation.RestController;

/**
* 我的第一个 SpringBoot HelloWord!
* created by Mars on 2017年10月19日
*/
@RestController
@RequestMapping("hello")
@EnableAutoConfiguration
public class HelloController {

  /**
   * SpringBoot HelloWord!
   * created by Mars on 2017年10月19日
   */
  @RequestMapping(value = "/say", method = RequestMethod.GET)
  public String say(){
    return "SpringBoot HelloWord!";
  }

  /**
   * 测试 JSON 数据
   * created by Mars on 2017年10月19日
   */
  @RequestMapping(value = "/json", method = RequestMethod.GET)
   public Object getObj(){
    Map<String, Object> maps = new HashMap<String, Object>();
    maps.put("id", 1);
    maps.put("name", "mars");
    maps.put("say", "SpringBoot HelloWord!");
    maps.put("describe", "虽然多余,但还是想测试中文是否有乱码");
    return maps;
  }

}

新建一个启动类命名为:RunApplication

package com.mars.run;

import java.util.ArrayList;
import java.util.List;

import org.springframework.boot.SpringApplication;
import org.springframework.boot.autoconfigure.SpringBootApplication;

import com.mars.controller.HelloController;

/**
* SpringBoot 启动类
* created by Mars on 2017年10月19日
*/
@SpringBootApplication
public class RunApplication {

  public static void main(String[] args) {
    List<Object> list = new ArrayList<Object>();
    list.add(HelloController.class);
    SpringApplication.run(list.toArray(), args);
  }

}

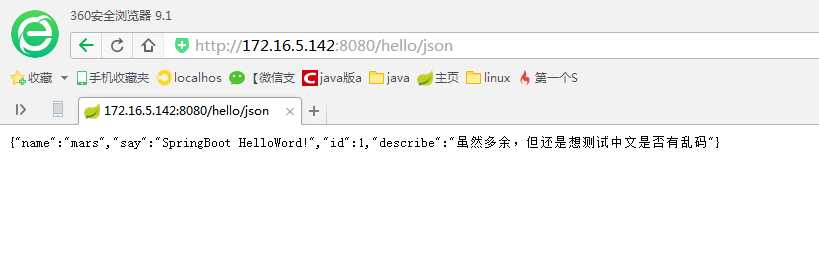
最后运行启动类的 main() 方法结果如下:

技术分享

技术分享


SpringBoot 入门学习(HelloWord)

标签:测试的   configure   1.4   create   tab   settings   ase   main   建立   

原文地址:http://www.cnblogs.com/MarsJiang/p/spring_boot_helloword.html

(0)
(0)
   
举报
评论 一句话评论(0
登录后才能评论!
© 2014 mamicode.com 版权所有  联系我们:gaon5@hotmail.com
迷上了代码!