标签:tdm 就会 reg 类对象 反射机制 ram efi res component
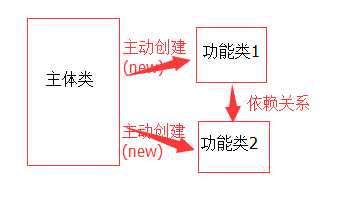
1.控制反转,字面可以理解为:主动权的转移,原来一个应用程序内的对象是类通过new去主动创建并实例化的,对对像创建的主动权在程序代码中。程序不仅要管理业务逻辑也要管理对的象创建和依赖关系。这是很累的,也跟软件工程 "低耦合高内聚" 的概念不十分符合。
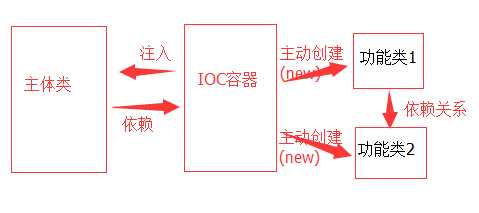
有了spring的ioc容器之后,对象的实例化和依赖关系管理都由IOC容器进行统一管理,主体类只要依赖ioc容器就够了,需要啥,容器会给他注入进去,也就是只要声明对象不用再主动去new,ioc容器帮忙把相应的对象注入到声明对象中,使其变成实例化对象。(类似主体类提供一个躯体,ioc容器把灵魂注入进去,使其变成一个生命体,激活他),这样创建对象的主动权就转移交接了,
1.在ioc容器中配置了dao实现类和service类的bean,在容器加载的时候就会实例化这些bean到内存中。(bean.xml配置如下)
 1 <beans xmlns="http://www.springframework.org/schema/beans"
 2        xmlns:xsi="http://www.w3.org/2001/XMLSchema-instance"
 3        xsi:schemaLocation="http://www.springframework.org/schema/beans
 4        http://www.springframework.org/schema/beans/spring-beans.xsd
 5       ">
 6
 7        <!-- BookDao Bean -->
 8        <bean id="bookDao" class="com.study.DaoImpl.BookDaoImpl"></bean>
 9
10        <!-- BookService Bean-->
11        <bean id="bookService" class="com.study.Service.BookService">
12               <!-- BookService中的声明了BookDao对象,通过ref属性将BookDao的bean注入到对象中 -->
13               <property name="bookDao" ref="bookDao"/>
14        </bean>
15 </beans>
2. service类中需要用到dao类的实例(正常情况下需要new一个dao类对象),但是用ioc容器接管后只需要声明dao接口对象即可,然后写一个dao对象的set方法。(要注入的对象必须要有set方法,否则将报错 Bean property ‘bookDao‘ is not writable or has an invalid setter method)因为spring注入是根据反射机制实现的,他在反射注入的时候会调用该方法名的set方法,如果set方法写错,或者根本没写,那么注入就会失败。(BookService类如下)
 1 public class BookService {
 2     private BookDao bookDao;
 3
 4     public BookService() {
 5         System.out.println("BookService实例化");
 6     }
 7
 8     public void setBookDao(BookDao bookDao) {
 9         System.out.println("BookService属性初始化装配成功");
10         this.bookDao = bookDao;
11     }
12
13     public void storeBook(String bookname){
14         System.out.println("图书上架");
15         System.out.println(bookDao.addBook(bookname));
16     }
17 }
如上代码:BookSerivce类需要用到BookDao对象,但是却没有new对象,只有一个set方法,这个set方法就是ioc容器注入的入口(必不可少),
3.此处我们用ApplicationContext作为容器,初始化配置文件,然后从容器中根据id名取出容器中已经帮我们实例化好的对象。
 1 public class TestDmeo {
 2     BookService bookService;
 3
 4     @Test
 5     public void testStoreBook(){
 6         System.out.println("容器初始化");
 7         ApplicationContext app = new ClassPathXmlApplicationContext("bean.xml");
 8         bookService = (BookService) app.getBean("bookService");//将对象注入到声明好的BookService对象中。(bookService就是配置文件中的id)
 9         bookService.storeBook("Spring MVC");
10     }
11 }
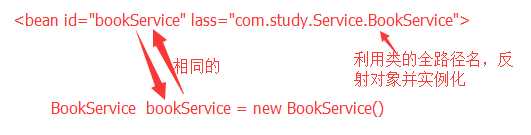
getBean中的参数就是配置文件中的bean的id名,这个id在spring进行反射实例化的时候,相当于实例化对象的名称:
4.dao类和实现类如下:
接口类:
1 public interface BookDao {
2     public String addBook(String BookName);
3 }
实现类:
 1 public class BookDaoImpl implements BookDao {
 2
 3     public BookDaoImpl() {
 4         System.out.println("BookDao实例化");
 5     }
 6
 7     public String addBook(String BookName) {
 8         return BookName+"添加成功";
 9     }
10 }
5.运行测试结果:

6.大体思路如下图:
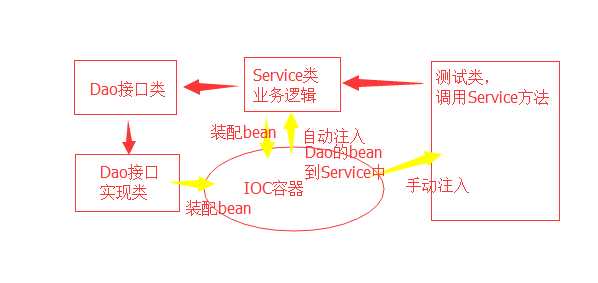
程序中除了初始化容器用了new对象,其余的基本没有new的存在。
注解配置方式目的和xml配置的目的一样,都是为了实现bean的创建。常用的注解如下:
装配注解如下:
范例:
1.例子同上,只是配置bean的方式从xml文件中转移到了代码中,用注解体现。

2.除了把配置文件中<bean id="" class=""/>变成对应的注解外,另外一个区别在于,bean.xml文件中的修改,需要做如下,配置才能够使注解生效
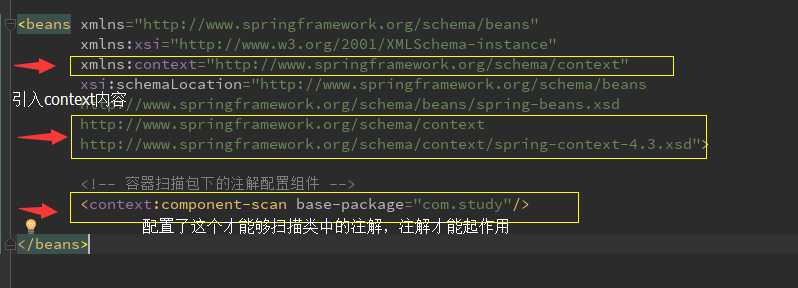
context的配置有如下方法:
1.仅扫描特定包下的特定类:
1 <context:component-scan base-package="com.study" resource-pattern="Service/B*.class"/>
这是扫描Service包下B开头的所有类。
2.使用<context:include-filter .../>和<context:exclude-filter .../>配置那些需要和不需要的扫描的包
| Filter Type | Examples Expression | Description |
| annotation | org.example.SomeAnnotation | 符合SomeAnnoation的target class(注解类) |
| assignable | org.example.SomeClass | 指定class或interface的全名(指定确切的类或接口) |
| aspectj | org.example..*Service+ | AspectJ语法 |
| regex | org\.example\.Default.* | Regelar Expression (正则表达式) |
| custom | org.example.MyTypeFilter | Spring3新增自定义Type,org.springframework.core.type.TypeFilter |
1 <!-- 容器扫描包下的注解配置组件 -->
2        <context:component-scan base-package="com.study" use-default-filters="false">
3               <context:include-filter type="aspectj" expression="com.study.Service.*"/> <!-- 模糊过滤 -->
4               <context:include-filter type="annotation" expression="org.springframework.stereotype.Component"/><!-- 过滤指定的注解 -->
5               <context:include-filter type="assignable" expression="com.study.Service.BookService"/><!-- 过滤指定的类或接口,路径要完整,如果是接口的话,所有派生类都会被过滤 -->
6               <context:include-filter type="regex" expression="com.*"/>
7        </context:component-scan>
<context:exclude-filter ../>要配在<context:include-filter .../>的后面。
标签:tdm 就会 reg 类对象 反射机制 ram efi res component
原文地址:http://www.cnblogs.com/caijh/p/7688044.html