标签:配置 ons inter ring name bsp xmlns protected splay
实现简单的登录验证
LoginServlet.java
|
import javax.servlet.http.HttpServletRequest; import javax.servlet.http.HttpServletResponse; import org.springframework.web.servlet.ModelAndView; import org.springframework.web.servlet.mvc.AbstractController; public class LoginServlet extends AbstractController{ @Override protected ModelAndView handleRequestInternal(HttpServletRequest req, HttpServletResponse res) throws Exception { String message=""; String name =req.getParameter("name"); String password = req.getParameter("password"); System.out.println(name); System.out.println(password); if("admin".equals(name)&&"123".equals(password)){ message="登陆成功"; }else{ message="登陆不成功"; } //创建ModelAndView对象 ModelAndView mav = new ModelAndView("index"); //保存消息 mav.addObject("message", message); return mav; } } |
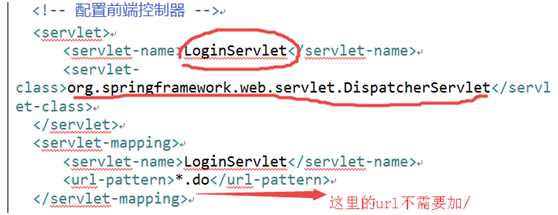
Web.xml
|
<?xml version="1.0" encoding="UTF-8"?> <web-app version="2.5" xmlns="http://java.sun.com/xml/ns/javaee" xmlns:xsi="http://www.w3.org/2001/XMLSchema-instance" xsi:schemaLocation="http://java.sun.com/xml/ns/javaee http://java.sun.com/xml/ns/javaee/web-app_2_5.xsd"> <display-name>SpringMVC</display-name> <!-- 配置前端控制器 --> <servlet> <servlet-name>LoginServlet</servlet-name> <servlet-class>org.springframework.web.servlet.DispatcherServlet</servlet-class> </servlet> <servlet-mapping> <servlet-name>LoginServlet</servlet-name> <url-pattern>*.do</url-pattern> </servlet-mapping> <!-- 配置过滤器 --> <filter> <filter-name>EncodingFilter</filter-name> <filter-class>org.springframework.web.filter.CharacterEncodingFilter</filter-class> <init-param> <param-name>encoding</param-name> <param-value>utf-8</param-value> </init-param> </filter> <filter-mapping> <filter-name>EncodingFilter</filter-name> <url-pattern>/*</url-pattern> </filter-mapping> <welcome-file-list> <welcome-file>login.jsp</welcome-file> </welcome-file-list> </web-app>
|
注意:XX-servlet.xml 的命名要按照web.xml配置的前段控制器的名字相同
LoginServlet-servlet.xml
|
<?xml version="1.0" encoding="UTF-8"?> <!-- url 和 Controller 关联--> <beans xmlns="http://www.springframework.org/schema/beans" xmlns:xsi="http://www.w3.org/2001/XMLSchema-instance" xmlns:context="http://www.springframework.org/schema/context" xmlns:mvc="http://www.springframework.org/schema/mvc" xmlns:aop="http://www.springframework.org/schema/aop" xmlns:tx="http://www.springframework.org/schema/tx" xsi:schemaLocation="http://www.springframework.org/schema/beans http://www.springframework.org/schema/beans/spring-beans-3.1.xsd http://www.springframework.org/schema/context http://www.springframework.org/schema/context/spring-context-3.1.xsd http://www.springframework.org/schema/mvc http://www.springframework.org/schema/mvc/spring-mvc-3.0.xsd http://www.springframework.org/schema/aop http://www.springframework.org/schema/aop/spring-aop-3.1.xsd http://www.springframework.org/schema/tx http://www.springframework.org/schema/tx/spring-tx-3.1.xsd"> <!-- 配置处理器 --> <bean id="login" name="/login.do" class="com.servlet.LoginServlet"></bean> </beans> |
上述LoginServlet-servlet.xml配置了一个处理器,页面请求action=login.do就可以访问。
想要添加视图解析器的配置如下
<!-- 配置视图解析器 -->
<bean class="org.springframework.web.servlet.view.InternalResourceViewResolver">
<!--前缀 -->
<property name="prefix" value="/jsp/"></property>
<!-- 后缀 -->
<property name="suffix" value=".jsp"></property>
</bean>
页面:
|
<form action="login.do"> <input type="text" name="name"/> <br/> <input type="text" name="password"/> <br/> <input type="submit" value="登录 ">
</form>
|
使用继承AbstractController一个类中只能写一个处理器
使用注解一个类中可以有多个处理器
定义处理器
@Controller
设置映射名
@RequsetMapping(value=“/login.do”) @RequsetMapping(“/login.do”)
|
package com.servlet;
import javax.servlet.http.HttpServletRequest; import javax.servlet.http.HttpServletResponse;
import org.springframework.stereotype.Controller; import org.springframework.web.bind.annotation.RequestMapping; import org.springframework.web.servlet.ModelAndView;
/** * 注解 * @author Administrator * */ @Controller @RequestMapping("oo") public class AnnotionLoginServlet {
@RequestMapping("/login.do") protected ModelAndView login(HttpServletRequest req, HttpServletResponse res) throws Exception { //声明消息变量 String message=""; //获取页面输入 String name =req.getParameter("name"); String password = req.getParameter("password"); //比较值是否相同 if("admin".equals(name)&&"123".equals(password)){ message="登陆成功"; System.out.println("message:"+message); }else{ message="登陆不成功"; System.out.println("message:"+message); }
//ModelAndView返回的页面 /jsp/index.jsp ModelAndView mav = new ModelAndView("index"); mav.addObject("message", message); return mav; }
}
|
页面显示
|
<form action="oo/login.do"> <input type="text" name="name"/> <br/> <input type="text" name="password"/> <br/> <input type="submit" value="登录 ">
</form> |
//在LoginServlet-servlet.xml中注册注解驱动和配置普通类为处理器
<!-- 加载注解驱动 -->
<mvc:annotation-driven/>
<!-- 配置普通类为处理器 -->
<bean id="annotation" class="com.servlet.AnnotionLoginServlet"></bean>
自动获取处理器
<!-- 组件扫描器 -->
Base-package :识别这个包下的处理器
<context:component-scan base-package="com.servlet"></context:component-scan>
|
<?xml version="1.0" encoding="UTF-8"?> <!-- url 和 Controller 关联--> <beans xmlns="http://www.springframework.org/schema/beans" xmlns:xsi="http://www.w3.org/2001/XMLSchema-instance" xmlns:context="http://www.springframework.org/schema/context" xmlns:mvc="http://www.springframework.org/schema/mvc" xmlns:aop="http://www.springframework.org/schema/aop" xmlns:tx="http://www.springframework.org/schema/tx" xsi:schemaLocation="http://www.springframework.org/schema/beans http://www.springframework.org/schema/beans/spring-beans-3.1.xsd http://www.springframework.org/schema/context http://www.springframework.org/schema/context/spring-context-3.1.xsd http://www.springframework.org/schema/mvc http://www.springframework.org/schema/mvc/spring-mvc-3.0.xsd http://www.springframework.org/schema/aop http://www.springframework.org/schema/aop/spring-aop-3.1.xsd http://www.springframework.org/schema/tx http://www.springframework.org/schema/tx/spring-tx-3.1.xsd"> <!—第一种方法 配置处理器 --> <bean id="login" name="/login.do" class="com.servlet.LoginServlet"></bean> <!-- 配置视图解析器 --> <bean class="org.springframework.web.servlet.view.InternalResourceViewResolver"> <!--前缀 --> <property name="prefix" value="/jsp/"></property> <!-- 后缀 --> <property name="suffix" value=".jsp"></property> </bean> <!—-第二种方式配置处理器 --> <!-- 加载注解驱动--> <mvc:annotation-driven/> <!-- 配置普通类为处理器 --> <bean id="annotation" class="com.servlet.AnnotionLoginServlet"></bean> <!--第三种方式配置处理器--> <!-- 组件扫描器 --> <!-- context:component-scan base-package="com.servlet"></context:component-scan> --> </beans> |
异常:没有可以识别的处理器
No mapping found for HTTP request with URI [/SpringMVC/oo/login.do] in DispatcherServlet with name ‘LoginServlet‘
标签:配置 ons inter ring name bsp xmlns protected splay
原文地址:http://www.cnblogs.com/Xheee/p/7799668.html