目录讲解:
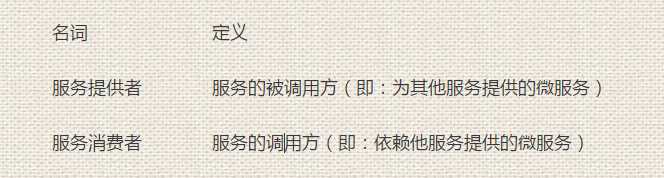
一、服务提供者与服务消费者的概念
二、编写一个服务提供者的测试类(code)
1.1、 使用微服务构建的是分布式系统,微服务之间通过网络进行通信。我们使用微服务提供者与服务消费者来描述微服务之间的调用关系。
如下:
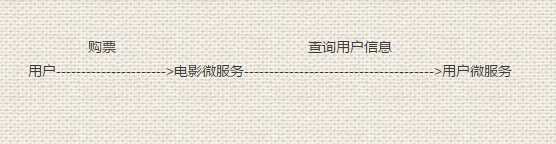
在生活中就有这样的例子,在我们看电影的时候,用户发起一个购票的请求。在进行购票的业务操作前,电影微服务需要调用用户微服务的接口,
查询当前用户的余额是多少,是不是符合购票标准等等。在这种场景下,用户微服务就是一个服务提供者,电影微服务则是一个服务消费者。
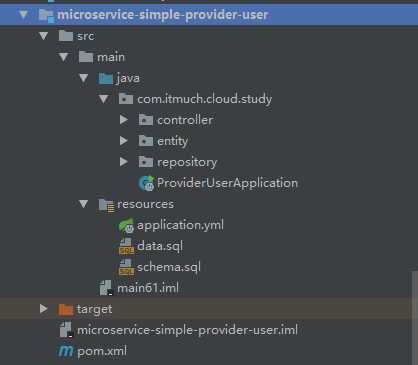
2.2 编写一个服务提供者
框架结构如下:
步骤:
2.1 创建一个maven项目,架构如上,pom.xml的内容如下:
<?xml version="1.0" encoding="UTF-8"?>
<project xmlns="http://maven.apache.org/POM/4.0.0" xmlns:xsi="http://www.w3.org/2001/XMLSchema-instance"
  xsi:schemaLocation="http://maven.apache.org/POM/4.0.0 http://maven.apache.org/xsd/maven-4.0.0.xsd">
  <modelVersion>4.0.0</modelVersion>
  <groupId>com.itmuch.cloud</groupId>
  <artifactId>microservice-simple-provider-user</artifactId>
  <version>0.0.1-SNAPSHOT</version>
  <packaging>jar</packaging>

  <!-- 引入spring boot的依赖 -->
  <parent>
    <groupId>org.springframework.boot</groupId>
    <artifactId>spring-boot-starter-parent</artifactId>
    <version>1.4.3.RELEASE</version>
  </parent>

  <properties>
    <project.build.sourceEncoding>UTF-8</project.build.sourceEncoding>
    <java.version>1.8</java.version>
  </properties>

  <dependencies>
    <dependency>
      <groupId>org.springframework.boot</groupId>
      <artifactId>spring-boot-starter-web</artifactId>
    </dependency>
    <dependency>
      <groupId>org.springframework.boot</groupId>
      <artifactId>spring-boot-starter-data-jpa</artifactId>
    </dependency>
    <dependency>
      <groupId>com.h2database</groupId>
      <artifactId>h2</artifactId>
    </dependency>
    <dependency>
      <groupId>org.springframework.boot</groupId>
      <artifactId>spring-boot-starter-actuator</artifactId>
    </dependency>
  </dependencies>

  <!-- 引入spring cloud的依赖 -->
  <dependencyManagement>
    <dependencies>
      <dependency>
        <groupId>org.springframework.cloud</groupId>
        <artifactId>spring-cloud-dependencies</artifactId>
        <version>Camden.SR4</version>
        <type>pom</type>
        <scope>import</scope>
      </dependency>
    </dependencies>
  </dependencyManagement>

  <!-- 添加spring-boot的maven插件 -->
  <build>
    <plugins>
      <plugin>
        <groupId>org.springframework.boot</groupId>
        <artifactId>spring-boot-maven-plugin</artifactId>
      </plugin>
    </plugins>
  </build>
</project>
2.2 准备好建表语句
drop table user if exists;
create table user (id bigint generated by default as identity, username varchar(40), name varchar(20), age int(3), balance decimal(10,2), primary key (id));
2.2 准备好几条语句
insert into user (id, username, name, age, balance) values (1, ‘account1‘, ‘张三‘, 20, 100.00);
insert into user (id, username, name, age, balance) values (2, ‘account2‘, ‘李四‘, 28, 180.00);
insert into user (id, username, name, age, balance) values (3, ‘account3‘, ‘王五‘, 32, 280.00);
2.3 准备实体类
package com.itmuch.cloud.study.entity;

import java.math.BigDecimal;

import javax.persistence.Column;
import javax.persistence.Entity;
import javax.persistence.GeneratedValue;
import javax.persistence.GenerationType;
import javax.persistence.Id;

@Entity
public class User {
  @Id
  @GeneratedValue(strategy = GenerationType.AUTO)
  private Long id;
  @Column
  private String username;
  @Column
  private String name;
  @Column
  private Integer age;
  @Column
  private BigDecimal balance;

  public Long getId() {
    return this.id;
  }

  public void setId(Long id) {
    this.id = id;
  }

  public String getUsername() {
    return this.username;
  }

  public void setUsername(String username) {
    this.username = username;
  }

  public String getName() {
    return this.name;
  }

  public void setName(String name) {
    this.name = name;
  }

  public Integer getAge() {
    return this.age;
  }

  public void setAge(Integer age) {
    this.age = age;
  }

  public BigDecimal getBalance() {
    return this.balance;
  }

  public void setBalance(BigDecimal balance) {
    this.balance = balance;
  }

}
2.3 编写Dao类
2.3 编写controller类
package com.itmuch.cloud.study.controller;

import org.springframework.beans.factory.annotation.Autowired;
import org.springframework.web.bind.annotation.GetMapping;
import org.springframework.web.bind.annotation.PathVariable;
import org.springframework.web.bind.annotation.RestController;

import com.itmuch.cloud.study.entity.User;
import com.itmuch.cloud.study.repository.UserRepository;

@RestController
public class UserController {
  @Autowired
  private UserRepository userRepository;

  @GetMapping("/{id}")
  public User findById(@PathVariable Long id) {
    User findOne = this.userRepository.findOne(id);
    return findOne;
  }
}
2.4 编写启动类
package com.itmuch.cloud.study;

import org.springframework.boot.SpringApplication;
import org.springframework.boot.autoconfigure.SpringBootApplication;

@SpringBootApplication
public class ProviderUserApplication {
  public static void main(String[] args) {
    SpringApplication.run(ProviderUserApplication.class, args);
  }
}
2.5 编写配置文件
server:
  port: 8000
spring:
  jpa:
    generate-ddl: false
    show-sql: true
    hibernate:
      ddl-auto: none
  datasource:                           # 指定数据源
    platform: h2                        # 指定数据源类型
    schema: classpath:schema.sql        # 指定h2数据库的建表脚本
    data: classpath:data.sql            # 指定h2数据库的数据脚本
logging:                                # 配置日志级别,让hibernate打印出执行的SQL
  level:
    root: INFO
    org.hibernate: INFO
    org.hibernate.type.descriptor.sql.BasicBinder: TRACE
    org.hibernate.type.descriptor.sql.BasicExtractor: TRACE

## INFO
info:
  app:
    name: @project.artifactId@
    encoding: @project.build.sourceEncoding@
    java:
      source: @java.version@
      target: @java.version@
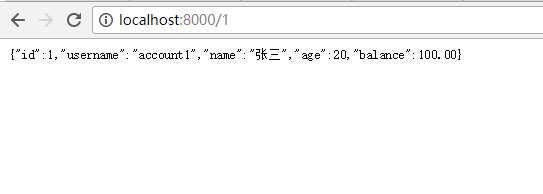
最后在浏览器里面输入:localhost:8000/1 看见了用户信息,则成功了
后续再为大家总结,有写的不周到的地方,欢迎大家提出来