由于初学Unity,写下此文作为笔记,文中难免会有疏漏,不当之处还望指正。
Unity-2017.3官方实例教程Space-Shooter(一)
章节列表:
一、创建小行星Prefab
二、创建敌机和敌机子弹Prefab
三、创建游戏控制器
四、添加音效
五、对象回收
六、创建计分板
一、创建小行星Prefab
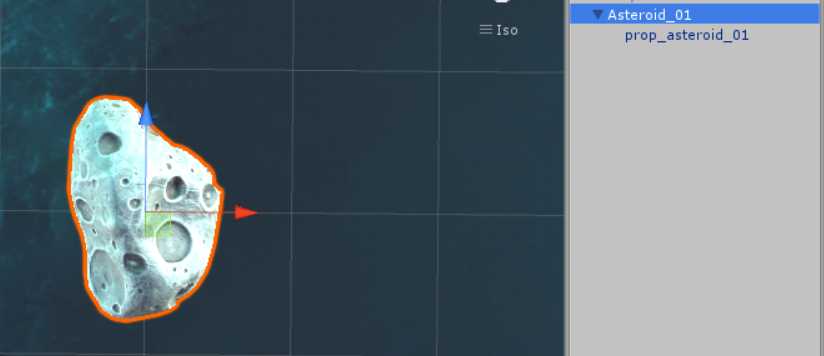
a、创建一个空对象,重命名为Asteroid_01,在Models文件夹下找到prop_asteroid_01模型,将模型拖拽到Asteroid_01上,使其成为Asteroid_01的一个子对象。
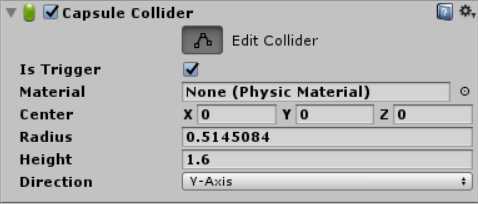
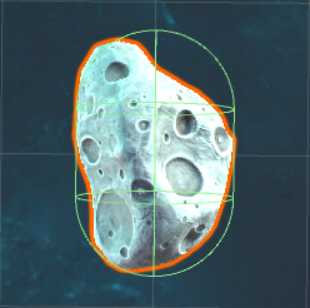
b、为prop_asteroid_01添加胶囊碰撞器(Capsule Collider),调整碰撞器的检测范围:
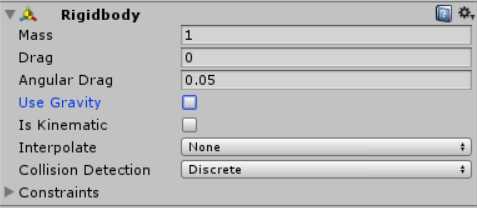
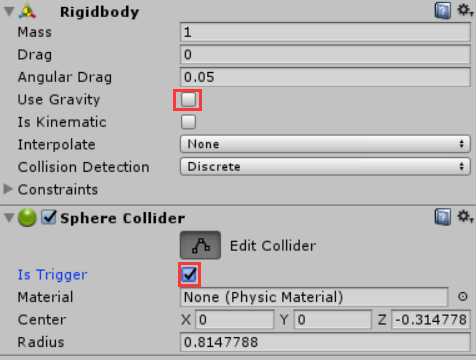
c、为Asteroid_01添加刚体组件(Rigidbody),去掉使用重力选项(Use Gravity):
d、为Asteroid_01添加随机旋转脚本RandomRotator,编辑如下内容:
using System.Collections;
using System.Collections.Generic;
using UnityEngine;

public class RandomRotator : MonoBehaviour
{
    public float tumble;
    private Rigidbody rg;
    // Use this for initialization
    void Start ()
    {
        rg = GetComponent<Rigidbody>();
        rg.angularVelocity = Random.insideUnitSphere * tumble;
    }

    // Update is called once per frame
    void Update ()
    {

    }
}
首先声明一个公有类型的变量tumble来设置翻滚速度,声明一个私有类型变量rg便于类内部使用刚体组件,angularVelocity是刚体的角速度向量,在大多数情况下不应该直接修改它,因为这会导致不真实的行为。Random.insideUnitSphere变量随机返回一个单位球体内的一点(Vector3类型变量,只读)。
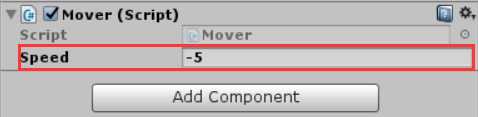
e、为Asteroid_01添加移动脚本。在上一篇中我们创建了一个Mover脚本,在这里我们把Mover脚本拖拽到Asteroid_01上,然后把速度设置为-5,让Asteroid_01沿Z轴负方向移动。
f、当我们的飞船发射子弹击中小行星,小行星会被击毁并产生一个爆炸的特效;当我们的飞船撞向小行星时,飞船会和小行星同归于尽,并产生另外一个爆炸效果。为了区分是子弹击中了小行星还是我们的飞船撞向了小行星,我们可以给我们的飞船增加一个tag,通过判断这个tag就可以知道是不是飞船撞向了小行星。点击Player,我们在Tag属性处选择Player,也可以新建另外的tag:

我们给Asteroid_01添加一个脚本组件,命名为DestroyByContact,编辑内容如下:
using System.Collections;
using System.Collections.Generic;
using UnityEngine;

public class DestroyByContact : MonoBehaviour
{
    public GameObject explosion;
    public GameObject explosion_player;

    // Use this for initialization
    void Start ()
    {

    }

    // Update is called once per frame
    void Update ()
    {

    }

    private void OnTriggerEnter(Collider other)
    {
        if(explosion)
        {
            Instantiate(explosion, transform.position, transform.rotation);
        }
        if(other.tag=="Player" && explosion_player)
        {
            Instantiate(explosion_player, transform.position, transform.rotation);//产生一个特效
        }

        Destroy(other.gameObject);
        Destroy(gameObject);
    }
}
声明两个公有变量explosion和explosion_player,分别绑定两种特效对象,用于在小行星和我方飞船爆炸时产生特效。
void OnTriggerEnter(Collider other)函数是碰撞检测的回调函数,当开始碰撞时调用,要想碰撞函数被调用,需要碰撞器中勾选Is Trigger选项。
Instantiate的函数原型为static Object Instantiate(Object original, Vector3 position, Quaternion rotation)或static Object Instantiate(Object original),函数作用为克隆原始物体并返回克隆物体,original为要拷贝的已经存在的对象,position和rotation分别为拷贝新对象的位置和方向。Instantiate更多通常用于实例投射物(如子弹、榴弹、破片、飞行的铁球等),AI敌人,粒子爆炸或破坏物体的替代品等。
Destroy的函数原型为static void Destroy(Object obj, float t = 0.0F),在时间t后删除一个游戏对象,组件或者资源,如果obj是组件,它将从GameObject销毁组件component。如果obj是GameObject它将销毁GameObject全部的组件和GameObject全部的transform子物体。实际物体的销毁总是延迟到当前更新循环后,但总是渲染之前完成。
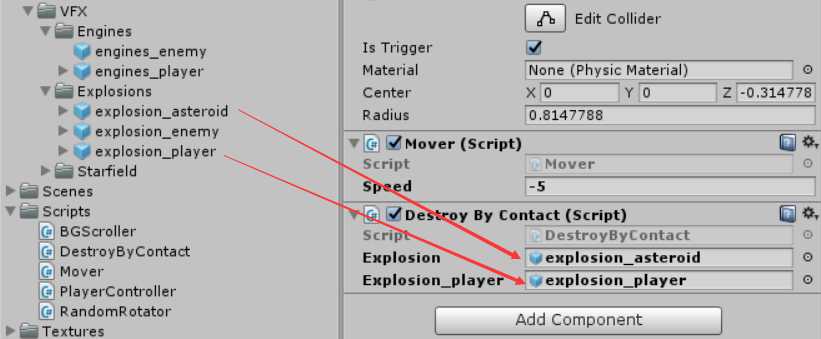
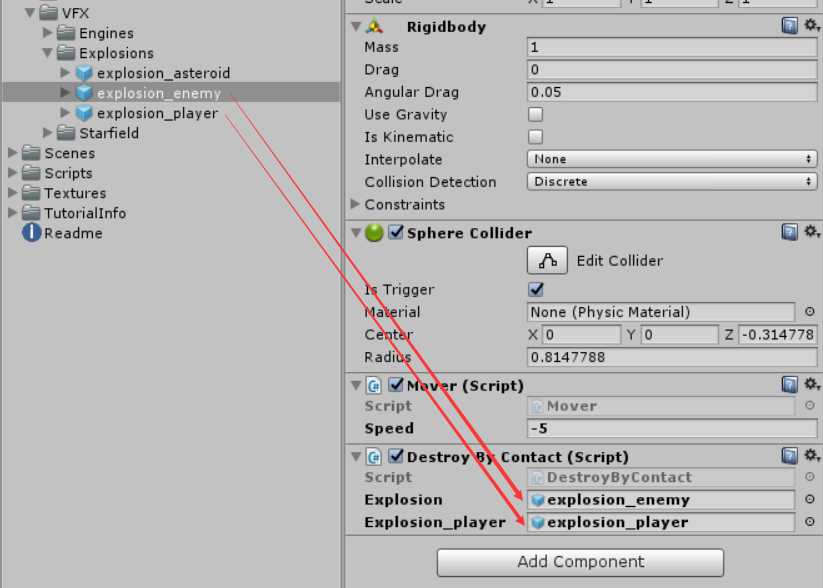
回到Unity编辑器,点击Asteroid_01对象,将Prefabs文件夹下的explosion和explosion_player分别拖拽到Explosion和Explosion_player属性上:
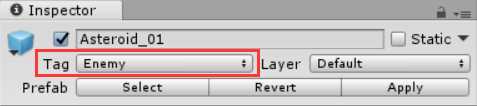
为了后续的使用,我们将Asteroid_01的tag属性选择为Enemy:
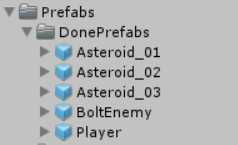
g、把Asteroid_01制作成一个Prefab。在Prefabs的DonePrefabs文件夹下创建一个Prefab,重命名为Asteroid_01,把Hierarchy视图中的Asteroid_01拖拽到Asteroid_01预制体上,完成Prefab的制作。
同样的我们把另外两个小行星模型也制作成Prefab,分别为Asteroid_02和Asteroid_03。
二、创建敌机和敌机子弹Prefab
和创建Player一样,敌机也具有船体、引擎特效、子弹挂载点,发射子弹,移动等属性。
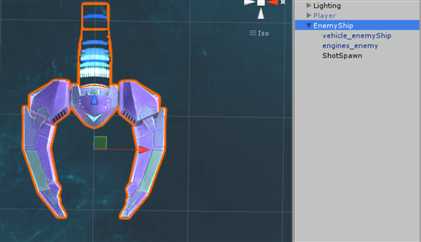
(1)、创建敌机模型。新建一个空对象,重命名为EnemyShip,将Models文件夹下的敌人飞船模型vehicle_playerShip拖到EnemyShip上,调整vehicle_playerShip模型的方向,绕Y轴旋转180度,使机头朝下。将Prefabs->VFX->Engines文件夹下的敌机引擎特效engines_enemy拖拽到EnemyShip。再在EnemyShip下建立一个空对象,命名为ShotSpawn,调整ShotSpawn的位置在机头位置。
(2)、为EnemyShip添加刚体组件和胶囊碰撞器。
(3)、给EnemyShip添加Mover脚本使能向下移动。把Mover脚本拖拽到EnemyShip上,并把Speed属性值设置为-5:
(4)、给EnemyShip添加DestroyByContact脚本,使其能被我方飞船发射的子弹击毁,或者和我方飞船同归于尽,但是不会被敌方物体撞毁(敌方子弹,敌方飞船,小行星),修改DestroyByContact脚本内容:
    private void OnTriggerEnter(Collider other)
    {
        if(other.tag=="Enemy")
        {
            return;
        }
        if(explosion)
        {
            Instantiate(explosion, transform.position, transform.rotation);
        }
        if(other.tag=="Player" && explosion_player)
        {
            Instantiate(explosion_player, transform.position, transform.rotation);//产生一个特效
        }

        Destroy(other.gameObject);
        Destroy(gameObject);
    }
回到Unity编辑器,点击EnemyShip对象,将Prefabs文件夹下的explosion_enemy和explosion_player分别拖拽到Explosion和Explosion_player属性上:
(5)、让敌机发射子弹。为EnemyShip添加一个新脚本,命名为WeaponController,编辑脚本内容如下:
using System.Collections;
using System.Collections.Generic;
using UnityEngine;

public class WeaponController : MonoBehaviour
{
    public GameObject shot;
    public Transform shotSpawn;
    public float shotRate;
    public float delay;
    // Use this for initialization
    void Start ()
    {
        InvokeRepeating("Fire", delay, shotRate);
    }

    // Update is called once per frame
    void Update ()
    {

    }

    private void Fire()
    {
        Instantiate(shot,shotSpawn.position,shotSpawn.rotation);
    }
}
a、shot变量用来实例化子弹,shotSpawn为子弹射出的位置,shotRate记录敌机发射子弹的频率,delay为实例化敌机后多少秒敌机开始发射子弹。
b、InvokeRepeat的函数原型为 void InvokeRepeating(string methodName, float time, float repeatRate),在time秒调用methodName方法,然后每repeatRate秒重复调用methodName方法。Fire函数实例化一个子弹对象。
c、创建子弹预制体。
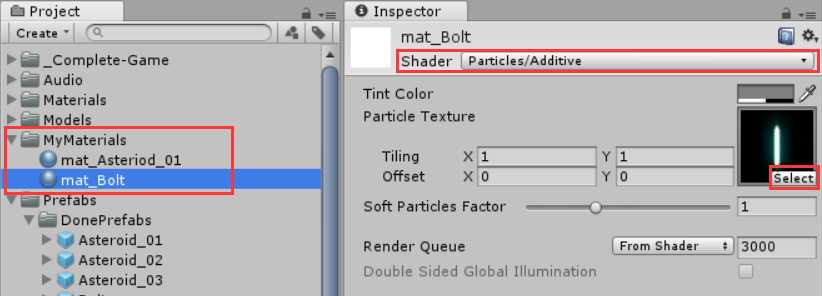
在Assets下新建一个文件夹命名为MyMaterials,在MyMaterials下新建一个材质球,右键->Create->Material,命名为mat_bolt,在Inspector视图中设置Shader属性为Particles/Additive,选择纹理为fx_lazer_cyan_dff:
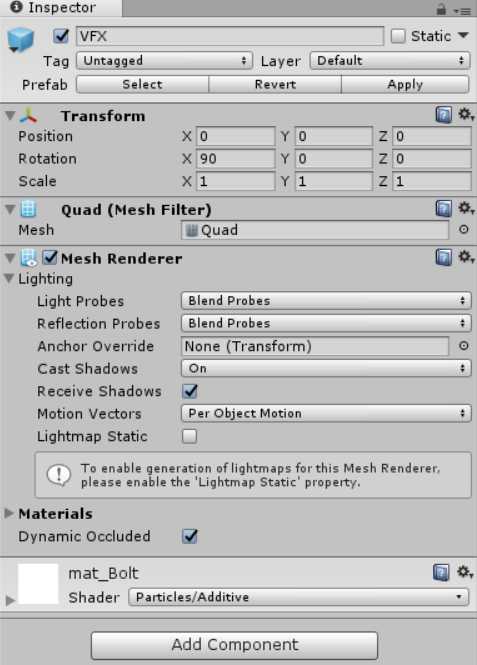
新建一个空对象,重命名为Bolt,在Bolt下新建一个Quat对象,重命名为VFX,删除VFX上的Mesh Collider。把材质球mat_bolt拖拽到VFX上面,并将VFX绕X轴旋转90°:
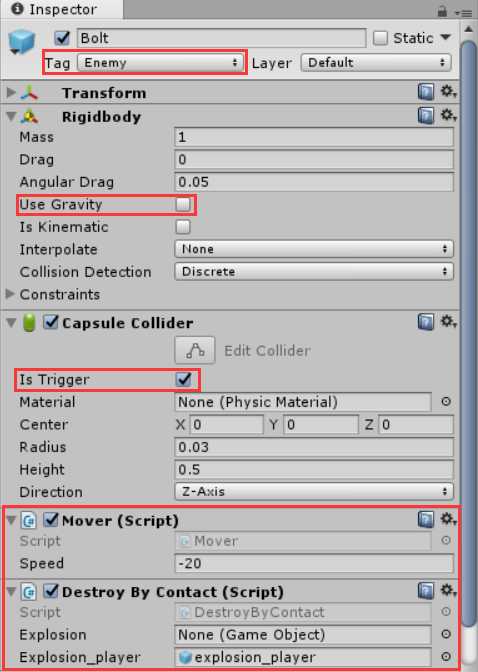
点击Bolt,设置Bolt的tag属性为Enemy,添加刚体组件和胶囊碰撞器,为Bolt添加Mover脚本,并设置Speed属性为-20,为Bolt添加DestroyByContent脚本,设置完成如下:
在Prefabs/DonePrefabs文件夹下新建一个Prefab,重命名为Bolt,将Hierarchy视图中的Bolt对象拖拽到Prefab Bolt上,完成子弹预制体的制作。然后删除Hierarchy视图中的Bolt对象。
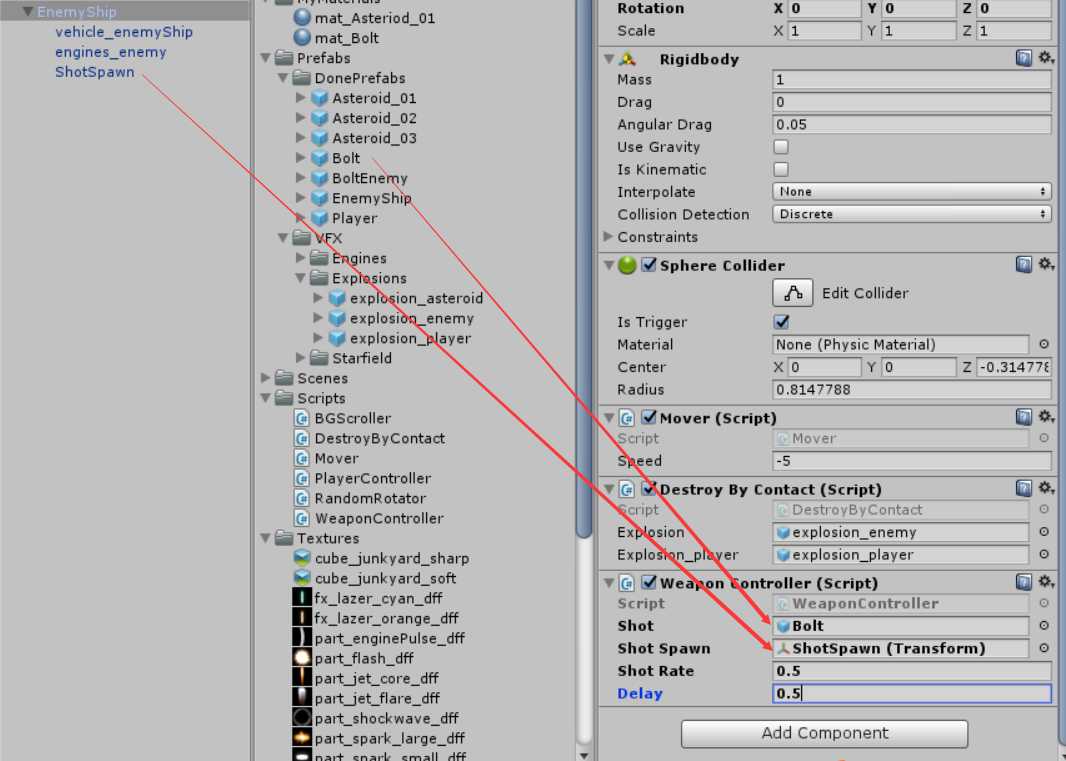
d、点击EnemyShip对象,为Shot、Shot Spawn、Shot Rate和Delay参数赋值:
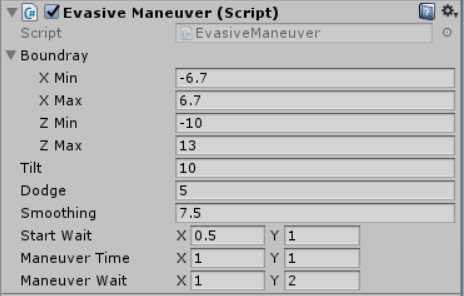
(6)、让敌机具有规避机动。为EnemyShip新添加一个脚本,命名为EvasiveManeuver,编辑脚本内容如下:
using System.Collections;
using System.Collections.Generic;
using UnityEngine;

public class EvasiveManeuver : MonoBehaviour
{
    public Boundray boundray;
    public float tilt;
    public float dodge;
    public float smoothing;
    public Vector2 startWait;
    public Vector2 maneuverTime;
    public Vector2 maneuverWait;

    private float currentSpeed;
    private float targetManeuver;
    private Rigidbody rg;
    // Use this for initialization
    void Start ()
    {
        rg = GetComponent<Rigidbody>();
        currentSpeed = rg.velocity.z;
        StartCoroutine(Evade());
    }

    // Update is called once per frame
    void Update ()
    {

    }

    IEnumerator Evade()
    {
        yield return new WaitForSeconds(Random.Range(startWait.x,startWait.y));
        while(true)
        {
            targetManeuver = Random.Range(1, dodge) * -Mathf.Sign(transform.position.x);
            yield return new WaitForSeconds(Random.Range(maneuverTime.x,maneuverTime.y));
            targetManeuver = 0;
            yield return new WaitForSeconds(Random.Range(maneuverWait.x,maneuverWait.y));
        }
    }

    private void FixedUpdate()
    {
        float newManeuver = Mathf.MoveTowards(rg.velocity.x,targetManeuver,smoothing*Time.deltaTime);
        rg.velocity = new Vector3(newManeuver,0.0f, currentSpeed);
        rg.position = new Vector3(
            Mathf.Clamp(rg.position.x, boundray.xMin, boundray.xMax),
            0.0f,
            Mathf.Clamp(rg.position.z,boundray.zMin,boundray.zMax));
        rg.rotation = Quaternion.Euler(0.0f,0.0f,rg.velocity.x*-tilt);
    }
}
设置参数如下所示:
(7)、把敌机对象制作成Prefab。为了后续的使用,我们把EnemyShip的tag属性宣威Enemy,然后在Prefabs->DonePrefabs文件夹下新建一个Prefab,重命名为EnemyShip,把EnemyShip拖拽到新建的Prefab上,完成Prefab的制作。
三、创建游戏控制器
完成了上述内容我们运行游戏发现小行星和敌机不会自动出现,所以我们需要建立一个脚本来控制敌人不间断的出现。我们在Scripts文件夹下新建一个脚本文件,命名为GameController,把GameController脚本绑定到Main Camera上,编辑脚本内容如下:
using System.Collections;
using System.Collections.Generic;
using UnityEngine;

public class GameController : MonoBehaviour
{
    public GameObject[] hazards;
    public Vector3 spawnValue;
    public long hazardCnt;
    public float spawnWait;
    public float startWait;
    public float waveWait;
    // Use this for initialization
    void Start ()
    {
        StartCoroutine(SpawnWaves());
    }

    // Update is called once per frame
    void Update ()
    {

    }

    IEnumerator SpawnWaves()
    {
        yield return new WaitForSeconds(startWait);
        while(true)
        {
            for (long i=0;i<hazardCnt;++i)
            {
                GameObject hazard = hazards[Random.Range(0,hazards.Length)];
                Vector3 spawnPosition = new Vector3(
                    Random.Range(-spawnValue.x,spawnValue.x),
                    spawnValue.y,
                    spawnValue.z);
                Quaternion spawnRotation = Quaternion.identity;
                Instantiate(hazard,spawnPosition,spawnRotation);
                yield return new WaitForSeconds(spawnWait);
            }
            yield return new WaitForSeconds(waveWait);
        }
    }
}
四、添加音效
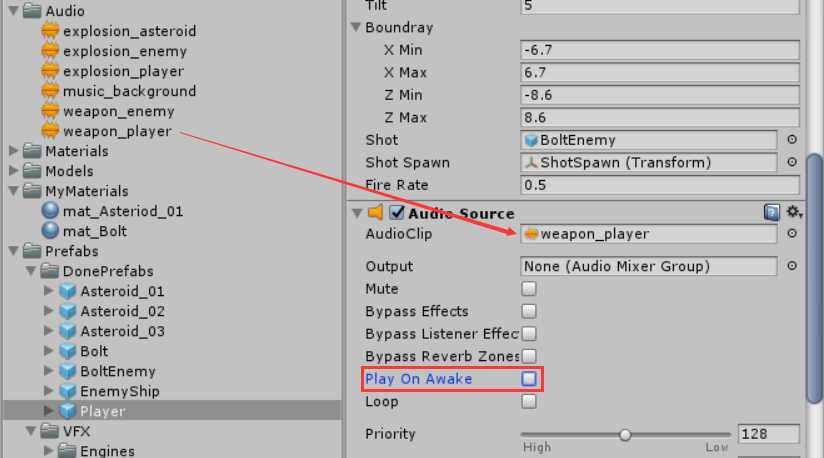
1、给我方飞船增加发射子弹音效。在Prefabs/DonePrefabs文件夹下找到Player预制体,选中Player预制体,在Inspector视图底部点击Add Component->Audio->Audio Source,将Audio文件夹下的weapon_player拖拽到Audio Source组件中的Audio Clip属性上,去掉Play On Awake选项:
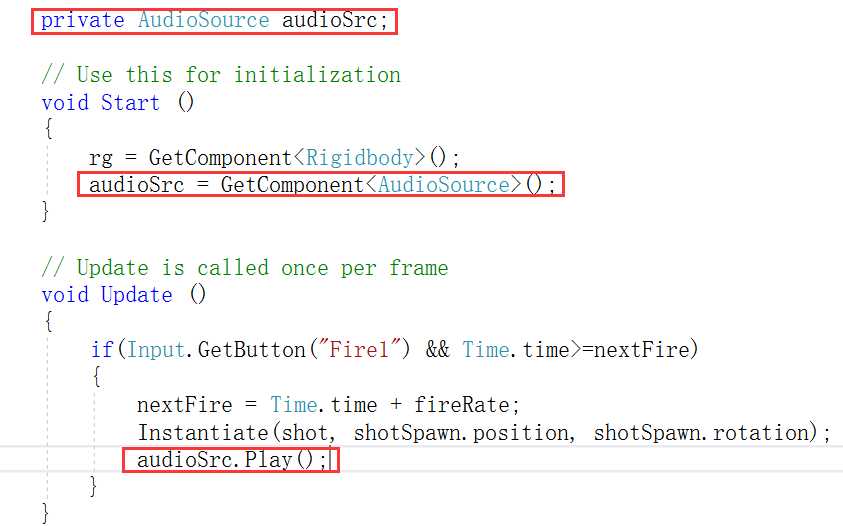
打开PlayController脚本文件,编辑脚本内容,使飞船在发射子弹时产生音效,修改内容如下:
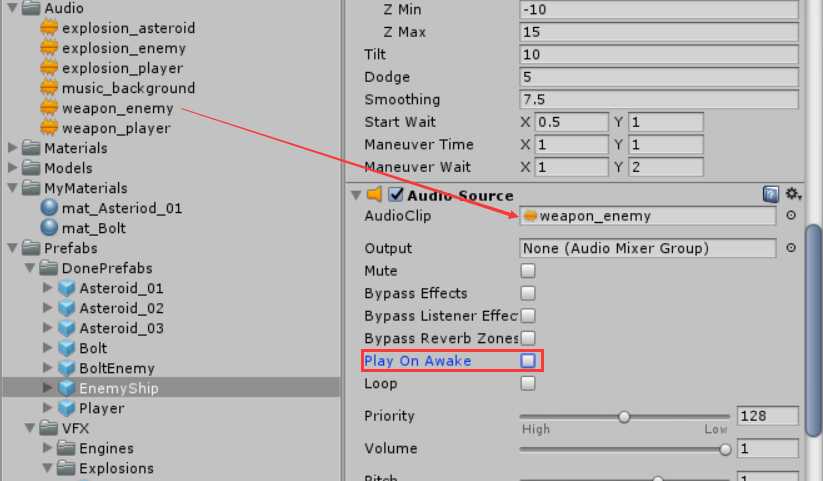
2、给敌机增加发射子弹音效。在Prefabs/DonePrefabs文件夹下找到EnemyShip预制体,选中EnemyShip预制体,在Inspector视图底部点击Add Component->Audio->Audio Source,将Audio文件夹下的weapon_enemy拖拽到Audio Source组件中的Audio Clip属性上,去掉Play On Awake选项:
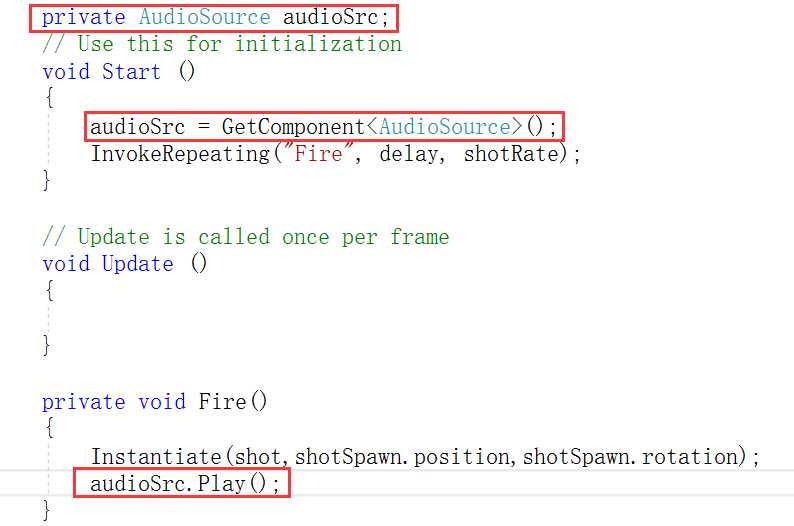
打开WeaponController脚本文件,编辑脚本内容,使敌方飞船在发射子弹时产生音效,修改内容如下:
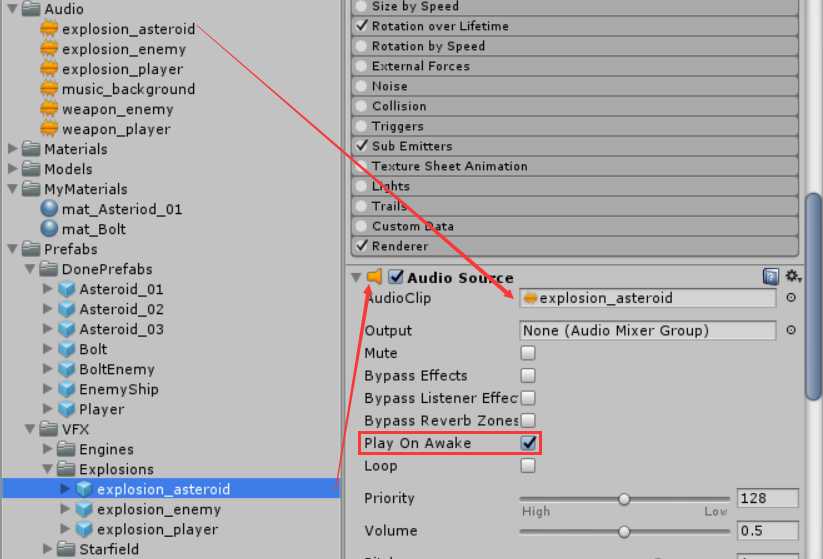
3、给小行星、我方飞船、敌方飞船添加爆炸音效。这三种音效不能像上述两种那样直接绑定到对象上,因为发生爆炸的时候对象直接被销毁了,这个时候即使调用了Play()函数也无法播放声音(因为对象已经销毁,所以绑定在对象上的AudioSource组件也一起销毁了)。我们需要把这个音效绑定在爆炸特效上,点击explosion_asteroid预制体,为预制体添加AudioSource组件,把Audio文件夹下的explosion_asteroid音效文件拖拽到Audio Clip属性上,注意Play On Awake属性为勾选状态:
我方飞船和敌方飞船爆炸音效按照同样的方法制作。
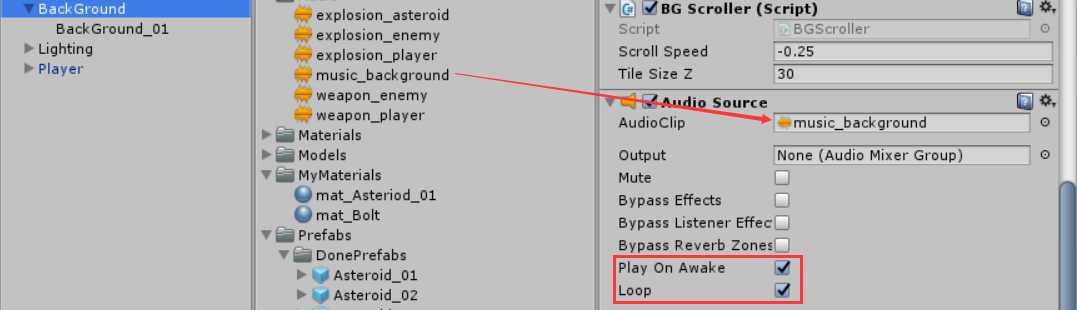
4、加上背景音效。背景音效我们可以绑定到主相机上,也可以绑定到背景上面,这里我们选择绑定到背景上。点击BackGround,为BackGround添加Audio Source组件,并把music_background音效拖拽到Audio Clip属性上,记得勾选Play On Awake和Loop选项:
五、对象回收
我们发现在我们的游戏运行的过程中,如果小行星和敌机没有被击毁并跑到了我们的视野之外,他们就会一直存在,另外子弹和爆炸效果产生的对象也不会自动销毁,这样我们的内存消耗就会越来越大。所以我们需要有对象回收机制。
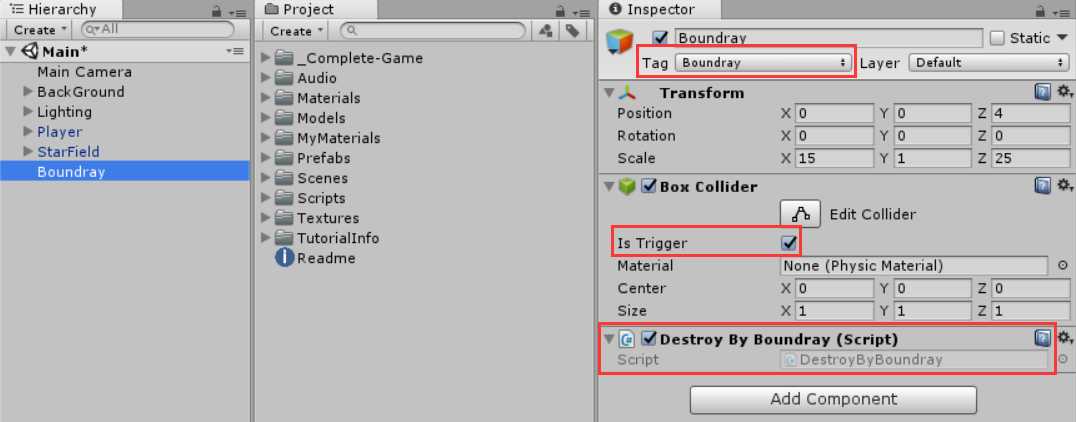
对于跑出视野的小行星和敌机、发射的子弹我们采用的方法是创建一个Cube对象,当这些对象和Cube碰撞时销毁这些对象。新建一个Cube,重命名为Boundray,去掉Cube(Mesh Filter)和Mesh Renderer组件,在Box Collider组件中选中Is Trigger选项,新建一个Tag,命名为Boundray,在Tag属性中选中Boundray,最后为Boundray对象添加一个脚本,命名为DestroyByBoundray:
编辑DestroyByBoundray脚本内容如下:
using System.Collections;
using System.Collections.Generic;
using UnityEngine;

public class DestroyByBoundray : MonoBehaviour
{

    // Use this for initialization
    void Start ()
    {

    }

    // Update is called once per frame
    void Update ()
    {

    }

    private void OnTriggerExit(Collider other)
    {
        Destroy(other.gameObject);

    }
}
让与Boundray对象发生碰撞的游戏对象直接销毁。(这里有个小错误:在我们制做小行星预制体时,我们只给prop_asteroid_01、prop_asteroid_02和prop_asteroid_03模型绑定了胶囊碰撞器,而没有给它们的父对象Asteroid_01、Asteroid_02和Asteroid_03绑定碰撞器,那么在这里我们直接Destroy(other.gameObject),只是把子对象销毁了,父对象还一直存在,所以我们还要给父对象绑定一个碰撞器。)
在DestroyByContent脚本中我们编写了与小行星或敌方飞船发生碰撞的对象都会被销毁,但是Boundray对象是不能销毁的,所以我们需要修改DestroyByContent脚本的OnTriggerEnter函数:
    private void OnTriggerEnter(Collider other)
    {
        if(other.tag=="Enemy" || other.tag == "Boundray")
        {
            return;
        }
        if(explosion)
        {
            Instantiate(explosion, transform.position, transform.rotation);
        }
        if(other.tag=="Player" && explosion_player)
        {
            Instantiate(explosion_player, transform.position, transform.rotation);//产生一个特效
        }

        Destroy(other.gameObject);
        Destroy(gameObject);
    }
对于爆炸效果的销毁,我们采取延时一段时间后销毁对象。首先我们新建一个脚本,命名为DestroyByTime,编辑内容如下:
using System.Collections;
using System.Collections.Generic;
using UnityEngine;

public class DestroyByTime : MonoBehaviour
{
    public float lifeTime;
    // Use this for initialization
    void Start ()
    {
        Destroy(gameObject,lifeTime);
    }

    // Update is called once per frame
    void Update ()
    {

    }
}
在Prefabs/VFX/Explosions文件夹下找到explosion_asteroid、explosion_enemy和explosion_player三个爆炸特效预制体,把这三个预制体都绑定DestroyByTime脚本,并把lifeTime设置为2秒,这样爆炸产生的特效对象会在2秒后销毁。
六、创建计分板
建立一个Text用来记录分数。在Hierarchy视图中右键->UI->Text,创建一个Text,重命名为ScoreText,颜色选择为红色。在创建Text的时候系统会自动建立一个画布,按照同样的办法我们再创建两个Text用来提示游戏结束和重新开始,调整Text的位置,如下所示:

为了实现计分功能,我们需要修改GameController脚本:
using System.Collections;
using System.Collections.Generic;
using UnityEngine;
using UnityEngine.SceneManagement;
using UnityEngine.UI;

public class GameController : MonoBehaviour
{
    public GameObject[] hazards;
    public Vector3 spawnValue;
    public long hazardCnt;
    public float spawnWait;
    public float startWait;
    public float waveWait;

    public Text scoreText;
    public Text gameOverText;
    public Text restartText;
    private int score;
    private bool gameOver;
    private bool restart;
    // Use this for initialization
    void Start ()
    {
        StartCoroutine(SpawnWaves());
        gameOverText.text = "";
        restartText.text = "";
        UpdateScore();
        score = 0;
        gameOver = false;
        restart = false;
    }

    // Update is called once per frame
    void Update ()
    {
        if(restart)
        {
            if(Input.GetKeyDown(KeyCode.R))
            {
                SceneManager.LoadScene(SceneManager.GetActiveScene().buildIndex);
            }
        }
    }

    IEnumerator SpawnWaves()
    {
        yield return new WaitForSeconds(startWait);
        while(true)
        {
            for (long i=0;i<hazardCnt;++i)
            {
                GameObject hazard = hazards[Random.Range(0,hazards.Length)];
                Vector3 spawnPosition = new Vector3(
                    Random.Range(-spawnValue.x,spawnValue.x),
                    spawnValue.y,
                    spawnValue.z);
                Quaternion spawnRotation = Quaternion.identity;
                Instantiate(hazard,spawnPosition,spawnRotation);
                yield return new WaitForSeconds(spawnWait);
            }
            yield return new WaitForSeconds(waveWait);

            if(gameOver)
            {
                restart = true;
                restartText.text = "Press ‘R‘ for Restart.";
                break;
            }
        }
    }

    private void UpdateScore()
    {
        scoreText.text = "Score:" + score.ToString();
    }

    public void AddScore(int newScore)
    {
        score += newScore;
        UpdateScore();
    }

    public void GameOver()
    {
        gameOver = true;
        gameOverText.text = "Game Over!";
    }
}
修改DestroyByContent脚本内容如下:
using System.Collections;
using System.Collections.Generic;
using UnityEngine;

public class DestroyByContact : MonoBehaviour
{
    public GameObject explosion;
    public GameObject explosion_player;

    public int scoreValue;
    private GameController gameController;
    // Use this for initialization
    void Start ()
    {
        GameObject gameControllerObj = GameObject.FindGameObjectWithTag("GameController");
        if(gameControllerObj)
        {
            gameController = gameControllerObj.GetComponent<GameController>();
        }
        if(!gameController)
        {
            Debug.Log("Can not Find ‘GameController‘ script.");
        }
    }

    // Update is called once per frame
    void Update ()
    {

    }

    private void OnTriggerEnter(Collider other)
    {
        if(other.tag=="Enemy" || other.tag == "Boundray")
        {
            return;
        }
        if(explosion)
        {
            Instantiate(explosion, transform.position, transform.rotation);
        }
        if(other.tag=="Player" && explosion_player)
        {
            Instantiate(explosion_player, transform.position, transform.rotation);//产生一个特效
            gameController.GameOver();
        }
        gameController.AddScore(scoreValue);
        Destroy(other.gameObject);
        Destroy(gameObject);
    }
}
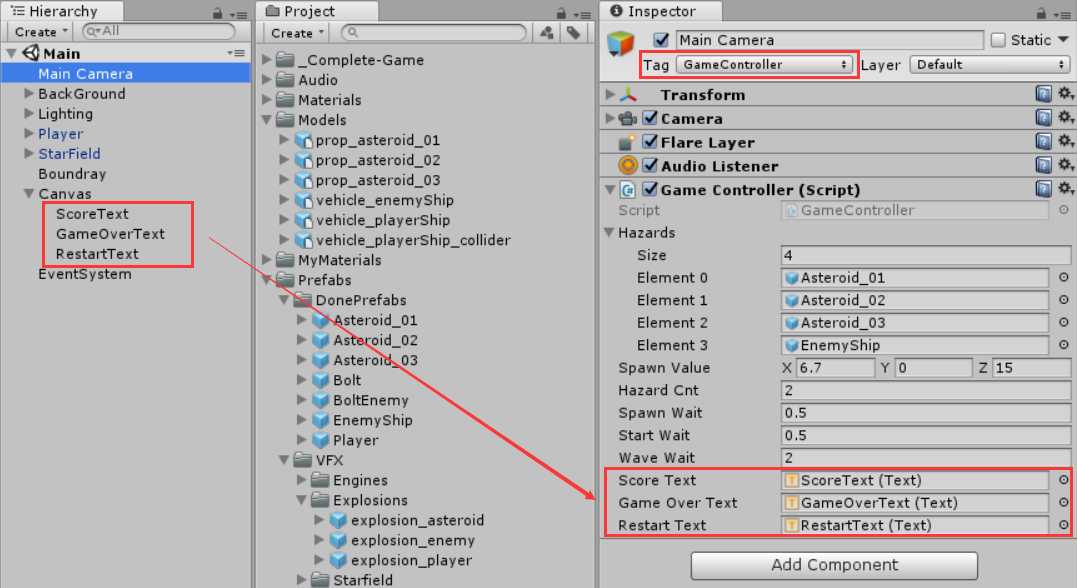
把预制体Asteroid_01、Asteroid_02和Asteroid_03的Score Value属性值设置为10,把预制体EnemyShip的Score Value属性值设置为20,点击Main Camera找到GameController脚本组件,分别将Hierarchy视图中的ScoreText、GameOverText和RestartText拖拽到Score Text、Game Over Text和Restart Text属性上,并把Main Camera的Tag属性设置为GameController:
至此游戏制作基本完成。