标签:bsp login 就是 www page token dfa 服务器 存储
上一篇介绍了如何爬取豆瓣TOP250的相关内容,今天我们来模拟登陆GitHub。语言:Python 3.6.1
IDE: Pycharm
浏览器:firefox
抓包工具:fiddler
爬虫框架:Scrapy 1.5.0
操作系统:Windows 10 家庭中文版分析登陆提交信息
分析登陆信息我使用的是fiddler,fiddler的使用方法就不作介绍了,大家可以自行搜索,首先我们打开github的登陆页面,输入用户名密码,提交查看fiddler获取的信息,我这里第一次故意输入错误的密码,结果入下:
登陆页面(https://github.com/login ) :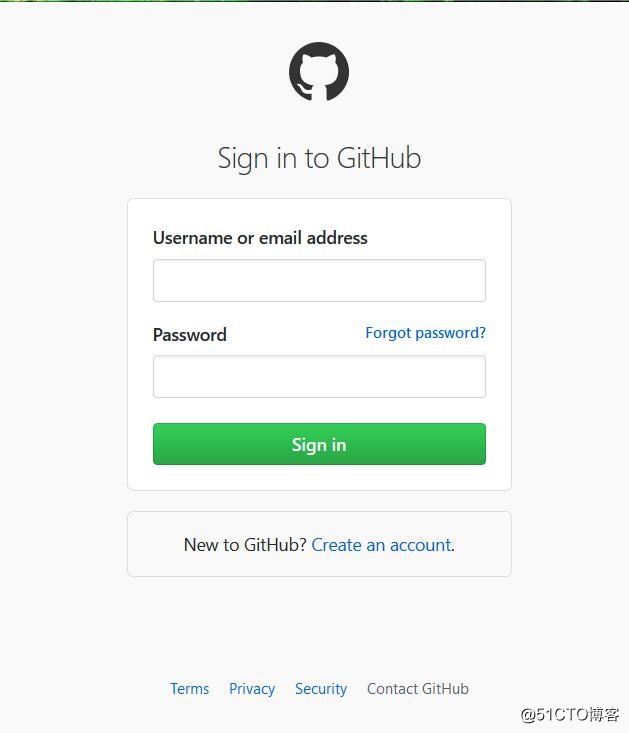
输入用户名和错误密码获取的fiddler结果:
这里我们用火狐开发者工具也可以看到form提交时会加入authenticity_token参数一起,如下图: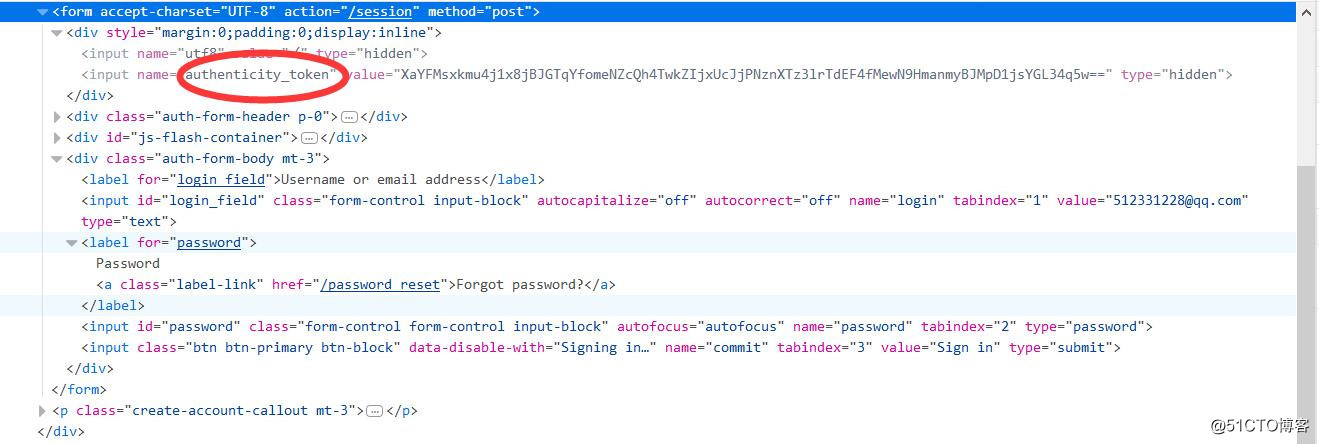
进入你要存储项目的文件夹中执行下面命令:
scrpy startproject githubspider可以根据提示继续创建spider,也可以自己手动创建,使用下面命令:
cd githubspider
scrapy genspider example example.com
如下图:
项目内容如下: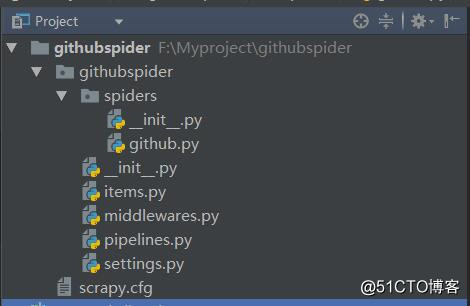
在scrapy.cfg同级目录下创建pycharm调试脚本run.py,内容如下:
# -*- coding: utf-8 -*-
from scrapy import cmdline

cmdline.execute(‘scrapy crawl github‘.split())
修改settings中的ROBOTSTXT_OBEY = True参数为False,因为默认为True,就是要遵守robots.txt 的规则, robots.txt 是遵循 Robot协议 的一个文件,它保存在网站的服务器中,它的作用是,告诉搜索引擎爬虫,本网站哪些目录下的网页不希望你进行爬取收录。在Scrapy启动后,会在第一时间访问网站的 robots.txt 文件,然后决定该网站的爬取范围。查看robots.txt可以直接网址后接robots.txt即可如百度:https://www.baidu.com/robots.txt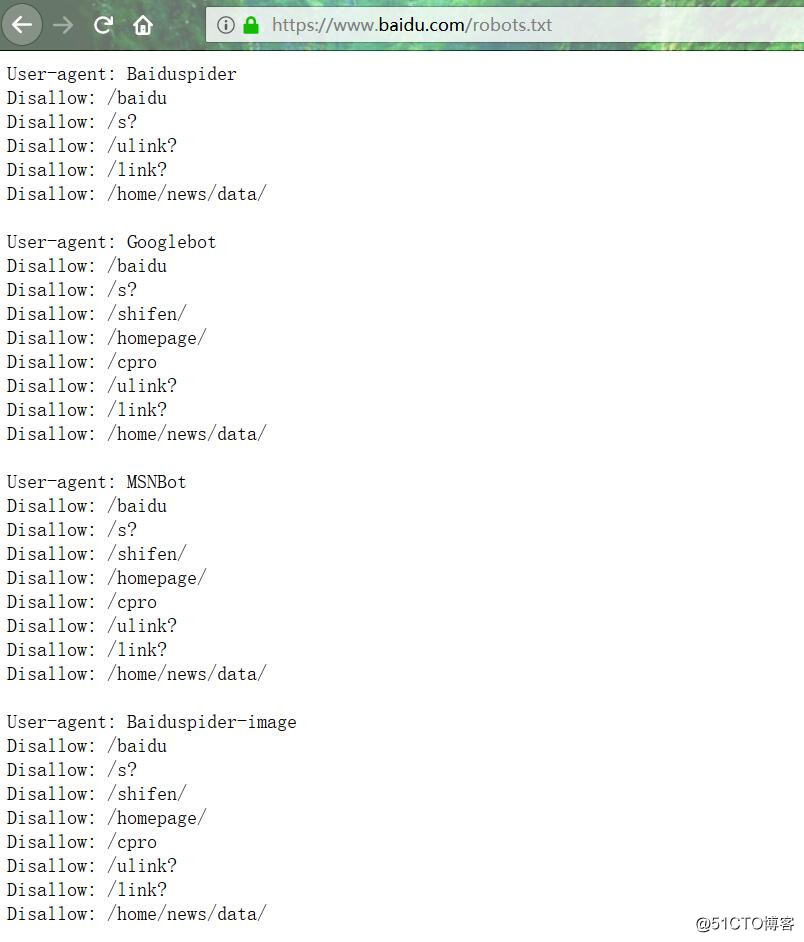
如果我们没有修改这个参数,则结果如下:
首先要打开登陆页面,获取authenticity_token,代码如下:
import scrapy
from scrapy.http import Request

class GithubSpider(scrapy.Spider):
    name = ‘github‘
    allowed_domains = [‘github.com‘]

    def start_requests(self):
        urls = [‘https://github.com/login‘]
        for url in urls:
            # 重写start_requests方法,通过meta传入特殊key cookiejar,爬取url作为参数传给回调函数
            yield Request(url, meta={‘cookiejar‘: 1}, callback=self.github_login)

    def github_login(self, response):
        # 首先获取authenticity_token,这里可以借助scrapy shell ”url“来获取页面
        # 然后从源码中获取到authenticity_token的值
        authenticity_token = response.xpath("//input[@name=‘authenticity_token‘]/@value").extract_first()
        # 利用scrapy内置logger打印info信息
        self.logger.info(‘authenticity_token=‘ + authenticity_token)
        pass
结果如下:
可以看到我们已经获取了authenticity_token的值,这一步重点要说明meta、cookiejar和logger。
meta:字典格式的元数据,可以传递给下一个函数meta官网解释;
cookiejar:是meta的一个特殊的key,通过cookiejar参数可以支持多个会话对某网站进行爬取,可以对cookie做标记,1,2,3,4......这样scrapy就维持了多个会话;
logger:scrapy为每个spider实例内置的日志记录器具体信息参考官网logging。
Scrapy提供了FormRequest类,是Request类的扩展,专门用来进行Form表单提交。我们主要使用FormRequest.from_response()方法来模拟简单登陆,通过FormRequest.from_response提交后,交给回调函数处理。代码如下:
     def github_login(self, response):
        # 首先获取authenticity_token,这里可以借助scrapy shell ”url“来获取页面
        # 然后从源码中获取到authenticity_token的值
        authenticity_token = response.xpath("//input[@name=‘authenticity_token‘]/@value").extract_first()
        self.logger.info(‘authenticity_token=‘ + authenticity_token)
        # url可以从fiddler抓取中获取,dont_click作用是如果是True,表单数据将被提交,而不需要单击任何元素。
        return FormRequest.from_response(response,
                                         url=‘https://github.com/session‘,
                                         meta={‘cookiejar‘: response.meta[‘cookiejar‘]},
                                         headers=self.headers,
                                         formdata={‘utf8‘: ‘?‘,
                                                   ‘authenticity_token‘: authenticity_token,
                                                   ‘login‘: ‘xxxxxx@qq.com‘,
                                                   ‘password‘: ‘xxxxxx‘},
                                         callback=self.github_after,
                                         dont_click=True,
                                         )
回调函数的代码如下:
    def github_after(self, response):
        # 获取登录页面主页中的字符串‘Browse activity‘
        list = response.xpath("//a[@class=‘tabnav-tab selected‘]/text()").extract()
        # 如果含有字符串,则打印日志说明登录成功
        if ‘Browse activity‘ in list:
            self.logger.info(‘我已经登录成功了,这是我获取的关键字:Browse activity‘)
主页如下: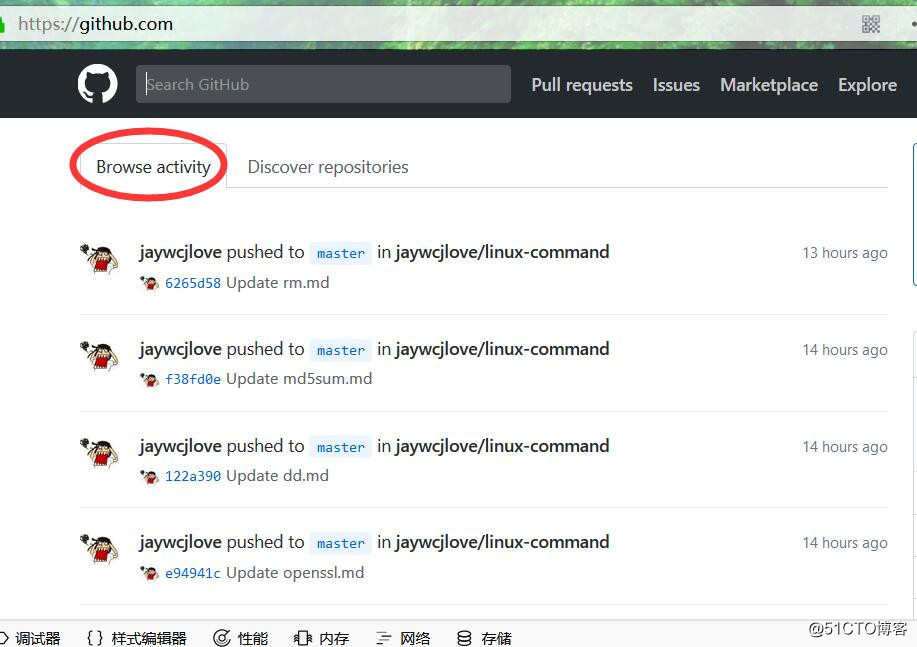
完整的github.py代码如下:
# -*- coding: utf-8 -*-
import scrapy
from scrapy.http import Request, FormRequest

class GithubSpider(scrapy.Spider):
    name = ‘github‘
    allowed_domains = [‘github.com‘]
    # 头信息直接从fiddler中复制出来的
    headers = {
        ‘User-Agent‘: ‘Mozilla/5.0 (Windows NT 10.0; Win64; x64; rv:58.0) Gecko/20100101 Firefox/58.0‘,
        ‘Accept‘: ‘text/html,application/xhtml+xml,application/xml;q=0.9,*/*;q=0.8‘,
        ‘Accept-Language‘: ‘zh-CN,zh;q=0.8,zh-TW;q=0.7,zh-HK;q=0.5,en-US;q=0.3,en;q=0.2‘,
        ‘Accept-Encoding‘: ‘gzip, deflate, br‘,
        ‘Referer‘: ‘https://github.com/‘,
        ‘Content-Type‘: ‘application/x-www-form-urlencoded‘,
    }

    def start_requests(self):
        urls = [‘https://github.com/login‘]
        for url in urls:
            # 重写start_requests方法,通过meta传入cookiejar特殊key,爬取url作为参数传给回调函数
            yield Request(url, meta={‘cookiejar‘: 1}, callback=self.github_login)

    def github_login(self, response):
        # 首先获取authenticity_token,这里可以借助scrapy shell ”url“来获取页面
        # 然后从源码中获取到authenticity_token的值
        authenticity_token = response.xpath("//input[@name=‘authenticity_token‘]/@value").extract_first()
        self.logger.info(‘authenticity_token=‘ + authenticity_token)
        # url可以从fiddler抓取中获取,dont_click作用是如果是True,表单数据将被提交,而不需要单击任何元素。
        return FormRequest.from_response(response,
                                         url=‘https://github.com/session‘,
                                         meta={‘cookiejar‘: response.meta[‘cookiejar‘]},
                                         headers=self.headers,
                                         formdata={‘utf8‘: ‘?‘,
                                                   ‘authenticity_token‘: authenticity_token,
                                                   # 这里是你自己的账号密码
                                                   ‘login‘: ‘xxxxx@qq.com‘,
                                                   ‘password‘: ‘xxxxxx‘},
                                         callback=self.github_after,
                                         dont_click=True,
                                         )

    def github_after(self, response):
        # 获取登录页面主页中的字符串‘Browse activity‘
        list = response.xpath("//a[@class=‘tabnav-tab selected‘]/text()").extract()
        # 如果含有字符串,则打印日志说明登录成功
        if ‘Browse activity‘ in list:
            self.logger.info(‘我已经登录成功了,这是我获取的关键字:Browse activity‘)
        else:
            self.logger.error(‘登录失败‘)
执行后的结果如下:
登录成功了。
不知不觉发现我也写了好多篇文章了,写完上面模拟登陆GitHub后,决定趁热打铁,模拟登陆51cto,将我写的博文全部列出来,整理成目录。
51cto的登陆和GitHub差不多,只不过获取的是csrf 而不是authenticity_token,用fiddler获取的结果如下: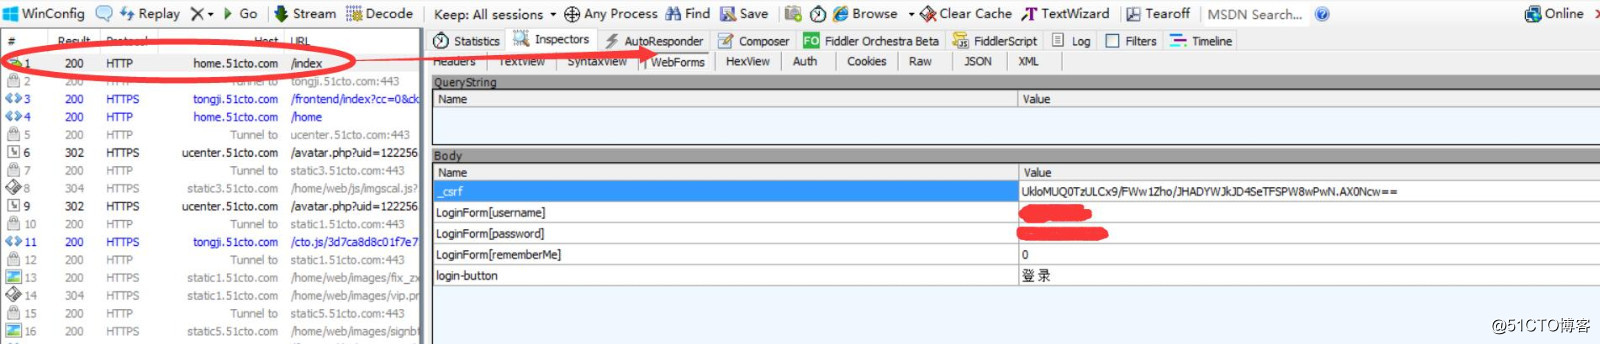
这里就不多说了,直接附代码,51cto.py(spider)内容如下:
# -*- coding: utf-8 -*-
import scrapy
from scrapy.http import FormRequest
from githubspider.items import CtospiderItem

class CtoSpider(scrapy.Spider):
    name = ‘51cto‘
    allowed_domains = [‘51cto.com‘]

    def start_requests(self):
        urls = [‘http://home.51cto.com/index‘]
        for url in urls:
            yield scrapy.Request(url, callback=self.cto_login, meta={‘cookiejar‘: 1})

    def cto_login(self, response):
        # 获取csrf值
        csrf = response.xpath("//input[@name=‘_csrf‘]/@value").extract_first()
        headers = {
            ‘User-Agent‘: ‘Mozilla/5.0 (Windows NT 10.0; Win64; x64; rv:58.0) Gecko/20100101 Firefox/58.0‘,
            ‘Accept‘: ‘text/html,application/xhtml+xml,application/xml;q=0.9,*/*;q=0.8‘,
            ‘Accept-Language‘: ‘zh-CN,zh;q=0.8,zh-TW;q=0.7,zh-HK;q=0.5,en-US;q=0.3,en;q=0.2‘,
            ‘Accept-Encoding‘: ‘gzip, deflate, br‘,
            ‘Referer‘: ‘http://blog.51cto.com‘,
            ‘Content-Type‘: ‘application/x-www-form-urlencoded‘,
        }
        # 此处为logger输出供调试时使用
        # self.logger.info("获取csrf值为 %s" % csrf)
        yield FormRequest.from_response(response,
                                        url=‘http://blog.51cto.com/linuxliu?type=1‘,
                                        headers=headers,
                                        meta={‘cookiejar‘: response.meta[‘cookiejar‘]},
                                        formdata={
                                                  # 这个位置注意0要加引号,不然会报错,这个参数意思是是否记住密码10天内自动登录
                                                  ‘LoginForm[rememberMe]‘: ‘0‘,
                                                  ‘LoginForm[username]‘: ‘xxxx‘,
                                                  ‘LoginForm[password]‘: ‘xxxx‘,
                                                  ‘_csrf‘: csrf,
                                                  },
                                        callback=self.after_login,
                                        dont_click=True,
                                        )

    def after_login(self, response):
        # 定义item实例,items.py中已经定义好字段
        item = CtospiderItem()
        # 获取的网页内容
        resps = response.css("ul.artical-list li")
        for resp in resps:
            # 写入item字段中
            item[‘title_url‘] = resp.css("a.tit::attr(href)").extract_first()
            item[‘title‘] = resp.css("a.tit::text").extract_first().strip()
            # fullname的格式为“[名称](链接)”之所以这样是因为
            # markdown语法里这个表示链接的意思,点击名称直接打开链接内容
            item[‘fullname‘] = ‘[‘ + item[‘title‘] + ‘]‘ + ‘(‘ + item[‘title_url‘] + ‘)‘
            # 此处logger也是调试使用
            # self.logger.info("title url的值为:%s , title的值为%s" % (tit_url, tit))
            yield item

        # 下一页内容获取
        next_page = response.css(‘li.next a::attr(href)‘).extract_first()
        # self.logger.info("下一页链接为:%s" % next_page)
        if next_page is not None:
            yield scrapy.Request(next_page, callback=self.after_login)
items.py字段如下:
class CtospiderItem(scrapy.Item):
    # define the fields for your item here like:
    # name = scrapy.Field()
    title = scrapy.Field()
    title_url = scrapy.Field()
    fullname = scrapy.Field()
执行命令写入csv文件:
scrapy crawl 51cto -o cto.csv文件结果如下: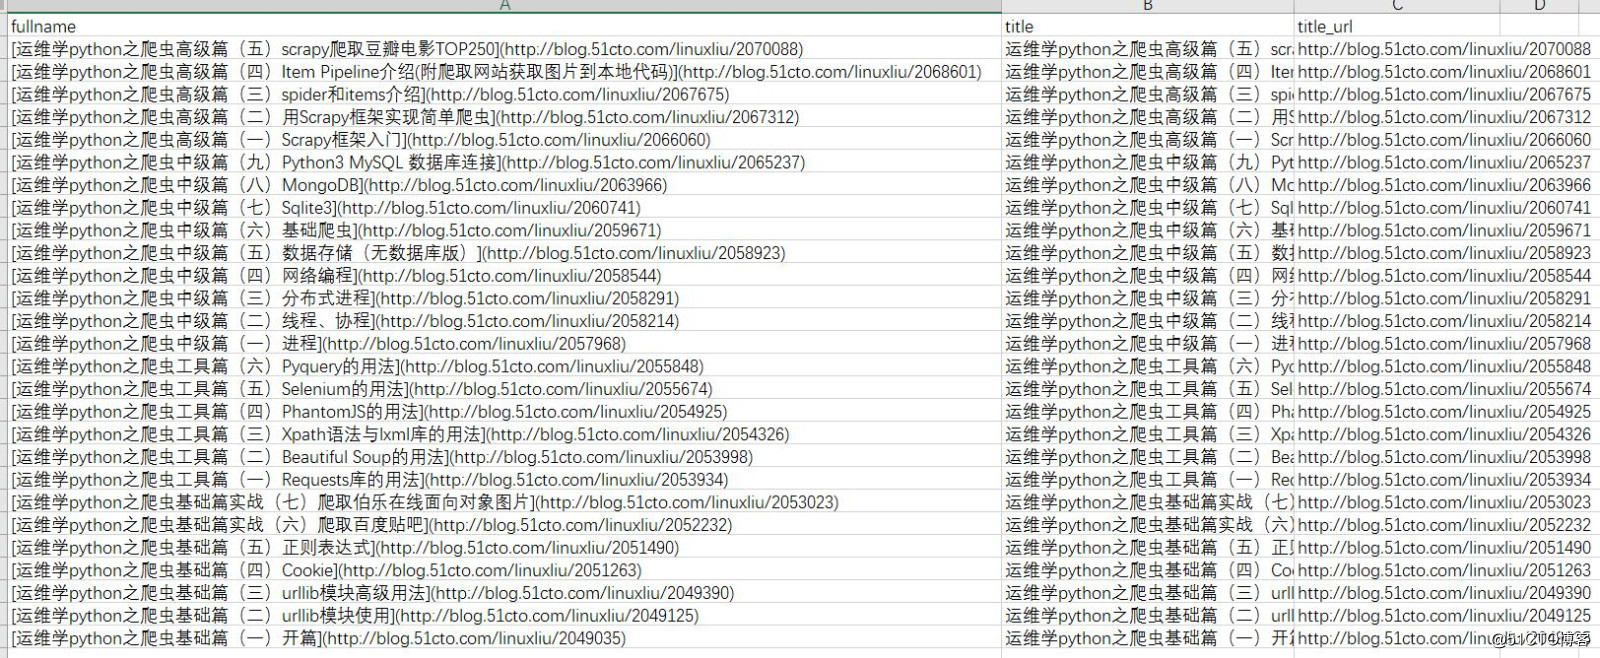
把我需要的fullname粘到这里大家就明白了:
运维学python之爬虫高级篇(五)scrapy爬取豆瓣电影TOP250
运维学python之爬虫高级篇(四)Item Pipeline介绍(附爬取网站获取图片到本地代码)
运维学python之爬虫高级篇(三)spider和items介绍
运维学python之爬虫高级篇(二)用Scrapy框架实现简单爬虫
运维学python之爬虫高级篇(一)Scrapy框架入门
运维学python之爬虫中级篇(九)Python3 MySQL 数据库连接
运维学python之爬虫中级篇(八)MongoDB
运维学python之爬虫中级篇(七)Sqlite3
运维学python之爬虫中级篇(六)基础爬虫
运维学python之爬虫中级篇(五)数据存储(无数据库版)
运维学python之爬虫中级篇(四)网络编程
运维学python之爬虫中级篇(三)分布式进程
运维学python之爬虫中级篇(二)线程、协程
运维学python之爬虫中级篇(一)进程
运维学python之爬虫工具篇(六)Pyquery的用法
运维学python之爬虫工具篇(五)Selenium的用法
运维学python之爬虫工具篇(四)PhantomJS的用法
运维学python之爬虫工具篇(三)Xpath语法与lxml库的用法
运维学python之爬虫工具篇(二)Beautiful Soup的用法
运维学python之爬虫工具篇(一)Requests库的用法
运维学python之爬虫基础篇实战(七)爬取伯乐在线面向对象图片
运维学python之爬虫基础篇实战(六)爬取百度贴吧
运维学python之爬虫基础篇(五)正则表达式
运维学python之爬虫基础篇(四)Cookie
运维学python之爬虫基础篇(三)urllib模块高级用法
运维学python之爬虫基础篇(二)urllib模块使用
运维学python之爬虫基础篇(一)开篇
年前最后一更,过节期间有时间我就更,没时间可能就不更了,在这里提前给大家拜个早年,祝大家新春快乐,18年心想事成,另外今天情人节,也祝大家情人节快乐!!!
标签:bsp login 就是 www page token dfa 服务器 存储
原文地址:http://blog.51cto.com/linuxliu/2071674