标签:日志收集 Flume Flume简介 Flume配置文件 Flume安装
一. Flume是什么?Flume是一个分布式,可靠的系统。它能够高效的收集,整合数据,还可以将来自不同源的大量数据移动到数据中心存储。
Flume是Apache下的一个顶级项目。Flume不仅可以收集整合日志数据,因为数据源是可以自定义的,Flume能够用于传输大量日志数据,这些数据包含到不仅限于网络传输数据、社交媒体生成的数据、邮件信息等等。
当前的版本有0.9.x和1.x。新版本具有更加灵活的配置和性能上的改进,推荐使用1.x版本。本文介绍使用的是1.8版本。
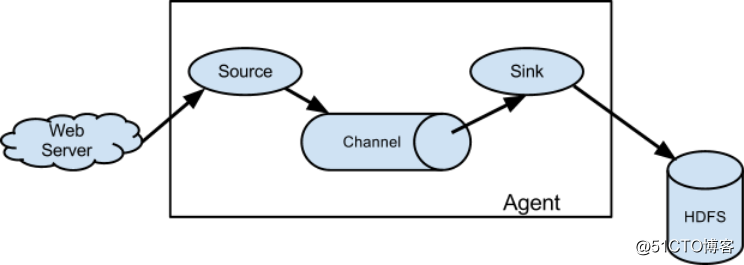
简单的讲,Flume Agent(一个JVM进程)将外部产生的事件发送给下一个目标也称成下一跳。
如上图,外部事件源Web Server 将组织成具体格式的数据发送给Flume source。Flume source有多种,以Avro Flume Source为例,Avro Flume Source会收到来自Avro client或者Flume agent发来的数据(是由Flume sink从Channel中获取的数据)。Flume Source将数据放入Channel中。Flume Sink可将event发送给HDFS,不过此处的Sink要使用HDFS Sink。
注意: Source、Channel、Sink都有不同的实现,对应着不同的功能。
~]# wget http://archive.apache.org/dist/flume/stable/apache-flume-1.8.0-bin.tar.gz
~]# tar xf apache-flume-1.8.0-bin.tar.gz -C /opt
~]# cd /opt
~]# ln -sv apache-flume-1.8.0-bin.tar.gz apache-flume
因为flume java程序,所以依赖jdk
jdk的版本要求为1.8.0+
~]# yum install -y java-1.8.0-openjdk
修改配置文件conf/flume-conf.properties.template
~]# vim conf/flume-conf.properties.template
#对这个flume agent取一个名字,称之为agent01。这个名字可以任意取
agent01.sources = r1     # 在flume agent中source的名字为r1。这个名字可以任意取
agent01.sinks = k1         # 在flume sinks中sinks的名字为k1。这个名字可以任意取
agent01.channels = c1   # 在flume agent中channels的名字为c1。这个名字可以任意取

#设置flume source参数
agent01.sources.r1.type = netcat           #agent01这个flume agent中源r1的类型为netcat,监听在指定的ip+port以接受数据
agent01.sources.r1.bind = localhost       #指明绑定的端口
agent01.sources.r1.port = 44444           #指明监听的端口

#设置flume sink
agent01.sinks.k1.type = logger    #会记录info级别的信息,主要用于调试

#配置flume channel
agent01.channels.c1.type = memory   #使用memory类型的channel,他会将event保存在内存中
agent01.channels.c1.capacity = 1000
a1.channels.c1.transactionCapacity = 100

#指定source和sink绑定的channel
agent01.sources.r1.channels = c1   #r1会将event发给c1 channel
agent01.sinks.k1.channel = c1 #k1会从c1中消费event一个flume agent可以配置多个flow,我们可以有多个sources,channel,sink。这些组件的组合可以形成多个数据流(data flow)。
使用场景:可以同时配置多个flow,这两个流相互干扰。以下面为例,
一条流为 : avro-AppSrv-source1-->mem-channel-1--> mem-channel-1
另一条为 : exec-tail-source2--> file-channel-2 --> file-channel-2
#list the sources, sinks and channels in the agent
agent_foo.sources = avro-AppSrv-source1 exec-tail-source2
agent_foo.sinks = hdfs-Cluster1-sink1 avro-forward-sink2
agent_foo.channels = mem-channel-1 file-channel-2

#flow #1 configuration
agent_foo.sources.avro-AppSrv-source1.channels = mem-channel-1
agent_foo.sinks.hdfs-Cluster1-sink1.channel = mem-channel-1

#flow #2 configuration
agent_foo.sources.exec-tail-source2.channels = file-channel-2
agent_foo.sinks. file-channel-2.channel = file-channel-2支持将一个source中的数据发往多个channel中,Fan out 有两种模式
#list the sources, sinks and channels in the agent
agent_foo.sources = avro-AppSrv-source1
agent_foo.sinks = hdfs-Cluster1-sink1 avro-forward-sink2
agent_foo.channels = mem-channel-1 file-channel-2

#set channels for source
agent_foo.sources.avro-AppSrv-source1.channels = mem-channel-1 file-channel-2

#set channel for sinks
agent_foo.sinks.hdfs-Cluster1-sink1.channel = mem-channel-1
agent_foo.sinks.avro-forward-sink2.channel = file-channel-2

#channel selector configuration
agent_foo.sources.avro-AppSrv-source1.selector.type = multiplexing
agent_foo.sources.avro-AppSrv-source1.selector.header = State
agent_foo.sources.avro-AppSrv-source1.selector.mapping.CA = mem-channel-1
agent_foo.sources.avro-AppSrv-source1.selector.mapping.AZ = file-channel-2
agent_foo.sources.avro-AppSrv-source1.selector.mapping.NY = mem-channel-1 file-channel-2
agent_foo.sources.avro-AppSrv-source1.selector.default = mem-channel-1
selector.header指定检测的头部的名称,上面配置为State。如果值是“CA”event将会发往mem-channel-1,如果值是“AZ”event将会发往file-channel-2,如果是“NY”将会发往 mem-channel-1和file-channel-2。如果都没有匹配到,则会发往默认channel mem-channel-1
需要注意:一旦指定的channel不能消费事件,selector会在所有的channel中重试。
以单个组件配置方式启动flume agent
apache-fluem]# bin/flume-ng agent --conf ./conf --conf-file ./conf/flume-conf.properties.template --name agent01
agent:表明运行为flume agent
--conf :指明配置文件目录
--conf-file:指明配置我文件
--name:指明运行agent的名称
可以看到端口已经监听
连接成功后,输入任意的字符串,如果正常会返回OK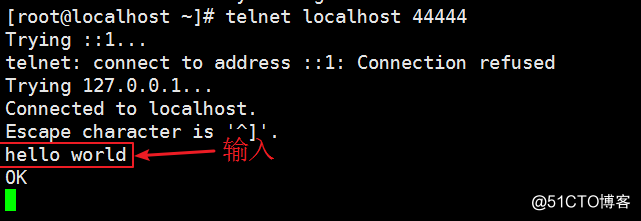
对于不同source,channel以及sink的使用可以参考官方文档
Flume官网文档:http://flume.apache.org/FlumeUserGuide.html
标签:日志收集 Flume Flume简介 Flume配置文件 Flume安装
原文地址:http://blog.51cto.com/13589448/2086140