标签:cut 目标 auto 收费 操作 eve framework 程序 个数
一、Spring 使用 AspectJ 进行 AOP 的开发:注解的方式
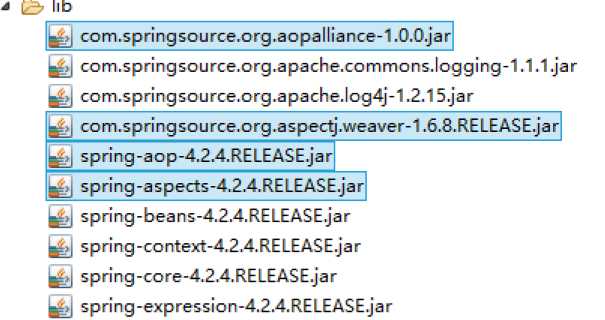
1.1 引入相关的jar包
1.2 引入spring的配置文件
<?xml version="1.0" encoding="UTF-8"?>
<beans xmlns="http://www.springframework.org/schema/beans"
        xmlns:xsi="http://www.w3.org/2001/XMLSchema-instance"
        xmlns:aop="http://www.springframework.org/schema/aop"
        xmlns:tx="http://www.springframework.org/schema/tx" xsi:schemaLocation="
        http://www.springframework.org/schema/beans http://www.springframework.org/schema/beans/spring-beans.xsd
        http://www.springframework.org/schema/tx http://www.springframework.org/schema/tx/spring-tx.xsd
        http://www.springframework.org/schema/aop http://www.springframework.org/schema/aop/spring-aop.xsd">
        <!-- 开启AOP操作 -->
        <aop:aspectj-autoproxy></aop:aspectj-autoproxy>


</beans>
1.3 编写目标类
package com.Kevin.aop;
/**
 * 使用注解方式进行AOP操作
 * 被增强类
 * @author Kevin
 *
 */

public class Book {

    public void add(){
        System.out.println("Book Method add----");
    }

}
1.4 配置目标类
<!-- 创建对象 -->
        <bean id="book" class="com.Kevin.aop.Book"></bean>
1.5 开启aop注解的自动代理
 <!-- 开启AOP操作 -->
        <aop:aspectj-autoproxy></aop:aspectj-autoproxy>
1.6 AspectJ 的 AOP 的注解
● Pointcut:切入点,在类中有很多方法可以被增强,而只有实际增强的方法称为切入点;
● Advice:通知/增强,实际增强的逻辑,被称为通知/增强,比如拓展日志功能,日志功能被称为通知/增强;
前置通知:在方法之前执行
后置通知:在方法之后执行
异常通知:方法出现异常
最终通知:在后置之后执行
环绕通知:在方法之前和之后执行
● Introduction(引介):引介是一种特殊的通知在不修改类代码的前提下, Introduction 可以在运行期为类动态地添加一些方法或 Field;
● Target(目标对象):代理的目标对象;
● Weaving(织入):是指把增强应用到目标对象来创建新的代理对象的过程(spring 采用动态代理织入,而 AspectJ 采用编译期织入和类装在期织入);
● Proxy(代理):一个类被 AOP 织入增强后,就产生一个结果代理类。
● Aspect:切面,将增强应用到具体方法上的过程称为切面(把增强用到切入点过程)
● Joinpoint:连接点,类里面可以被增强的方法,被称为连接点
1.7 编写切面类
package com.Kevin.aop;

import org.aspectj.lang.annotation.Aspect;
import org.aspectj.lang.annotation.Before;
import org.springframework.context.annotation.Bean;

/**
 * 使用注解方式进行AOP操作
 * 增强类
 * @author Kevin
 *
 */

@Aspect
public class StrBook {

    //在方法上使用注解完成增强配置
    @Before(value="execution(* com.Kevin.aop.Book.*(..))")
    public void add(){
        System.out.println("Before Strength---");
    }

}
1.8 配置切面
<bean id="strBook" class="com.Kevin.aop.StrBook"></bean>
二、Spring的JDBC模版
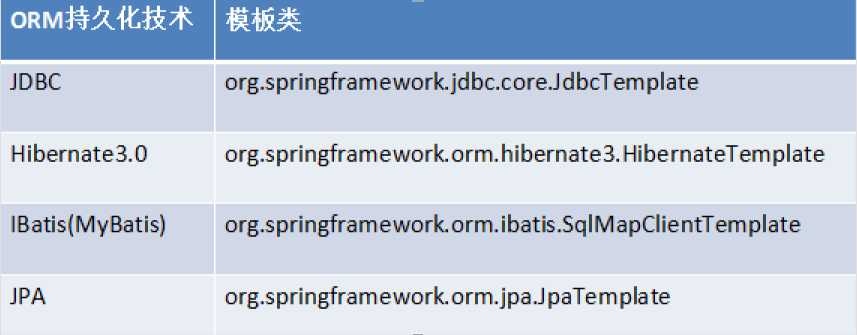
2.1 Spring 提供了很多持久层技术的模板类简化编程
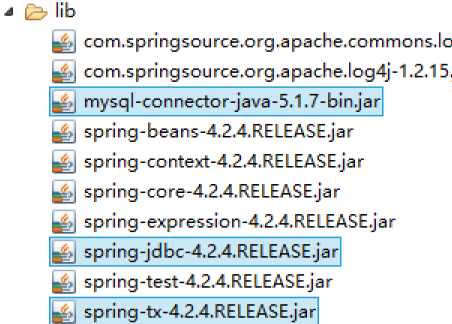
2.2 引入开发相关的包
2.3 创建一个测试类
package com.Kevin.jdbc;

import org.junit.Test;
import org.springframework.jdbc.core.JdbcTemplate;
import org.springframework.jdbc.datasource.DriverManagerDataSource;

/**
 * 使用jdbcTemplate模版操作数据库
 * @author Kevin
 *
 */
public class JdbcTemplateDemo1 {
    //添加操作
    @Test
    public void add(){
        //设置数据库信息
        DriverManagerDataSource dataSource=new DriverManagerDataSource();
        dataSource.setDriverClassName("com.mysql.jdbc.Driver");
        dataSource.setUrl("jdbc:mysql:///springday3");
        dataSource.setUsername("root");
        dataSource.setPassword("admin");

        //创建jdbcTemplate对象,设置数据源
        JdbcTemplate jdbcTemplate=new JdbcTemplate(dataSource);

        //调用jdbcTemplate对象里的方法实现操作
        //创建sql语句
        String sql="insert into user values(?,?)";
        int rows=jdbcTemplate.update(sql,"Kevin","admin");
        System.out.println(rows);
    }
}
三、将连接池交给Spring管理
3.1 Spring的c3p0连接池配置
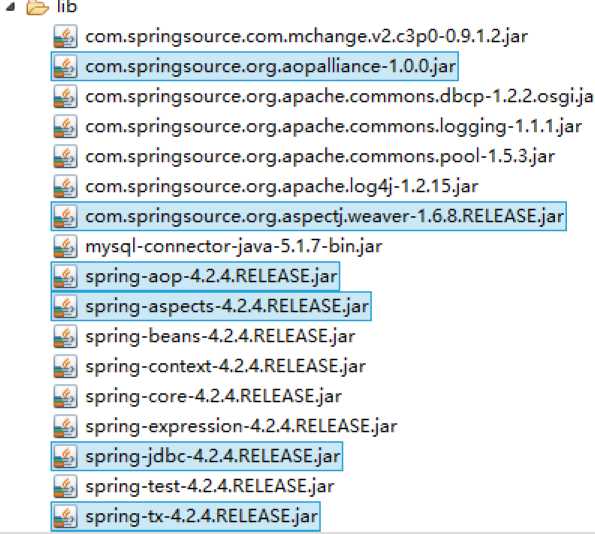
【引入相应的jar包】

【编写c3p0配置文件】
<?xml version="1.0" encoding="UTF-8"?>
<beans xmlns="http://www.springframework.org/schema/beans"
    xmlns:xsi="http://www.w3.org/2001/XMLSchema-instance" xmlns:aop="http://www.springframework.org/schema/aop"
    xmlns:tx="http://www.springframework.org/schema/tx"
    xsi:schemaLocation="
        http://www.springframework.org/schema/beans http://www.springframework.org/schema/beans/spring-beans.xsd
        http://www.springframework.org/schema/tx http://www.springframework.org/schema/tx/spring-tx.xsd
        http://www.springframework.org/schema/aop http://www.springframework.org/schema/aop/spring-aop.xsd">

    <!-- 配置c3p0连接池 -->
    <bean id="dataSource" class="com.mchange.v2.c3p0.ComboPooledDataSource">
        <!-- 注入属性 -->
        <property name="driverClass" value="com.mysql.jdbc.Driver"></property>
        <property name="jdbcUrl" value="jdbc:mysql:///springday3"></property>
        <property name="user" value="root"></property>
        <property name="password" value="admin"></property>
    </bean>

    <!-- 创建jdbcTemplate对象 -->
    <bean id="jdbcTemplate" class="org.springframework.jdbc.core.JdbcTemplate">
        <!-- 把dataSource传递到模版对象里 -->
        <property name="dataSource" ref="dataSource"></property>
    </bean>

</beans>
3.2 将数据库连接信息配置到属性文件中
【定义属性文件】
//设置数据库信息
        DriverManagerDataSource dataSource=new DriverManagerDataSource();
        dataSource.setDriverClassName("com.mysql.jdbc.Driver");
        dataSource.setUrl("jdbc:mysql:///springday3");
        dataSource.setUsername("root");
        dataSource.setPassword("admin");
四、JDBC模版的CRUD操作
【添加操作】
    //添加操作
    @Test
    public void add(){
        //设置数据库信息
        DriverManagerDataSource dataSource=new DriverManagerDataSource();
        dataSource.setDriverClassName("com.mysql.jdbc.Driver");
        dataSource.setUrl("jdbc:mysql:///springday3");
        dataSource.setUsername("root");
        dataSource.setPassword("admin");

        //创建jdbcTemplate对象,设置数据源
        JdbcTemplate jdbcTemplate=new JdbcTemplate(dataSource);

        //调用jdbcTemplate对象里的方法实现操作
        //创建sql语句
        String sql="insert into user values(?,?)";
        int rows=jdbcTemplate.update(sql,"Kevin","admin");
        System.out.println(rows);
    }
【修改操作】
    //修改操作
    @Test
    public void update(){
        //设置数据库信息
        DriverManagerDataSource dataSource=new DriverManagerDataSource();
        dataSource.setDriverClassName("com.mysql.jdbc.Driver");
        dataSource.setUrl("jdbc:mysql:///springday3");
        dataSource.setUsername("root");
        dataSource.setPassword("admin");

        //创建jdbcTemplate对象,设置数据源
        JdbcTemplate jdbcTemplate=new JdbcTemplate(dataSource);

        //调用jdbcTemplate对象里的方法实现操作
        //创建sql语句
        String sql="update user set password=? where username=?";
        int rows=jdbcTemplate.update(sql,"666","Kevin");
        System.out.println(rows);


    }
【删除操作】
//删除操作
    @Test
    public void delete(){
        //设置数据库信息
        DriverManagerDataSource dataSource=new DriverManagerDataSource();
        dataSource.setDriverClassName("com.mysql.jdbc.Driver");
        dataSource.setUrl("jdbc:mysql:///springday3");
        dataSource.setUsername("root");
        dataSource.setPassword("admin");

        //创建jdbcTemplate对象,设置数据源
        JdbcTemplate jdbcTemplate=new JdbcTemplate(dataSource);

        //调用jdbcTemplate对象里的方法实现操作
        //创建sql语句
        String sql="delete from user where username=?";
        jdbcTemplate.update(sql,"Kevin");
    }
五、事务回顾
5.1 什么是事务
事务逻辑上的一组操作,组成这组操作的各个逻辑单元,要么一起成功,要么一起失败。
5.2 事务特性
● 原子性(Atomicity):操作这些指令时,要么全部执行成功,要么全部不执行。只要其中一个指令执行失败,所有的指令都执行失败,数据进行回滚,回到执行指令前的数据状态。
eg:拿转账来说,假设用户A和用户B两者的钱加起来一共是20000,那么不管A和B之间如何转账,转几次账,事务结束后两个用户的钱相加起来应该还得是20000,这就是事务的一致性。
● 一致性(Consistency):事务的执行使数据从一个状态转换为另一个状态,但是对于整个数据的完整性保持稳定。
● 隔离性(Isolation):隔离性是当多个用户并发访问数据库时,比如操作同一张表时,数据库为每一个用户开启的事务,不能被其他事务的操作所干扰,多个并发事务之间要相互隔离。
即要达到这么一种效果:对于任意两个并发的事务T1和T2,在事务T1看来,T2要么在T1开始之前就已经结束,要么在T1结束之后才开始,这样每个事务都感觉不到有其他事务在并发地执行。
● 持久性(Durability):当事务正确完成后,它对于数据的改变是永久性的。
5.3 如果不考虑隔离性而引发的问题
● 脏读 :一个事务读到了另一个事务的未提交的数据。
● 不可重复读 :一个事务读到了另一个事务已经提交的 update 的数据导致多次查询结果不一致。
● 虚幻读 :一个事务读到了另一个事务已经提交的 insert 的数据导致多次查询结果不一致。
5.4 解决读问题:设置事务隔离级别
事务的隔离级别有4种,由低到高分别为Read uncommitted 、Read committed 、Repeatable read 、Serializable 。而且,在事务的并发操作中可能会出现脏读,不可重复读,幻读。下面通过事例一一阐述它们的概念与联系。
Read uncommitted(最低级别,任何情况都无法保证。)
读未提交,顾名思义,就是一个事务可以读取另一个未提交事务的数据。
eg:老板要给程序员发工资,程序员的工资是3.6万/月。但是发工资时老板不小心按错了数字,按成3.9万/月,该钱已经打到程序员的户口,但是事务还没有提交,就在这时,程序员去查看自己这个月的工资,发现比往常多了3千元,以为涨工资了非常高兴。但是老板及时发现了不对,马上回滚差点就提交了的事务,将数字改成3.6万再提交。
Analyse:实际程序员这个月的工资还是3.6万,但是程序员看到的是3.9万。他看到的是老板还没提交事务时的数据。这就是脏读。
那怎么解决脏读呢?Read committed!读提交,能解决脏读问题。
Read committed(可避免脏读的发生。)
读提交,顾名思义,就是一个事务要等另一个事务提交后才能读取数据。
eg:程序员拿着信用卡去享受生活(卡里当然是只有3.6万),当他埋单时(程序员事务开启),收费系统事先检测到他的卡里有3.6万,就在这个时候!!程序员的妻子要把钱全部转出充当家用,并提交。当收费系统准备扣款时,再检测卡里的金额,发现已经没钱了(第二次检测金额当然要等待妻子转出金额事务提交完)。程序员就会很郁闷,明明卡里是有钱的…
Analyse:这就是读提交,若有事务对数据进行更新(UPDATE)操作时,读操作事务要等待这个更新操作事务提交后才能读取数据,可以解决脏读问题。但在这个事例中,出现了一个事务范围内两个相同的查询却返回了不同数据,这就是不可重复读。
那怎么解决可能的不可重复读问题?Repeatable read !
Repeatable read(可避免脏读、不可重复读的发生。)
重复读,就是在开始读取数据(事务开启)时,不再允许修改操作
eg:程序员拿着信用卡去享受生活(卡里当然是只有3.6万),当他埋单时(事务开启,不允许其他事务的UPDATE修改操作),收费系统事先检测到他的卡里有3.6万。这个时候他的妻子不能转出金额了。接下来收费系统就可以扣款了。
Analyse:重复读可以解决不可重复读问题。写到这里,应该明白的一点就是,不可重复读对应的是修改,即UPDATE操作。但是可能还会有幻读问题。因为幻读问题对应的是插入INSERT操作,而不是UPDATE操作。
什么时候会出现幻读?
eg:程序员某一天去消费,花了2千元,然后他的妻子去查看他今天的消费记录(全表扫描FTS,妻子事务开启),看到确实是花了2千元,就在这个时候,程序员花了1万买了一部电脑,即新增INSERT了一条消费记录,并提交。当妻子打印程序员的消费记录清单时(妻子事务提交),发现花了1.2万元,似乎出现了幻觉,这就是幻读。
那怎么解决幻读问题?Serializable!
Serializable(可避免脏读、不可重复读、幻读的发生。) 序列化
Serializable 是最高的事务隔离级别,在该级别下,事务串行化顺序执行,可以避免脏读、不可重复读与幻读。但是这种事务隔离级别效率低下,比较耗数据库性能,一般不使用。
Tips:大多数数据库默认的事务隔离级别是Read committed,比如Sql Server , Oracle。
Mysql的默认隔离级别是Repeatable read。
Tips:隔离级别的设置只对当前链接有效。对于使用MySQL命令窗口而言,一个窗口就相当于一个链接,当前窗口设置的隔离级别只对当前窗口中的事务有效;对于JDBC操作数据库来说,一个Connection对象相当于一个链接,而对于Connection对象设置的隔离级别只对该Connection对象有效,与其他链接Connection对象无关。
Tips:设置数据库的隔离级别一定要是在开启事务之前。
有关事务的详情可查阅什么是事务?事务的四个特性以及事务的隔离级别
五、Spring进行事务管理一组API
5.1 PlatformTransactionManager:平台事务管理器
真正管理事务的对象:
● JDBC 或 iBatis 进行持久化数据时使用 org.springframework.jdbc.datasource.DataSourceTransactionManager
● Hibernate 版本进行持久化数据时使用 org.springframework.orm.hibernate3.HibernateTransactionManager
5.2 TransactionDefinition:事务定义信息
事务定义信息:
● 隔离级别
● 传播行为
● 超时信息
● 是否只读
5.3 事务的传播行为
PROPAGION_XXX :事务的传播行为
● 保证同一个事务中
PROPAGATION_REQUIRED:支持当前事务,如果不存在 就新建一个(默认)
PROPAGATION_SUPPORTS :支持当前事务,如果不存在,就不使用事务
PROPAGATION_MANDATORY :支持当前事务,如果不存在,抛出异常
● 保证没有在同一个事务中
PROPAGATION_REQUIRES_NEW:如果有事务存在,挂起当前事务,创建一个新的事务
PROPAGATION_NOT_SUPPORTED: 以非事务方式运行,如果有事务存在,挂起当前事务
PROPAGATION_NEVER :以非事务方式运行,如果有事务存在,抛出异常
PROPAGATION_NESTED:如果当前事务存在,则嵌套事务执行
六、案例:搭建一个转账环境
6.1 创建业务层和DAO类
package com.Kevin.dao;

import org.springframework.jdbc.core.JdbcTemplate;

import com.mchange.v2.c3p0.ComboPooledDataSource;

public class OrdersDao {

    //注入jdbcTemplate
    private JdbcTemplate jdbcTemplate;
    public void setJdbcTemplate(JdbcTemplate jdbcTemplate) {
        this.jdbcTemplate = jdbcTemplate;
    }

    //少钱方法
    public void lessmoney(){
        String sql="update account set salary=salary+? where username=?";
        jdbcTemplate.update(sql,"-1000","Ryan");

    }

    //多钱方法
    public void moremoney(){
        String sql="update account set salary=salary+? where username=?";
        jdbcTemplate.update(sql,"1000","Kevin");

    }

}
package com.Kevin.service;

import com.Kevin.dao.OrdersDao;

public class OrdersService {

    private OrdersDao ordersDao;

    public void setOrdersDao(OrdersDao ordersDao) {
        this.ordersDao = ordersDao;
    }

    //调用dao方法
    //业务逻辑层,编写转账业务
    public void accountMoney(){
        ordersDao.lessmoney();
        ordersDao.moremoney();
    }


}
6.2 配置业务层和DAO
<?xml version="1.0" encoding="UTF-8"?>
<beans xmlns:xsi="http://www.w3.org/2001/XMLSchema-instance"
    xmlns="http://www.springframework.org/schema/beans" xmlns:context="http://www.springframework.org/schema/context"
    xmlns:aop="http://www.springframework.org/schema/aop" xmlns:tx="http://www.springframework.org/schema/tx"
    xsi:schemaLocation="http://www.springframework.org/schema/beans
                    http://www.springframework.org/schema/beans/spring-beans-4.2.xsd
                    http://www.springframework.org/schema/context
                    http://www.springframework.org/schema/context/spring-context-4.2.xsd
                    http://www.springframework.org/schema/aop
                    http://www.springframework.org/schema/aop/spring-aop-4.2.xsd
                    http://www.springframework.org/schema/tx
                    http://www.springframework.org/schema/tx/spring-tx-4.2.xsd ">

    <!-- 配置c3p0连接池 -->
    <bean id="dataSource" class="com.mchange.v2.c3p0.ComboPooledDataSource">
        <!-- 注入属性 -->
        <property name="driverClass" value="com.mysql.jdbc.Driver"></property>
        <property name="jdbcUrl" value="jdbc:mysql:///springday3"></property>
        <property name="user" value="root"></property>
        <property name="password" value="admin"></property>
    </bean>

    <!-- 第一步:配置事务管理器 -->
    <bean id="transactionManager"
        class="org.springframework.jdbc.datasource.DataSourceTransactionManager">
        <property name="dataSource" ref="dataSource"></property>
    </bean>

    <!-- 第二步:配置事务增强 -->
    <tx:advice id="txadvice" transaction-manager="transactionManager">
        <!-- 设置进行事务操作的方法匹配原则 -->
        <tx:attributes>
            <tx:method name="account*" propagation="REQUIRED" />
        </tx:attributes>
    </tx:advice>

    <!-- 第三步:配置切面 -->
    <aop:config>
        <!-- 切入点 -->
        <aop:pointcut expression="execution(* com.Kevin.service.OrdersService.*(..))" id="pointcut1"/>
        <!-- 切面 -->
        <aop:advisor advice-ref="txadvice" pointcut-ref="pointcut1"/>
    </aop:config>

    <bean id="ordersService" class="com.Kevin.service.OrdersService">
        <property name="ordersDao" ref="ordersDao"></property>
    </bean>

    <bean id="ordersDao" class="com.Kevin.dao.OrdersDao">
        <property name="jdbcTemplate" ref="jdbcTemplate"></property>
    </bean>

    <bean id="jdbcTemplate" class="org.springframework.jdbc.core.JdbcTemplate">
        <property name="dataSource" ref="dataSource"></property>
    </bean>

</beans>
6.3 编写测试类
package com.Kevin.service;

import org.junit.Test;
import org.springframework.context.ApplicationContext;
import org.springframework.context.support.ClassPathXmlApplicationContext;

public class TestService {

    @Test
    public void testService(){
        ApplicationContext context=new ClassPathXmlApplicationContext("beans1.xml");
        int i=1/0;
        OrdersService service=(OrdersService) context.getBean("ordersService");
        service.accountMoney();
    }


}
七、Spring声明事物的注解方式
7.1 引入jar包
7.2 配置事务管理器并开启事务注解
<?xml version="1.0" encoding="UTF-8"?>
<beans xmlns:xsi="http://www.w3.org/2001/XMLSchema-instance"
    xmlns="http://www.springframework.org/schema/beans" xmlns:context="http://www.springframework.org/schema/context"
    xmlns:aop="http://www.springframework.org/schema/aop" xmlns:tx="http://www.springframework.org/schema/tx"
    xsi:schemaLocation="http://www.springframework.org/schema/beans
                    http://www.springframework.org/schema/beans/spring-beans-4.2.xsd
                    http://www.springframework.org/schema/context
                    http://www.springframework.org/schema/context/spring-context-4.2.xsd
                    http://www.springframework.org/schema/aop
                    http://www.springframework.org/schema/aop/spring-aop-4.2.xsd
                    http://www.springframework.org/schema/tx
                    http://www.springframework.org/schema/tx/spring-tx-4.2.xsd ">

    <!-- 配置c3p0连接池 -->
    <bean id="dataSource" class="com.mchange.v2.c3p0.ComboPooledDataSource">
        <!-- 注入属性 -->
        <property name="driverClass" value="com.mysql.jdbc.Driver"></property>
        <property name="jdbcUrl" value="jdbc:mysql:///springday3"></property>
        <property name="user" value="root"></property>
        <property name="password" value="admin"></property>
    </bean>

    <!-- 第一步:配置事务管理器 -->
    <bean id="transactionManager" class="org.springframework.jdbc.datasource.DataSourceTransactionManager">
        <property name="dataSource" ref="dataSource"></property>
    </bean>

    <!-- 开启事务注解 -->
    <tx:annotation-driven transaction-manager="transactionManager"/>

    <bean id="ordersService" class="com.Kevin.service.OrdersService">
        <property name="ordersDao" ref="ordersDao"></property>
    </bean>

    <bean id="ordersDao" class="com.Kevin.dao.OrdersDao">
        <property name="jdbcTemplate" ref="jdbcTemplate"></property>
    </bean>

    <bean id="jdbcTemplate" class="org.springframework.jdbc.core.JdbcTemplate">
        <property name="dataSource" ref="dataSource"></property>
    </bean>

</beans>
7.3 在使用事务的类上添加一个注解:@Transactional
package com.Kevin.service;

import org.junit.Test;
import org.springframework.context.ApplicationContext;
import org.springframework.context.support.ClassPathXmlApplicationContext;
import org.springframework.transaction.annotation.Transactional;

@Transactional
public class TestService {

    @Test
    public void testService(){
        ApplicationContext context=new ClassPathXmlApplicationContext("beans1.xml");
        OrdersService service=(OrdersService) context.getBean("ordersService");
        service.accountMoney();
    }


}
[ SSH框架 ] Spring框架学习之二(Bean的管理和AOP思想)
标签:cut 目标 auto 收费 操作 eve framework 程序 个数
原文地址:https://www.cnblogs.com/Kevin-ZhangCG/p/9073524.html