标签:def else 配置 str net get strong 必须 null
原文:ASP.NET CORE系列【四】基于Claim登录授权关于什么是Claim?
可以看看其他大神的文章:
http://www.cnblogs.com/jesse2013/p/aspnet-identity-claims-based-authentication-and-owin.html
http://www.cnblogs.com/savorboard/p/aspnetcore-identity.html
注:本人目前还是菜鸟初学阶段,如有写错的地方,望各位大鸟 指出!
用户登录是一个非常常见的应用场景 .net core的登录方式跟以往有些不同,可以说是往好的方向发展,变得更容易扩展,更方便。
在上一章里面,有过简单的介绍,那么这一章,我们来详细看看。
1.首先需要NuGet安装一个包:Microsoft.AspNetCore.Authentication.Cookies
打开项目中的Startup.cs文件,找到ConfigureServices方法,我们通常在这个方法里面做依赖注入的相关配置。
public void ConfigureServices(IServiceCollection services)
        {//增加Cookie中间件配置
            services.AddAuthentication(options =>
            {
                options.DefaultAuthenticateScheme = "MyCookieAuthenticationScheme";
                options.DefaultChallengeScheme = "MyCookieAuthenticationScheme";
                options.DefaultSignInScheme = "MyCookieAuthenticationScheme";

            })
            .AddCookie("MyCookieAuthenticationScheme", options =>
            {
                //options.AccessDeniedPath = "/Account/Forbidden";
                options.LoginPath = "/Home/Login";
            });
        }
这里的代码意思是 添加授权,添加使用Cookie的方式,配置登录页面和没有权限时的跳转页面。
2.再找到Configure方法,添加 app.UseAuthentication(),使用授权:
 public void Configure(IApplicationBuilder app, IHostingEnvironment env, EFCoreContext context)
        {

            app.UseAuthentication();

        }
3.创建一个新的 Controller,并添加登录的方法:
 public async Task<IActionResult> Login([FromBody]  SysUser sysUser)
        {
                //使用ef获取用户
                var info = _context.SysUsers.Where(m => m.UserName == sysUser.UserName && m.PassWord == sysUser.PassWord).FirstOrDefault();
                if (info != null)
                {
                    //创建一个身份认证
                    var claims = new List<Claim>() {
                    new Claim(ClaimTypes.Sid,info.Id.ToString()), //用户ID
                    new Claim(ClaimTypes.Name,info.UserName)  //用户名称
                    };

                    var identity = new ClaimsIdentity(claims, "TestLogin");
                    var userPrincipal = new ClaimsPrincipal(identity);
                    await HttpContext.SignInAsync("MyCookieAuthenticationScheme", userPrincipal, new AuthenticationProperties
                    {
                        ExpiresUtc = DateTime.UtcNow.AddMinutes(20),
                        IsPersistent = false,
                        AllowRefresh = false
                    });
                    return Json(new
                    {
                        success = true
                    });
                }
                else
                {
                    return Json(new
                    {
                        success = false,
                        message = "账户名密码错误!"
                    });
                }
        }
由以上代码,我们来具体分析。
ASP.NET Core 的验证模型是 claims-based authentication 。Claim 是对被验证主体特征的一种表述,比如:登录用户名是xxx,email是xxx,其中的“登录用户名”,“email”就是ClaimType.
一组claims构成了一个identity,具有这些claims的identity就是 ClaimsIdentity
 var claims = new List<Claim>() {
                    new Claim(ClaimTypes.Sid,info.Id.ToString()), //用户ID
                    new Claim(ClaimTypes.Name,info.UserName)  //用户名称
                    };

                    var identity = new ClaimsIdentity(claims, "Login");
ClaimsIdentity的持有者就是 ClaimsPrincipal
var userPrincipal = new ClaimsPrincipal(identity);
一个ClaimsPrincipal可以持有多个ClaimsIdentity,就比如一个人既持有驾照,又持有护照.
var userPrincipal = new ClaimsPrincipal(identity);
                    await HttpContext.SignInAsync("MyCookieAuthenticationScheme", userPrincipal, new AuthenticationProperties
                    {
                        ExpiresUtc = DateTime.UtcNow.AddMinutes(20),
                        IsPersistent = false,
                        AllowRefresh = false
                    });
理解了Claim, ClaimsIdentity, ClaimsPrincipal这三个概念,就能理解生成登录Cookie为什么要用之前的代码。
要用Cookie代表一个通过验证的主体,必须包含Claim, ClaimsIdentity, ClaimsPrincipal这三个信息,ClaimsPrincipal就是持有证件的人,ClaimsIdentity就是证件,"Login"就是证件类型(这里假设是驾照),Claim就是驾照中的信息。
我们在需要验证权限的Action上面加入[Authorize] 就可以了, 如果没有登录状态,会跳转到Login页面, 如何配置跳转,已经各种其他的配置,见Startup.cs文件、
 public IActionResult Index()
        {//取用户信息
            var userId = User.FindFirst(ClaimTypes.Sid).Value;
            var userName = User.Identity.Name;
            return View();
        }
为什么User.Identity.Name可以取到用户名呢, 我们看看User的定义:
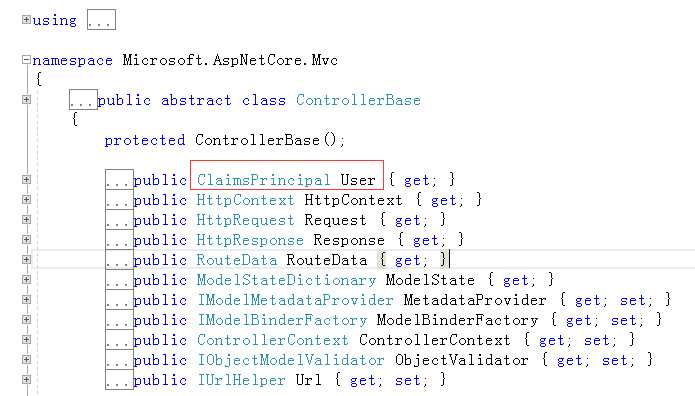
没错,他就是我们上面说的ClaimsPrincipal
此时,我掏出身份证(ClaimsIdentity),身份证上面有我的名称 (claim)
4.退出登录
public async Task<IActionResult> Logout()
        {
            await HttpContext.SignOutAsync("MyCookieAuthenticationScheme");
            return RedirectToAction("Index", "Home");
        }
标签:def else 配置 str net get strong 必须 null
原文地址:https://www.cnblogs.com/lonelyxmas/p/9197269.html