标签:rest instance except 端口配置 ++ 统一 temp tor lease
为什么需要使用消息中间件?
什么是中间件?
非底层操作系统软件,非业务应用软件,不是直接给最终用户使用的,不能直接给客户带来价值的软件统称为中间件。
什么是消息中间件?
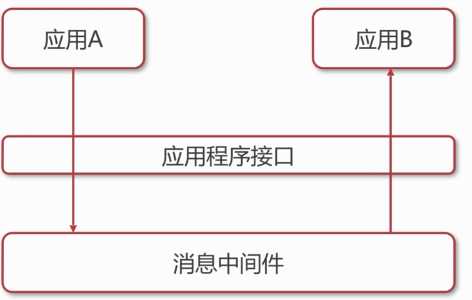
关注于数据的发送和接受,利用高效可靠的异步消息传递机制集成分布式系统。
消息中间件图示?
什么是JMS?
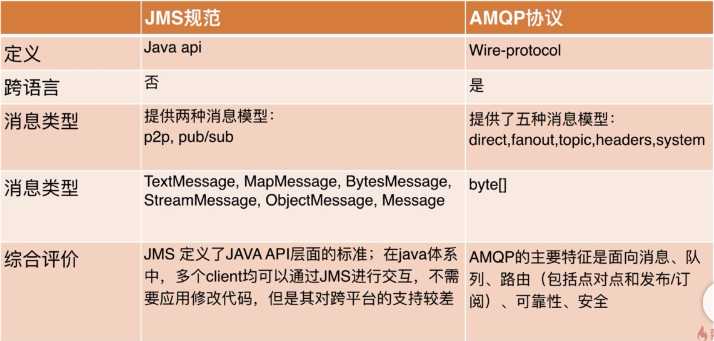
java消息服务(java Message Service)即JMS,是一个Java平台中关于面向消息中间件的API,用于在两个应用程序之间,或分布式系统中发送消息,进行异步通信。
什么是AMQP?
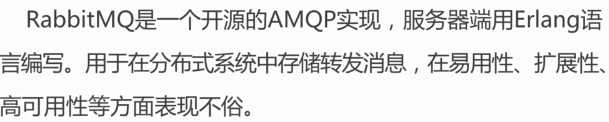
AMQP(advanced message queuing protocol)是一个提供统一消息服务的应用层标准协议,基于此协议的客户端与消息中间件可传递消息,并不受客户端.中间件不同产品,不同开发语言等条件的限制
JMS和AMQP对比
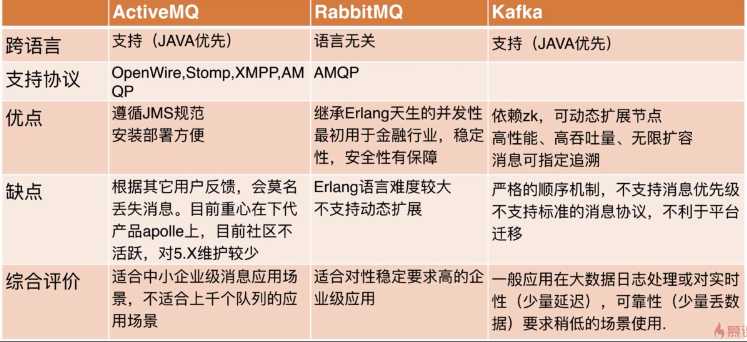
常见消息中间件对比

JMS规范
-> Java消息服务(Java Message Service)即JMS,是一个Java平台中面向消息中间件的API,用于在两个应用程序之间或分布式系统中发送/接收消息,进行异步通信
-> 提供者:实现JMS规范的消息中间件服务器
-> 客户端:发送或接收消息的应用程序
-> 生产者/发布者:创建并发送消息的客户端
-> 消费者/订阅者:接收并处理消息的客户端
-> 消息:应用程序之间传递的数据内容
-> 消息模式:在客户端之间传递消息的方式,JMS中定义了主题和队列两种模式
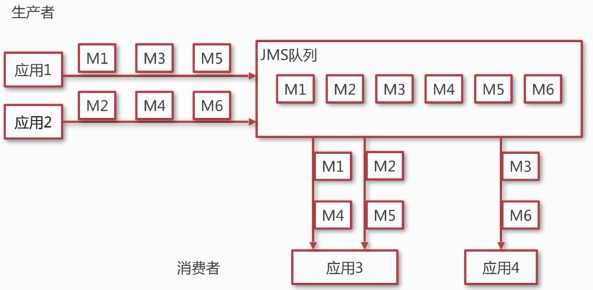
-> 队列模型
(1) 客户端包括生产者和消费者
(2) 队列中的消息只能被一个消费者消费
(3) 消费者可以随时消费队列中的消息
-> 队列模型示意图
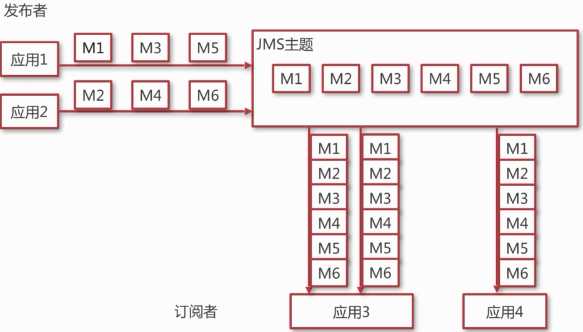
-> 主题模型
(1) 客户端包括发布者和订阅者
(2) 主题中的消息被所有订阅者消费
(3) 消费者不能消费订阅之前就发送到主题中的消息
-> 主题模型示意图
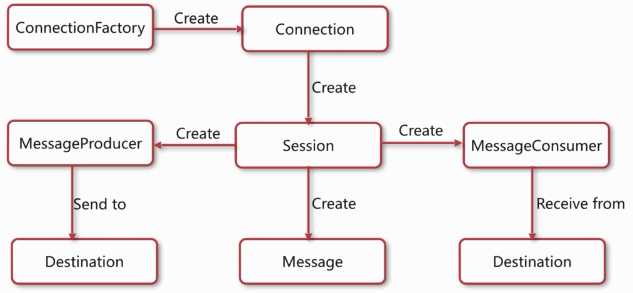
-> ConnectionFactory 用于创建连接到消息中间件的连接工厂
-> Connection 代表了应用程序和消息服务器之间的通信链路
-> Destination 指消息发布和接收的地点,包括队列和主题
-> Session 表示一个单线程的上下文,用于发送和接收消息
-> MessageConsumer 由会话创建,用于接收发送到目标的消息
-> MessageProducer 由会话创建,用于发送消息到目标
-> Message 是在消费者和生产者之间传送的对象,消息头,一组消息属性,一个消息体
Linux下安装ActiveMQ
官网下载地址:http://activemq.apache.org/activemq-5154-release.html
wget https://mirrors.tuna.tsinghua.edu.cn/apache//activemq/5.15.4/apache-activemq-5.15.4-bin.tar.gz //远程下载ActiveMQ压缩包
tar -zxvf apache-activemq-5.15.4-bin.tar.gz -C /usr/local/ //将压缩包解压到/usr/local/目录下
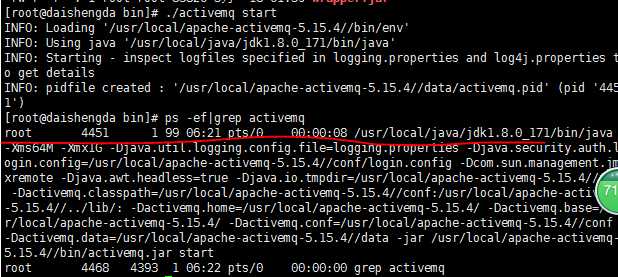
cd /usr/local/apache-activemq-5.15.4/bin //进入activeMQ的bin目录
./activemq start //启动activemq
./activemq stop //停止activemq
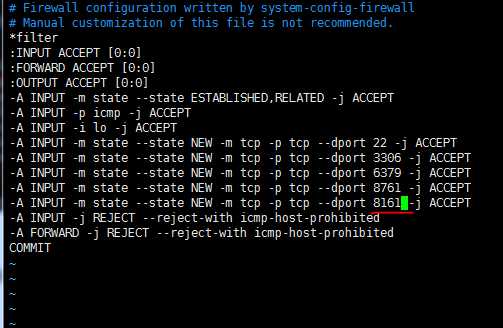
vim /etc/sysconfig/iptables //编辑防火墙策略文件,默认是8161、61616端口,
添加内容:
-A INPUT -m state --state NEW -m tcp -p tcp --dport 8161 -j ACCEPT //管理端口
-A INPUT -m state --state NEW -m tcp -p tcp --dport 61616 -j ACCEPT //连接端口
service iptables restart //重启防火墙

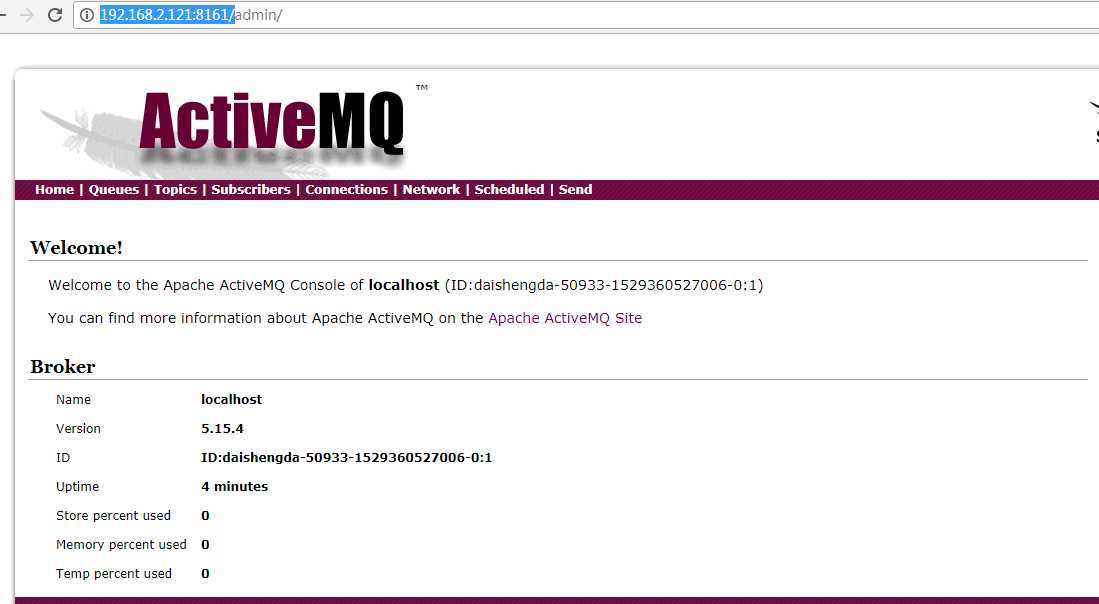
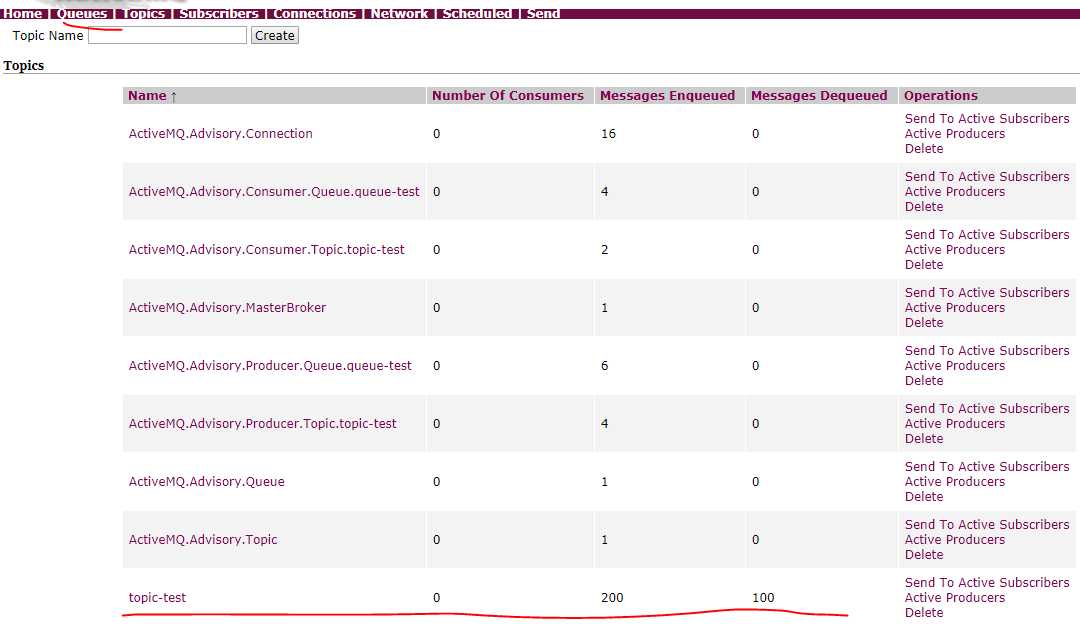
地址:http://192.168.2.121:8161/
管理帐号,默认帐号和密码都是admin
JMS代码实现
<dependency>
<groupId>org.apache.activemq</groupId>
<artifactId>activemq-all</artifactId>
<version>5.9.0</version>
</dependency>

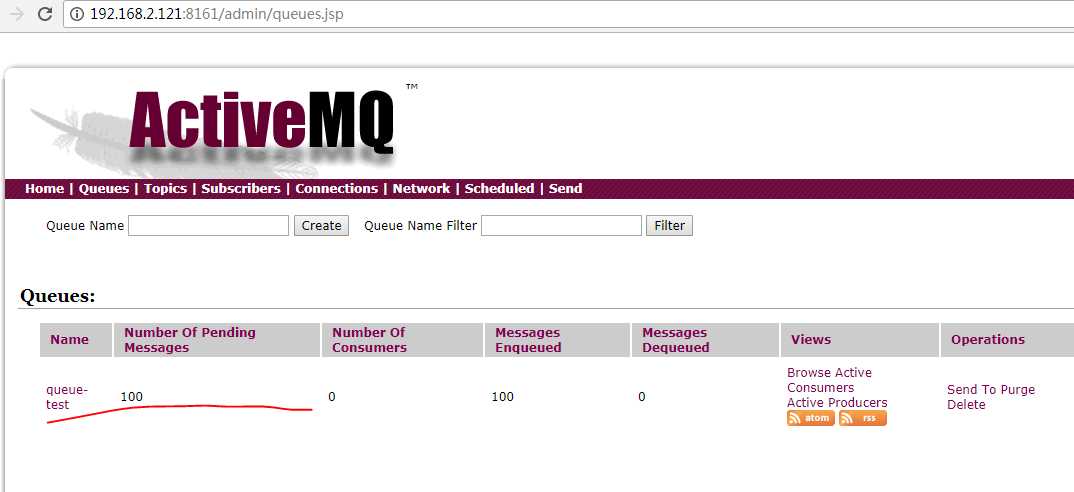
 1 package com.dsd.jms.queue;
 2
 3 import javax.jms.Connection;
 4 import javax.jms.ConnectionFactory;
 5 import javax.jms.Destination;
 6 import javax.jms.JMSException;
 7 import javax.jms.MessageProducer;
 8 import javax.jms.Session;
 9 import javax.jms.TextMessage;
10
11 import org.apache.activemq.ActiveMQConnectionFactory;
12
13 /**
14  * 消息提供者
15  * @author daishengda
16  *
17  */
18 public class AppProducer {
19
20     private static final String URL = "tcp://192.168.2.121:61616";
21
22     private static final String QUEUE_NAME = "queue-test";
23
24     public static void main(String[] args) throws JMSException {
25
26         //1、创建ConnectionFactory
27         ConnectionFactory connectionFactory = new ActiveMQConnectionFactory(URL);
28
29         //2、创建Connection
30         Connection connection = connectionFactory.createConnection();
31
32         //3、启动连接
33         connection.start();
34
35         //4、创建会话
36         Session session = connection.createSession(false, Session.AUTO_ACKNOWLEDGE);
37
38         //5、创建一个目标(创建队列模型)
39         Destination destination = session.createQueue(QUEUE_NAME);
40
41         //6、创建生产者
42         MessageProducer producer = session.createProducer(destination);
43
44         for (int i = 0; i < 100; i++) {
45             //7、创建消息
46             TextMessage textMessage = session.createTextMessage("test"+i);
47
48             //8、发布消息
49             producer.send(textMessage);
50
51             System.out.println("发送消息"+textMessage.getText());
52         }
53
54         //9、关闭连接
55         connection.close();
56     }
57 }
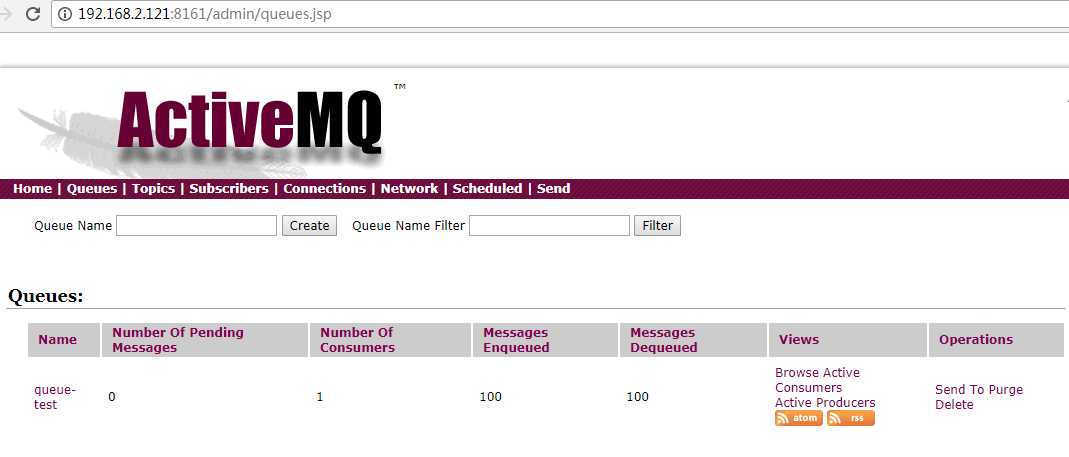
 1 package com.dsd.jms.queue;
 2
 3 import javax.jms.Connection;
 4 import javax.jms.ConnectionFactory;
 5 import javax.jms.Destination;
 6 import javax.jms.JMSException;
 7 import javax.jms.Message;
 8 import javax.jms.MessageConsumer;
 9 import javax.jms.MessageListener;
10 import javax.jms.Session;
11 import javax.jms.TextMessage;
12
13 import org.apache.activemq.ActiveMQConnectionFactory;
14
15 /**
16  * 消息消费者
17  * @author daishengda
18  *
19  */
20 public class AppConsumer {
21
22     private static final String URL = "tcp://192.168.2.121:61616";
23
24     private static final String QUEUE_NAME = "queue-test";
25
26     public static void main(String[] args) throws JMSException {
27
28         //1、创建ConnectionFactory
29         ConnectionFactory connectionFactory = new ActiveMQConnectionFactory(URL);
30
31         //2、创建Connection
32         Connection connection = connectionFactory.createConnection();
33
34         //3、启动连接
35         connection.start();
36
37         //4、创建会话
38         Session session = connection.createSession(false, Session.AUTO_ACKNOWLEDGE);
39
40         //5、创建一个目标(创建队列模型)
41         Destination destination = session.createQueue(QUEUE_NAME);
42
43         //6、创建消费者
44         MessageConsumer consumer = session.createConsumer(destination);
45
46         //7、创建一个监听器
47         consumer.setMessageListener(new MessageListener() {
48
49             @Override
50             public void onMessage(Message message) {
51                 TextMessage textMessage = (TextMessage) message;
52                 try {
53                     System.out.println("接收消息    "+textMessage.getText());
54                 } catch (JMSException e) {
55                     e.printStackTrace();
56                 }
57             }
58         });
59
60         //8、关闭连接
61 //        connection.close();
62     }
63 }
 1 package com.dsd.jms.topic;
 2
 3 import javax.jms.Connection;
 4 import javax.jms.ConnectionFactory;
 5 import javax.jms.Destination;
 6 import javax.jms.JMSException;
 7 import javax.jms.MessageProducer;
 8 import javax.jms.Session;
 9 import javax.jms.TextMessage;
10
11 import org.apache.activemq.ActiveMQConnectionFactory;
12
13 /**
14  * 消息提供者
15  * @author daishengda
16  *
17  */
18 public class AppProducer {
19
20     private static final String URL = "tcp://192.168.2.121:61616";
21
22     private static final String TOPIC_NAME = "topic-test";
23
24     public static void main(String[] args) throws JMSException {
25
26         //1、创建ConnectionFactory
27         ConnectionFactory connectionFactory = new ActiveMQConnectionFactory(URL);
28
29         //2、创建Connection
30         Connection connection = connectionFactory.createConnection();
31
32         //3、启动连接
33         connection.start();
34
35         //4、创建会话
36         Session session = connection.createSession(false, Session.AUTO_ACKNOWLEDGE);
37
38         //5、创建一个目标(创建主题模型)
39         Destination destination = session.createTopic(TOPIC_NAME);
40
41         //6、创建生产者
42         MessageProducer producer = session.createProducer(destination);
43
44         for (int i = 0; i < 100; i++) {
45             //7、创建消息
46             TextMessage textMessage = session.createTextMessage("test"+i);
47
48             //8、发布消息
49             producer.send(textMessage);
50
51             System.out.println("发送消息"+textMessage.getText());
52         }
53
54         //9、关闭连接
55         connection.close();
56     }
57 }
需要提前订阅才能接收到消息,而且消息会发送给所有订阅者
 1 package com.dsd.jms.topic;
 2
 3 import javax.jms.Connection;
 4 import javax.jms.ConnectionFactory;
 5 import javax.jms.Destination;
 6 import javax.jms.JMSException;
 7 import javax.jms.Message;
 8 import javax.jms.MessageConsumer;
 9 import javax.jms.MessageListener;
10 import javax.jms.Session;
11 import javax.jms.TextMessage;
12
13 import org.apache.activemq.ActiveMQConnectionFactory;
14
15 /**
16  * 消息消费者
17  * @author daishengda
18  *
19  */
20 public class AppConsumer {
21
22     private static final String URL = "tcp://192.168.2.121:61616";
23
24     private static final String TOPIC_NAME = "topic-test";
25
26     public static void main(String[] args) throws JMSException {
27
28         //1、创建ConnectionFactory
29         ConnectionFactory connectionFactory = new ActiveMQConnectionFactory(URL);
30
31         //2、创建Connection
32         Connection connection = connectionFactory.createConnection();
33
34         //3、启动连接
35         connection.start();
36
37         //4、创建会话
38         Session session = connection.createSession(false, Session.AUTO_ACKNOWLEDGE);
39
40         //5、创建一个目标(创建主题模型)
41         Destination destination = session.createTopic(TOPIC_NAME);
42
43         //6、创建消费者
44         MessageConsumer consumer = session.createConsumer(destination);
45
46         //7、创建一个监听器
47         consumer.setMessageListener(new MessageListener() {
48
49             @Override
50             public void onMessage(Message message) {
51                 TextMessage textMessage = (TextMessage) message;
52                 try {
53                     System.out.println("接收消息    "+textMessage.getText());
54                 } catch (JMSException e) {
55                     e.printStackTrace();
56                 }
57             }
58         });
59
60         //8、关闭连接
61 //        connection.close();
62     }
63 }
connection.createSession(paramA,paramB);
paramA是设置事务的,paramB设置acknowledgment mode
paramA设置为false时:paramB的值可为Session.AUTO_ACKNOWLEDGE,Session.CLIENT_ACKNOWLEDGE,DUPS_OK_ACKNOWLEDGE其中一个。
paramA设置为true时:paramB的值忽略, acknowledgment mode被jms服务器设置为SESSION_TRANSACTED 。
Session.AUTO_ACKNOWLEDGE为自动确认,客户端发送和接收消息不需要做额外的工作。
Session.CLIENT_ACKNOWLEDGE为客户端确认。客户端接收到消息后,必须调用javax.jms.Message的acknowledge方法。jms服务器才会删除消息。
DUPS_OK_ACKNOWLEDGE允许副本的确认模式。一旦接收方应用程序的方法调用从处理消息处返回,会话对象就会确认消息的接收;
而且允许重复确认。在需要考虑资源使用时,这种模式非常有效。
使用Spring集成JMS连接ActiveMQ
-> 一个Spring为我们提供的连接池
-> JmsTemplate每次发消息都会重新创建连接,会话和productor
-> spring 中提供了SingleConnectionFactory和CachingConnectionFactory
-> 是spring提供的,只需向spring容器内注册这个类就可以使用JmsTemplate方便的操作jms
-> JmsTemplate类是线程安全的,可以在整个应用范围使用
-> 实现一个onMessage方法,该方法只接收一个Message参数
 1   <properties>
 2     <project.build.sourceEncoding>UTF-8</project.build.sourceEncoding>
 3     <spring.version>4.2.5.RELEASE</spring.version>
 4   </properties>
 5
 6   <dependencies>
 7     <dependency>
 8       <groupId>junit</groupId>
 9       <artifactId>junit</artifactId>
10       <version>4.11</version>
11       <scope>test</scope>
12     </dependency>
13
14     <dependency>
15       <groupId>org.springframework</groupId>
16       <artifactId>spring-context</artifactId>
17       <version>${spring.version}</version>
18     </dependency>
19
20     <dependency>
21       <groupId>org.springframework</groupId>
22       <artifactId>spring-jms</artifactId>
23       <version>${spring.version}</version>
24     </dependency>
25
26     <dependency>
27       <groupId>org.springframework</groupId>
28       <artifactId>spring-test</artifactId>
29       <version>${spring.version}</version>
30     </dependency>
31
32     <dependency>
33       <groupId>org.apache.activemq</groupId>
34       <artifactId>activemq-all</artifactId>
35       <version>5.7.0</version>
36       <exclusions>
37           <exclusion>
38               <artifactId>spring-context</artifactId>
39               <groupId>spring-context</groupId>
40           </exclusion>
41       </exclusions>
42     </dependency>
43   </dependencies>
 1 <?xml version="1.0" encoding="UTF-8"?>
 2 <beans xmlns="http://www.springframework.org/schema/beans" xmlns:xsi="http://www.w3.org/2001/XMLSchema-instance" xmlns:context="http://www.springframework.org/schema/context" xmlns:aop="http://www.springframework.org/schema/aop" xsi:schemaLocation="
 3         http://www.springframework.org/schema/beans
 4         http://www.springframework.org/schema/beans/spring-beans-3.2.xsd
 5         http://www.springframework.org/schema/context
 6         http://www.springframework.org/schema/context/spring-context-3.2.xsd
 7         http://www.springframework.org/schema/aop
 8         http://www.springframework.org/schema/aop/spring-aop-3.2.xsd" default-autowire="byName" default-lazy-init="false">
 9
10     <context:annotation-config />
11
12     <!-- ActiveMQ为我们提供的ConnectionFactory -->
13     <bean id="targetConnectionFactory" class="org.apache.activemq.ActiveMQConnectionFactory">
14         <property name="brokerURL" value="tcp://192.168.2.121:61616" />
15     </bean>
16
17     <!-- spring jms为我们提供连接池 -->
18     <bean id="connectionFactory" class="org.springframework.jms.connection.SingleConnectionFactory">
19         <property name="targetConnectionFactory" ref="targetConnectionFactory" />
20     </bean>
21
22     <!-- 一个队列目的地,点对点的 -->
23     <bean id="queueDestination" class="org.apache.activemq.command.ActiveMQQueue">
24         <!-- 队列名 -->
25         <constructor-arg value="queue" />
26     </bean>
27
28     <!-- 一个主题目的地,发布订阅模式 -->
29     <bean id="topicDestination" class="org.apache.activemq.command.ActiveMQTopic">
30         <!-- 主题名 -->
31         <constructor-arg value="topic" />
32     </bean>
33 </beans>
 1 <?xml version="1.0" encoding="UTF-8"?>
 2 <beans xmlns="http://www.springframework.org/schema/beans" xmlns:xsi="http://www.w3.org/2001/XMLSchema-instance" xmlns:context="http://www.springframework.org/schema/context" xmlns:aop="http://www.springframework.org/schema/aop" xsi:schemaLocation="
 3         http://www.springframework.org/schema/beans
 4         http://www.springframework.org/schema/beans/spring-beans-3.2.xsd
 5         http://www.springframework.org/schema/context
 6         http://www.springframework.org/schema/context/spring-context-3.2.xsd
 7         http://www.springframework.org/schema/aop
 8         http://www.springframework.org/schema/aop/spring-aop-3.2.xsd" default-autowire="byName" default-lazy-init="false">
 9
10     <import resource="common.xml"/>
11
12     <!-- 配置JmsTemplate,用于发送消息 -->
13     <bean id="jmsTemplate" class="org.springframework.jms.core.JmsTemplate">
14         <property name="connectionFactory" ref="connectionFactory" />
15     </bean>
16
17     <bean class="com.dsd.jms_spring.producer.ProducerServiceImpl" />
18 </beans>
 1 package com.dsd.jms_spring.producer;
 2
 3 /**
 4  * 生产者接口
 5  * @author daishengda
 6  *
 7  */
 8 public interface ProducerService {
 9
10     void sendMessage(String message);
11 }
 1 package com.dsd.jms_spring.producer;
 2
 3 import javax.annotation.Resource;
 4 import javax.jms.Destination;
 5 import javax.jms.JMSException;
 6 import javax.jms.Message;
 7 import javax.jms.Session;
 8 import javax.jms.TextMessage;
 9
10 import org.springframework.beans.factory.annotation.Autowired;
11 import org.springframework.jms.core.JmsTemplate;
12 import org.springframework.jms.core.MessageCreator;
13
14 /**
15  * 生产者实现类
16  * @author daishengda
17  *
18  */
19 public class ProducerServiceImpl implements ProducerService {
20
21     @Autowired
22     private JmsTemplate jmsTemplate;
23
24 //    @Resource(name="queueDestination")
25     @Resource(name="topicDestination")
26     private Destination destination;
27
28     @Override
29     public void sendMessage(String message)
30     {
31         //使用JmsTemplate发送消息
32         jmsTemplate.send(destination,new MessageCreator() {
33             //创建一个消息
34             @Override
35             public Message createMessage(Session session) throws JMSException {
36                 TextMessage textMessage = session.createTextMessage(message);
37                 return textMessage;
38             }
39         });
40         System.out.println("发送消息 "+message);
41     }
42
43 }
 1 package com.dsd.jms_spring.producer;
 2
 3 import org.springframework.context.support.ClassPathXmlApplicationContext;
 4
 5 /**
 6  * 启动生产者
 7  * @author daishengda
 8  *
 9  */
10 public class AppProducer {
11
12     public static void main(String[] args) {
13         ClassPathXmlApplicationContext context = new ClassPathXmlApplicationContext("producer.xml");
14         ProducerService service = context.getBean(ProducerService.class);
15         for (int i = 0; i < 100; i++) {
16             service.sendMessage("test "+i);
17         }
18         context.close();
19     }
20 }
 1 <?xml version="1.0" encoding="UTF-8"?>
 2 <beans xmlns="http://www.springframework.org/schema/beans" xmlns:xsi="http://www.w3.org/2001/XMLSchema-instance" xmlns:context="http://www.springframework.org/schema/context" xmlns:aop="http://www.springframework.org/schema/aop" xsi:schemaLocation="
 3         http://www.springframework.org/schema/beans
 4         http://www.springframework.org/schema/beans/spring-beans-3.2.xsd
 5         http://www.springframework.org/schema/context
 6         http://www.springframework.org/schema/context/spring-context-3.2.xsd
 7         http://www.springframework.org/schema/aop
 8         http://www.springframework.org/schema/aop/spring-aop-3.2.xsd" default-autowire="byName" default-lazy-init="false">
 9
10     <!-- 导入公共配置 -->
11     <import resource="common.xml"/>
12
13     <!-- 配置消息监听器 -->
14     <bean id="consumerMessageListener" class="com.dsd.jms_spring.consumer.ConsumerMessageListener" />
15
16     <!-- 配置消息容器 -->
17     <bean id="jmsContainer" class="org.springframework.jms.listener.DefaultMessageListenerContainer">
18         <property name="connectionFactory" ref="connectionFactory" />
19         <!-- <property name="destination" ref="queueDestination" /> -->
20         <property name="destination" ref="topicDestination" />
21         <property name="messageListener" ref="consumerMessageListener" />
22     </bean>
23 </beans>
 1 package com.dsd.jms_spring.consumer;
 2
 3 import javax.jms.JMSException;
 4 import javax.jms.Message;
 5 import javax.jms.MessageListener;
 6 import javax.jms.TextMessage;
 7
 8 /**
 9  * 消息监听者
10  * @author daishengda
11  *
12  */
13 public class ConsumerMessageListener implements MessageListener{
14
15     @Override
16     public void onMessage(Message message) {
17         TextMessage textMessage = (TextMessage) message;
18         try {
19             System.out.println("接收消息:"+textMessage.getText());
20         } catch (JMSException e) {
21             e.printStackTrace();
22         }
23     }
24
25
26 }
 1 package com.dsd.jms_spring.consumer;
 2
 3 import org.springframework.context.support.ClassPathXmlApplicationContext;
 4
 5 /**
 6  * 启动类
 7  * @author daishengda
 8  *
 9  */
10 public class AppConsumer {
11
12     public static void main(String[] args) {
13         ClassPathXmlApplicationContext context = new ClassPathXmlApplicationContext("consumer.xml");
14     }
15 }
ActiveMQ集群配置
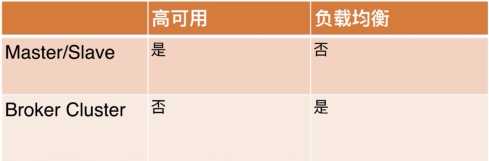
-> 实现高可用,以排除单点故障引起的服务中断
-> 实现负载均衡,以提升效率为更多客户提供服务
-> 客户端集群:让多个消费者消费同一个队列
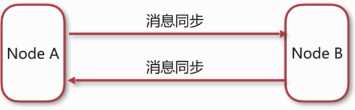
-> Broker clusters:多个Broker之间同步消息
-> Master Slave:实现高可用
-> ActiveMQ失效转移(failover)
允许当其中一台消息服务器宕机时,客户端在传输层上重新连接到其他消息服务器。
语法:failover:(uri1,......,uriN)?transportOptions
transportOptions参数说明
- randomize 默认为true,表示在URI列表中选择URI连接时是否采用随机策略
- initialReconnectDelay 默认为10,单位毫秒,表示第一次尝试重连之间等待的时间
- maxReconnectDelay 默认30000,单位毫秒,最长重连的时间间隔
-> 原理
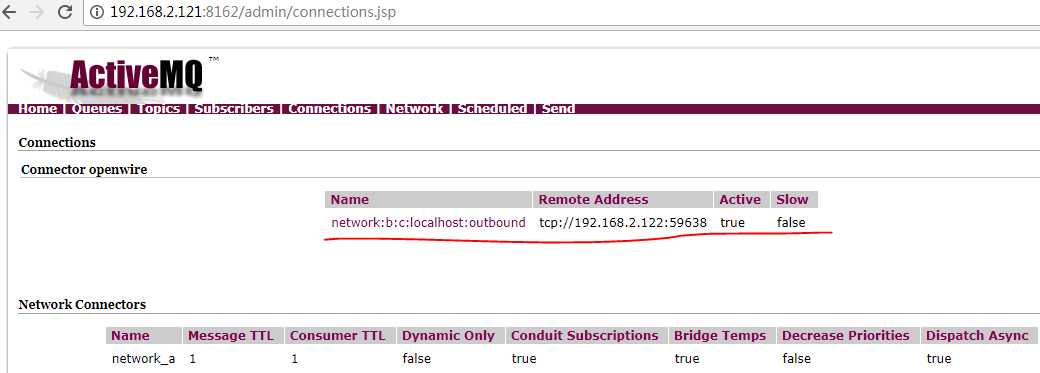
-> NetworkConnector(网络连接器)
网络连接器主要用于配置ActiveMQ服务器与服务器之间的网络通讯方式,用于服务器透传消息。
网络连接器分为静态连接器和动态连接器。
-> 静态连接器
<networkConnectors>
<networkConnector uri="static:(tcp://192.168.2.1,tcp://192.168.2.2)" />
</networkConnectors>
-> 动态连接器
<networkConnectors>
<networkConnector uri="multicast://default" />
</networkConnectors>
<transportConnectors>
<transportConnector uri="tcp://localhost:0" discoveryUri="multicast://default" />
</transportConnectors>
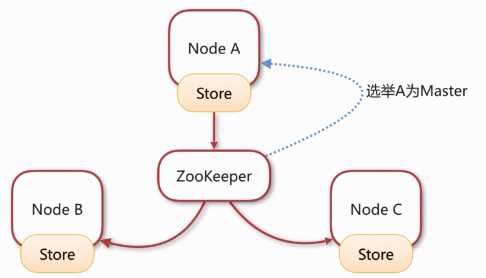
-> ActiveMQ Master Slave集群方案
- Shared storage master/slave 共享存储
- Replicated LevelDB Store 基于复制的LevelDB Store
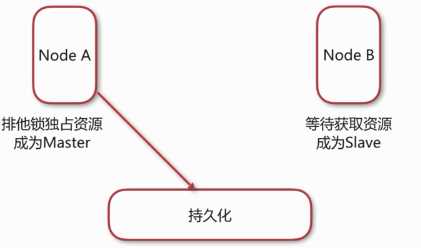
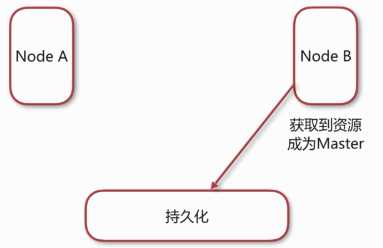
-> 共享存储集群的原理
-> 基于复制的LevelDB Storede的原理
-> 两种集群方式对比
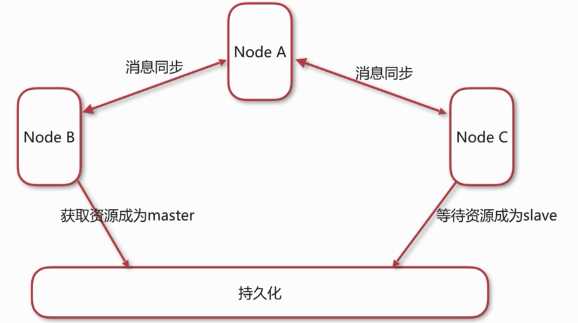
说明:这个集群是综合了Broker Cluster和master/slave两种基本集群方式,其中master/slave(B和C)是基于共享存储实现的。
A和B组成消息同步,A和C组成消息同步是为实现均衡负载,B和C组成master/slave是为了实现高可用。如果A宕机,集群退化成标准master/slave集群,只是了失去均衡负载能力。如果B宕机,C会继续提供服务,集群退化成Broker Cluster集群,失去高可用能力。如果C宕机也会失去高可用能力(同B)。ABC无论哪一台宕机,集群都不会崩溃,但是需要迅速恢复。

集群方案配置步骤:
(1) Node-B和Node-C部署在同一台服务器,服务端口分别是61617、61618(管理端口是8162、8163),IP是192.168.2.121,共享存储使用/usr/local/activemq/kahadb,作为生产者和消费者使用;Node-A部署在另一台服务器,服务端口和管理端口用默认的端口,只作为消费者使用。
(2)配置Node-A的activemq服务
cd /usr/local/activemq-a //进入activemq安装目录
vim conf/activemq.xml //编辑activemq.xml
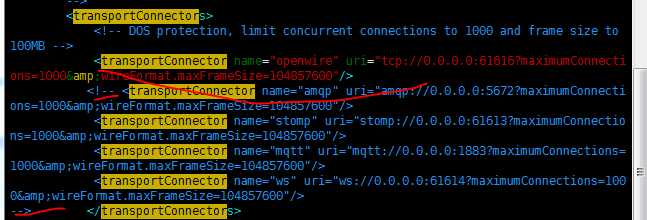
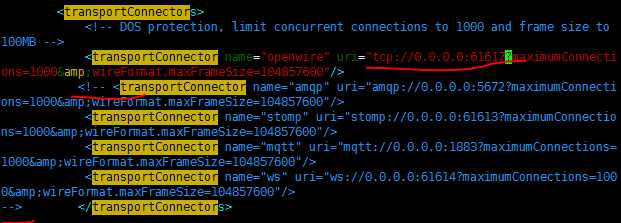
=》查找/transportConnector,注释掉除了61616的端口配置
=》添加配置网络连接器(静态发现),连接到Node-B和Node-C节点

(3) 配置Node-B的activemq服务
cd /usr/local/activemq/activemq-b //进入activemq安装目录
vim conf/activemq.xml //编辑activemq.xml
=》查找/transportConnector,注释掉除了61616的端口配置,并把服务端口改为61617
=》添加配置网络连接器(静态发现),连接到Node-A节点

=》配置指定文件存储持久化,找到<persistenceAdapter>

vim conf/jetty.xml //配置active的管理接口,将端口改为8162
=》找到jettyPort,将端口改为8162

(4) 同(3)一样配置Node-C的activemq服务
(5) 先关闭防火墙来测试,或者将端口加入信赖
service iptables stop
(6) 启动服务
./activemq-a/bin/activemq start //启动Node-A
./activemq-b/bin/activemq start //启动Node-B
./activemq-c/bin/activemq start //启动Node-C
netstat -na | grep 61618 //等待,因为被B节点获取了共享存储锁,它在等待获取锁,所以它不提供服务等待
(7) 客户端url修改(改为失效转移方式)
生产者配置
URL = "failover:(tcp://192.168.2.121:61617,tcp://192.168.2.121:61618)?randomize=true"; //因为Node-A不参与生产者,所以只配置了Node-B和Node-C
消费者配置
URL = "failover:(tcp://192.168.2.122:61616,tcp://192.168.2.121:61617,tcp://192.168.2.121:61618)?randomize=true"; //因为三者都需要参与消费者,所以都配置
(8) 显示效果
启动一个生产者生产数据
Node-A连接到Node-B节点(因为B现在是Master,对外开放服务,实现消息同步,也就是A现在可以直接消费B的数据,而不是数据持久化同步),,
证明了如果消费者调用A节点,A节点再调用B节点来消费,实现了负载均衡
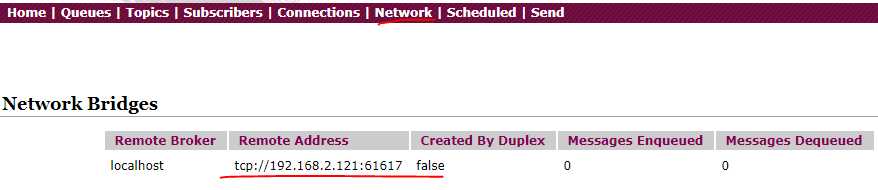
Node-B连接到Node-A

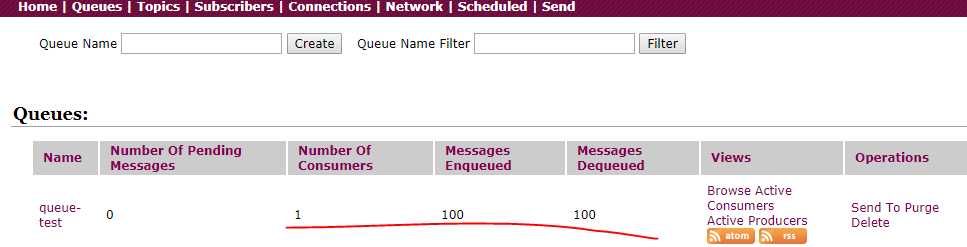
A节点消费信息

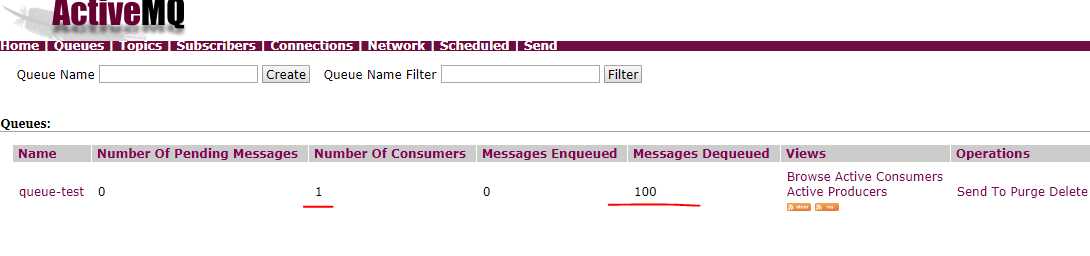
B节点消费信息
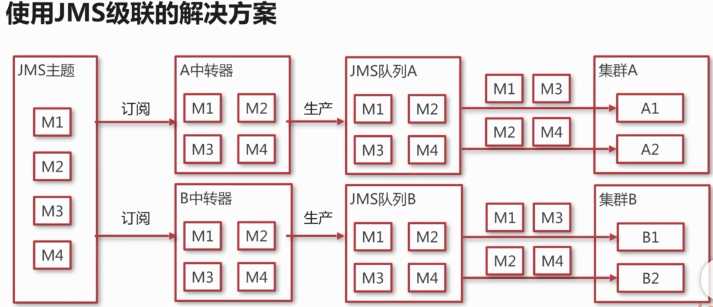
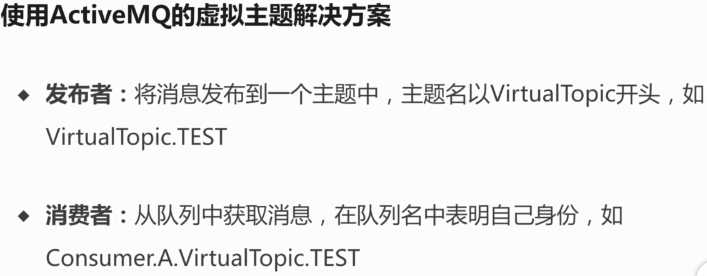
企业系统中的最佳实践
=》子业务系统都有集群的可能性
=》同一个消息会广播给关注该类消息的所有子业务系统
=》同一类消息在集群中被负载消费
=》业务的发生和消息的发布最终一致性
=》不同业务系统分别处理同一个消息,同一业务系统负载处理同类消息
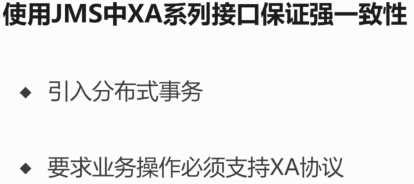
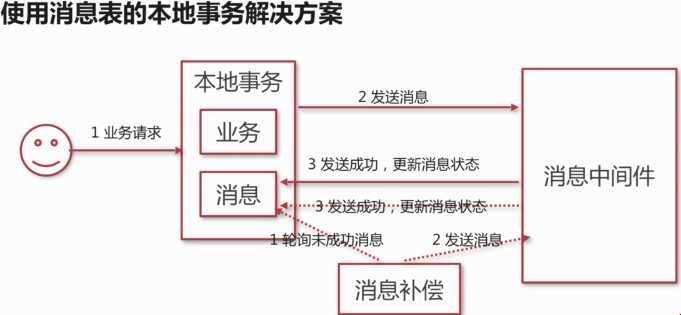
=》解决消息发送时的一致性问题
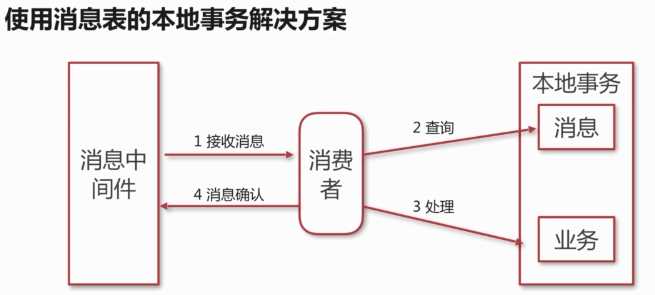
=》解决消息处理时的幂等性问题
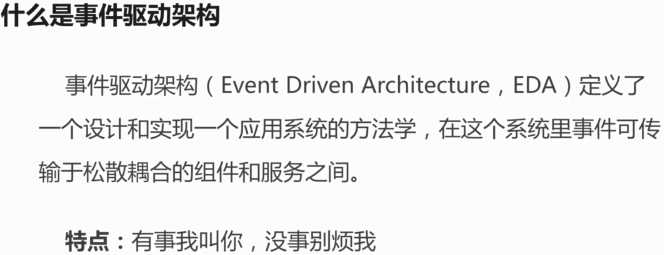
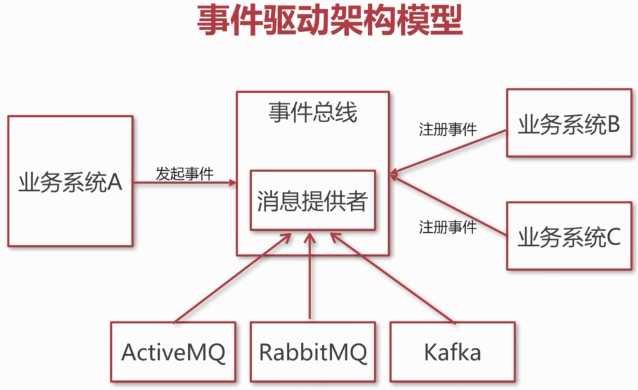
=》基于消息机制建立事件总线


标签:rest instance except 端口配置 ++ 统一 temp tor lease
原文地址:https://www.cnblogs.com/daishengda/p/9195976.html
