标签:version only 1.0 应用 actor xmanager 结果 aop配置 分类
最近向自己单独做一个基于ssh的项目,来预习和巩固自己的Java基础。找了一个实际生活中的定做衣服的例子来做一做,放到博客上给大家一起分享学习,后边会持续更新项目编写时候遇到的困难和使用的技术等。
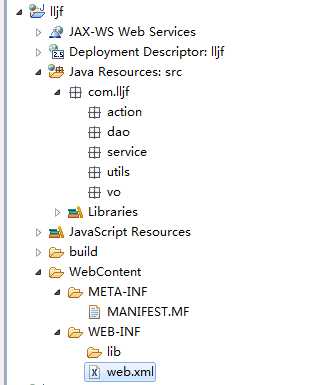
1.点击新建--》选择Dynamic Web Project --》next--》next。。并创建package结果图:
2.创建自己的架包库并导入架包到项目:
平时开发需要使用外部的jar时直接将其拷入WEB-INF/lib下。这个是可以的,但是分类一下会让系统更有条理。eclipse中分类是以uesr Libary为单位的,创建user Libary的方法很简单,Window--> Preference---> Java --->Build Path ---> User Library 。点击右侧的 New 就可以创建一个 User library, 选择 Add External jars就可以添加我们要的jar文件了。
引入 user library : myEclipse下可以很方便的引入,直接右击项目名 选择building path 再选择子菜单就可以了,但是eclipse中没有。eclipse的方法也不难。右击项目名,选择building path 在选择 configure building path,在弹出的窗体上部选中 Libraries,右侧选择 Add Library,在弹框中选择 User Library,点下一步就可以看到自己添加的User Library了。
我们可以发现 WEB-INF/lib是空的,但是 Libraries下都了一个文件夹,是不是感觉项目更有序了?
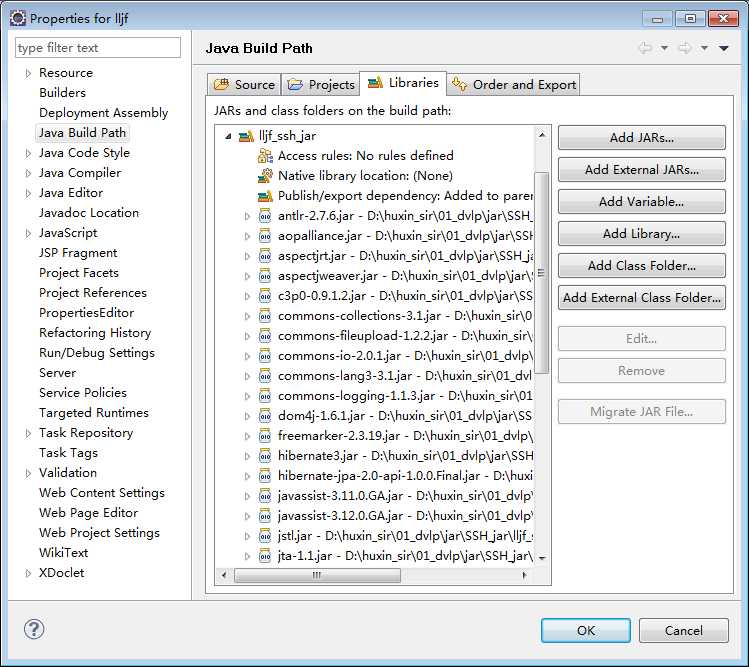
但是运行是会抛出 java.lang.ClassNotFoundException 错误,因为这个只是逻辑上的引入,我们可以选中项目,右击Properties 选择 Deployment Assembly,点击 Add,弹框Java Build Path Entities,按提示操作,问题就迎刃而解了。
Java build path时的图。这里我整理好了ssh三个框架所要使用的jar包,放在了lljf_ssh_jar User Library里
下图是添加ssh使用的jar包和创建所要使用类包后的项目结构图:
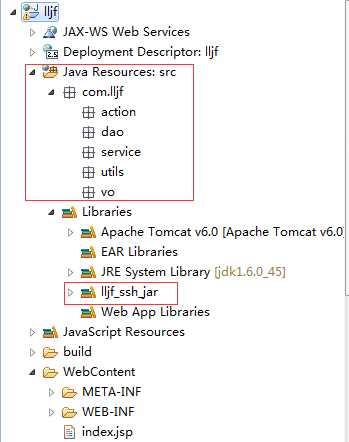
***********需要注意的是SSH项目整合起来时一定要注意各个框架之间的版本兼容问题,很多时候错误出现的问题可能是框架版本之间的不兼容问题导致的。本项目使用的是Struts2 2.3 + Spring 3.2 + Hibernate 3.6***********
3.编辑web.xml文件
 1 <?xml version="1.0" encoding="UTF-8"?>
 2 <web-app version="2.5" xmlns="http://java.sun.com/xml/ns/javaee"
 3     xmlns:xsi="http://www.w3.org/2001/XMLSchema-instance"
 4     xsi:schemaLocation="http://java.sun.com/xml/ns/javaee
 5     http://java.sun.com/xml/ns/javaee/web-app_2_5.xsd">
 6     <display-name>lljf</display-name>
 7
 8   <!-- struts2配置  -->
 9   <filter>
10         <filter-name>struts2</filter-name>
11         <filter-class>org.apache.struts2.dispatcher.ng.filter.StrutsPrepareAndExecuteFilter</filter-class>
12     </filter>
13     <filter-mapping>
14         <filter-name>struts2</filter-name>
15         <url-pattern>/*</url-pattern>
16     </filter-mapping>
17
18   <!-- spring配置 -->
19   <context-param>
20         <param-name>contextConfigLocation</param-name>
21          <param-value>classpath:bean.xml</param-value>
22         <!-- <param-value>/WEB-INF/classes/applicationContext.xml</param-value>  -->
23     </context-param>
24     <listener>
25         <listener-class>org.springframework.web.context.ContextLoaderListener</listener-class>
26     </listener>
27
28   <welcome-file-list>
29     <welcome-file>index.jsp</welcome-file>
30   </welcome-file-list>
31 </web-app>
4.创建并编辑struts.xml
 1 <?xml version="1.0" encoding="UTF-8"?>
 2     <!DOCTYPE struts PUBLIC
 3     "-//Apache Software Foundation//DTD Struts Configuration 2.3//EN"
 4     "http://struts.apache.org/dtds/struts-2.3.dtd">
 5     <struts>
 6         <package name="com.lljf" extends="struts-default" namespace="/" >
 7             <!-- 交给Spring管理,能够实现AOP处理,建议使用:就是class中使用spring中的id名称即可 -->
 8             <action name="order" class="orderAction" method="orderAdd">
 9                 <result name="add">lljfList.jsp</result>
10             </action>
11         </package>
12     </struts>
5.创建并编辑Spring配置文件
<?xml version="1.0" encoding="UTF-8"?>
<beans xmlns="http://www.springframework.org/schema/beans"
    xmlns:xsi="http://www.w3.org/2001/XMLSchema-instance"
    xmlns:p="http://www.springframework.org/schema/p"
    xmlns:context="http://www.springframework.org/schema/context"
    xmlns:aop="http://www.springframework.org/schema/aop"
    xmlns:tx="http://www.springframework.org/schema/tx"
    xsi:schemaLocation="http://www.springframework.org/schema/beans
         http://www.springframework.org/schema/beans/spring-beans.xsd
          http://www.springframework.org/schema/context
         http://www.springframework.org/schema/context/spring-context.xsd
         http://www.springframework.org/schema/aop
         http://www.springframework.org/schema/aop/spring-aop.xsd
         http://www.springframework.org/schema/tx
          http://www.springframework.org/schema/tx/spring-tx.xsd">

    <!-- 所有配置的公用部分 -->
    <!-- 1.配置c3p0数据库连接池实例 -->
    <bean id="dataSource" class="com.mchange.v2.c3p0.ComboPooledDataSource">
        <property name="jdbcUrl" value="jdbc:oracle:thin:@localhost:1521:orcl"></property>
        <property name="driverClass" value="oracle.jdbc.driver.OracleDriver"></property>
        <property name="user" value="lljf"></property>
        <property name="password" value="123456"></property>
        <property name="initialPoolSize" value="2"></property>
        <property name="maxPoolSize" value="6"></property>
    </bean>
    <!-- 2.SessionFactory实例创建 -->
        <!-- 所有的配置都由spring维护(项目中不需要hibernate.cfg.xml了) -->
    <bean id ="sessionFactory" class="org.springframework.orm.hibernate3.LocalSessionFactoryBean">
        <!-- a.注入连接池 -->
        <property name="dataSource" ref="dataSource"></property>
        <!-- b.hibernate常用配置 :方言,显示sql,自动建表 -->
        <property name="hibernateProperties">
            <props>
                <prop key="hibernate.dialect">org.hibernate.dialect.Oracle10gDialect</prop>
                <prop key="hibernate.show_sql">true</prop>
                <prop key="hibernate.hbm2ddl.auto">update</prop>
            </props>
        </property>
        <!-- c.映射文件路径配置 -->
        <property name="mappingLocations">
            <list>
                <value>classpath:com/lljf/vo/*.hbm.xml</value>
            </list>
        </property>
    </bean>
    <!-- 3.事务配置 -->
        <!-- a.事务管理器 -->
    <bean id="txManager" class="org.springframework.orm.hibernate3.HibernateTransactionManager">
        <property name="sessionFactory" ref="sessionFactory"></property>
    </bean>
    <!-- b.事务增强 -->
        <tx:advice id="txAdvice" transaction-manager="txManager">
            <tx:attributes>
                <tx:method name="*" read-only="false"/>
            </tx:attributes>
        </tx:advice>
    <!-- c.AOP配置  = 切入点表达式(拦截目标对象,生成代理)  + 事务增强应用-->
    <aop:config>
        <aop:pointcut expression="execution(* com.lljf.service.*.*(..))" id="pt"/>
        <aop:advisor advice-ref="txAdvice" pointcut-ref="pt"/>
    </aop:config>

    <!-- 配置Action,DAO,Service类 -->
    <!-- 配置Action的类,其中scope是指action中的orderService变量是多例模式 -->
    <bean id="orderAction" class="com.lljf.action.OrderAction" scope="prototype">
        <!-- 注入业务层的类 -->
        <property name="orderService" ref="orderService"></property>
    </bean>


    <!-- 配置Service层的类 -->
    <bean id="orderService" class="com.lljf.service.impl.OrderServiceImpl">
        <!-- 注入DAO层的类 -->
        <property name="orderDao" ref="orderDao"></property>
        <property name="customerDao" ref="customerDao"></property>
    </bean>


    <!-- 配置Dao层的类 -->
    <bean id="orderDao" class="com.lljf.dao.impl.OrderDaoImpl">
        <property name="sessionFactory" ref="sessionFactory"></property>
    </bean>
    <bean id="customerDao" class="com.lljf.dao.impl.CustomerDaoImpl">
        <property name="sessionFactory" ref="sessionFactory"></property>
    </bean>
</beans>
今天先到这了,敬请关注后续更新。
标签:version only 1.0 应用 actor xmanager 结果 aop配置 分类
原文地址:https://www.cnblogs.com/huxiny/p/9251786.html