标签:返回 结果 url nal start man 多个 tis col
spring:
  datasource:
    username: root
    password: rootpassword
    url: jdbc:mysql://localhost:3306/springboot
    driver-class-name: com.mysql.jdbc.Driver
debug: true
logging:
  level:
    com:
      springbootmybatis:
         mapper: debug
然后在service 类中的方法上添加上缓存注解。
@Cacheable(value = "user")
public User selectUserById(Integer id) {
    User user = userMapper.selectUserById(id);
    return user;
}
? 默认的是将传入参数(id)作为缓存的 key ,方法的返回值作为 value 存入缓存中 。
在方法 selectUserById(Integer id ) 执行之前 先去根据 key 去缓存中查询是否有该 key 的数据,如果有,则直接在缓存中查询数据,然后返回,不再执行 selectUserById 方法,如果没有在缓存中查到该 key 的数据,才回去执行 selectUserById 方法。
@CachePut(value = "user")
public User updateUser(User user) {
    userMapper.updateUser(user);
    return user;
}
从缓存中查询到的仍然是旧的缓存数据,需要在 @CachePut(value = "user",key = "#result.id") 或者@CachePut(value = "user",key = "#user.id") 只要在 key 设置为 user 的 id ,然后根据id 去查询,就能从缓存中获取修改后的数据。
@CacheEvict(value = "user",key = "#id")
@Caching注解可以让我们在一个方法或者类上同时指定多个Spring Cache相关的注解。其拥有三个属性:cacheable、put和evict,分别用于指定@Cacheable、@CachePut和@CacheEvict。
@Target({ElementType.METHOD, ElementType.TYPE})
@Retention(RetentionPolicy.RUNTIME)
@Inherited
@Documented
public @interface Caching {
    Cacheable[] cacheable() default {};
    CachePut[] put() default {};
    CacheEvict[] evict() default {};
}
@Caching(cacheable = @Cacheable("users"), evict = { @CacheEvict("cache2"),
          @CacheEvict(value = "cache3", allEntries = true) })
 public List<User> selectUser() {
        List<User> users = userMapper.selectUser();
        return users;
 }
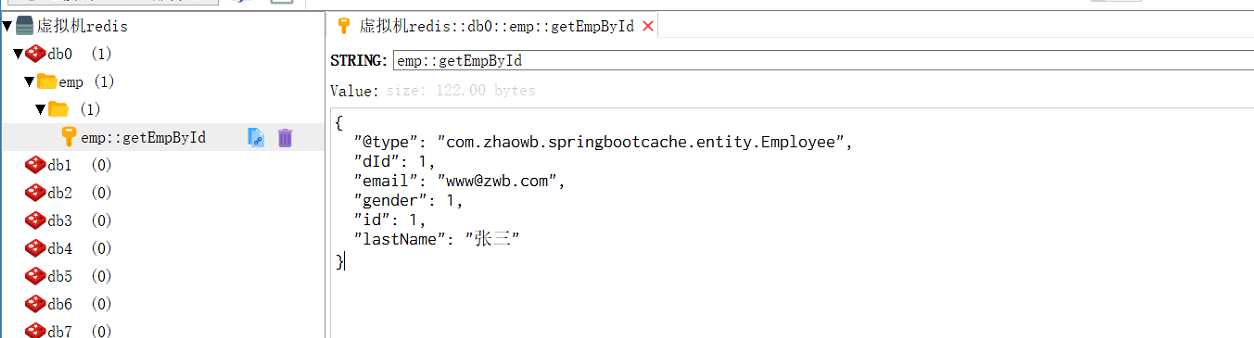
导入对应的jar:使用fastjson 来序列化value
<dependency>
    <groupId>org.springframework.boot</groupId>
    <artifactId>spring-boot-starter-data-redis</artifactId>
</dependency>
<!-- https://mvnrepository.com/artifact/com.alibaba/fastjson -->
<dependency>
    <groupId>com.alibaba</groupId>
    <artifactId>fastjson</artifactId>
    <version>1.2.47</version>
</dependency>
在application.yml 添加配置:
spring:
    redis:
         host: #redis 安装的IP,其他的可以不用配置,默认的就可以满足测试需要
import com.alibaba.fastjson.JSON;
import com.alibaba.fastjson.serializer.SerializerFeature;
import org.springframework.cache.CacheManager;
import org.springframework.cache.annotation.CachingConfigurerSupport;
import org.springframework.cache.annotation.EnableCaching;
import org.springframework.cache.interceptor.KeyGenerator;
import org.springframework.context.annotation.Bean;
import org.springframework.context.annotation.Configuration;
import org.springframework.data.redis.cache.RedisCacheManager;
import org.springframework.data.redis.connection.RedisConnectionFactory;
import org.springframework.data.redis.core.RedisTemplate;
import org.springframework.data.redis.core.StringRedisTemplate;
import org.springframework.data.redis.serializer.RedisSerializer;
import org.springframework.data.redis.serializer.SerializationException;

import java.lang.reflect.Method;
import java.nio.charset.Charset;

@EnableCaching
@Configuration
public class RedisConfig extends CachingConfigurerSupport {
    @Bean
    public KeyGenerator wiselyKeyGenerator() {
        return new KeyGenerator() {
            @Override
            public Object generate(Object target, Method method, Object... params) {
                StringBuilder sb = new StringBuilder();
                sb.append(target.getClass().getName());
                sb.append(method.getName());
                for (Object obj : params) {
                    sb.append(obj.toString());
                }
                return sb.toString();
            }
        };
    }

    @Bean
    public CacheManager cacheManager(
            @SuppressWarnings("rawtypes") RedisTemplate redisTemplate) {
        return new RedisCacheManager(redisTemplate);
    }

    @Bean
    public RedisTemplate<String, String> redisTemplate(
            RedisConnectionFactory factory) {
        StringRedisTemplate template = new StringRedisTemplate(factory);
        FastJsonRedisSerializer<Object> serializer = new FastJsonRedisSerializer<>(Object.class);
        template.setValueSerializer(serializer);
        template.afterPropertiesSet();
        return template;
    }

    private static class FastJsonRedisSerializer<T> implements RedisSerializer<T> {
        private static final Charset DEFAULT_CHARSET = Charset.forName("UTF-8");
        private Class<T> clazz;
        public FastJsonRedisSerializer(Class<T> clazz) {
            this.clazz = clazz;
        }

        @Override
        public byte[] serialize(T t) throws SerializationException {
            if (t == null) {
                return new byte[0];
            }
            return JSON.toJSONString(t, SerializerFeature.WriteClassName).getBytes(DEFAULT_CHARSET);
        }

        @Override
        public T deserialize(byte[] bytes) throws SerializationException {
            if (bytes == null || bytes.length <= 0) {
                return null;
            }
            String str = new String(bytes, DEFAULT_CHARSET);
            return (T) JSON.parseObject(str, clazz);
        }
    }
}
其他的配置不用动,需要修改RedisConfig.java 因为springboot2 中new RedisCacheManager(redisTemplate);被遗弃了
@Bean
    public CacheManager cacheManager(RedisConnectionFactory connectionFactory) {
        //初始化一个RedisCacheWriter
        RedisCacheWriter redisCacheWriter = RedisCacheWriter.nonLockingRedisCacheWriter(connectionFactory);
        //设置CacheManager的值序列化方式为 fastJsonRedisSerializer,但其实RedisCacheConfiguration默认使用StringRedisSerializer序列化key,
        ClassLoader loader = this.getClass().getClassLoader();

        FastJsonRedisSerializer fastJsonRedisSerializer = new FastJsonRedisSerializer<>(loader.getClass());
        RedisSerializationContext.SerializationPair<Object> pair = RedisSerializationContext.SerializationPair.fromSerializer(fastJsonRedisSerializer);
        RedisCacheConfiguration defaultCacheConfig=RedisCacheConfiguration.defaultCacheConfig().serializeValuesWith(pair);
        RedisCacheManager cacheManager = new RedisCacheManager(redisCacheWriter, defaultCacheConfig);
        return cacheManager;
    }
这样设置就可以正常使用了
标签:返回 结果 url nal start man 多个 tis col
原文地址:https://www.cnblogs.com/zwb1234/p/9257639.html