标签:var add led targe success 生成 where object support
1.maven引包
<dependency>
            <groupId>org.springframework.boot</groupId>
            <artifactId>spring-boot-starter-data-redis</artifactId>
</dependency>
注:springboot版本1.5.2
2. 配置application.properties
# Redis数据库索引(默认为0)
spring.redis.database=0
# Redis服务器地址
spring.redis.host=127.0.0.1
# Redis服务器连接端口
spring.redis.port=6379
# Redis服务器连接密码(默认为空)
spring.redis.password=
# 连接池最大连接数(使用负值表示没有限制)
spring.redis.pool.max-active=8
# 连接池最大阻塞等待时间(使用负值表示没有限制)
spring.redis.pool.max-wait=-1
# 连接池中的最大空闲连接
spring.redis.pool.max-idle=8
# 连接池中的最小空闲连接
spring.redis.pool.min-idle=0
# 连接超时时间(毫秒)
spring.redis.timeout=0
注:sever,mybatis等配置不赘述
3.为启动类添加注解:
@SpringBootApplication
@MapperScan("com.tqh.demo.mapper")
@EnableScheduling
@EnableCaching
public class DemoApplication {

    public static void main(String[] args) {
        SpringApplication.run(DemoApplication.class, args);
    }
}
4.创建redis的配置类
@Configuration
@EnableCaching
public class RedisConfig extends CachingConfigurerSupport {
    @Value("${spring.redis.host}")
    private String host;
    @Value("${spring.redis.port}")
    private int port;
    @Value("${spring.redis.timeout}")
    private int timeout;

    //自定义缓存key生成策略
//    @Bean
//    public KeyGenerator keyGenerator() {
//        return new KeyGenerator(){
//            @Override
//            public Object generate(Object target, java.lang.reflect.Method method, Object... params) {
//                StringBuffer sb = new StringBuffer();
//                sb.append(target.getClass().getName());
//                sb.append(method.getName());
//                for(Object obj:params){
//                    sb.append(obj.toString());
//                }
//                return sb.toString();
//            }
//        };
//    }
    //缓存管理器
    @Bean
    public CacheManager cacheManager(@SuppressWarnings("rawtypes") RedisTemplate redisTemplate) {
        RedisCacheManager cacheManager = new RedisCacheManager(redisTemplate);
        //设置缓存过期时间
        cacheManager.setDefaultExpiration(10000);
        return cacheManager;
    }
    @Bean
    public RedisTemplate<String, String> redisTemplate(RedisConnectionFactory factory){
        StringRedisTemplate template = new StringRedisTemplate(factory);
        setSerializer(template);//设置序列化工具
        template.afterPropertiesSet();
        return template;
    }
    private void setSerializer(StringRedisTemplate template){
        @SuppressWarnings({ "rawtypes", "unchecked" })
        Jackson2JsonRedisSerializer jackson2JsonRedisSerializer = new Jackson2JsonRedisSerializer(Object.class);
        ObjectMapper om = new ObjectMapper();
        om.setVisibility(PropertyAccessor.ALL, JsonAutoDetect.Visibility.ANY);
        om.enableDefaultTyping(ObjectMapper.DefaultTyping.NON_FINAL);
        jackson2JsonRedisSerializer.setObjectMapper(om);
        template.setValueSerializer(jackson2JsonRedisSerializer);
    }
}
4.创建测试类 User
public class User {
    String id;
    String name;
    String age;

    public String getId() {
        return id;
    }

    public void setId(String id) {
        this.id = id;
    }

    public String getName() {
        return name;
    }

    public void setName(String name) {
        this.name = name;
    }

    public String getAge() {
        return age;
    }
注:数据库里也要创建好相应的表和测试的数据
5.创建UserMapper
@Repository
public interface UserMapper {
    @Insert("insert into user(name,age) values(#{name},#{age})")
    int addUser(@Param("name")String name,@Param("age")String age);

    @Select("select * from user where id =#{id}")
    User findById(@Param("id") String id);


    @Update("update user set name=#{name} where id=#{id}")
    void updataById(@Param("id")String id,@Param("name")String name);


    @Delete("delete from user where id=#{id}")
    void deleteById(@Param("id")String id);
}
6.创建UserService,缓存就在这层工作
//@Cacheable将查询结果缓存到redis中,(key="#p0")指定传入的第一个参数作为redis的key。
//
//@CachePut,指定key,将更新的结果同步到redis中
//
//@CacheEvict,指定key,删除缓存数据,allEntries=true,方法调用后将立即清除缓存
@Service
@CacheConfig(cacheNames = "users")
public class UserService {
    @Autowired
    UserMapper userMapper;

    @Cacheable(key ="#p0")
    public User selectUser(String id){
        System.out.println("select");
        return userMapper.findById(id);
    }

    @CachePut(key = "#p0")
    public void updataById(String id, String name){
        System.out.println("update");
        userMapper.updataById(id,name);
    }

    //如果指定为 true,则方法调用后将立即清空所有缓存
    @CacheEvict(key ="#p0",allEntries=true)
    public void deleteById(String id){
        System.out.println("delete");
        userMapper.deleteById(id);
    }
}
7.Controller
@Controller
@RequestMapping("/")
public class RedisController {
    @Autowired
    UserService userService;

    @RequestMapping("select/{id}")
    @ResponseBody
    public User ForTest(@PathVariable String id){
      return userService.selectUser(id);
    }

    @RequestMapping( "/update/{id}")
    @ResponseBody
    public String update(@PathVariable String id){
        userService.updataById(id,"aaa");
        return "update success";
    }

    @RequestMapping( "/delete/{id}")
    @ResponseBody
    public String delete (@PathVariable String id){
        userService.deleteById(id);
        return "delete success";
    }

}
测试:
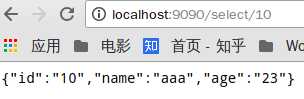
第一次select成功,会在控制台打印“select”,说明查询了mysql数据库
第二次以后就不会打印了,因为查的是redis缓存
update和delete不赘述,可以在redis客户端查看keys * 看到修改和删除对应的数据变化
注:
redis默认的持久化方案是RDB,每xxx分钟如果发生xxx条数据变化就存一次dump文件,重启后会自动恢复。
另一种方案是AOF,记录每一次数据的变化,二者都可在redis.conf里配置
标签:var add led targe success 生成 where object support
原文地址:https://www.cnblogs.com/Mcorleon/p/9348084.html