标签:dde service status adr log forbidden logout guid mit
我曾经使用 Interceptor 实现了一个简单网站Demo的登录拦截和Session处理工作,虽然能够实现相应的功能,但是无疑Spring Security提供的配置方法更加简单明确,能够更好的保护Web应用。
这里大家可以参考Spring Security的官方介绍文档:spring-security-architecture
简单的来说:
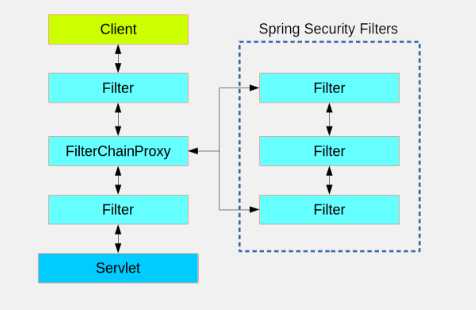
Filter,其具体的类型是FilterChainProxy,其是作为@Bean在ApplicationContext中配置的。从容器的角度来看,Spring Security是一个单一的Filter,但是在其中有很多额外的Filter,每一个都扮演着他们各自的角色,如下图所示:
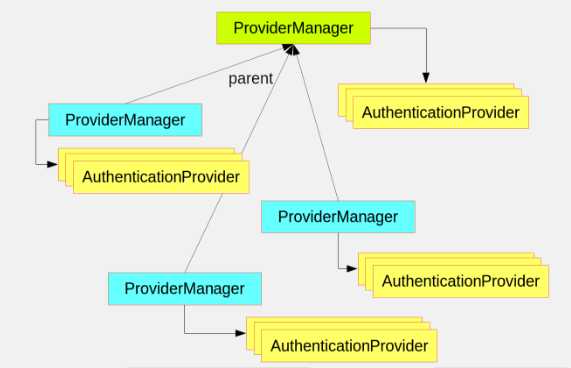
Spring Security的身份验证,主要由AuthenticationManager这个接口完成,其验证的主要方法是authenticate()
public interface AuthenticationManager {

  Authentication authenticate(Authentication authentication)
    throws AuthenticationException;

}Authentication(通常包含 authenticated=true)AuthenticationExceptionnullAuthicationManager的实现是ProviderManager,它将其委托给AuthticationProvider这个实例,AuthenticationProvider和AuthenticationManager有一点像,但是含有一些额外的方法,来允许调用者来查询是否支持该Authenticaion形式。public interface AuthenticationProvider {
Authentication authenticate(Authentication authentication)
throws AuthenticationException;
boolean supports(Class<?> authentication);
}
supports()方法中的Class<?>参数是Class<? extends Authentication>,它只会询问其是否支持传递给authenticate()方法。
ProviderManager通过委托一系列的AuthenticaitonProviders,以此来支支持多个不同的认证机制,如果ProviderManager无法识别一个特定的Authentication实例类型,则会跳过它。很多时候,一个程序含有多个资源保护逻辑组,每一个组都有他们独有的AuthenticationManager,通常他们共享父级,那么父级就成为了了一个"global"资源,作为所有provider的后背。
Spring Security提供了一些配置帮助我们快速的开启验证功能,最常用的就是AuthenticationManagerBuiler,它在内存(in-memory)、JDBC、LDAP或者个人定制的UserDetailService这些领域都很擅长。
注意:本后续代码以SpringBoot为框架实现,其DEMO Git: Spring-Security-Demo
| 方法 | 描述 |
|---|---|
| configure(WebSecurity) | 通过重载,配置Spring Security的Filter链 |
| configure(HttpSecurity) | 通过重载,配置如何拦截器保护请求 |
| configure(AuthenticationManagerBuilder) | 通过重载,配置user-detail服务 |
    @Override
    protected void configure(HttpSecurity http) throws Exception {
        http
        .authorizeRequests()
        .antMatchers("/index").hasAnyAuthority("ROLE_USER","ROLE_ADMIN")
        .antMatchers("/oss").hasAuthority("ROLE_ADMIN")
        .antMatchers(HttpMethod.GET, "/login").permitAll()
        .anyRequest().authenticated()
        .and()
        .formLogin()
        .loginPage("/login")
        .permitAll()//.successHandler(successHandler)
        .and()
        .logout()
        .logoutSuccessUrl("/")
        .permitAll();
    }


    @Override
    protected void configure(AuthenticationManagerBuilder auth) throws Exception {
        auth.inMemoryAuthentication().passwordEncoder(new BCryptPasswordEncoder())
                .withUser("root").password(new BCryptPasswordEncoder().encode("root")).roles("USER","ADMIN").and()
                .withUser("normal").password(new BCryptPasswordEncoder().encode("normal")).roles("USER");
        //auth.authenticationProvider(userProvider);
        //auth.authenticationProvider(afterProvider);

    }
- 通过`antMatchers()`进行URL匹配,再进行相应的处理,比如见上代码,我们将**/index**和**/oss**两个链接进行了拦截,并分别要求拥有`ROLE_USER`或`ROLE_ADMIN`、`ROLE_ADMIN`这两个身份才能访问。
- `anyRequest().authenticated()`指其他请求都会需要验证
- `formLogin()`使其有了登录页面,如果没有后面的`loginPage()`,则会默认生成一个Spring Security的页面,而后面注释掉的`successHandler`则是后续会讲到的。
- `permitAll()`则表示当前连接不需要认证。
- `logout()`会拦截所以的**\logout**请求,完成登出操作,`logoutSuccessUrl()`则是登出后的重定向地址。
- `and()`在其中起连接作用。则此时我们的root账号既能够访问index也能够访问oss,而normal账号只能访问index,不能访问oss,如果访问oss会出现:
There was an unexpected error (type=Forbidden, status=403).
上面我们通过重载configure(AuthenticationManagerBuilder auth)生成了两个内存用户root和normal,我们也可以通过jdbc等方法实现。
Token的设置等等,比如我现在打印一条登录信息,并将请求重定向到首页@Component
public class SuccessHandler implements AuthenticationSuccessHandler{
@Override
public void onAuthenticationSuccess(HttpServletRequest request, HttpServletResponse response,
Authentication authentication) throws IOException, ServletException {
System.out.println(authentication.getName()+" is loging , role is"+authentication.getAuthorities());
response.sendRedirect("/");
}
formLogin()后,即:
.formLogin()
        .loginPage("/login")
        .permitAll().successHandler(successHandler)
UserAuthProvider,并让其实现AuthenticationProvider接口:@Override
public Authentication authenticate(Authentication authentication) throws AuthenticationException {
System.out.println("-----------------------------------------------------------------------");
System.out.println("This is UserAuthProvider");
System.out.println("starting authenticate ... ...");
System.out.println("Credentials:"+authentication.getCredentials());
System.out.println("Name:"+authentication.getName());
System.out.println("Class:"+authentication.getClass());
System.out.println("Details:"+authentication.getDetails());
System.out.println("Principal:"+authentication.getPrincipal());
System.out.println("-----------------------------------------------------------------------");
UsernamePasswordAuthenticationToken auth=new UsernamePasswordAuthenticationToken(authentication.getPrincipal(), authentication.getCredentials());
return auth;
}
@Override
public boolean supports(Class<?> authentication) {
System.out.println("This is UserAuthProvider");
System.out.println("starting supports");
System.out.println(authentication.getClass());
return false;
}auth.inMemoryAuthentication(),将UserAuthProvider加入到AuthenticationManagerBuilder中,即: @Override
protected void configure(AuthenticationManagerBuilder auth) throws Exception {
// auth.inMemoryAuthentication().passwordEncoder(new BCryptPasswordEncoder())
// .withUser("root").password(new BCryptPasswordEncoder().encode("root")).roles("USER","ADMIN").and()
// .withUser("normal").password(new BCryptPasswordEncoder().encode("normal")).roles("USER");
auth.authenticationProvider(userProvider);
auth.authenticationProvider(afterProvider);
}
    This is UserAuthProvider
    starting supports
java.lang. Class supports()方法,永远返回false,而返回false时,即不会再调用authenticate()进行认证操作(正如上面所介绍的),我们将supports()的返回值变成true,再次登录(username: root password: 1234),则控制台会输出This is UserAuthProvider
starting supports
class java.lang.Class
-----------------------------------------------------------------------
This is UserAuthProvider
starting authenticate ... ...
Credentials:1234
Name:root
Class:class org.springframework.security.authentication.UsernamePasswordAuthenticationToken
Details:org.springframework.security.web.authentication.WebAuthenticationDetails@166c8: RemoteIpAddress: 0:0:0:0:0:0:0:1; SessionId: node04v47liue6knt1oghnzgiqb9dx0
Principal:root
-----------------------------------------------------------------------
root is loging , role is[]
即成功登录了,因为我们在authenticate()方法中直接声明了一个Authentication的实例UsernamePasswordAuthenticationToken,并返回了,正如上面所说,当返回Authentication实例时,则默认为授权成功,而如果我们返回null,则说明无法判断,不会登录成功。
此时我们再创建一个对象UserAfterProvider,其也实现AuthenticationProvider接口,并将UserAfterProvider和UserAuthProvider的authenticate()返回值都设置为null,我们再次使用上面的数据进行登录,控制台输出如下:
This is UserAuthProvider
starting supports
class java.lang.Class
-----------------------------------------------------------------------
This is UserAuthProvider
starting authenticate ... ...
Credentials:1234
Name:root
Class:class org.springframework.security.authentication.UsernamePasswordAuthenticationToken
Details:org.springframework.security.web.authentication.WebAuthenticationDetails@43458: RemoteIpAddress: 0:0:0:0:0:0:0:1; SessionId: node01m47f3t6xq5a470fu07jaipzb0
Principal:root
-----------------------------------------------------------------------
This is UserAfterProvider
starting supports
class java.lang.Class
-----------------------------------------------------------------------
This is UserAfterProvider
starting authenticate ... ...
Credentials:1234
Name:root
Class:class org.springframework.security.authentication.UsernamePasswordAuthenticationToken
Details:org.springframework.security.web.authentication.WebAuthenticationDetails@43458: RemoteIpAddress: 0:0:0:0:0:0:0:1; SessionId: node01m47f3t6xq5a470fu07jaipzb0
Principal:root
-----------------------------------------------------------------------
AuthenticationManagerBuilder的验证都会进行一遍,那么如果我们将其中一个Provider的authenticate()返回值还原为Authentication实例,再次登录,则控制台会输出如下结果:This is UserAuthProvider
starting supports
class java.lang.Class
-----------------------------------------------------------------------
This is UserAuthProvider
starting authenticate ... ...
Credentials:1234
Name:root
Class:class org.springframework.security.authentication.UsernamePasswordAuthenticationToken
Details:org.springframework.security.web.authentication.WebAuthenticationDetails@166c8: RemoteIpAddress: 0:0:0:0:0:0:0:1; SessionId: node04v47liue6knt1oghnzgiqb9dx0
Principal:root
-----------------------------------------------------------------------
root is loging , role is[]
This is UserAuthProvider
starting supports
class java.lang.Class
-----------------------------------------------------------------------
This is UserAuthProvider
starting authenticate ... ...
Credentials:null
Name:root
Class:class org.springframework.security.authentication.UsernamePasswordAuthenticationToken
Details:org.springframework.security.web.authentication.WebAuthenticationDetails@166c8: RemoteIpAddress: 0:0:0:0:0:0:0:1; SessionId: node04v47liue6knt1oghnzgiqb9dx0
Principal:root
-----------------------------------------------------------------------因为我们重写了AuthenticationSuccessHandler,所以验证成功后悔重定向到/,而我Controller里对/又做了一次重定向到/index,所以发生了两次验证,而这次我们发现因为UserAuthProvider通过了,所以UserAfterProvider并没有进行验证,所以我们可以知道,只要有一个Provider通过了验证我们就可以认为通过了验证。
因此,我们可以通过实现AuthenticationProvider来写入自己的一些认证逻辑,甚至可以@Autowire相关Service来辅助实现。
标签:dde service status adr log forbidden logout guid mit
原文地址:https://www.cnblogs.com/rekent/p/9456892.html