标签:temp fail info filename 网络 mongodb分片 nosql数据库 -- ip add
本文介绍了热门的NoSQL数据库Mongodb的分片架构模式的相关概念以及分片环境搭建方法。分片就是在分布式数据架构中常见的Sharding这个词。Mongodb分片的方式包括范围分片、哈希分片和标签分片三种。
1.分片相关概念
Mongodb分片是什么?
分片即sharding。在Mongodb中,一个集合可以根据特定的规则将其数据分成几个不同的部分,然后每个组成部分分布在不同的Mongodb服务器上。在查询时,自动从这些组成部分中查询并给给出汇总结果。
分片跟副本集是不同的概念。
分片后,每个服务器上的数据只是一个集合的一部分数据,必须将所有服务器上的数据集中后才能得到完整的数据。
副本集方式部署时,每个服务器上的数据都是完整的,不需要汇总即可得到一个集合的完整数据。
分片方式部署的节点结构。
在Mongodb分片方式部署时,需要三种类型的节点:
分片服务器。用于实际存放集合的数据。直接查询某个分片服务器是不能得到一个集合的完整数据的。至少应该有2个分片服务器。
配置服务器。用于存放各种配置数据。至少应该有3个配置服务器以副本集方式部署。
路由服务器。用于定位分片并向外提供数据服务。直接查询路由服务器的数据可以得到一个集合的完整数据。至少应该有2个路由服务器。
Mongodb分片的三种应用方式。
范围分片。使用集合的某个键作为分片字段,根据范围分片。
哈希分片。使用集合的某个键作为分片字段,根据哈希值分片。
标签分片。使用集合的某个键作为分片字段,根据标签值分片。
2.分片环境搭建
为了操作方便,假定所有服务器均在同一个机器上运行。
在搭建Mongodb分片方式的集群时,按照以下步骤进行。
(1)创建如图所示的目录结构,每个数字目录代表一个服务器所使用的端口。
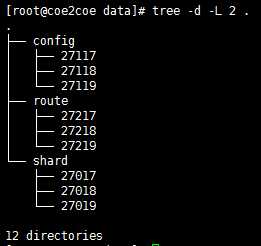
图1
config目录中的端口用于配置服务器。route目录中的端口用于路由服务器。shard目录中的端口用于分片服务器。因此,这个mongodb集群中总共会运行9个mongodb服务器,每种类型的服务器各有3个。
(2)编写配置服务器的启动脚本。
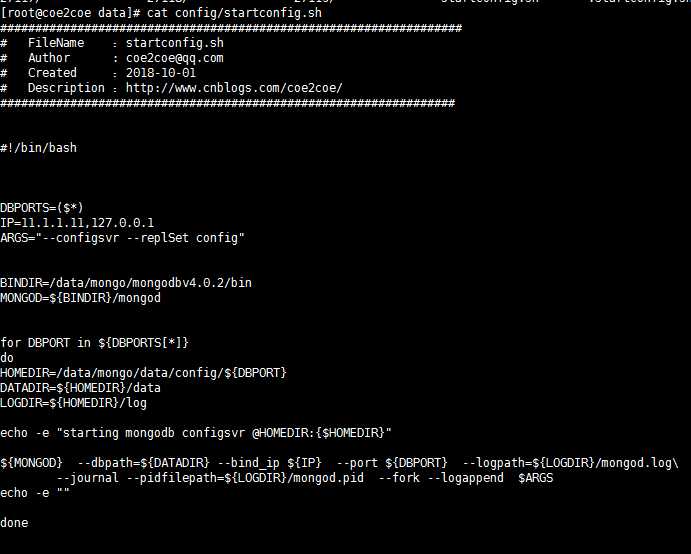
图2
(3)编写分片服务器的启动脚本。
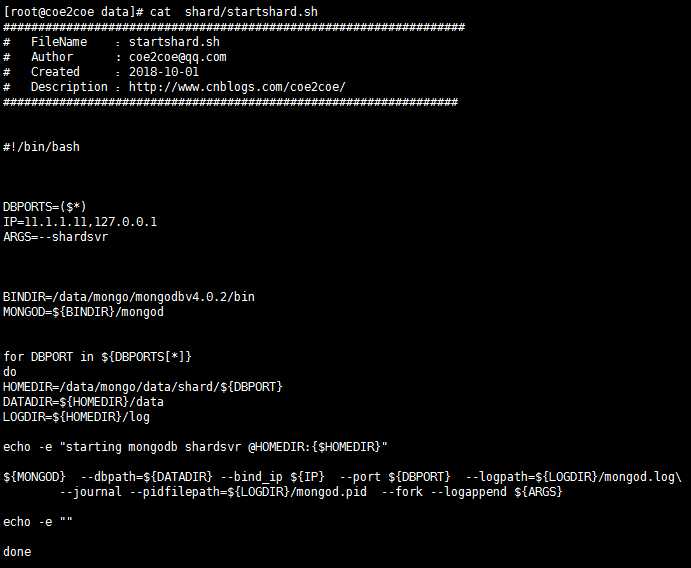
图3
编写路由服务器的启动脚本。
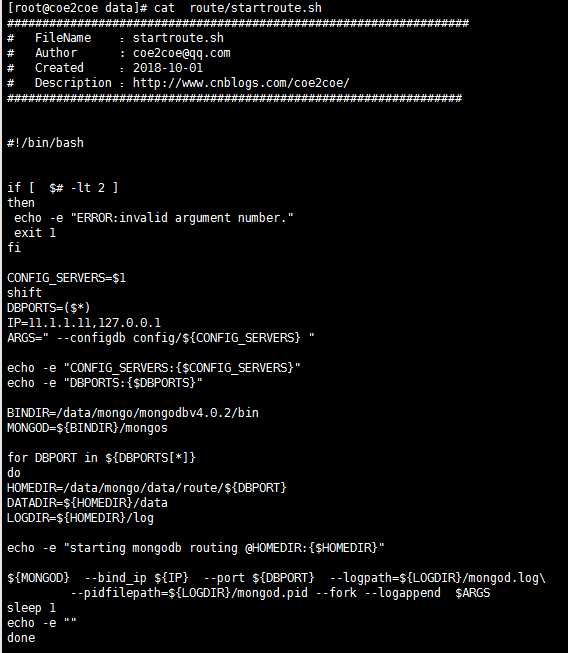
图4
(5)启动配置服务器节点。
首先应该启动配置服务器节点,再启动分片节点,最后启动路由节点。
[root@coe2coe data]# ./config/startconfig.sh 27117 27118 27119
starting mongodb configsvr @HOMEDIR:{/data/mongo/data/config/27117}
about to fork child process, waiting until server is ready for connections.
forked process: 6403
child process started successfully, parent exiting
starting mongodb configsvr @HOMEDIR:{/data/mongo/data/config/27118}
about to fork child process, waiting until server is ready for connections.
forked process: 6437
child process started successfully, parent exiting
starting mongodb configsvr @HOMEDIR:{/data/mongo/data/config/27119}
about to fork child process, waiting until server is ready for connections.
forked process: 6471
child process started successfully, parent exiting
3个配置服务器需要配置成为副本集的方式,因此将它们组成一个副本集,以27117节点为主节点,另外两个节点均为从节点(SECONDARY)。具体配置方式请参考之前的关于副本集的博客。此处不再赘述。
(6)启动分片服务器节点。
[root@coe2coe data]# ./shard/startshard.sh 27017 27018 27019
starting mongodb shardsvr @HOMEDIR:{/data/mongo/data/shard/27017}
about to fork child process, waiting until server is ready for connections.
forked process: 6324
child process started successfully, parent exiting
starting mongodb shardsvr @HOMEDIR:{/data/mongo/data/shard/27018}
about to fork child process, waiting until server is ready for connections.
forked process: 6350
child process started successfully, parent exiting
starting mongodb shardsvr @HOMEDIR:{/data/mongo/data/shard/27019}
about to fork child process, waiting until server is ready for connections.
forked process: 6376
child process started successfully, parent exiting
(7)启动路由服务器节点。
[root@coe2coe data]# ./route/startroute.sh 11.1.1.11:27117,11.1.1.11:27118,11.1.1.11:27119 27217 27218 27219
CONFIG_SERVERS:{11.1.1.11:27117,11.1.1.11:27118,11.1.1.11:27119}
DBPORTS:{27217}
starting mongodb routing @HOMEDIR:{/data/mongo/data/route/27217}
about to fork child process, waiting until server is ready for connections.
forked process: 6643
child process started successfully, parent exiting
starting mongodb routing @HOMEDIR:{/data/mongo/data/route/27218}
about to fork child process, waiting until server is ready for connections.
forked process: 6674
child process started successfully, parent exiting
starting mongodb routing @HOMEDIR:{/data/mongo/data/route/27219}
about to fork child process, waiting until server is ready for connections.
forked process: 6705
child process started successfully, parent exiting
启动路由服务器节点后需要将三个分片服务器节点加入到这个路由中。
[root@coe2coe data]# mongo --quiet --port=27217
mongos> sh.addShard("11.1.1.11:27017");
{
"shardAdded" : "shard0000",
"ok" : 1,
"operationTime" : Timestamp(1538403870, 4),
"$clusterTime" : {
"clusterTime" : Timestamp(1538403870, 4),
"signature" : {
"hash" : BinData(0,"AAAAAAAAAAAAAAAAAAAAAAAAAAA="),
"keyId" : NumberLong(0)
}
}
}
mongos> sh.addShard("11.1.1.11:27018");
{
"shardAdded" : "shard0001",
"ok" : 1,
"operationTime" : Timestamp(1538403879, 3),
"$clusterTime" : {
"clusterTime" : Timestamp(1538403879, 4),
"signature" : {
"hash" : BinData(0,"AAAAAAAAAAAAAAAAAAAAAAAAAAA="),
"keyId" : NumberLong(0)
}
}
}
mongos> sh.addShard("11.1.1.11:27019");
{
"shardAdded" : "shard0002",
"ok" : 1,
"operationTime" : Timestamp(1538403887, 2),
"$clusterTime" : {
"clusterTime" : Timestamp(1538403887, 2),
"signature" : {
"hash" : BinData(0,"AAAAAAAAAAAAAAAAAAAAAAAAAAA="),
"keyId" : NumberLong(0)
}
}
}
此时可以查看分片状态:
mongos> sh.status();
--- Sharding Status ---
sharding version: {
"_id" : 1,
"minCompatibleVersion" : 5,
"currentVersion" : 6,
"clusterId" : ObjectId("5bb22c83322f90f844d3defc")
}
shards:
{ "_id" : "shard0000", "host" : "11.1.1.11:27017", "state" : 1 }
{ "_id" : "shard0001", "host" : "11.1.1.11:27018", "state" : 1 }
{ "_id" : "shard0002", "host" : "11.1.1.11:27019", "state" : 1 }
active mongoses:
"4.0.2-76-g279a1f51b9" : 3
autosplit:
Currently enabled: yes
balancer:
Currently enabled: yes
Currently running: no
Failed balancer rounds in last 5 attempts: 0
Migration Results for the last 24 hours:
No recent migrations
databases:
{ "_id" : "config", "primary" : "config", "partitioned" : true }
三个分片节点27017,27018,27019均处于正常状态。至此一个正常的分片环境基本搭建完毕。
对数据库启用分片功能
在实际应用分片前,首先应该对含有需要分片的集合所在的数据库启用分片功能。在启用分片功能之后可以对其中的集合进行分片的实际操作。
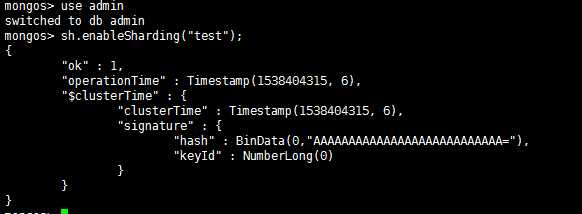
图5
3.范围分片
对t1集合进行范围分片,分片字段为shard。
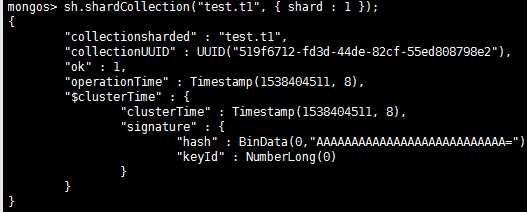
图6
4.哈希分片
对t1表进行哈希分片,分片字段为shard。
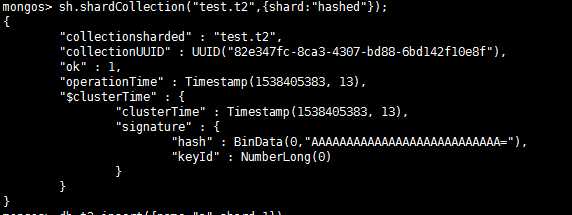
图7
向t2集合中插入一些数据:
mongos> db.t2.find();
{ "_id" : ObjectId("5bb2341df116ff2bb6014822"), "name" : "a", "shard" : 2 }
{ "_id" : ObjectId("5bb2341ff116ff2bb6014823"), "name" : "a", "shard" : 3 }
{ "_id" : ObjectId("5bb23444f116ff2bb6014824"), "name" : "a", "shard" : 4 }
{ "_id" : ObjectId("5bb2344af116ff2bb6014826"), "name" : "a", "shard" : 6 }
{ "_id" : ObjectId("5bb23419f116ff2bb6014821"), "name" : "a", "shard" : 1 }
{ "_id" : ObjectId("5bb23448f116ff2bb6014825"), "name" : "a", "shard" : 5 }
分别通过mongo客户端直接向三个分片服务器节点查询,可以看到三个节点上各自有一部分数据。
[root@coe2coe route]# mongo --quiet --port=27017
> use test
switched to db test
> db.t2.find();
{ "_id" : ObjectId("5bb2344af116ff2bb6014826"), "name" : "a", "shard" : 6 }
[root@coe2coe route]# mongo --quiet --port=27018
> use test
switched to db test
> db.t2.find();
{ "_id" : ObjectId("5bb2341df116ff2bb6014822"), "name" : "a", "shard" : 2 }
{ "_id" : ObjectId("5bb2341ff116ff2bb6014823"), "name" : "a", "shard" : 3 }
{ "_id" : ObjectId("5bb23444f116ff2bb6014824"), "name" : "a", "shard" : 4 }
[root@coe2coe route]# mongo --quiet --port=27019
> use test
switched to db test
> db.t2.find();
{ "_id" : ObjectId("5bb23419f116ff2bb6014821"), "name" : "a", "shard" : 1 }
{ "_id" : ObjectId("5bb23448f116ff2bb6014825"), "name" : "a", "shard" : 5 }
至此哈希分片功能已经实现。
5.标签分片
对t3集合进行标签分片,分片字段为shard。
先添加几个标签。
mongos> use config
switched to db config
mongos> db.shards.find();
{ "_id" : "shard0000", "host" : "11.1.1.11:27017", "state" : 1 }
{ "_id" : "shard0001", "host" : "11.1.1.11:27018", "state" : 1 }
{ "_id" : "shard0002", "host" : "11.1.1.11:27019", "state" : 1 }
mongos> sh.addShardTag("shard0000","tag1");
{
"ok" : 1,
"operationTime" : Timestamp(1538405808, 1),
"$clusterTime" : {
"clusterTime" : Timestamp(1538405808, 1),
"signature" : {
"hash" : BinData(0,"AAAAAAAAAAAAAAAAAAAAAAAAAAA="),
"keyId" : NumberLong(0)
}
}
}
mongos> sh.addShardTag("shard0001","tag2");
{
"ok" : 1,
"operationTime" : Timestamp(1538405813, 1),
"$clusterTime" : {
"clusterTime" : Timestamp(1538405813, 1),
"signature" : {
"hash" : BinData(0,"AAAAAAAAAAAAAAAAAAAAAAAAAAA="),
"keyId" : NumberLong(0)
}
}
}
mongos> sh.addShardTag("shard0002","tag3");
{
"ok" : 1,
"operationTime" : Timestamp(1538405817, 2),
"$clusterTime" : {
"clusterTime" : Timestamp(1538405817, 2),
"signature" : {
"hash" : BinData(0,"AAAAAAAAAAAAAAAAAAAAAAAAAAA="),
"keyId" : NumberLong(0)
}
}
}
为t3集合的shard字段设置标签。
shard值小于100的文档分配标签tag1,100到1000的分配标签tag2,1000以上的分配tag3。
mongos> use test
switched to db test
mongos> sh.addTagRange("test.t3", {shard:MinKey},{shard:100} ,"tag1");
{
"ok" : 1,
"operationTime" : Timestamp(1538405898, 1),
"$clusterTime" : {
"clusterTime" : Timestamp(1538405898, 1),
"signature" : {
"hash" : BinData(0,"AAAAAAAAAAAAAAAAAAAAAAAAAAA="),
"keyId" : NumberLong(0)
}
}
}
mongos> sh.addTagRange("test.t3", {shard:100},{shard:1000} ,"tag2");
{
"ok" : 1,
"operationTime" : Timestamp(1538405913, 1),
"$clusterTime" : {
"clusterTime" : Timestamp(1538405913, 1),
"signature" : {
"hash" : BinData(0,"AAAAAAAAAAAAAAAAAAAAAAAAAAA="),
"keyId" : NumberLong(0)
}
}
}
mongos> sh.addTagRange("test.t3", {shard:1000},{shard:MaxKey} ,"tag3");
{
"ok" : 1,
"operationTime" : Timestamp(1538405924, 1),
"$clusterTime" : {
"clusterTime" : Timestamp(1538405924, 1),
"signature" : {
"hash" : BinData(0,"AAAAAAAAAAAAAAAAAAAAAAAAAAA="),
"keyId" : NumberLong(0)
}
}
}
向t3集合中增加一些文档,并直接访问三个分片节点予以验证标签分片结果。
t3集合中的文档列表:
mongos> db.t3.find();
{ "_id" : ObjectId("5bb2368cf116ff2bb6014827"), "name" : "a", "shard" : 1 }
{ "_id" : ObjectId("5bb23697f116ff2bb6014828"), "name" : "a", "shard" : 99 }
{ "_id" : ObjectId("5bb2369bf116ff2bb6014829"), "name" : "a", "shard" : 100 }
{ "_id" : ObjectId("5bb2369ef116ff2bb601482a"), "name" : "a", "shard" : 101 }
{ "_id" : ObjectId("5bb236a4f116ff2bb601482b"), "name" : "a", "shard" : 999 }
{ "_id" : ObjectId("5bb236a9f116ff2bb601482c"), "name" : "a", "shard" : 1000 }
{ "_id" : ObjectId("5bb236abf116ff2bb601482d"), "name" : "a", "shard" : 1001 }
{ "_id" : ObjectId("5bb236b3f116ff2bb601482e"), "name" : "a", "shard" : 9999 }
分别直接访问三个分片节点:
[root@coe2coe route]# mongo --quiet --port=27017
> use test
switched to db test
> db.t3.find();
{ "_id" : ObjectId("5bb2368cf116ff2bb6014827"), "name" : "a", "shard" : 1 }
{ "_id" : ObjectId("5bb23697f116ff2bb6014828"), "name" : "a", "shard" : 99 }
> exit
[root@coe2coe route]# mongo --quiet --port=27018
> use test
switched to db test
> db.t3.find();
{ "_id" : ObjectId("5bb2369bf116ff2bb6014829"), "name" : "a", "shard" : 100 }
{ "_id" : ObjectId("5bb2369ef116ff2bb601482a"), "name" : "a", "shard" : 101 }
{ "_id" : ObjectId("5bb236a4f116ff2bb601482b"), "name" : "a", "shard" : 999 }
> exit
[root@coe2coe route]# mongo --quiet --port=27019
> use test
switched to db test
> db.t3.find();
{ "_id" : ObjectId("5bb236a9f116ff2bb601482c"), "name" : "a", "shard" : 1000 }
{ "_id" : ObjectId("5bb236abf116ff2bb601482d"), "name" : "a", "shard" : 1001 }
{ "_id" : ObjectId("5bb236b3f116ff2bb601482e"), "name" : "a", "shard" : 9999 }
> exit
结果表明,分片成功。
也可以直接通过config数据库查看分片情况和标签情况。
mongos> use config;
switched to db config
mongos> db.shards.find();
{ "_id" : "shard0000", "host" : "11.1.1.11:27017", "state" : 1, "tags" : [ "tag1" ] }
{ "_id" : "shard0001", "host" : "11.1.1.11:27018", "state" : 1, "tags" : [ "tag2" ] }
{ "_id" : "shard0002", "host" : "11.1.1.11:27019", "state" : 1, "tags" : [ "tag3" ] }
mongos> db.tags.find();
{ "_id" : { "ns" : "test.t3", "min" : { "shard" : { "$minKey" : 1 } } }, "ns" : "test.t3", "min" : { "shard" : { "$minKey" : 1 } }, "max" : { "shard" : 100 }, "tag" : "tag1" }
{ "_id" : { "ns" : "test.t3", "min" : { "shard" : 100 } }, "ns" : "test.t3", "min" : { "shard" : 100 }, "max" : { "shard" : 1000 }, "tag" : "tag2" }
{ "_id" : { "ns" : "test.t3", "min" : { "shard" : 1000 } }, "ns" : "test.t3", "min" : { "shard" : 1000 }, "max" : { "shard" : { "$maxKey" : 1 } }, "tag" : "tag3" }
6.分片的优点
Mongodb的分片集群架构具有以下的优点:
在分片集群架构中,可以轻松实现多点写入。
在分片架构中,可以有多个路由节点,因此,连接到任意一个路由节点均可以提供数据的读写功能。
在分片集群架构中,可以提供写数据的负载均衡。
在分片结构中,数据实际存储在分片节点中,而一个集群中可以有多个分片节点,而集合中的数据实际存储到哪一个节点是有分片的键来决定的,因此可以通过分片键来调整数据的存储位置,从而实现一定的写均衡的功能。
7.分片的缺点
Mongodb的分片集群架构具有以下的缺点:
在分片集群架构中,存在分片节点的单点故障问题。
每一份数据仅仅保存在某个特定的分片服务器节点中,如果这个分片分片节点宕机,则这部分数据无法读取。解决办法稍后给出。
在分片集群架构中,如果需要读取完整的数据,只能通过路由节点读取。而数据实际存储在分片节点中,因此其中必然会多出一些节点间的网络数据传输的消耗。
8.分片集群总控脚本
由于集群中节点个数和种类比较多,编写了一个总控脚本,用于简化集群的启动和停止以及状态查看操作。
完整脚本内容如下:
[root@coe2coe data]# cat cluster.sh
#!/bin/bash
##################################################################
# FileName :startcluster.sh
# Author : coe2coe@qq.com
# Created :2018-10-02
# Description :http://www.cnblogs.com/coe2coe/
#################################################################
start()
{
IP=$(ip addr |grep inet |grep brd |awk -F‘ ‘ ‘{ print $2}‘|awk -F‘/‘ ‘{print $1}‘)
if [ "$IP" == "" ]
then
echo -e "Failed to get IP on this host."
exit 1
fi
CONFIG_PORTS="27117 27118 27119"
SHARD_PORTS="27017 27018 27019"
ROUTE_PORTS="27217 27218 27219"
CONFIG_ADDRESSES="$IP:27117,$IP:27118,$IP:27119"
echo -e "Starting mongodb cluster at {$IP}....."
echo -e "Starting config nodes @{$CONFIG_PORTS} ..."
/data/mongo/data/config/startconfig.sh $CONFIG_PORTS
echo -e "Starting shard nodes @{$SHARD_PORTS}...."
/data/mongo/data/shard/startshard.sh $SHARD_PORTS
echo -e "Starting route nodes @{$ROUTE_PORTS} with CONFIG:{$CONFIG_ADDRESSES}...."
/data/mongo/data/route/startroute.sh $CONFIG_ADDRESSES $ROUTE_PORTS
echo -e "===ALL DONE====="
}
stop()
{
PIDS=$(pidof mongod mongos 2>/dev/null )
if [ "$PIDS" == "" ]
then
echo -e "NO such process found!"
exit 1
fi
echo -e "Stopping mongod and mongos:{$PIDS} ...."
kill -9 ${PIDS}
exit 0
}
status()
{
C_PIDS=$(ps -elf |grep mongod |grep configsvr |grep -v grep |awk ‘{print $4}‘ |xargs )
D_PIDS=$(ps -elf |grep mongod |grep shardsvr |grep -v grep |awk ‘{print $4}‘ |xargs )
R_PIDS=$(ps -elf |grep mongos |grep -v grep |awk ‘{print $4}‘ |xargs )
if [ "$C_PIDS" == "" ]
then
C_STATUS="NOT running"
else
C_STATUS="Running"
fi
if [ "$D_PIDS" == "" ]
then
D_STATUS="NOT running"
else
D_STATUS="Running"
fi
if [ "$R_PIDS" == "" ]
then
R_STATUS="NOT running"
else
R_STATUS="Running"
fi
echo -e "config nodes:{$C_PIDS}:{${C_STATUS}}"
echo -e "shard nodes :{$D_PIDS}:{${D_STATUS}}"
echo -e "route nodes :{$R_PIDS}:{${R_STATUS}}"
exit 0
}
usage()
{
echo -e "Usage: $0 [start|stop|status]"
exit 1
}
case "$1" in
start)
start
;;
stop)
stop
;;
status)
status
;;
*)
usage
;;
esac
脚本功能如下:
启动集群:
[root@coe2coe data]# ./cluster.sh start
Starting mongodb cluster at {11.1.1.11}.....
Starting config nodes @{27117 27118 27119} ...
starting mongodb configsvr @HOMEDIR:{/data/mongo/data/config/27117}
about to fork child process, waiting until server is ready for connections.
forked process: 5569
child process started successfully, parent exiting
starting mongodb configsvr @HOMEDIR:{/data/mongo/data/config/27118}
about to fork child process, waiting until server is ready for connections.
forked process: 5652
child process started successfully, parent exiting
starting mongodb configsvr @HOMEDIR:{/data/mongo/data/config/27119}
about to fork child process, waiting until server is ready for connections.
forked process: 5737
child process started successfully, parent exiting
Starting shard nodes @{27017 27018 27019}....
starting mongodb shardsvr @HOMEDIR:{/data/mongo/data/shard/27017}
about to fork child process, waiting until server is ready for connections.
forked process: 5826
child process started successfully, parent exiting
starting mongodb shardsvr @HOMEDIR:{/data/mongo/data/shard/27018}
about to fork child process, waiting until server is ready for connections.
forked process: 5888
child process started successfully, parent exiting
starting mongodb shardsvr @HOMEDIR:{/data/mongo/data/shard/27019}
about to fork child process, waiting until server is ready for connections.
forked process: 5934
child process started successfully, parent exiting
Starting route nodes @{27217 27218 27219} with CONFIG:{11.1.1.11:27117,11.1.1.11:27118,11.1.1.11:27119}....
CONFIG_SERVERS:{11.1.1.11:27117,11.1.1.11:27118,11.1.1.11:27119}
DBPORTS:{27217}
starting mongodb routing @HOMEDIR:{/data/mongo/data/route/27217}
about to fork child process, waiting until server is ready for connections.
forked process: 5982
child process started successfully, parent exiting
starting mongodb routing @HOMEDIR:{/data/mongo/data/route/27218}
about to fork child process, waiting until server is ready for connections.
forked process: 6015
child process started successfully, parent exiting
starting mongodb routing @HOMEDIR:{/data/mongo/data/route/27219}
about to fork child process, waiting until server is ready for connections.
forked process: 6044
child process started successfully, parent exiting
===ALL DONE=====
查看集群状态:
[root@coe2coe data]# ./cluster.sh status
config nodes:{5569 5652 5737}:{Running}
shard nodes :{5826 5888 5934}:{Running}
route nodes :{5982 6015 6044}:{Running}
停止集群:
[root@coe2coe data]# ./cluster.sh stop
Stopping mongod and mongos:{5934 5888 5826 5737 5652 5569 6044 6015 5982} ....
停止集群后查看状态:
[root@coe2coe data]# ./cluster.sh status
config nodes:{}:{NOT running}
shard nodes :{}:{NOT running}
route nodes :{}:{NOT running}
标签:temp fail info filename 网络 mongodb分片 nosql数据库 -- ip add
原文地址:https://www.cnblogs.com/coe2coe/p/9736955.html