标签:sele ica persist 持久 dea username this field col
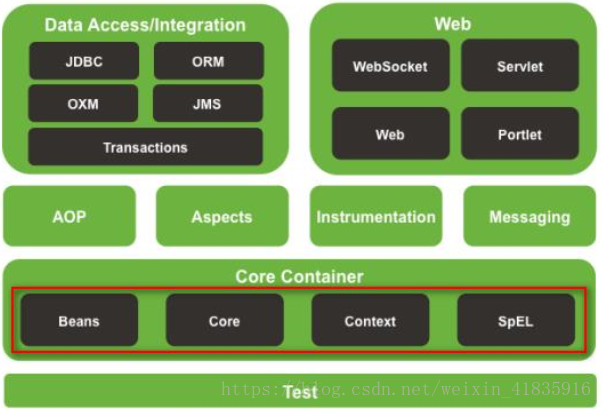
Spring负责管理项目中的所有对象。Spring是一站式框架,仅仅使用Spring足以完成Web项目。
二、Spring项目搭建以及测试
环境为IDEA,Spring项目创建:
创建一个对象:
public class User {
    private String name;
    public String getName() {
        return name;
    }
    public void setName(String name) {
        this.name = name;
    }
}
配置文件(建议放到src下面):
<?xml version="1.0" encoding="UTF-8"?>
<beans xmlns="http://www.springframework.org/schema/beans"
       xmlns:xsi="http://www.w3.org/2001/XMLSchema-instance"
       xsi:schemaLocation="http://www.springframework.org/schema/beans http://www.springframework.org/schema/beans/spring-beans.xsd">
    <!--将user对象交给Spring容器-->
    <bean id="user" class="domain.User">
        <property name="name" value="helloworld"></property>
    </bean>
</beans>
测试代码:
public class Main {
    public static void main(String[] args){
        //创建容器对象
        //ApplicationContext对象在加载 spring-config.xml(容器启动)时候就会创建
        ApplicationContext context = new ClassPathXmlApplicationContext("spring-config.xml");
        //向容器要user对象
        User user = (User) context.getBean("user");
        System.out.println(user.getName());
    }
}
运行结果:helloworld
三、IOC和DI
IOC:Inverse Of Control反转控制。即将我们创建对象的方式反转,以前对象的创建和依赖关系是我们自己维护。使用Spring之后,对象的创建以及依赖关系可以由Spring完成创建以及注入。
DI:Dependency Injection依赖注入,实现IOC思想需要DI做支持,注入方式:set方式注入、构造方式注入、字段注入。注入类型:值类型注入、引用类型注入。
public class User {
    public User() {
    }
    private String name;
    public String getName() {
        return name;
    }
    public void setName(String name) {
        this.name = name;
    }
}
<?xml version="1.0" encoding="UTF-8"?>
<beans xmlns="http://www.springframework.org/schema/beans"
       xmlns:xsi="http://www.w3.org/2001/XMLSchema-instance"
       xsi:schemaLocation="http://www.springframework.org/schema/beans http://www.springframework.org/schema/beans/spring-beans.xsd">
    <!--创建方式1:空参构造创建-->
    <bean name="user" class="domain.User">
        <property name="name" value="naruto"></property>
    </bean>
</beans>
public class UserFactory {
    public static User createUser(){
        System.out.println("静态工厂创建User");
        return new User();
    }
}
<?xml version="1.0" encoding="UTF-8"?>
<beans xmlns="http://www.springframework.org/schema/beans"
       xmlns:xsi="http://www.w3.org/2001/XMLSchema-instance"
       xsi:schemaLocation="http://www.springframework.org/schema/beans http://www.springframework.org/schema/beans/spring-beans.xsd">
    <!-- 创建方式2:静态工厂创建
          调用UserFactory的createUser方法创建名为user2的对象.放入容器
     -->
    <bean  name="user2"
           class="domain.UserFactory"
           factory-method="createUser" >
    </bean>
</beans>
public class UserFactory {
    public  User createUser2(){
        System.out.println("实例工厂创建User");
        return new User();
    }
}
<?xml version="1.0" encoding="UTF-8"?>
<beans xmlns="http://www.springframework.org/schema/beans"
       xmlns:xsi="http://www.w3.org/2001/XMLSchema-instance"
       xsi:schemaLocation="http://www.springframework.org/schema/beans http://www.springframework.org/schema/beans/spring-beans.xsd">
    <!-- 创建方式3:实例工厂创建
         调用UserFactory对象的createUser2方法创建名为user3的对象.放入容器
     -->
    <bean  name="user3"
           factory-bean="userFactory"
           factory-method="createUser2" >
    </bean>
    <bean  name="userFactory"
           class="domain.UserFactory"   >
    </bean>
</beans>
Scpoe即Bean的作用范围:
singleton :默认值,单例的。
prototype :多例的
request :WEB 项目中,Spring 创建一个 Bean 的对象,将对象存入到 request 域中。
session :WEB 项目中,Spring 创建一个 Bean 的对象,将对象存入到 session 域中。(了解即可)
globalSession :WEB 项目中,应用在 Porlet 环境.如果没有 Porlet 环境那么 globalSession 相当于 session。(了解即可)
在一个配置文件中包含另一个配置文件:
<import resource="applicationContext2.xml"></import>
User对象:
public class User {
    public User() {
    }
    private String name;
    private Car car;
    public Car getCar() {
        return car;
    }
    public void setCar(Car car) {
        this.car = car;
    }
    public String getName() {
        return name;
    }
    public void setName(String name) {
        this.name = name;
    }
    @Override
    public String toString() {
        return "User{" +
                "name=‘" + name + ‘\‘‘ +
                ", car=" + car +
                ‘}‘;
    }
}
Car对象:
public class Car {
    private String color;
    public String getColor() {
        return color;
    }
    public void setColor(String color) {
        this.color = color;
    }
    @Override
    public String toString() {
        return "Car{" +
                "color=‘" + color + ‘\‘‘ +
                ‘}‘;
    }
}
注入容器:
<?xml version="1.0" encoding="UTF-8"?>
<beans xmlns="http://www.springframework.org/schema/beans"
       xmlns:xsi="http://www.w3.org/2001/XMLSchema-instance"
       xsi:schemaLocation="http://www.spring
       framework.org/schema/beans http://www.springframework.org/schema/beans/spring-beans.xsd">
    <!--set方式注入-->
    <bean name="user6" class="domain.User">
        <!--为User对象中名为name的属性注入naruto-->
        <property name="name" value="naruto"></property>
        <property name="car" ref="car"></property>
    </bean>
    <!--将car对象配置到容器中-->
    <bean name="car" class="domain.Car">
        <!--为car对象中名为color的属性注入yellow-->
        <property name="color" value="yellow"></property>
    </bean>
</beans>
运行测试:
public class Main {
    public static void main(String[] args){
        ApplicationContext context = new ClassPathXmlApplicationContext("spring-config.xml");
        User user = (User) context.getBean("user6");
        System.out.println(user.toString());
    }
}
运行结果:User{name=’naruto’, car=Car{color=’yellow’}}
User对象:
public class User {
    public User() {
    }
    private String name;
    private Car car;

    public User(Car car, String name) {
        this.car = car;
        this.name = name;
    }

    public Car getCar() {
        return car;
    }

    public void setCar(Car car) {
        this.car = car;
    }

    public String getName() {
        return name;
    }
    public void setName(String name) {
        this.name = name;
    }

    @Override
    public String toString() {
        return "User{" +
                "name=‘" + name + ‘\‘‘ +
                ", car=" + car +
                ‘}‘;
    }
}!
配置:
<?xml version="1.0" encoding="UTF-8"?>
<beans xmlns="http://www.springframework.org/schema/beans"
       xmlns:xsi="http://www.w3.org/2001/XMLSchema-instance"
       xsi:schemaLocation="http://www.springframework.org/schema/beans http://www.springframework.org/schema/beans/spring-beans.xsd">
    <!--将car对象配置到容器中-->
    <bean name="car" class="domain.Car">
        <!--为car对象中名为color的属性注入yellow-->
        <property name="color" value="yellow"></property>
    </bean>
    <!--构造方法注入-->
    <bean name="user66" class="domain.User">
        <!--为User对象中名为name的属性注入naruto-->
        <constructor-arg name="name" value="long" index="1"></constructor-arg>
        <constructor-arg name="car" ref="car"></constructor-arg>
    </bean>
</beans>
运行测试:
public class Main {
    public static void main(String[] args){
        ApplicationContext context = new ClassPathXmlApplicationContext("spring-config.xml");
        User user = (User) context.getBean("user66");
        System.out.println(user.toString());
    }
}
创建一个复杂对象:
public class CollectionBean {
    private Object[] arr;//数组类型注入
    private List list;//list/set 类型注入
    private Map map;//map类型注入
    private Properties prop;//properties类型注入

    public Object[] getArr() {
        return arr;
    }
    public void setArr(Object[] arr) {
        this.arr = arr;
    }
    public List getList() {
        return list;
    }
    public void setList(List list) {
        this.list = list;
    }
    public Map getMap() {
        return map;
    }
    public void setMap(Map map) {
        this.map = map;
    }
    public Properties getProp() {
        return prop;
    }
    public void setProp(Properties prop) {
        this.prop = prop;
    }
    @Override
    public String toString() {
        return "CollectionBean [arr=" + Arrays.toString(arr) + ", list=" + list + ", map=" + map + ", prop=" + prop
                + "]";
    }
}
配置:
<!-- ============================================================= -->
   <!-- 复杂类型注入 -->
   <bean name="cb" class="domain.CollectionBean" >
       <!-- 如果数组中只准备注入一个值(对象),直接使用value|ref即可
       <property name="arr" value="tom" ></property>
       -->
       <!-- array注入,多个元素注入 -->
       <property name="arr">
           <array>
               <value>tom</value>
               <value>jerry</value>
               <ref bean="user6" />
           </array>
       </property>
       <!-- 如果List中只准备注入一个值(对象),直接使用value|ref即可
       <property name="list" value="jack" ></property>-->
       <property name="list"  >
           <list>
               <value>jack</value>
               <value>rose</value>
               <ref bean="user3" />
           </list>
       </property>
       <!-- map类型注入 -->
       <property name="map"  >
           <map>
               <entry key="url" value="jdbc:mysql:///crm" ></entry>
               <entry key="user" value-ref="user6"  ></entry>
               <entry key-ref="user3" value-ref="user2"  ></entry>
           </map>
       </property>
       <!-- prperties 类型注入 -->
       <property name="prop"  >
           <props>
               <prop key="driverClass">com.jdbc.mysql.Driver</prop>
               <prop key="userName">root</prop>
               <prop key="password">1234</prop>
           </props>
       </property>
   </bean>
配置监听器:
<!-监听器:服务器启动,Spring对象创建,服务器销毁,Spring对象销毁。-->
<listener>
    <listener-class>org.springframework.web.context.ContextLoaderListener</listenerclass>
</listener>
<!--指定加载Spring配置文件的位置。-->
<context-param>
    <param-name>contextConfigLocation</param-name>
    <param-value>classpath:applicationContext.xml</param-value>
</context-param>
Spring将容器放入ServletContext中去了,即可以从Application域中获取Spring对象。
配置XML文件:
<?xml version="1.0" encoding="UTF-8"?>
<beans xmlns="http://www.springframework.org/schema/beans"
       xmlns:xsi="http://www.w3.org/2001/XMLSchema-instance"
       xmlns:context="http://www.springframework.org/schema/context"
       xsi:schemaLocation="http://www.springframework.org/schema/beans http://www.springframework.org/schema/beans/spring-beans.xsd http://www.springframework.org/schema/context http://www.springframework.org/schema/context/spring-context.xsd">

    <!--扫描指定包及其子包下所有类中的注解-->
    <context:component-scan base-package="domain"></context:component-scan>

</beans>
将car对象注入到Spring中:
@Component("car2")
public class Car {
    @Value("yellow")
    private String color;

    public void setColor(String color) {
        this.color = color;
    }
    @Override
    public String toString() {
        return "Car{" +
                "color=‘" + color + ‘\‘‘ +
                ‘}‘;
    }
}
将user对象注入到Spring中:
//对象名为user,将其放入Spring容器中
@Component("user")
//@Service("user")       //service层
//@Controller("user")    //web层
//@Repository("user")    //dao层
//@Scope(scopeName = "protoType")  //指定对象作用范围:多例
public class User {
    @Value("long")  //通过反射的Field赋值,破坏了封装性
    private String name;
    //@Autowired      //自动装配
    //自动装配问题:如果匹配多个类型一致的对象,将无法选择具体注入哪一个对象
    //@Qualifier("car2")  使用Qualifier注解告诉Spring容器自动装配哪个名称的对象
    //使用Resource注解手动注入,指定注入哪个名称的对象(推荐)
    @Resource(name="car2")
    private Car car;
    @PostConstruct   //在对象被创建后调用
    public void init(){
        System.out.println("我是初始化方法");
    }
    @PreDestroy      //在对象被销毁之前调用
    public void destroy(){
        System.out.println("我是销毁方法");
    }

    public Car getCar() {
        return car;
    }
    public void setCar(Car car) {
        this.car = car;
    }

    public String getName() {
        return name;
    }
    //@Value("long")  //通过set方法赋值(推荐)
    public void setName(String name) {
        this.name = name;
    }
    @Override
    public String toString() {
        return "User{" +
                "name=‘" + name + ‘\‘‘ +
                ", car=" + car +
                ‘}‘;
    }
}
测试:
public class Main {
    public static void main(String[] args){
        ApplicationContext context = new ClassPathXmlApplicationContext("spring-config.xml");
        User bean = (User) context.getBean("user");
        System.out.println(bean.toString());
    }
}
运行结果:
我是初始化方法
User{name=’long’, car=Car{color=’yellow’}}
十、Spring中的AOP
Spring能够为容器中管理的对象生成动态代理对象。
Spring实现Aop的原理:Spring封装了动态代理和cglib代理
动态代理局限性:被代理对象必须要有接口,才能产生代理对象。
cglib代理:第三方代理技术,可以对任何类生成代理。代理的原理是对目标对象进行继承代理。如果目标对象被final修饰,那么该类无法被cglib代理。
使用动态代理:
UserService:
public interface UserService {
    void save();
    void delete();
    void update();
    void find();
}
UserServiceImpl:
public class UserServiceImpl implements UserService {
    @Override
    public void save() {
        System.out.println("保存用户!");
        //int i = 1/0;
    }
    @Override
    public void delete() {
        System.out.println("删除用户!");
    }
    @Override
    public void update() {
        System.out.println("更新用户!");
    }
    @Override
    public void find() {
        System.out.println("查找用户!");
    }
}
生成代理:
public class UserServiceProxyFactory implements InvocationHandler {
    public UserServiceProxyFactory(UserService us) {
        super();
        this.us = us;
    }
    private UserService us;
    public UserService getUserServiceProxy(){
        //生成动态代理
        UserService usProxy = (UserService) Proxy.newProxyInstance(UserServiceProxyFactory.class.getClassLoader(),
                UserServiceImpl.class.getInterfaces(),  //被代理对象实现的接口
                this);
        //返回
        return usProxy;
    }
    @Override
    public Object invoke(Object arg0, Method method, Object[] arg2) throws Throwable {
        System.out.println("打开事务!");
        Object invoke = method.invoke(us, arg2);
        System.out.println("提交事务!");
        return invoke;
    }
}
测试:
public class Demo {
    @Test
    //动态代理
    public void fun1(){
        UserService us = new UserServiceImpl();
        //传入代理对象
        UserServiceProxyFactory factory = new UserServiceProxyFactory(us);
        UserService usProxy = factory.getUserServiceProxy();
        usProxy.save();
        //代理对象与被代理对象实现了相同的接口
        //代理对象 与 被代理对象没有继承关系
        System.out.println(usProxy instanceof UserServiceImpl );//false
    }
}
运行结果:
打开事务!
保存用户!
提交事务!
false
2、动态代理
什么是代理(中介)
目标对象/被代理对象 —— 房主:真正的租房的方法
代理对象 ——- 黑中介:有租房子的方法(调用房主的租房的方法)
执行代理对象方法的对象 —- 租房的人
流程:我们要租房—–>中介(租房的方法)——>房主(租房的方法)
抽象:调用对象—–>代理对象——>目标对象
动态代理的API:
在jdk的API中存在一个Proxy中存在一个生成动态代理的的方法newProxyInstance:
newProxyInstance(ClassLoader loader, Class<?>[] interfaces, InvocationHandler h)
返回值:Object就是代理对象
参数:loader:代表与目标对象相同的类加载器—–目标对象.getClass().getClassLoader()
interfaces:代表与目标对象实现的所有的接口字节码对象数组
h:具体的代理的操作,InvocationHandler接口
栗子1:
目标对象接口:
public interface TargetInterface {
    public void method1();
    public String method2();
    public int method3(int x);
}
目标对象:
//目标对象
public class Target implements TargetInterface{
    @Override
    public void method1() {
        System.out.println("method1 running...");
    }
    @Override
    public String method2() {
        System.out.println("method2 running...");
        return "method2";
    }
    @Override
    public int method3(int x) {
        return x;
    }
}
代理对象:
//代理对象
public class ProxyTest {
    @Test
    public void test1(){
        //获得动态的代理对象----在运行时 在内存中动态的为Target创建一个虚拟的代理对象
        //objProxy是代理对象 根据参数确定到底是谁的代理对象
        TargetInterface objProxy = (TargetInterface) Proxy.newProxyInstance(
            Target.class.getClassLoader(),      //与目标对象相同的类加载器
            new Class[]{TargetInterface.class},
            new InvocationHandler() {
                    //invoke 代表的是执行代理对象的方法
                    @Override
                    //method:代表目标对象的方法字节码对象
                    //args:代表目标对象的响应的方法的参数
                    public Object invoke(Object proxy, Method method, Object[] args) throws Throwable {
                        System.out.println("目标方法前的逻辑");
                        //执行目标对象的方法
                        Object invoke = method.invoke(new Target(), args);
                        System.out.println("目标方法后的逻辑");
                        return invoke;
                    }
            }
        );
        objProxy.method1();
        String method2 = objProxy.method2();
        //System.out.println(method2);
    }
}
运行结果:
目标方法前的逻辑
method1 running…
目标方法后的逻辑
目标方法前的逻辑
method2 running…
目标方法后的逻辑
package com.proxy;

import java.lang.reflect.InvocationHandler;
import java.lang.reflect.Method;
import java.lang.reflect.Proxy;

public class ProxyTest2 {
    public static void main(String[] args) {
        final Target target = new Target();
        //动态创建代理对象
        TargetInterface proxy = (TargetInterface) Proxy.newProxyInstance(
            target.getClass().getClassLoader(),
            target.getClass().getInterfaces(),
            new InvocationHandler() {
                @Override
                //被执行几次?------- 看代理对象调用方法几次
                //代理对象调用接口相应方法 都是调用invoke
                /*
                 * proxy:是代理对象
                 * method:代表的是目标方法的字节码对象
                 * args:代表是调用目标方法时参数
                 */
                public Object invoke(Object proxy, Method method, Object[] args) throws Throwable {
                    //反射知识点
                    Object invoke = method.invoke(target, args);//目标对象的相应方法
                    //retrun返回的值给代理对象
                    return invoke;
                }
            }
        );
        //调用invoke---Method:目标对象的method1方法  args:null  返回值null
        proxy.method1();
        //调用invoke---Method:目标对象的method2方法  args:null  返回值method2
        String method2 = proxy.method2();
        ////调用invoke-----Method:目标对象的method3方法 args:Object[]{100}  返回值100
        int method3 = proxy.method3(100);
        System.out.println(method2);
        System.out.println(method3);

    }
}
运行结果:
method1 running…
method2 running…
method2
100
public class EncodingFilter implements Filter{
    @Override
    public void doFilter(ServletRequest request, ServletResponse response, FilterChain chain)
                    throws IOException, ServletException {
        final HttpServletRequest req = (HttpServletRequest) request;
        //使用动态代理完成全局编码
        HttpServletRequest enhanceRequset = (HttpServletRequest) Proxy.newProxyInstance(
                req.getClass().getClassLoader(),
                req.getClass().getInterfaces(),
                new InvocationHandler() {
                        @Override
                        public Object invoke(Object proxy, Method method, Object[] args) throws Throwable {
                            //对getParameter方法进行增强
                            String name = method.getName();//获得目标对象的方法名称
                            if("getParameter".equals(name)){
                                String invoke = (String) method.invoke(req, args);//乱码
                                //转码
                                invoke = new String(invoke.getBytes("iso8859-1"),"UTF-8");
                                return invoke;
                            }
                            return method.invoke(req, args);
                        }
                }
        );
        chain.doFilter(enhanceRequset, response);
    }
    @Override
    public void destroy() {

    }
    @Override
    public void init(FilterConfig filterConfig) throws ServletException {

    }
}
public class UserServiceProxyFactory2 implements MethodInterceptor {
    public UserService getUserServiceProxy(){
        //帮我们生成代理对象
        Enhancer en = new Enhancer();
        //设置对谁进行代理
        en.setSuperclass(UserServiceImpl.class);
        //代理要做什么
        en.setCallback(this);
        //创建代理对象
        UserService us = (UserService) en.create();
        return us;
    }
    @Override
    public Object intercept(Object prxoyobj, Method method, Object[] arg, MethodProxy methodProxy) throws Throwable {
        //打开事务
        System.out.println("打开事务!");
        //调用原有方法
        Object returnValue = methodProxy.invokeSuper(prxoyobj, arg);
        //提交事务
        System.out.println("提交事务!");
        return returnValue;
    }
}
代码测试:
@Test
    public void fun2(){
        UserServiceProxyFactory2 factory = new UserServiceProxyFactory2();
        UserService usProxy = factory.getUserServiceProxy();
        usProxy.save();
        //判断代理对象是否属于被代理对象类型
        //代理对象继承了被代理对象=>true
        System.out.println(usProxy instanceof UserServiceImpl );  //true
    }
运行结果:
打开事务!
保存用户!
提交事务!
true
JoinPoint(连接点):目标对象中所有可以增强的方法。
PointCut(切入点):目标对象,已经增强的方法。
Advice(通知 / 增强):增强的代码。
Target(目标对象):被代理对象。
Weaving(织入):将通知应用到切入点的过程。
Proxy(代理):将通知织入到目标对象之后形成代理对象。
Aspect(切面):切入点+通知
创建通知类:
//表示该类是一个通知类
public class MyAdvice {
    //前置通知
    public void before(){
        System.out.println("这是前置通知!!");
    }
    //后置通知
    public void afterReturning(){
        System.out.println("这是后置通知(如果出现异常不会调用)!!");
    }
    //环绕通知
    public Object around(ProceedingJoinPoint pjp) throws Throwable {
        System.out.println("这是环绕通知之前的部分!!");
        Object proceed = pjp.proceed();//调用目标方法
        System.out.println("这是环绕通知之后的部分!!");
        return proceed;
    }
    //异常通知
    public void afterException(){
        System.out.println("出事啦!出现异常了!!");
    }
    //后置通知
    public void after(){
        System.out.println("这是后置通知(出现异常也会调用)!!");
    }
}
XML文件中进行配置:
<?xml version="1.0" encoding="UTF-8"?>
<beans xmlns="http://www.springframework.org/schema/beans"
       xmlns:xsi="http://www.w3.org/2001/XMLSchema-instance"
       xmlns:context="http://www.springframework.org/schema/context"
       xmlns:aop="http://www.springframework.org/schema/aop"
       xsi:schemaLocation="http://www.springframework.org/schema/beans http://www.springframework.org/schema/beans/spring-beans.xsd http://www.springframework.org/schema/context http://www.springframework.org/schema/context/spring-context.xsd http://www.springframework.org/schema/aop http://www.springframework.org/schema/aop/spring-aop.xsd">
    <!--扫描指定包及其子包下所有类中的注解-->
    <context:component-scan base-package="domain"></context:component-scan>
    <context:component-scan base-package="aop"></context:component-scan>
    <!--1、配置目标对象,得到的是代理的对象-->
    <bean name="userServiceTarget" class="aop.service.UserServiceImpl"></bean>
    <!--2、配置通知对象-->
    <bean name="myAdvice" class="aop.advice.MyAdvice"></bean>
    <!--3、配置将通知织入目标对象-->
    <aop:config>
        <!-- 配置切入点
            public void cn.long.service.UserServiceImpl.save()
            void cn.long.service.UserServiceImpl.save()
            * cn.long.service.UserServiceImpl.save()
            * cn.long.service.UserServiceImpl.*()

            * cn.long.service.*ServiceImpl.*(..)
            * cn.long.service..*ServiceImpl.*(..)
        -->
        <aop:pointcut id="pc" expression="execution(* aop.service.UserServiceImpl.*(..))"></aop:pointcut>
        <aop:aspect ref="myAdvice" >
            <!-- 指定名为before方法作为前置通知 -->
            <aop:before method="before" pointcut-ref="pc"></aop:before>
            <!-- 后置 -->
            <aop:after-returning method="afterReturning" pointcut-ref="pc"></aop:after-returning>
            <!-- 环绕通知 -->
            <aop:around method="around" pointcut-ref="pc" />
            <!-- 异常拦截通知 -->
            <aop:after-throwing method="afterException" pointcut-ref="pc"></aop:after-throwing>
            <!-- 后置 -->
            <aop:after method="after" pointcut-ref="pc"></aop:after>
        </aop:aspect>
    </aop:config>
</beans>
测试:
package aop;

import aop.service.UserService;
import org.junit.Test;
import org.junit.runner.RunWith;
import org.springframework.test.context.ContextConfiguration;
import org.springframework.test.context.junit4.SpringJUnit4ClassRunner;

import javax.annotation.Resource;

@RunWith(SpringJUnit4ClassRunner.class)
@ContextConfiguration("classpath:/spring-config.xml")
public class Demo {
    @Resource(name="userServiceTarget")
    private UserService us;

    @Test
    public void fun1(){
        us.save();
    }
}
运行结果:
我是初始化方法这是前置通知!!
这是环绕通知之前的部分!!
保存用户!
这是后置通知(出现异常也会调用)!!
这是环绕通知之后的部分!!
这是后置通知(如果出现异常不会调用)!!
我是销毁方法
XML文件:
<?xml version="1.0" encoding="UTF-8"?>
<beans xmlns="http://www.springframework.org/schema/beans"
       xmlns:xsi="http://www.w3.org/2001/XMLSchema-instance"
       xmlns:context="http://www.springframework.org/schema/context"
       xmlns:aop="http://www.springframework.org/schema/aop"
       xsi:schemaLocation="http://www.springframework.org/schema/beans http://www.springframework.org/schema/beans/spring-beans.xsd http://www.springframework.org/schema/context http://www.springframework.org/schema/context/spring-context.xsd http://www.springframework.org/schema/aop http://www.springframework.org/schema/aop/spring-aop.xsd">

    <!--1、配置目标对象-->
    <bean name="userServiceTarget" class="aop.service.UserServiceImpl"></bean>
    <!--2、配置通知对象-->
    <bean name="myAdvice" class="aop.advice.MyAdvice2"></bean>
    <!-- 3.开启使用注解完成织入 -->
    <aop:aspectj-autoproxy></aop:aspectj-autoproxy>

</beans>
通知:
package aop.advice;

import org.aspectj.lang.ProceedingJoinPoint;
import org.aspectj.lang.annotation.*;

//通知类
@Aspect
//表示该类是一个通知类
public class MyAdvice2 {
    @Pointcut("execution(* aop.service.UserServiceImpl.*(..))")
    public void pc(){}
    //前置通知
    //指定该方法是前置通知,并制定切入点
    @Before("MyAdvice2.pc()")
    public void before(){
        System.out.println("这是前置通知!!");
    }
    //后置通知
    @AfterReturning("execution(* aop.service.UserServiceImpl.*(..))")
    public void afterReturning(){
        System.out.println("这是后置通知(如果出现异常不会调用)!!");
    }
    //环绕通知
    @Around("execution(* aop.service.UserServiceImpl.*(..))")
    public Object around(ProceedingJoinPoint pjp) throws Throwable {
        System.out.println("这是环绕通知之前的部分!!");
        Object proceed = pjp.proceed();//调用目标方法
        System.out.println("这是环绕通知之后的部分!!");
        return proceed;
    }
    //异常通知
    @AfterThrowing("execution(* aop.service.UserServiceImpl.*(..))")
    public void afterException(){
        System.out.println("出事啦!出现异常了!!");
    }
    //后置通知
    @After("execution(* aop.service.UserServiceImpl.*(..))")
    public void after(){
        System.out.println("这是后置通知(出现异常也会调用)!!");
    }
}
测试:
@RunWith(SpringJUnit4ClassRunner.class)
@ContextConfiguration("classpath:/aop/advice/spring-config.xml")
public class Demo {
    @Resource(name="userServiceTarget")
    private UserService us;
    @Test
    public void fun1(){
        us.save();
    }
}
运行结果:
这是环绕通知之前的部分!!
这是前置通知!!
保存用户!
这是环绕通知之后的部分!!
这是后置通知(出现异常也会调用)!!
这是后置通知(如果出现异常不会调用)!!
Spring整合了一个可以操作数据库的对象JDBCTemplate(JBDC模板对象),该对象封装了jdbc技术,与DBUtils中的QueryRunner非常相似。
演示一下JDBCTemplate的使用:
//演示JDBC模板
public class Demo {
    @Test
    public void fun1() throws Exception {
        //0 准备连接池
        ComboPooledDataSource dataSource = new ComboPooledDataSource();
        dataSource.setDriverClass("com.mysql.jdbc.Driver");
        dataSource.setJdbcUrl("jdbc:mysql:///test");
        dataSource.setUser("root");
        dataSource.setPassword("666");
        //1 创建JDBC模板对象
        JdbcTemplate jt = new JdbcTemplate();
        jt.setDataSource(dataSource);
        //2 书写sql,并执行
        String sql = "insert into user values(null,‘long‘) ";
        jt.update(sql);
    }
}
运行结果: 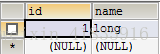
JDBCTemplate增删改查:
UserDao :
public interface UserDao {
    //增
    void save(User u);
    //删
    void delete(Integer id);
    //改
    void update(User u);
    //查
    User getById(Integer id);
    //查
    int getTotalCount();
    //查
    List<User> getAll();
}
UserDaoImpl:
//使用JDBC模板实现增删改查
public class UserDaoImpl extends JdbcDaoSupport implements UserDao {
    @Override
    public void save(User u) {
        String sql = "insert into t_user values(null,?) ";
        super.getJdbcTemplate().update(sql, u.getName());
    }
    @Override
    public void delete(Integer id) {
        String sql = "delete from t_user where id = ? ";
        super.getJdbcTemplate().update(sql,id);
    }
    @Override
    public void update(User u) {
        String sql = "update  t_user set name = ? where id=? ";
        super.getJdbcTemplate().update(sql, u.getName(),u.getId());
    }
    @Override
    public User getById(Integer id) {
        String sql = "select * from t_user where id = ? ";
        return super.getJdbcTemplate().queryForObject(sql,new RowMapper<User>(){
            @Override
            public User mapRow(ResultSet rs, int arg1) throws SQLException {
                User u = new User();
                u.setId(rs.getInt("id"));
                u.setName(rs.getString("name"));
                return u;
            }}, id);
    }
    @Override
    public int getTotalCount() {
        String sql = "select count(*) from t_user  ";
        Integer count = super.getJdbcTemplate().queryForObject(sql, Integer.class);
        return count;
    }
    @Override
    public List<User> getAll() {
        String sql = "select * from t_user  ";
        List<User> list = super.getJdbcTemplate().query(sql, new RowMapper<User>(){
            @Override
            public User mapRow(ResultSet rs, int arg1) throws SQLException {
                User u = new User();
                u.setId(rs.getInt("id"));
                u.setName(rs.getString("name"));
                return u;
            }});
        return list;
    }
}
将其配置到Spring容器中:
依赖关系: 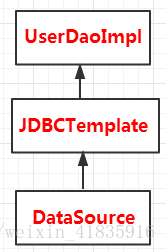
配置文件如下:
<?xml version="1.0" encoding="UTF-8"?>
<beans xmlns="http://www.springframework.org/schema/beans"
       xmlns:xsi="http://www.w3.org/2001/XMLSchema-instance"
       xmlns:context="http://www.springframework.org/schema/context"
       xsi:schemaLocation="http://www.springframework.org/schema/beans http://www.springframework.org/schema/beans/spring-beans.xsd http://www.springframework.org/schema/context http://www.springframework.org/schema/context/spring-context.xsd">

    <!-- 指定spring读取db.properties配置 -->
    <context:property-placeholder location="classpath:db.properties"  />

    <!-- 1.将连接池放入spring容器 -->
    <bean name="dataSource" class="com.mchange.v2.c3p0.ComboPooledDataSource" >
        <property name="jdbcUrl" value="${jdbc.jdbcUrl}" ></property>
        <property name="driverClass" value="${jdbc.driverClass}" ></property>
        <property name="user" value="${jdbc.user}" ></property>
        <property name="password" value="${jdbc.password}" ></property>
    </bean>

    <!-- 2.将JDBCTemplate放入spring容器 -->
    <bean name="jdbcTemplate" class="org.springframework.jdbc.core.JdbcTemplate" >
        <property name="dataSource" ref="dataSource" ></property>
    </bean>

    <!-- 3.将UserDao放入spring容器 -->
    <bean name="userDao" class="jdbcTemplate.UserDaoImpl" >
        <!-- <property name="jt" ref="jdbcTemplate" ></property> -->
        <property name="dataSource" ref="dataSource" ></property>
    </bean>

</beans>
测试:
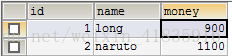
package jdbcTemplate;

import com.mchange.v2.c3p0.ComboPooledDataSource;
import org.junit.Test;
import org.junit.runner.RunWith;
import org.springframework.jdbc.core.JdbcTemplate;
import org.springframework.test.context.ContextConfiguration;
import org.springframework.test.context.junit4.SpringJUnit4ClassRunner;

import javax.annotation.Resource;

/**
 * Created by KPL on 2018/7/1.
 */
//演示JDBC模板
@RunWith(SpringJUnit4ClassRunner.class)
@ContextConfiguration("classpath:spring-config.xml")
public class Demo {
    @Resource(name="userDao")
    private UserDao ud;
    @Test
    public void fun2() throws Exception{
        User u = new User();
        u.setName("naruto");
        ud.save(u);
    }
    @Test
    public void fun3() throws Exception{
        User u = new User();
        u.setId(2);
        u.setName("jack");
        ud.update(u);

    }
    @Test
    public void fun4() throws Exception{
        ud.delete(2);
    }
    @Test
    public void fun5() throws Exception{
        System.out.println(ud.getTotalCount());
    }
    @Test
    public void fun6() throws Exception{
        System.out.println(ud.getById(1));
    }
    @Test
    public void fun7() throws Exception{
        System.out.println(ud.getAll());
    }
}
运行结果: 
public class UserDaoImpl extends JdbcDaoSupport继承了JdbcDaoSupport,Spring会根据连接池自动创建JDBC模板对象。也就是说不需要手动擦行间JBDC模板对象,从父类方法中直接获取即可。
String sql = "insert into t_user values(null,?) ";
super.getJdbcTemplate().update(sql, u.getName());
此时,配置文件修改成如下:
<?xml version="1.0" encoding="UTF-8"?>
<beans xmlns="http://www.springframework.org/schema/beans"
       xmlns:xsi="http://www.w3.org/2001/XMLSchema-instance"
       xmlns:context="http://www.springframework.org/schema/context"
       xsi:schemaLocation="http://www.springframework.org/schema/beans http://www.springframework.org/schema/beans/spring-beans.xsd http://www.springframework.org/schema/context http://www.springframework.org/schema/context/spring-context.xsd">

    <!-- 指定spring读取db.properties配置 -->
    <context:property-placeholder location="classpath:db.properties"  />

    <!-- 1.将连接池放入spring容器 -->
    <bean name="dataSource" class="com.mchange.v2.c3p0.ComboPooledDataSource" >
        <property name="jdbcUrl" value="${jdbc.jdbcUrl}" ></property>
        <property name="driverClass" value="${jdbc.driverClass}" ></property>
        <property name="user" value="${jdbc.user}" ></property>
        <property name="password" value="${jdbc.password}" ></property>
    </bean>

    <!-- 3.将UserDao放入spring容器 -->
    <bean name="userDao" class="jdbcTemplate.UserDaoImpl" >
        <property name="dataSource" ref="dataSource" ></property>
    </bean>

</beans>
1.1、事务概述
(1)什么是事务?
一件事情有n个组成单元 要不这n个组成单元同时成功,要不n个单元就同时失败
就将n个组成单元放到一个事务中。
(2)mysql的事务
默认的事务:一条sql语句就是一个事务 默认就开启事务并提交事务。sql执行完了之后自动提交了。
手动事务:
显示的开启一个事务:start transaction。
事务提交:commit代表从开启事务到事务提交,中间的所有的sql都认为有效真正的更新数据库。
事务的回滚:rollback代表事务的回滚从开启事务到事务回滚中间的所有的sql操作都认为无效数据库没有被更新。
1.2、JDBC事务操作
默认是自动事务:
执行sql语句:executeUpdate() —- 每执行一次executeUpdate方法代表事务自动提交。
通过jdbc的API手动事务:
开启事务:conn.setAutoComnmit(false);
提交事务:conn.commit();
回滚事务:conn.rollback();
注意:控制事务的connnection必须是同一个执行sql的connection与开启事务的connnection必须是同一个才能对事务进行控制。
1.3、DBUtils事务操作
QueryRunner
有参构造:QueryRunner runner = new QueryRunner(DataSource dataSource);
有参构造将数据源(连接池)作为参数传入QueryRunner,QueryRunner会从连接池中获得一个数据库连接资源操作数据库,所以直接使用无Connection参数的update方法即可操作数据库。不需要事务则采用此方法。
无参构造:QueryRunner runner = new QueryRunner();
无参的构造没有将数据源(连接池)作为参数传入QueryRunner,那么我们在使用QueryRunner对象操作数据库时要使用有Connection参数的方法。此方法能实现事务。
1.4、事务的特性ACID
(1)原子性(Atomicity)原子性是指事务是一个不可分割的工作单位,事务中的操作 要么都发生,要么都不发生。
(2)一致性(Consistency)一个事务中,事务前后数据的完整性必须保持一致。
(3)隔离性(Isolation)多个事务,事务的隔离性是指多个用户并发访问数据库时,一个用户的 事务不能被其它用户的事务所干扰,多个并发事务之间数据要相互隔离。
(4)持久性(Durability)持久性是指一个事务一旦被提交,它对数据库中数据的改变 就是永久性的,接下来即使数据库发生故障也不应该对其有任何影响。
五、事务的隔离
如果不考虑隔离性,事务存在3种并发访问问题。
脏读:B事务读取到了A事务尚未提交的数据 —— 要求B事务要读取A事务提交的数据
不可重复读:一个事务中 两次读取的数据的内容不一致 —– 要求的是一个事务中多次读取时数据是一致的 — unpdate
幻读/虚读:一个事务中 两次读取的数据的数量不一致 —– 要求在一个事务多 次读取的数据的数量是一致的 –insert delete
事务的隔离级别:
(1)read uncommitted : 读取尚未提交的数据 :哪个问题都不能解决
(2)read committed:读取已经提交的数据 :可以解决脏读 —- oracle默认的
(3)repeatable read:重读读取:可以解决脏读和不可重复读 —mysql默认的
(4)serializable:串行化:可以解决脏读不可重复读和虚读—相当于锁表
注意:mysql数据库默认的隔离级别
查看mysql数据库默认的隔离级别:select @@tx_isolation
设置mysql的隔离级别:set session transaction isolation level 设置事务隔离级别
因为在不用平台,操纵事务的代码各不相同,于是Spring提供了一个接口PlatfromTransactionManager接口,针对不同的平台,提供不同的实现类。
***** 真正管理事务的对象
org.springframework.jdbc.datasource.DataSourceTransactionManager
//使用 SpringJDBC 或 iBatis 进行持久化数据时使用
org.springframework.orm.hibernate3.HibernateTransactionManager
//使用Hibernate 版本进行持久化数据时使用
事务的传播行为:决定业务方法之间调用,事务应该如何处理。
//保证同一个事务中
PROPAGATION_REQUIRED 支持当前事务,如果不存在 就新建一个(默认)
PROPAGATION_SUPPORTS 支持当前事务,如果不存在,就不使用事务
PROPAGATION_MANDATORY 支持当前事务,如果不存在,抛出异常
//保证没有在同一个事务中
PROPAGATION_REQUIRES_NEW 如果有事务存在,挂起当前事务,创建一个新的事务
PROPAGATION_NOT_SUPPORTED 以非事务方式运行,如果有事务存在,挂起当前事务
PROPAGATION_NEVER 以非事务方式运行,如果有事务存在,抛出异常
PROPAGATION_NESTED 如果当前事务存在,则嵌套事务执行
演示一下Spring事务:
先完成基本的转账功能:
Dao:
package Transaction.dao;

public interface AccountDao {
    //加钱
    void increaseMoney(Integer id, Double money);
    //减钱
    void decreaseMoney(Integer id, Double money);
}
DaoImpl:
public class AccountDaoImpl extends JdbcDaoSupport implements AccountDao  {
    @Override
    public void increaseMoney(Integer id, Double money) {
        getJdbcTemplate().update("update t_account set money = money+? where id = ? ", money,id);
    }
    @Override
    public void decreaseMoney(Integer id, Double money) {
        getJdbcTemplate().update("update t_account set money = money-? where id = ? ", money,id);
    }
}
XML文件:
<?xml version="1.0" encoding="UTF-8"?>
<beans xmlns="http://www.springframework.org/schema/beans"
       xmlns:xsi="http://www.w3.org/2001/XMLSchema-instance"
       xmlns:context="http://www.springframework.org/schema/context"
       xsi:schemaLocation="http://www.springframework.org/schema/beans http://www.springframework.org/schema/beans/spring-beans.xsd http://www.springframework.org/schema/context http://www.springframework.org/schema/context/spring-context.xsd">

    <!-- 指定spring读取db.properties配置 -->
    <context:property-placeholder location="classpath:db.properties"  />

    <!-- 1.将连接池 -->
    <bean name="dataSource1" class="com.mchange.v2.c3p0.ComboPooledDataSource" >
        <property name="jdbcUrl" value="${jdbc.jdbcUrl}" ></property>
        <property name="driverClass" value="${jdbc.driverClass}" ></property>
        <property name="user" value="${jdbc.user}" ></property>
        <property name="password" value="${jdbc.password}" ></property>
    </bean>
    <!-- 2.Dao-->
    <bean name="accountDao" class="Transaction.dao.AccountDaoImpl" >
        <property name="dataSource" ref="dataSource1" ></property>
    </bean>
    <!-- 3.Service-->
    <bean name="accountService" class="Transaction.service.AccountServiceImpl" >
        <property name="ad" ref="accountDao" ></property>
    </bean>
</beans>
测试类:
@RunWith(SpringJUnit4ClassRunner.class)
@ContextConfiguration("classpath:spring-config2.xml")
public class Demo {
    @Resource(name="accountService")
    private AccountService as;
    @Test
    public void fun1(){
        as.transfer(1, 2, 100d);
    }
}
运行结果: 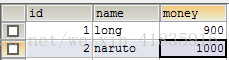
现在开始加事务:
Spring管理事务的方式:
编码式:(了解)
将核心事务管理器配置到Spring容器:
<?xml version="1.0" encoding="UTF-8"?>
<beans xmlns="http://www.springframework.org/schema/beans"
       xmlns:xsi="http://www.w3.org/2001/XMLSchema-instance"
       xmlns:context="http://www.springframework.org/schema/context"
       xsi:schemaLocation="http://www.springframework.org/schema/beans http://www.springframework.org/schema/beans/spring-beans.xsd http://www.springframework.org/schema/context http://www.springframework.org/schema/context/spring-context.xsd">

<!-- 指定spring读取db.properties配置 -->
<context:property-placeholder location="classpath:db.properties"  />

<!-- 事务核心管理器,封装了所有事务操作. 依赖于连接池 -->
<bean name="transactionManager" class="org.springframework.jdbc.datasource.DataSourceTransactionManager" >
    <property name="dataSource" ref="dataSource1" ></property>
</bean>

<!-- 事务模板对象 -->
<bean name="transactionTemplate" class="org.springframework.transaction.support.TransactionTemplate" >
    <property name="transactionManager" ref="transactionManager" ></property>
</bean>

<!-- 1.将连接池 -->
<bean name="dataSource1" class="com.mchange.v2.c3p0.ComboPooledDataSource" >
    <property name="jdbcUrl" value="${jdbc.jdbcUrl}" ></property>
    <property name="driverClass" value="${jdbc.driverClass}" ></property>
    <property name="user" value="${jdbc.user}" ></property>
    <property name="password" value="${jdbc.password}" ></property>
</bean>
<!-- 2.Dao-->
<bean name="accountDao" class="Transaction.dao.AccountDaoImpl" >
    <property name="dataSource" ref="dataSource1" ></property>
</bean>
<!-- 3.Service-->
<bean name="accountService" class="Transaction.service.AccountServiceImpl" >
    <property name="ad" ref="accountDao" ></property>
    <property name="tt" ref="transactionTemplate" ></property>
</bean>
</beans>
ServiceImpl:
@Transactional(isolation=Isolation.REPEATABLE_READ,propagation=Propagation.REQUIRED,readOnly=true)
public class AccountServiceImpl implements AccountService {
    private AccountDao ad ;
    private TransactionTemplate tt;
    @Override
    public void transfer(final Integer from,final Integer to,final Double money) {
        tt.execute(new TransactionCallbackWithoutResult() {
            @Override
            protected void doInTransactionWithoutResult(TransactionStatus arg0) {
                //减钱
                ad.decreaseMoney(from, money);
                int i = 1/0;
                //加钱
                ad.increaseMoney(to, money);
            }
        });
    }

    public void setAd(AccountDao ad) {
        this.ad = ad;
    }

    public void setTt(TransactionTemplate tt) {
        this.tt = tt;
    }
}
测试代码:
@RunWith(SpringJUnit4ClassRunner.class)
@ContextConfiguration("classpath:spring-config2.xml")
public class Demo {
    @Resource(name="accountService")
    private AccountService as;
    @Test
    public void fun1(){
        as.transfer(1, 2, 100d);
    }
}
运行结果,由于加入了事务,报错之后,钱并不会转过去: 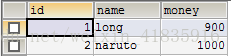
XML配置(aop)
Spring内部已经封装了事务通知方法,那么咱们只需要将它配置到业务处理上去就可以了。
<?xml version="1.0" encoding="UTF-8"?>
<beans xmlns:xsi="http://www.w3.org/2001/XMLSchema-instance"
       xmlns="http://www.springframework.org/schema/beans"
       xmlns:context="http://www.springframework.org/schema/context"
       xmlns:aop="http://www.springframework.org/schema/aop"
       xmlns:tx="http://www.springframework.org/schema/tx"
       xsi:schemaLocation="http://www.springframework.org/schema/beans http://www.springframework.org/schema/beans/spring-beans-4.2.xsd http://www.springframework.org/schema/context http://www.springframework.org/schema/context/spring-context-4.2.xsd http://www.springframework.org/schema/aop http://www.springframework.org/schema/aop/spring-aop-4.2.xsd http://www.springframework.org/schema/tx http://www.springframework.org/schema/tx/spring-tx-4.2.xsd ">

    <!-- 指定spring读取db.properties配置 -->
    <context:property-placeholder location="classpath:db.properties"  />

    <!-- 事务核心管理器,封装了所有事务操作. 依赖于连接池 -->
    <bean name="transactionManager" class="org.springframework.jdbc.datasource.DataSourceTransactionManager" >
        <property name="dataSource" ref="dataSource" ></property>
    </bean>
    <!-- 事务模板对象 -->
    <bean name="transactionTemplate" class="org.springframework.transaction.support.TransactionTemplate" >
        <property name="transactionManager" ref="transactionManager" ></property>
    </bean>

    <!-- 配置事务通知 -->
    <tx:advice id="txAdvice" transaction-manager="transactionManager" >
        <tx:attributes>
            <!-- 以方法为单位,指定方法应用什么事务属性
                isolation:隔离级别
                propagation:传播行为
                read-only:是否只读
             -->
            <tx:method name="save*" isolation="REPEATABLE_READ" propagation="REQUIRED" read-only="false" />
            <tx:method name="persist*" isolation="REPEATABLE_READ" propagation="REQUIRED" read-only="false" />
            <tx:method name="update*" isolation="REPEATABLE_READ" propagation="REQUIRED" read-only="false" />
            <tx:method name="modify*" isolation="REPEATABLE_READ" propagation="REQUIRED" read-only="false" />
            <tx:method name="delete*" isolation="REPEATABLE_READ" propagation="REQUIRED" read-only="false" />
            <tx:method name="remove*" isolation="REPEATABLE_READ" propagation="REQUIRED" read-only="false" />
            <tx:method name="get*" isolation="REPEATABLE_READ" propagation="REQUIRED" read-only="true" />
            <tx:method name="find*" isolation="REPEATABLE_READ" propagation="REQUIRED" read-only="true" />
            <tx:method name="transfer" isolation="REPEATABLE_READ" propagation="REQUIRED" read-only="false" />
        </tx:attributes>
    </tx:advice>

    <!-- 配置织入 -->
    <aop:config  >
        <!-- 配置切点表达式 -->
        <aop:pointcut expression="execution(* Transaction.service.*ServiceImpl.*(..))" id="txPc"/>
        <!-- 配置切面 : 通知+切点
                 advice-ref:通知的名称
                 pointcut-ref:切点的名称
         -->
        <aop:advisor advice-ref="txAdvice" pointcut-ref="txPc" />
    </aop:config>

    <!-- 1.将连接池 -->
    <bean name="dataSource" class="com.mchange.v2.c3p0.ComboPooledDataSource" >
        <property name="jdbcUrl" value="${jdbc.jdbcUrl}" ></property>
        <property name="driverClass" value="${jdbc.driverClass}" ></property>
        <property name="user" value="${jdbc.user}" ></property>
        <property name="password" value="${jdbc.password}" ></property>
    </bean>

    <!-- 2.Dao-->
    <bean name="accountDao" class="Transaction.dao.AccountDaoImpl" >
        <property name="dataSource" ref="dataSource" ></property>
    </bean>
    <!-- 3.Service-->
    <bean name="accountService" class="Transaction.service.AccountServiceImpl" >
        <property name="ad" ref="accountDao" ></property>
        <property name="tt" ref="transactionTemplate" ></property>
    </bean>

</beans>
注解配置(aop)
<?xml version="1.0" encoding="UTF-8"?>
<beans xmlns:xsi="http://www.w3.org/2001/XMLSchema-instance"
       xmlns="http://www.springframework.org/schema/beans"
       xmlns:context="http://www.springframework.org/schema/context"
       xmlns:aop="http://www.springframework.org/schema/aop"
       xmlns:tx="http://www.springframework.org/schema/tx"
       xsi:schemaLocation="http://www.springframework.org/schema/beans http://www.springframework.org/schema/beans/spring-beans-4.2.xsd http://www.springframework.org/schema/context http://www.springframework.org/schema/context/spring-context-4.2.xsd http://www.springframework.org/schema/aop http://www.springframework.org/schema/aop/spring-aop-4.2.xsd http://www.springframework.org/schema/tx http://www.springframework.org/schema/tx/spring-tx-4.2.xsd ">

    <!-- 指定spring读取db.properties配置 -->
    <context:property-placeholder location="classpath:db.properties"  />

    <!-- 事务核心管理器,封装了所有事务操作. 依赖于连接池 -->
    <bean name="transactionManager" class="org.springframework.jdbc.datasource.DataSourceTransactionManager" >
        <property name="dataSource" ref="dataSource" ></property>
    </bean>
    <!-- 事务模板对象 -->
    <bean name="transactionTemplate" class="org.springframework.transaction.support.TransactionTemplate" >
        <property name="transactionManager" ref="transactionManager" ></property>
    </bean>

    <!-- 开启使用注解管理aop事务 -->
    <tx:annotation-driven/>

    <!-- 1.将连接池 -->
    <bean name="dataSource" class="com.mchange.v2.c3p0.ComboPooledDataSource" >
        <property name="jdbcUrl" value="${jdbc.jdbcUrl}" ></property>
        <property name="driverClass" value="${jdbc.driverClass}" ></property>
        <property name="user" value="${jdbc.user}" ></property>
        <property name="password" value="${jdbc.password}" ></property>
    </bean>

    <!-- 2.Dao-->
    <bean name="accountDao" class="Transaction.dao.AccountDaoImpl" >
        <property name="dataSource" ref="dataSource" ></property>
    </bean>
    <!-- 3.Service-->
    <bean name="accountService" class="Transaction.service.AccountServiceImpl" >
        <property name="ad" ref="accountDao" ></property>
        <property name="tt" ref="transactionTemplate" ></property>
    </bean>

</beans>
加入注解:
@Transactional(isolation= Isolation.REPEATABLE_READ,propagation= Propagation.REQUIRED,readOnly=true)
public class AccountServiceImpl implements AccountService {
    private AccountDao ad ;
    private TransactionTemplate tt;

    @Override
    @Transactional(isolation=Isolation.REPEATABLE_READ,propagation=Propagation.REQUIRED,readOnly=false)
    public void transfer(final Integer from,final Integer to,final Double money) {
        //减钱
        ad.decreaseMoney(from, money);
        int i = 1/0;
        //加钱
        ad.increaseMoney(to, money);
    }
    public void setAd(AccountDao ad) {
        this.ad = ad;
    }

    public void setTt(TransactionTemplate tt) {
        this.tt = tt;
    }
}
测试
@RunWith(SpringJUnit4ClassRunner.class)
@ContextConfiguration("classpath:spring-config4.xml")
public class Demo {
    @Resource(name="accountService")
    private AccountService as;
    @Test
    public void fun1(){
        as.transfer(1, 2, 100d);
    }
}
运行结果,由于出错,钱不会转过去:
标签:sele ica persist 持久 dea username this field col
原文地址:https://www.cnblogs.com/wuluogan/p/9943304.html