标签:blog 服务 hand one lis dir man ide 数据库
Mysql服务的搭建
[root@xiaochen ~]# yum -y install mariadb-server.x86_64
[root@xiaochen ~]# cat /etc/my.cnf.d/server.cnf
#
# These groups are read by MariaDB server.
# Use it for options that only the server (but not clients) should see
#
# See the examples of server my.cnf files in /usr/share/mysql/
#
# this is read by the standalone daemon and embedded servers
[server]
# this is only for the mysqld standalone daemon
[mysqld]
# this is only for embedded server
[embedded]
skip_name_resove=NO
innodb_file_per_table=NO
# This group is only read by MariaDB-5.5 servers.
# If you use the same .cnf file for MariaDB of different versions,
# use this group for options that older servers don‘t understand
[mysqld-5.5]
# These two groups are only read by MariaDB servers, not by MySQL.
# If you use the same .cnf file for MySQL and MariaDB,
# you can put MariaDB-only options here
[mariadb]
[mariadb-5.5]
[root@xiaochen ~]# systemctl start mariadb.service
[root@xiaochen ~]# ss -tnl
State Recv-Q Send-Q Local Address:Port Peer Address:Port
LISTEN 0 128 *:22 *:*
LISTEN 0 100 127.0.0.1:25 *:*
LISTEN 0 128 192.168.10.10:9000 *:*
LISTEN 0 50 *:3306 *:*
LISTEN 0 128 :::8080 :::*
LISTEN 0 128 :::80 :::*
LISTEN 0 128 :::22 :::*
LISTEN 0 100 ::1:25
[root@xiaochen ~]# mysql_secure_installation
[root@xiaochen ~]# mysql -uroot -p123456
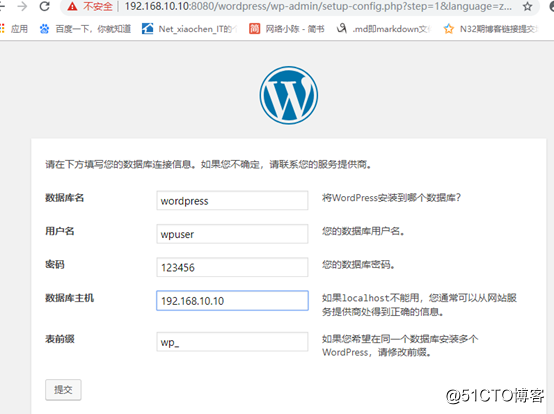
MariaDB [(none)]> create database wordpress;
MariaDB [(none)]> GRANT ALL ON *.* to ‘wordpress‘@‘192.168.10.10‘ IDENTIFIED BY ‘123456‘;
MariaDB [(none)]> GRANT ALL ON wordpress.* TO ‘wpuser‘@‘192.168.10.10‘ IDENTIFIED BY ‘123456‘;
MariaDB [(none)]> FLUSH PRIVILEGES;Php-fpm服务器的搭建
[root@xiaochen ~]# yum install -y php-mysql.x86_64 php-fpm php-mbstring
[root@xiaochen ~]# vi /etc/php-fpm.d/www.conf    #修改相关参数
[root@xiaochen ~]# mkdir -pv /var/lib/php/session
[root@xiaochen ~]# chown apache:apache /var/lib/php/session/
[root@xiaochen ~]# systemctl start php-fpm.service
[root@xiaochen ~]# ss -tnl
State      Recv-Q Send-Q                        Local Address:Port                                       Peer Address:Port
LISTEN     0      128                                       *:22                                                    *:*
LISTEN     0      100                               127.0.0.1:25                                                    *:*
LISTEN     0      128                           192.168.10.10:9000                                                  *:*
LISTEN     0      50                                        *:3306                                                  *:*
LISTEN     0      128                                      :::8080                                                 :::*
LISTEN     0      128                                      :::80                                                   :::*
LISTEN     0      128                                      :::22                                                   :::*
LISTEN     0      100                                     ::1:25
搭建httpd服务
[root@xiaochen ~]# yum -y install httpd
[root@xiaochen ~]# httpd -M | grep fcgi
proxy_fcgi_module (shared)
[root@xiaochen ~]# cat /etc/httpd/conf.d/fcgi.conf
Listen 8080
<VirtualHost *:8080>
        DirectoryIndex index.php
        ServerName www.xiaochen.com
        DocumentRoot /var/www/html
        ProxyRequests off
        ProxyPassMatch ^/(.*\.php)$ fcgi://192.168.10.10:9000/var/www/html/$1
        ProxyPassMatch ^/(ping|pmstatus)$ fcgi://192.168.10.10:9000/$1
        <Directory "/var/www/html">
               options none
               Allowoverride None
               Require all granted
        </Directory>
</VirtualHost>
创建测试文件
[root@xiaochen ~]# cat /var/www/html/index.php
<?php
          phpinfo();
?>
[root@xiaochen ~]# cat /var/www/html/mysql.php
<?php
         $conn = mysql_connect(‘192.168.10.10‘,‘wordpress‘,‘123456‘);
         if ($conn)
                 echo "Connected to mysql.";
         else
                 echo "Fail";
?>
测试访问页面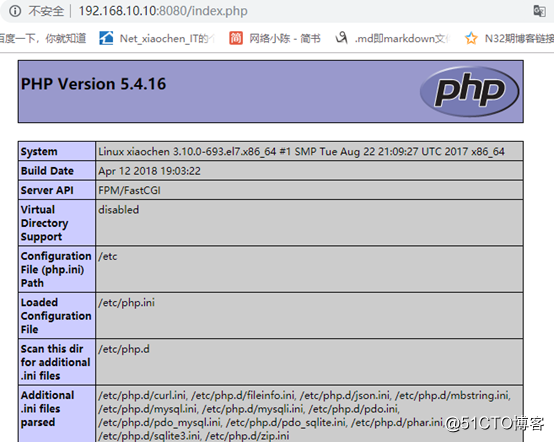
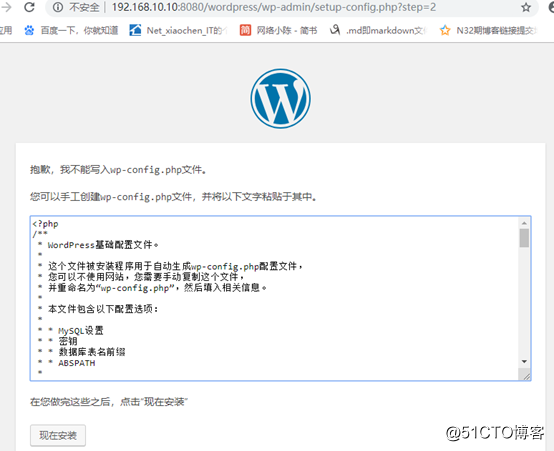
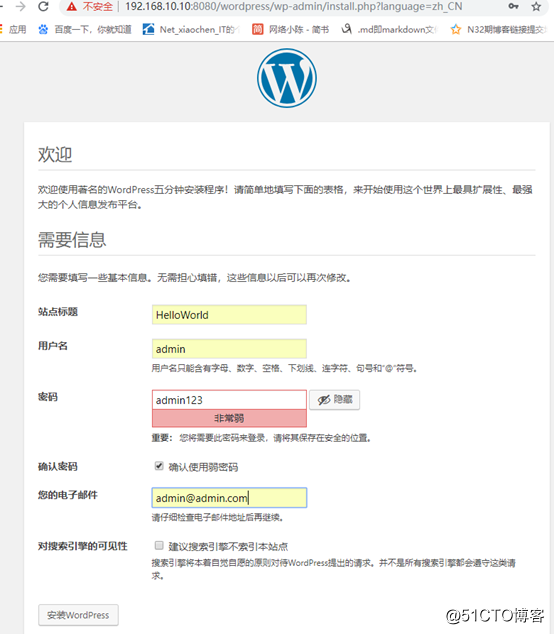
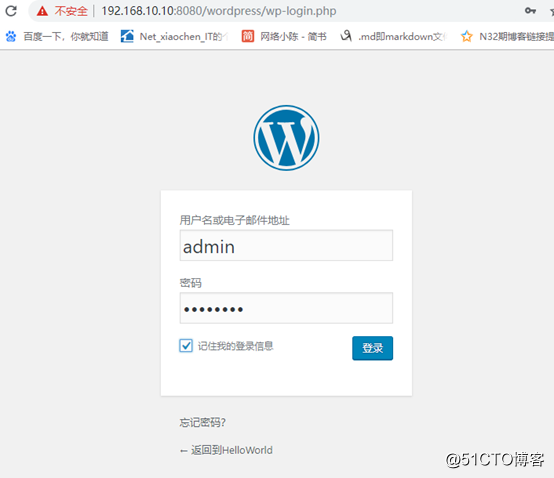
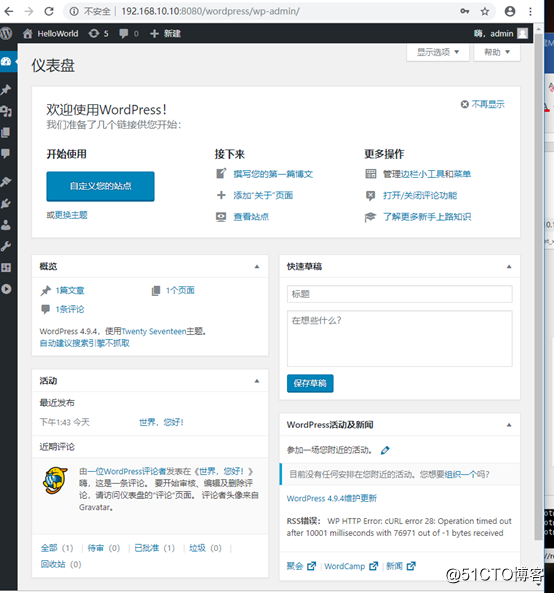
搭建wordpress
[root@xiaochen ~]# unzip wordpress-4.9.4-zh_CN.zip -d /var/www/html/访问页面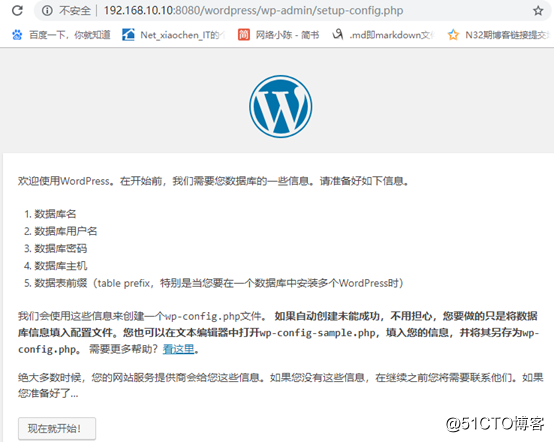
DDL(Data Definition Language)是mysql数据库服务器端命令的一种语言类型,表示数据定义语言,主要用于管理数据库组件,例如数据库,表,索引,视图,用户,存储过程等;常用命令有CREATE,ALTER,DROP等;
MariaDB [(none)]> CREATE DATABASE test;
Query OK, 1 row affected (0.01 sec)

MariaDB [(none)]> use test;
Database changed
MariaDB [test]> CREATE TABLE users (id TINYINT UNSIGNED NOT NULL AUTO_INCREMENT PRIMARY KEY, name VARCHAR(60) NOT NULL);
Query OK, 0 rows affected (0.11 sec)MariaDB [(none)]> show databases;
+--------------------+
| Database |
+--------------------+
| information_schema |
| mysql |
| performance_schema |
| test |
| wordpress |
+--------------------+
5 rows in set (0.00 sec)
MariaDB [wordpress]> show tables;
+-----------------------+
| Tables_in_wordpress |
+-----------------------+
| wp_commentmeta |
| wp_comments |
| wp_links |
| wp_options |
| wp_postmeta |
| wp_posts |
| wp_term_relationships |
| wp_term_taxonomy |
| wp_termmeta |
| wp_terms |
| wp_usermeta |
| wp_users |
+-----------------------+
12 rows in set (0.00 sec)MariaDB [(none)]> ALTER DATABASE test CHARACTER SET ‘utf8‘;
Query OK, 1 row affected (0.00 sec)
MariaDB [test]> DESC users;
+-------+---------------------+------+-----+---------+----------------+
| Field | Type | Null | Key | Default | Extra |
+-------+---------------------+------+-----+---------+----------------+
| id | tinyint(3) unsigned | NO | PRI | NULL | auto_increment |
| name | varchar(60) | NO | | NULL | |
+-------+---------------------+------+-----+---------+----------------+
2 rows in set (0.00 sec)DROP(删除)
DROP DATABASE 删除数据库
DROP TABLE 删除表
DROP USER 删除用户
MariaDB [(none)]> DROP DATABASE test;
Query OK, 1 row affected (0.01 sec)
MariaDB [(none)]> show databases;
+--------------------+
| Database           |
+--------------------+
| information_schema |
| mysql              |
| performance_schema |
| wordpress          |
+--------------------+
4 rows in set (0.00 sec)
DML(Data Manipulation Language)是mysql数据库服务器端命令的一种语言类型,表示数据操纵语言,主要用于管理表中的数据,实现数据的增删改查等功能,常用命令有INSERT,DELETE,UPDATE,SELECT等;
MariaDB [TEST]> INSERT INTO tbl1(name,gender) VALUES(‘xiaohua‘,‘M‘),(‘Ding Dian‘,‘F‘);
Query OK, 2 rows affected (0.01 sec)
Records: 2  Duplicates: 0  Warnings: 0

MariaDB [TEST]> select * from tbl1;
+----+--------+-----------+
| id | gender | name      |
+----+--------+-----------+
|  1 | M      | xiaohua   |
|  2 | F      | Ding Dian |
+----+--------+-----------+
2 rows in set (0.00 sec)MariaDB [TEST]> select * from tbl1;
+----+--------+-----------+
| id | gender | name |
+----+--------+-----------+
| 1 | M | xiaohua |
| 2 | F | Ding Dian |
+----+--------+-----------+
2 rows in set (0.00 sec)MariaDB [TEST]> DELETE FROM tbl1 WHERE id=2
-> ;
Query OK, 1 row affected (0.00 sec)MariaDB [TEST]> UPDATE tbl1 SET gender=‘F‘ WHERE id=3;
Query OK, 1 row affected (0.00 sec)
Rows matched: 1 Changed: 1 Warnings: 0主动模式
数据传输连接由服务器主动创建,客户端先随机一个端口N,用这端口连接服务器的21端口来完成命令的连接的建立,之后服务器以TCP的20端口主动连接客户端的N+1端口来进行数据传输连接,如下图所示: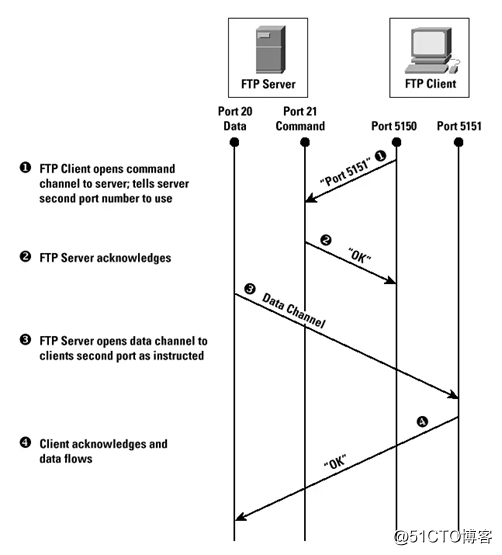
被动模式:
数据传输连接由客户端的某个随机端口去连接服务器的某个端口,命令连接的方式与主动连接方式一致,完成连接之后服务器会告诉客户端连接的端口M,于是客户端的N+1端口连接服务器的M端口来进行数据传输的连接,如下图所示:
Pam认证配置:
[root@xiaochen ~]# yum -y install vsftpd
[root@xiaochen ~]# rpm -ql pam | grep so
/etc/security/console.apps
/etc/security/console.handlers
/etc/security/console.perms
/etc/security/console.perms.d
/usr/lib64/libpam.so.0
/usr/lib64/libpam.so.0.83.1
/usr/lib64/libpam_misc.so.0
/usr/lib64/libpam_misc.so.0.82.0
/usr/lib64/libpamc.so.0
/usr/lib64/libpamc.so.0.82.1
/usr/lib64/security/pam_access.so
/usr/lib64/security/pam_chroot.so
/usr/lib64/security/pam_console.so
/usr/lib64/security/pam_cracklib.so
/usr/lib64/security/pam_debug.so
/usr/lib64/security/pam_deny.so
/usr/lib64/security/pam_echo.so
/usr/lib64/security/pam_env.so
/usr/lib64/security/pam_exec.so
/usr/lib64/security/pam_faildelay.so
/usr/lib64/security/pam_faillock.so
/usr/lib64/security/pam_filter.so
/usr/lib64/security/pam_ftp.so
/usr/lib64/security/pam_group.so
/usr/lib64/security/pam_issue.so
/usr/lib64/security/pam_keyinit.so
/usr/lib64/security/pam_lastlog.so
/usr/lib64/security/pam_limits.so
/usr/lib64/security/pam_listfile.so
/usr/lib64/security/pam_localuser.so
/usr/lib64/security/pam_loginuid.so
/usr/lib64/security/pam_mail.so
/usr/lib64/security/pam_mkhomedir.so
/usr/lib64/security/pam_motd.so
/usr/lib64/security/pam_namespace.so
/usr/lib64/security/pam_nologin.so
/usr/lib64/security/pam_permit.so
/usr/lib64/security/pam_postgresok.so
/usr/lib64/security/pam_pwhistory.so
/usr/lib64/security/pam_rhosts.so
/usr/lib64/security/pam_rootok.so
/usr/lib64/security/pam_securetty.so
/usr/lib64/security/pam_selinux.so
/usr/lib64/security/pam_selinux_permit.so
/usr/lib64/security/pam_sepermit.so
/usr/lib64/security/pam_shells.so
/usr/lib64/security/pam_stress.so
/usr/lib64/security/pam_succeed_if.so
/usr/lib64/security/pam_tally2.so
/usr/lib64/security/pam_time.so
/usr/lib64/security/pam_timestamp.so
/usr/lib64/security/pam_tty_audit.so
/usr/lib64/security/pam_umask.so
/usr/lib64/security/pam_unix.so
/usr/lib64/security/pam_unix_acct.so
/usr/lib64/security/pam_unix_auth.so
/usr/lib64/security/pam_unix_passwd.so
/usr/lib64/security/pam_unix_session.so
/usr/lib64/security/pam_userdb.so
/usr/lib64/security/pam_warn.so
/usr/lib64/security/pam_wheel.so
/usr/lib64/security/pam_xauth.so
/usr/sbin/pam_console_apply
/usr/share/doc/pam-1.1.8/html/sag-see-also.html
/usr/share/doc/pam-1.1.8/txts/README.pam_console
/usr/share/doc/pam-1.1.8/txts/README.pam_postgresok
/usr/share/man/man5/console.apps.5.gz
/usr/share/man/man5/console.handlers.5.gz
/usr/share/man/man5/console.perms.5.gz
/usr/share/man/man8/pam_console.8.gz
/usr/share/man/man8/pam_console_apply.8.gz
/usr/share/man/man8/pam_postgresok.8.gz
/var/run/console
[root@xiaochen ~]# ls /etc/pam.d/
chfn         fingerprint-auth     passwd            postlogin     runuser-l          smtp.postfix  sudo-i          systemd-user
chsh         fingerprint-auth-ac  password-auth     postlogin-ac  smartcard-auth     sshd          su-l            vlock
config-util  login                password-auth-ac  remote        smartcard-auth-ac  su            system-auth     vmtoolsd
crond        other                polkit-1          runuser       smtp               sudo          system-auth-ac  vsftpd
[root@xiaochen ~]# vi /etc/vsftpd/vuser.list
magedu1
123456
magedu2
987654
[root@xiaochen ~]# db_load -T -t hash -f /etc/vsftpd/vuser.list /etc/vsftpd/vuser.list.db
[root@xiaochen ~]# chmod 600 /etc/vsftpd/vuser.*
[root@xiaochen ~]# ll /etc/vsftpd/vuser.*
-rw-------. 1 root root    30 Dec  4 13:08 /etc/vsftpd/vuser.list
-rw-------. 1 root root 12288 Dec  4 13:09 /etc/vsftpd/vuser.list.db
[root@xiaochen ~]# mkdir /var/ftproot
[root@xiaochen ~]# useradd -d /var/ftproot/ -s /sbin/nologin virtual
useradd: warning: the home directory already exists.
Not copying any file from skel directory into it.
[root@xiaochen ~]# chmod 755 /var/ftproot/
[root@xiaochen ~]# vi /etc/pam.d/vsftpd
#%PAM-1.0
session    optional     pam_keyinit.so    force revoke
auth       required pam_listfile.so item=user sense=deny file=/etc/vsftpd/ftpusers onerr=succeed
auth       required pam_shells.so
auth       include  password-auth
account    include  password-auth
session    required     pam_loginuid.so
session    include  password-auth
auth       required     pam_userdb.so db=/etc/vsftpd/vuser
account    required     pam_userdb.so db=/etc/vsftpd/vuser
[root@xiaochen ~]# vi /etc/vsftpd/vsftpd.conf
anonymous_enable=NO
pam_service_name=vsftpd
userlist_enable=YES
tcp_wrappers=YES
guest_enable=YES
guest_username=virtual
pam_service_name=vsftpd
virtual_use_local_privs=YES
user_config_dir=/etc/vsftpd/vusers_dir
tcp_wrappers=YES
[root@xiaochen ~]# mkdir /etc/vsftpd/vusers_dir
[root@xiaochen ~]# cd /etc/vsftpd/vusers_dir
[root@xiaochen vusers_dir]# touch magedu1 magedu2
[root@xiaochen vusers_dir]# vi magedu2
anon_upload_enable=YES
anon_mkdir_enable=YES
[root@xiaochen vusers_dir]# systemctl restart vsftpd
[root@xiaochen vusers_dir]# vi /etc/sysconfig/selinux
[root@xiaochen vusers_dir]# setenforce 0
[root@xiaochen vusers_dir]# getenforce
Permissive
[root@xiaochen vusers_dir]# systemctl stop firewalld
##最后测试
[root@localhost ~]# lftp -u virtual 192.168.10.10
Password:
lftp virtual@192.168.10.10:~> NFS (Network File System)即网络文件系统,它允许网络中的计算机通过TCP/IP网络共享资源。在NFS中,客户端可以透明读写服务器端上的文件,就像访问本地文件一样,通过挂载的方式将服务器的文件挂载到本地,如同本地磁盘一样。
下图是NFS工作原理图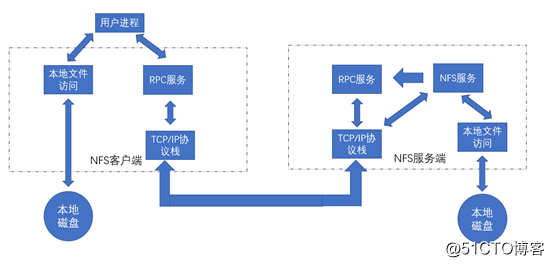
NFS服务的配置:
服务器端:
[root@xiaochen ~]# yum -y install nfs-utils.x86_64
[root@xiaochen ~]# yum -y install rpcbind
[root@xiaochen ~]# mkdir /tmp/test
[root@xiaochen ~]# vi /etc/exports
/tmp/test 192.168.10.20(rw,sync,no_root_squash) ##192.168.10.20是客户端地址
[root@xiaochen ~]# systemctl start nfs rpcbind
[root@xiaochen ~]# systemctl status nfs rpcbind
● nfs-server.service - NFS server and services
   Loaded: loaded (/usr/lib/systemd/system/nfs-server.service; disabled; vendor preset: disabled)
   Active: active (exited) since Tue 2018-12-04 13:49:34 CST; 8s ago
  Process: 4388 ExecStartPost=/bin/sh -c if systemctl -q is-active gssproxy; then systemctl restart gssproxy ; fi (code=exited, status=0/SUCCESS)
  Process: 4371 ExecStart=/usr/sbin/rpc.nfsd $RPCNFSDARGS (code=exited, status=0/SUCCESS)
  Process: 4370 ExecStartPre=/usr/sbin/exportfs -r (code=exited, status=0/SUCCESS)
 Main PID: 4371 (code=exited, status=0/SUCCESS)
   CGroup: /system.slice/nfs-server.service

Dec 04 13:49:34 xiaochen systemd[1]: Starting NFS server and services...
Dec 04 13:49:34 xiaochen systemd[1]: Started NFS server and services.

● rpcbind.service - RPC bind service
   Loaded: loaded (/usr/lib/systemd/system/rpcbind.service; enabled; vendor preset: enabled)
   Active: active (running) since Tue 2018-12-04 13:49:33 CST; 9s ago
  Process: 4340 ExecStart=/sbin/rpcbind -w $RPCBIND_ARGS (code=exited, status=0/SUCCESS)
 Main PID: 4344 (rpcbind)
   CGroup: /system.slice/rpcbind.service
           └─4344 /sbin/rpcbind -w

Dec 04 13:49:33 xiaochen systemd[1]: Starting RPC bind service...
Dec 04 13:49:33 xiaochen systemd[1]: Started RPC bind service.
客户端:
[root@localhost ~]# showmount -e 192.168.10.10
Export list for 192.168.10.10:
/tmp/test 192.168.10.20
[root@localhost ~]# mkdir /tmp/test
[root@localhost ~]# mount -t nfs 192.168.10.10:/tmp/test /tmp/test
[root@localhost ~]# mount
sysfs on /sys type sysfs (rw,nosuid,nodev,noexec,relatime,seclabel)
proc on /proc type proc (rw,nosuid,nodev,noexec,relatime)
devtmpfs on /dev type devtmpfs (rw,nosuid,seclabel,size=490476k,nr_inodes=122619,mode=755)
securityfs on /sys/kernel/security type securityfs (rw,nosuid,nodev,noexec,relatime)
tmpfs on /dev/shm type tmpfs (rw,nosuid,nodev,seclabel)
devpts on /dev/pts type devpts (rw,nosuid,noexec,relatime,seclabel,gid=5,mode=620,ptmxmode=000)
tmpfs on /run type tmpfs (rw,nosuid,nodev,seclabel,mode=755)
tmpfs on /sys/fs/cgroup type tmpfs (ro,nosuid,nodev,noexec,seclabel,mode=755)
cgroup on /sys/fs/cgroup/systemd type cgroup (rw,nosuid,nodev,noexec,relatime,xattr,release_agent=/usr/lib/systemd/systemd-cgroups-agent,name=systemd)
pstore on /sys/fs/pstore type pstore (rw,nosuid,nodev,noexec,relatime)
cgroup on /sys/fs/cgroup/perf_event type cgroup (rw,nosuid,nodev,noexec,relatime,perf_event)
cgroup on /sys/fs/cgroup/cpu,cpuacct type cgroup (rw,nosuid,nodev,noexec,relatime,cpuacct,cpu)
cgroup on /sys/fs/cgroup/net_cls type cgroup (rw,nosuid,nodev,noexec,relatime,net_cls)
cgroup on /sys/fs/cgroup/cpuset type cgroup (rw,nosuid,nodev,noexec,relatime,cpuset)
cgroup on /sys/fs/cgroup/freezer type cgroup (rw,nosuid,nodev,noexec,relatime,freezer)
cgroup on /sys/fs/cgroup/devices type cgroup (rw,nosuid,nodev,noexec,relatime,devices)
cgroup on /sys/fs/cgroup/blkio type cgroup (rw,nosuid,nodev,noexec,relatime,blkio)
cgroup on /sys/fs/cgroup/hugetlb type cgroup (rw,nosuid,nodev,noexec,relatime,hugetlb)
cgroup on /sys/fs/cgroup/memory type cgroup (rw,nosuid,nodev,noexec,relatime,memory)
configfs on /sys/kernel/config type configfs (rw,relatime)
/dev/mapper/centos-root on / type xfs (rw,relatime,seclabel,attr2,inode64,noquota)
selinuxfs on /sys/fs/selinux type selinuxfs (rw,relatime)
mqueue on /dev/mqueue type mqueue (rw,relatime,seclabel)
hugetlbfs on /dev/hugepages type hugetlbfs (rw,relatime,seclabel)
debugfs on /sys/kernel/debug type debugfs (rw,relatime)
/dev/sda1 on /boot type xfs (rw,relatime,seclabel,attr2,inode64,noquota)
tmpfs on /run/user/0 type tmpfs (rw,nosuid,nodev,relatime,seclabel,size=100136k,mode=700)
systemd-1 on /proc/sys/fs/binfmt_misc type autofs (rw,relatime,fd=29,pgrp=1,timeout=0,minproto=5,maxproto=5,direct)
192.168.10.10:/tmp/test on /tmp/test type nfs4 (rw,relatime,vers=4.1,rsize=262144,wsize=262144,namlen=255,hard,proto=tcp,port=0,timeo=600,retrans=2,sec=sys,clientaddr=192.168.10.20,local_lock=none,addr=192.168.10.10)
[root@localhost ~]# cd /tmp/test
[root@localhost test]# ls
[root@localhost test]# vi nfs.txt
this is a client nfs file
##在服务器端进行验证
[root@xiaochen ~]# cd /tmp/test/
[root@xiaochen test]# ls
nfs.txt
[root@xiaochen test]# cat nfs.txt
this is a client nfs fileSMB(Server Messages Block)即服务信息块,是一种在局域网上共享文件和打印机的一种通信协议,它为局域网内的不同计算机之间提供文件及打印机等资源的共享服务。SMB协议是客户机/服务器型协议,客户机通过该协议可以访问服务器上的共享文件系统、打印机及其他资源,例如在window和linux,windows和unix之间,可以使用samba服务器来解决二者传输问题
Samba 配置
[root@xiaochen ~]# yum -y install samba
[root@xiaochen ~]# vi /etc/samba/smb.conf
[homes]
comment = samba test dir
path = /tmp/sambatest
writeable = Yes
create mask = 0600
public = Yes
browseable = No
[root@xiaochen ~]# systemctl stop firewalld
[root@xiaochen ~]# systemctl disable firewalld
Removed symlink /etc/systemd/system/multi-user.target.wants/firewalld.service.
Removed symlink /etc/systemd/system/dbus-org.fedoraproject.FirewallD1.service.
[root@xiaochen ~]# vi /etc/sysconfig/selinux
# This file controls the state of SELinux on the system.
# SELINUX= can take one of these three values:
# enforcing - SELinux security policy is enforced.
# permissive - SELinux prints warnings instead of enforcing.
# disabled - No SELinux policy is loaded.
SELINUX=disabled
# SELINUXTYPE= can take one of three two values:
# targeted - Targeted processes are protected,
# minimum - Modification of targeted policy. Only selected processes are protected.
# mls - Multi Level Security protection.
SELINUXTYPE=targeted
[root@xiaochen ~]# setenforce 0
[root@xiaochen ~]# mkdir /tmp/sambatest
[root@xiaochen ~]# useradd smbtest
[root@xiaochen ~]# smbpasswd -a smbtest
New SMB password:
Retype new SMB password:
[root@xiaochen ~]# groupadd samba
[root@xiaochen ~]# gpasswd -a smbtest samba
Adding user smbtest to group samba
[root@xiaochen ~]# chown :samba /tmp/sambatest/
[root@xiaochen ~]# chmod g+w /tmp/sambatest/
[root@xiaochen ~]# ll -d /tmp/sambatest/
drwxrwxr-x. 2 root samba 6 Dec 4 23:06 /tmp/sambatest/
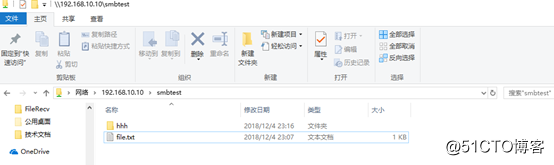
[root@xiaochen ~]# systemctl start smb nmb最后Windows访问: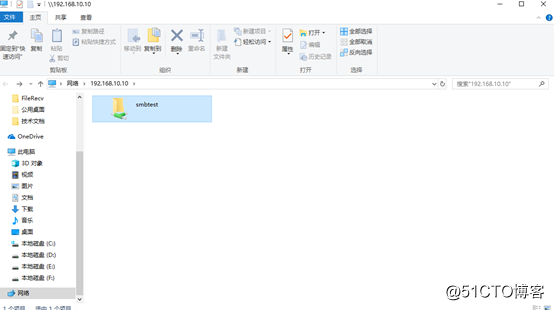
Linux中LAMP实现、SQL语句及FTP与Samba服务配置
标签:blog 服务 hand one lis dir man ide 数据库
原文地址:http://blog.51cto.com/13929964/2326228