标签:close nfa att setattr tps wrap 意思 自己的 ext
<!-- Spring Config -->
<listener>
  <listener-class>org.springframework.web.context.ContextLoaderListener</listener-class>
</listener>
<context-param>
  <param-name>contextConfigLocation</param-name>
  <param-value>classpath:spring/spring-config.xml</param-value>
</context-param>

<!-- SpringMvc Config -->
<servlet>
  <servlet-name>springMvc</servlet-name>
  <servlet-class>org.springframework.web.servlet.DispatcherServlet</servlet-class>
  <init-param>
    <param-name>contextConfigLocation</param-name>
    <param-value>classpath:spring/spring-mvc.xml</param-value>
  </init-param>
  <load-on-startup>1</load-on-startup>
</servlet>
<servlet-mapping>
  <servlet-name>springMvc</servlet-name>
  <url-pattern>/*</url-pattern>
</servlet-mapping>从 Spring 配置部分可以看出,ContextLoaderListener 监听器是 Spring 容器的入口,进入该文件
public class ContextLoaderListener extends ContextLoader implements ServletContextListener {
    public ContextLoaderListener() {
    }
    public ContextLoaderListener(WebApplicationContext context) {
        super(context);
    }
    @Override
    public void contextInitialized(ServletContextEvent event) {
        initWebApplicationContext(event.getServletContext());
    }
    @Override
    public void contextDestroyed(ServletContextEvent event) {
        closeWebApplicationContext(event.getServletContext());
        ContextCleanupListener.cleanupAttributes(event.getServletContext());
    }
}
ContextLoaderListener 监听器一共有四个方法,可以很容易地判断出来,进入该监听器后,会进入初始化方法:contextInitialized。继而进入 initWebApplicationContext 方法,方法注释中 “Initialize Spring’s web application context for the given servlet context”,明确表明了该方法的目的是初始化 Spring Web 应用。这段代码中有两句话比较关键:
// 创建 Web 应用容器,即创建了 Spring 容器;
this.context = createWebApplicationContext(servletContext);

// 配置并刷新Spring容器。后续发生的所有事,都是从它开始的。进入,里面的重点代码是:
configureAndRefreshWebApplicationContext(cwac, servletContext);
wac.refresh();
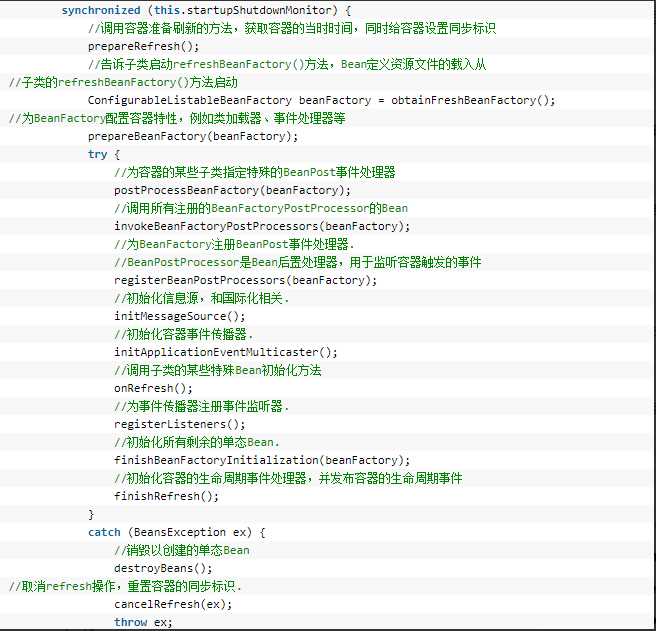
refresh() 方法是spring容器注入bean的核心方法,每一行代码都很重要。这里也是真正加载spring-*.xml配置的开始的地方
获取 Bean 工厂,把你配置文件中的内容,放在 Bean 工厂中,留着后面创建 Bean 时用。
开始创建 Bean,即实现 Spring 中的自动注入功能。进入该方法后,末尾有这么一句话:
beanFactory.preInstantiateSingletons();继续跟进,贴出该方法中的重点代码:
getBean(beanName);我们在 preInstantiateSingletons() 方法中,会发现有多个地方出现了 getBean() 方法,究竟咱们贴出来的是哪一句?无关紧要。跟进去之后,
@Override
public Object getBean(String name) throws BeansException {
    return doGetBean(name, null, null, false);
}
这里调用了 doGetBean() 方法,Spring 中只要以 do 命名的方法,都是真正干活的。重点代码分段贴出分析:
// Eagerly check singleton cache for manually registered singletons.
Object sharedInstance = getSingleton(beanName);
if (sharedInstance != null && args == null) {
    if (logger.isDebugEnabled()) {
        if (isSingletonCurrentlyInCreation(beanName)) {
            logger.debug("Returning eagerly cached instance of singleton bean '" + beanName +
                    "' that is not fully initialized yet - a consequence of a circular reference");
        }
        else {
            logger.debug("Returning cached instance of singleton bean '" + beanName + "'");
        }
    }
    bean = getObjectForBeanInstance(sharedInstance, name, beanName, null);
}
直接获取单例 Bean,若没有取到,继续往下走:
// Check if bean definition exists in this factory.
BeanFactory parentBeanFactory = getParentBeanFactory();
if (parentBeanFactory != null && !containsBeanDefinition(beanName)) {
    // Not found -> check parent.
    String nameToLookup = originalBeanName(name);
    if (args != null) {
        // Delegation to parent with explicit args.
        return (T) parentBeanFactory.getBean(nameToLookup, args);
    }
    else {
        // No args -> delegate to standard getBean method.
        return parentBeanFactory.getBean(nameToLookup, requiredType);
    }
}

// 这一段代码单独看,不知所云,里面提到了一个词:Parent。暂且跳过,后续会回来分析这一段。继续:
// Create bean instance.
if (mbd.isSingleton()) {
       sharedInstance = getSingleton(beanName, new ObjectFactory<Object>() {
            @Override
             public Object getObject() throws BeansException {
                 try {
                     return createBean(beanName, mbd, args);
                  }
                  catch (BeansException ex) {
                      // Explicitly remove instance from singleton cache: It might have been put there
                      // eagerly by the creation process, to allow for circular reference resolution.
                      // Also remove any beans that received a temporary reference to the bean.
                      destroySingleton(beanName);
                      throw ex;
                 }
                }
         });
        bean = getObjectForBeanInstance(sharedInstance, name, beanName, mbd);
}
这段代码中有 createBean,咱们的目的是分析 Bean 的创建过程,此处出现了 create,毫不犹豫地跟进,进入实现类中的方法,有这么一句:
Object beanInstance = doCreateBean(beanName, mbdToUse, args);
刚才咱们提了,Spring 中有 do 命名的方法,是真正干活的。跟进:
instanceWrapper = createBeanInstance(beanName, mbd, args);这句话是初始化 Bean,即创建了 Bean,等价于调用了一个类的空构造方法。此时,已经成功地创建了对象,下文需要做的是,给该对象注入需要的属性;
populateBean(beanName, mbd, instanceWrapper);填充 Bean 属性,就是刚才咱们提的,初始化一个对象后,只是一个空对象,需要给它填充属性。跟进,看 Spring 是如何为对象注入属性的,或者说,看一下 Spring 是如何实现 Bean 属性的自动注入:
pvs = ibp.postProcessPropertyValues(pvs, filteredPds, bw.getWrappedInstance(), beanName);继续进入 AutowiredAnnotationBeanPostProcessor 的 postProcessPropertyValues 方法:
metadata.inject(bean, beanName, pvs);这句话中,出现了 inject,这个词的意思是“注入”。咱们可以断定,Spring 的自动注入,八成跟它有关了。进入该方法:
element.inject(target, beanName, pvs); 与上一句一样,只是做了一些参数处理,并没有开始注入。继续跟进看:InjectionMetadata类
Field field = (Field) this.member;
ReflectionUtils.makeAccessible(field);
field.set(target, getResourceToInject(target, requestingBeanName));
看到这里,大概明白了 Spring 是如何自动注入了。Java 反射相关的代码,通过反射的方式给 field 赋值。这里的 field 是 Bean 中的某一个属性
getResourceToInject,获取需要赋予的值了,其实这里会重新进入 getBean 方法,获取 Bean 值(例如 UserController 对象中需要注入 userService。),然后赋予 field。至此,Spring容器已经初始化完成,Spring Bean注入的大概流程
回到开始初始化 Spring 容器的地方,ContextLoader 类 initWebApplicationContext 方法,
servletContext.setAttribute(WebApplicationContext.ROOT_WEB_APPLICATION_CONTEXT_ATTRIBUTE, this.context);初始化 Spring 容器之后,将其放入了 servletContext 中。
从 web.xml 中的 SpringMVC 配置出发,里面有 DispatcherServlet,这是 SpringMVC 的入口.
DispatcherServlet 本质上是一个 Servlet.看一下 Servlet 的接口
public interface Servlet {
    public void init(ServletConfig config) throws ServletException;
    public ServletConfig getServletConfig();
    public void service(ServletRequest req, ServletResponse res)
            throws ServletException, IOException;
    public String getServletInfo();
    public void destroy();
}
从 Servlet 接口方法中可以看出,Servlet 的入口是 init 方法,层层跟进(一定要根据 DispatcherServlet 继承图跟进),进入到了 FrameworkServlet 的 initServletBean() 方法,进入方法,贴出重点代码:
this.webApplicationContext = this.initWebApplicationContext();字面理解,初始化 SpringMVC Web容器,进入探究:
WebApplicationContext rootContext = WebApplicationContextUtils.getWebApplicationContext(this.getServletContext());前面咱们提到,Spring 容器初始化完成之后,放入了 servletContext 中。这里又从 servletContext 获取到了 Spring 容器;
wac = this.createWebApplicationContext(rootContext);字面理解创建 Web 应用容器,且参数是 Spring 容器。跟进方法:
ConfigurableWebApplicationContext wac = (ConfigurableWebApplicationContext)BeanUtils.instantiateClass(contextClass);创建web应用容器,即咱们所理解的 SpringMVC 容器在此创建了;
wac.setParent(parent);这里是重点,SpringMVC 容器将 Spring 容器设置成了自己的父容器。
configureAndRefreshWebApplicationContext(wac);这个方法刚才在分析 Spring Bean 加载流程时,分析过了。其中有一段,前面说,“暂且跳过,后续会回来分析这一段”。现在开始分析:
在 AbstractBeanFactory 类 doGetBean 方法,有这么一段:
// Check if bean definition exists in this factory.
BeanFactory parentBeanFactory = getParentBeanFactory();
if (parentBeanFactory != null && !containsBeanDefinition(beanName)) {
    // Not found -> check parent.
    String nameToLookup = originalBeanName(name);
    if (args != null) {
            // Delegation to parent with explicit args.
        return (T) parentBeanFactory.getBean(nameToLookup, args);
    }
    else {
        // No args -> delegate to standard getBean method.
        return parentBeanFactory.getBean(nameToLookup, requiredType);
    }
}
这里其实是在获取父容器中的 Bean,若获取到,直接拿到 Bean,这个方法就结束了。
结论:子容器可以使用父容器里的 Bean,反之则不行。
[spring 源码相关解析](https://juejin.im/post/5a3f5b43f265da432e5c37ea)
[spring 源码相关解析](https://juejin.im/user/58fcc0768d6d810058965a06/posts )
https://mp.weixin.qq.com/s/hJX9-lc4q2Uoc3eJNPHFdw
标签:close nfa att setattr tps wrap 意思 自己的 ext
原文地址:https://www.cnblogs.com/zhangjianbin/p/10119152.html