标签:ebean java 模式 util this develop start 编程 规范
Spring架构图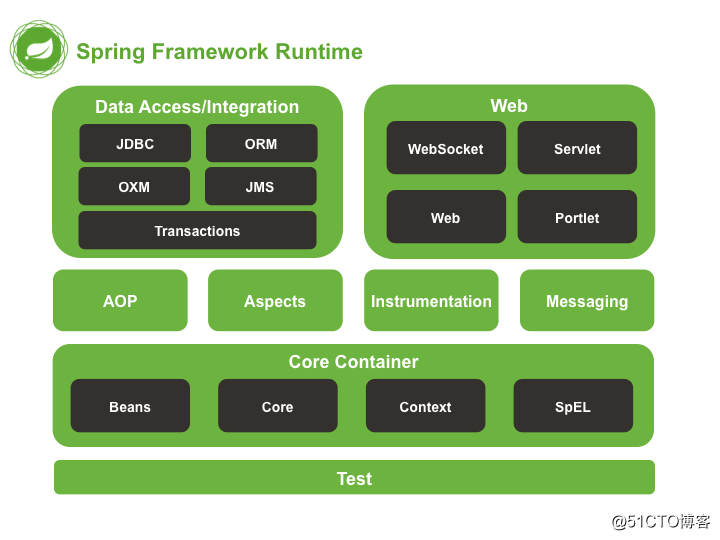
Spring的流行程度就不用我来说了,相信大家如果使用JAVA开发就一定知道它。写这篇文章的初衷在于:
1.了解Spring底层实现原理,提升对Spring的认识与理解。
2.学习优秀框架编程实现,学习优秀的设计模式。
3.使用Spring三年多,对于底层细节希望知道更多,便于求职。
对于Spring整个架构是很庞大的,很难一下看完和思考完,所以我会从Core Container进行切入,一步一步往上走,从而解开Spring神秘的底层面纱。同时对Spring的IOC\AOP\事务管理\DI等经典特性做源码解读,过程中会穿插源码设计模式的讲解以及一些简单的验证demo代码。对于任何阶段想要了解Spring底层原理和设计的JAVA开发或者感兴趣的人都可以看这篇文章。
Spring版本:5.1.3.RELEASE
JDK:jdk1.8.0_181
开发工具:Intellij IDEA 2018.1.6 (UE)
操作系统:Linux mint 19
包管理工具:Maven 3.3.9
核心容器:spring-beans、spring-context、spring-core、Spring-Expression四个组件组成。如下图: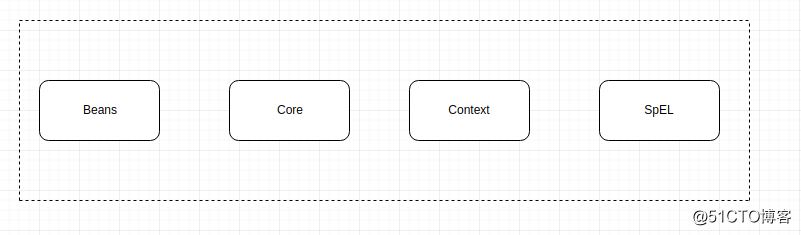
在介绍这四个组件之前,我们先来写一个简单的demo,通过xml配置bean,然后测试获取一个bean的demo。
员工类:
package com.ckmike.beans;

/**
 * Person 简要描述
 * <p> TODO:描述该类职责 </p>
 *
 * @author ckmike
 * @version 1.0
 * @date 18-12-14 下午5:46
 * @copyright ckmike
 **/
public class Employee {

    private int id;
    private String name;
    private int age;
    private String address;
    private String description;

    public Person() {
        this.id = 1;
        this.name = "ckmike";
        this.age = 18;
        this.address = "深圳";
        this.description = "Java developer";
    }

    public void setId(int id) {
        this.id = id;
    }

    public void setName(String name) {
        this.name = name;
    }

    public void setAge(int age) {
        this.age = age;
    }

    public void setAddress(String address) {
        this.address = address;
    }

    public void setDescription(String description) {
        this.description = description;
    }

    public int getId() {
        return id;
    }

    public String getName() {
        return name;
    }

    public int getAge() {
        return age;
    }

    public String getAddress() {
        return address;
    }

    public String getDescription() {
        return description;
    }

    @Override
    public String toString() {
        return "Employee{" +
                "id=" + id +
                ", name=‘" + name + ‘\‘‘ +
                ", age=" + age +
                ", address=‘" + address + ‘\‘‘ +
                ", description=‘" + description + ‘\‘‘ +
                ‘}‘;
    }
}
Spring-beans.xml文件配置bean:
<?xml version="1.0" encoding="UTF-8"?>
<beans xmlns="http://www.springframework.org/schema/beans"
       xmlns:xsi="http://www.w3.org/2001/XMLSchema-instance"
       xsi:schemaLocation="http://www.springframework.org/schema/beans http://www.springframework.org/schema/beans/spring-beans.xsd">

    <bean id="employee" name="employee" class="com.ckmike.beans.Employee"></bean>
</beans>
测试代码:
import com.ckmike.beans.Employee;
import org.springframework.context.ApplicationContext;
import org.springframework.context.support.ClassPathXmlApplicationContext;

/**
 * SpringCoreTest 简要描述
 * <p> TODO:描述该类职责 </p>
 *
 * @author ckmike
 * @version 1.0
 * @date 18-12-14 下午5:55
 * @copyright ckmike
 **/
public class SpringCoreTest {

    public static void main(String[] args) {
        ApplicationContext applicationContext = new ClassPathXmlApplicationContext("spring-beans.xml");

        Employee person = (Employee) applicationContext.getBean("employee");

        System.out.println(person.toString());
    }
}
pom.xml文件
<?xml version="1.0" encoding="UTF-8"?>
<project xmlns="http://maven.apache.org/POM/4.0.0"
         xmlns:xsi="http://www.w3.org/2001/XMLSchema-instance"
         xsi:schemaLocation="http://maven.apache.org/POM/4.0.0 http://maven.apache.org/xsd/maven-4.0.0.xsd">
    <modelVersion>4.0.0</modelVersion>

    <groupId>Spring-Core-Demo</groupId>
    <artifactId>com.ckmike.springcore.demo</artifactId>
    <version>1.0-SNAPSHOT</version>

    <dependencies>
        <!-- core模块 -->
        <dependency>
            <groupId>org.springframework</groupId>
            <artifactId>spring-core</artifactId>
            <version>5.1.3.RELEASE</version>
        </dependency>
        <!-- Beans模块 -->
        <dependency>
            <groupId>org.springframework</groupId>
            <artifactId>spring-beans</artifactId>
            <version>5.1.3.RELEASE</version>
        </dependency>
        <!-- context模块 -->
        <dependency>
            <groupId>org.springframework</groupId>
            <artifactId>spring-context</artifactId>
            <version>5.1.3.RELEASE</version>
        </dependency>
        <!-- expression模块 -->
        <dependency>
            <groupId>org.springframework</groupId>
            <artifactId>spring-expression</artifactId>
            <version>5.1.3.RELEASE</version>
        </dependency>
    </dependencies>
</project>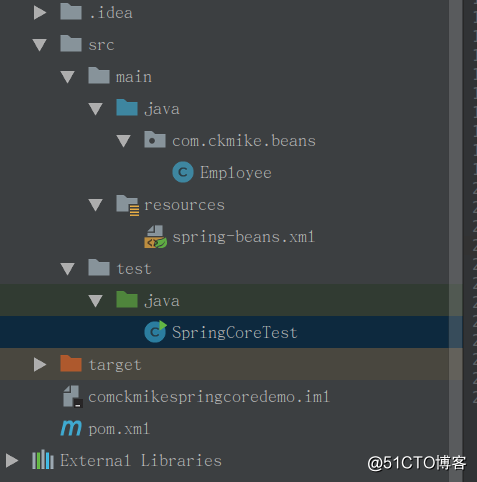

分析:在这个demo里,用到了spring-beans.xml配置bean,使用ClassPathXmlApplicationContext加载spring-beans.xml文件,通过getBean()方法获取Employee实例bean.
package org.springframework.context.support;

import org.springframework.beans.BeansException;
import org.springframework.context.ApplicationContext;
import org.springframework.core.io.ClassPathResource;
import org.springframework.core.io.Resource;
import org.springframework.lang.Nullable;
import org.springframework.util.Assert;

public class ClassPathXmlApplicationContext extends AbstractXmlApplicationContext {

    @Nullable
    private Resource[] configResources;

    public ClassPathXmlApplicationContext() {   }

    public ClassPathXmlApplicationContext(ApplicationContext parent) {
        super(parent);
    }

    public ClassPathXmlApplicationContext(String configLocation) throws BeansException {
        this(new String[] {configLocation}, true, null);
    }

    public ClassPathXmlApplicationContext(String... configLocations) throws BeansException {
        this(configLocations, true, null);
    }

    public ClassPathXmlApplicationContext(String[] configLocations, @Nullable ApplicationContext parent)
            throws BeansException {

        this(configLocations, true, parent);
    }

    public ClassPathXmlApplicationContext(String[] configLocations, boolean refresh) throws BeansException {
        this(configLocations, refresh, null);
    }

    public ClassPathXmlApplicationContext(
            String[] configLocations, boolean refresh, @Nullable ApplicationContext parent)
            throws BeansException {

        super(parent);
        setConfigLocations(configLocations);
        if (refresh) {
            refresh();
        }
    }

    public ClassPathXmlApplicationContext(String path, Class<?> clazz) throws BeansException {
        this(new String[] {path}, clazz);
    }

    public ClassPathXmlApplicationContext(String[] paths, Class<?> clazz) throws BeansException {
        this(paths, clazz, null);
    }

    public ClassPathXmlApplicationContext(String[] paths, Class<?> clazz, @Nullable ApplicationContext parent)
            throws BeansException {

        super(parent);
        Assert.notNull(paths, "Path array must not be null");
        Assert.notNull(clazz, "Class argument must not be null");
        this.configResources = new Resource[paths.length];
        for (int i = 0; i < paths.length; i++) {
            this.configResources[i] = new ClassPathResource(paths[i], clazz);
        }
        refresh();
    }

    @Override
    @Nullable
    protected Resource[] getConfigResources() {
        return this.configResources;
    }
}
我们同时查看下ClassPathXmlApplicationContext的依赖类图: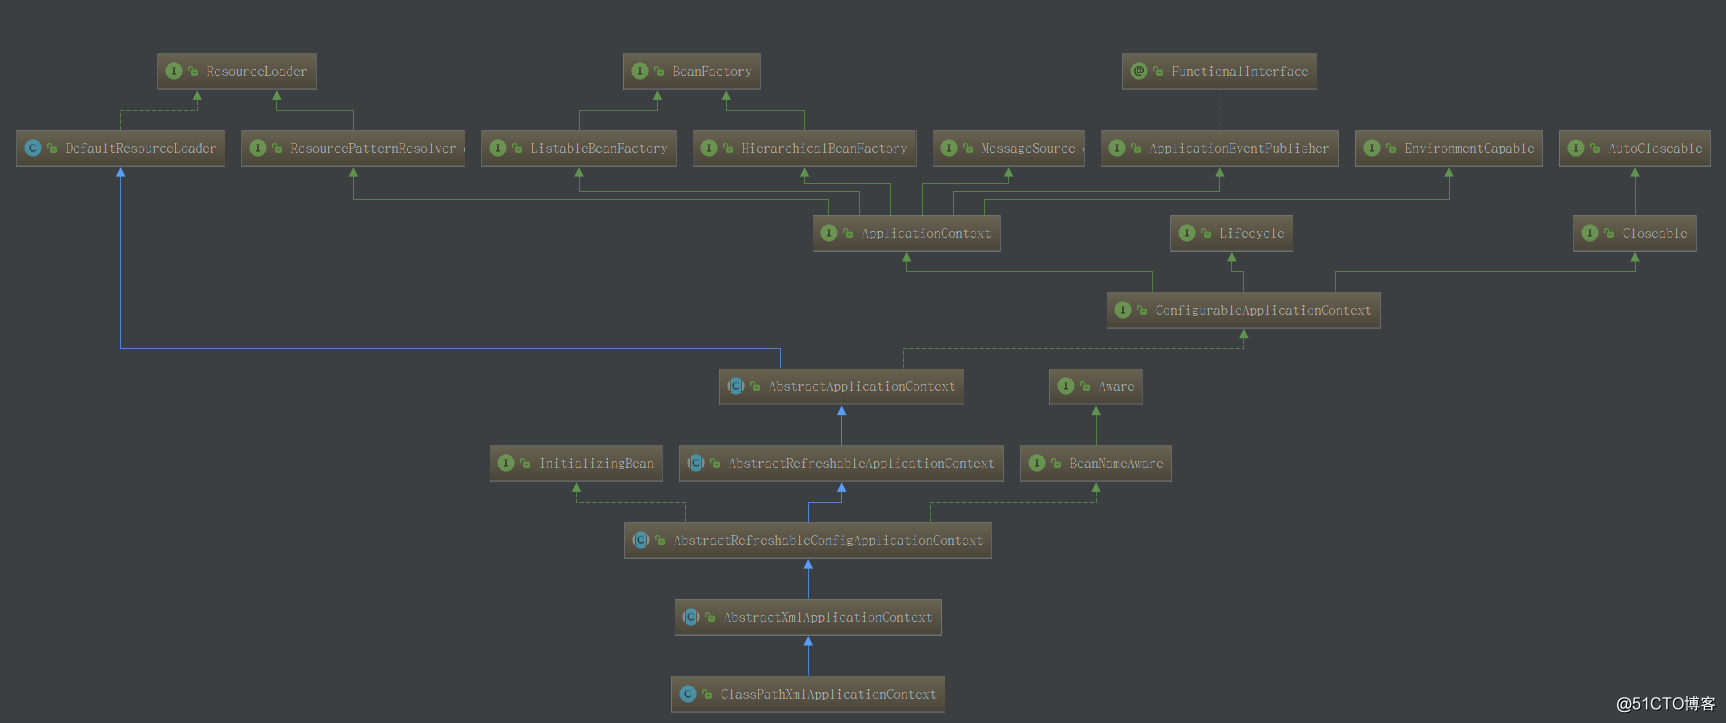
上面的图是不是看着很复杂?看到这里你是不是已经打算放弃了?其实我们可以关注几个点:
1.ResouceLoader接口
2.InitializingBean接口
3.BeanFactory接口
4.ApplicationContext接口
5.LifeCycle接口
6.BeanNameAware接口
7.AbstractRefreshableConfigApplicatonContext类
结合这几个点,我们就可以大致了解整个过程中都做了什么。我们不要想着一次性把所有都看懂,循序渐进是一个很好的方法,毕竟设计者也不是一下就设计好的,所以不要气馁。
package org.springframework.core.io;

import org.springframework.lang.Nullable;

public interface ResourceLoader {
    String CLASSPATH_URL_PREFIX = "classpath:";

    Resource getResource(String var1);

    @Nullable
    ClassLoader getClassLoader();
}
从途中可以知道DefaultResourceLoader实现了这个接口,AbstractApplicationContext继承了DefaultResourceLoader,我们可以继续看DefaultResourceLoader,
AbstractApplicationContext源代码,这里我就不贴出来了,太多。从这里其实我们就很清楚知道,利用这个接口加载从classpath下加载xml文件。
public interface InitializingBean {
    void afterPropertiesSet() throws Exception;
}
从类图我们知道这个接口AbstractRefreshableConfigApplicationContext类实现了,那么我们继续看AbstractRefreshableConfigApplicationContext对这个接口实现: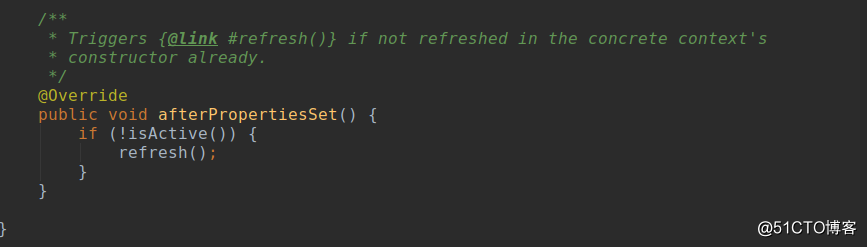
那么我们继续看refresh()方:
@Override
    public void refresh() throws BeansException, IllegalStateException {
        synchronized (this.startupShutdownMonitor) {
            // Prepare this context for refreshing.
            prepareRefresh();

            // Tell the subclass to refresh the internal bean factory.
            ConfigurableListableBeanFactory beanFactory = obtainFreshBeanFactory();

            // Prepare the bean factory for use in this context.
            prepareBeanFactory(beanFactory);

            try {
                // Allows post-processing of the bean factory in context subclasses.
                postProcessBeanFactory(beanFactory);

                // Invoke factory processors registered as beans in the context.
                invokeBeanFactoryPostProcessors(beanFactory);

                // Register bean processors that intercept bean creation.
                registerBeanPostProcessors(beanFactory);

                // Initialize message source for this context.
                initMessageSource();

                // Initialize event multicaster for this context.
                initApplicationEventMulticaster();

                // Initialize other special beans in specific context subclasses.
                onRefresh();

                // Check for listener beans and register them.
                registerListeners();

                // Instantiate all remaining (non-lazy-init) singletons.
                finishBeanFactoryInitialization(beanFactory);

                // Last step: publish corresponding event.
                finishRefresh();
            }

            catch (BeansException ex) {
                if (logger.isWarnEnabled()) {
                    logger.warn("Exception encountered during context initialization - " +
                            "cancelling refresh attempt: " + ex);
                }

                // Destroy already created singletons to avoid dangling resources.
                destroyBeans();

                // Reset ‘active‘ flag.
                cancelRefresh(ex);

                // Propagate exception to caller.
                throw ex;
            }

            finally {
                // Reset common introspection caches in Spring‘s core, since we
                // might not ever need metadata for singleton beans anymore...
                resetCommonCaches();
            }
        }
    }
该方法是在AbstractApplicationContext中,这个类有必要仔细查看一下代码,因代码过多不贴出来。自行查看。
package org.springframework.beans.factory;

import org.springframework.beans.BeansException;
import org.springframework.core.ResolvableType;
import org.springframework.lang.Nullable;

public interface BeanFactory {
    String FACTORY_BEAN_PREFIX = "&";

    Object getBean(String var1) throws BeansException;

    <T> T getBean(String var1, Class<T> var2) throws BeansException;

    Object getBean(String var1, Object... var2) throws BeansException;

    <T> T getBean(Class<T> var1) throws BeansException;

    <T> T getBean(Class<T> var1, Object... var2) throws BeansException;

    <T> ObjectProvider<T> getBeanProvider(Class<T> var1);

    <T> ObjectProvider<T> getBeanProvider(ResolvableType var1);

    boolean containsBean(String var1);

    boolean isSingleton(String var1) throws NoSuchBeanDefinitionException;

    boolean isPrototype(String var1) throws NoSuchBeanDefinitionException;

    boolean isTypeMatch(String var1, ResolvableType var2) throws NoSuchBeanDefinitionException;

    boolean isTypeMatch(String var1, Class<?> var2) throws NoSuchBeanDefinitionException;

    @Nullable
    Class<?> getType(String var1) throws NoSuchBeanDefinitionException;

    String[] getAliases(String var1);
}
BeanFactory接口被AbstractApplicationContext类实现了这个接口类。这个也是我们非常熟悉的工厂模式。建议要重点去看看AbstractApplicationContext类的实现。
 spring-beans和spring-core模块是Spring框架的核心模块,包含了控制反转(Inversion of Control, IoC)和依赖注入(Dependency Injection, DI)。BeanFactory 接口是Spring框架中的核心接口,它是工厂模式的具体实现。BeanFactory 使用控制反转对应用程序的配置和依赖性规范与实际的应用程序代码进行了分离。但 BeanFactory 容器实例化后并不会自动实例化 Bean,只有当 Bean 被使用时 BeanFactory 容器才会对该 Bean 进行实例化与依赖关系的装配。

  spring-context模块构架于核心模块之上,他扩展了BeanFactory,为它添加了Bean生命周期控制、框架事件体系以及资源加载透明化等功能。此外该模块还提供了许多企业级支持,如邮件访问、远程访问、任务调度等,ApplicationContext是该模块的核心接口,她是 BeanFactory 的超类,与 BeanFactory 不同,ApplicationContext 容器实例化后会自动对所有的单例 Bean 进行实例化与依赖关系的装配,使之处于待用状态。

   spring-expression模块是统一表达式语言(unified EL)的扩展模块,可以查询、管理运行中的对象,同时也方便的可以调用对象方法、操作数组、集合等。它的语法类似于传统EL,但提供了额外的功能,最出色的要数函数调用和简单字符串的模板函数。这种语言的特性是基于 Spring 产品的需求而设计,他可以非常方便地同Spring IoC进行交互。
我也是第一阅读Spring源码,有错误的地方希望包含且留言告诉我,我会第一时间改过来,防止误导读者。这一篇内容因为过多,所以我打算分上下两篇写。谢谢阅读。
标签:ebean java 模式 util this develop start 编程 规范
原文地址:http://blog.51cto.com/4837471/2330684