标签:mask vma word pwd mission remote 输入 dwr mys
CPU:

[root@localhost ~]# grep ‘physical id‘ /proc/cpuinfo | sort -u | wc -l
2
[root@localhost ~]# grep ‘core id‘ /proc/cpuinfo | sort -u | wc -l
4
[root@localhost ~]# grep ‘processor‘ /proc/cpuinfo | sort -u | wc -l
16
[root@localhost ~]# dmidecode -s processor-version
Intel(R) Xeon(R) CPU           L5520  @ 2.27GHz
Intel(R) Xeon(R) CPU           L5520  @ 2.27GHz
系统:
[root@localhost ~]# cat /etc/issue
CentOS release 6.8 (Final)
Kernel \r on an \m
内存:
[root@localhost ~]# free -h
             total       used       free     shared    buffers     cached
Mem:           15G        12G       3.1G         4K       185M       2.6G
-/+ buffers/cache:       9.7G       5.9G
Swap:         7.9G        51M       7.8G
硬盘:
[root@localhost ~]# df -h
Filesystem            Size  Used Avail Use% Mounted on
/dev/mapper/VolGroup-lv_root
                       50G  8.7G   38G  19% /
tmpfs                 7.8G     0  7.8G   0% /dev/shm
/dev/sda1             477M   39M  414M   9% /boot
/dev/mapper/VolGroup-lv_home
                      860G  3.8G  812G   1% /home
software:
[root@localhost tomcat8.35]# sh bin/version.sh
Using CATALINA_BASE:   /home/server/tomcat8.35/
Using CATALINA_HOME:   /home/server/tomcat8.35/
Using CATALINA_TMPDIR: /home/server/tomcat8.35/temp
Using JRE_HOME:        /usr
Using CLASSPATH:       /home/server/tomcat8.35/bin/bootstrap.jar:/home/server/tomcat8.35/bin/tomcat-juli.jar
Server version: Apache Tomcat/8.5.35
Server built:   Nov 3 2018 17:39:20 UTC
Server number:  8.5.35.0
OS Name:        Linux
OS Version:     2.6.32-642.el6.x86_64
Architecture:   amd64
JVM Version:    1.8.0_191-b12
JVM Vendor:     Oracle Corporation
[root@localhost ~]# java -version
java version "1.8.0_191"
Java(TM) SE Runtime Environment (build 1.8.0_191-b12)
Java HotSpot(TM) 64-Bit Server VM (build 25.191-b12, mixed mode)
CPU:2核4核心16线程
系统:Centos6.8
内存:16G
硬盘:50G + 860G + 477M
软件:Tomcat8.35 \ JDK1.8.0_191-b12
1)编辑DNS
[root@localhost ~]# vi /etc/resolv.conf
[root@localhost ~]# cat /etc/resolv.conf
#阿里云 DNS
nameserver 223.5.5.5
nameserver 223.6.6.6

#Google DNS
nameserver 8.8.8.8
2)重启网络服务
[root@localhost ~]# service network restart
正在关闭接口 em2:                                         [确定]
关闭环回接口:                                             [确定]
弹出环回接口:                                             [确定]
弹出界面 em2: Determining if ip address 221.235.184.199 is already in use for device em2...
                                                           [确定]
[root@localhost ~]# mv /etc/yum.repos.d/CentOS-Base.repo /etc/yum.repos.d/CentOS-Base.repo.backup
[root@localhost ~]# wget -P /etc/yum.repos.d/ http://mirrors.aliyun.com/repo/Centos-6.repo
[root@localhost ~]# yum makecache
如果无wget命令,则手动编辑。
1)安装并启动
[root@localhost ~]# yum -y install ntp
2)同步时间
[root@localhost ~]# ntpdate time.nuri.net
23 Dec 21:13:45 ntpdate[30444]: adjust time server 211.115.194.21 offset -0.020057 sec
3)增加时间服务器, time.nuri.net
[root@localhost ~]# vi /etc/ntp.conf
[root@localhost ~]# cat /etc/ntp.conf
# For more information about this file, see the man pages
# ntp.conf(5), ntp_acc(5), ntp_auth(5), ntp_clock(5), ntp_misc(5), ntp_mon(5).

driftfile /var/lib/ntp/drift

# Permit time synchronization with our time source, but do not
# permit the source to query or modify the service on this system.
restrict default kod nomodify notrap nopeer noquery
restrict -6 default kod nomodify notrap nopeer noquery

# Permit all access over the loopback interface.  This could
# be tightened as well, but to do so would effect some of
# the administrative functions.
restrict 127.0.0.1
restrict -6 ::1

# Hosts on local network are less restricted.
#restrict 192.168.1.0 mask 255.255.255.0 nomodify notrap

# Use public servers from the pool.ntp.org project.
# Please consider joining the pool (http://www.pool.ntp.org/join.html).
server 0.centos.pool.ntp.org iburst
server 1.centos.pool.ntp.org iburst
server 2.centos.pool.ntp.org iburst
server 3.centos.pool.ntp.org iburst
server time.nuri.net iburst

#broadcast 192.168.1.255 autokey    # broadcast server
#broadcastclient            # broadcast client
#broadcast 224.0.1.1 autokey        # multicast server
#multicastclient 224.0.1.1        # multicast client
#manycastserver 239.255.254.254        # manycast server
#manycastclient 239.255.254.254 autokey # manycast client

# Enable public key cryptography.
#crypto

includefile /etc/ntp/crypto/pw

# Key file containing the keys and key identifiers used when operating
# with symmetric key cryptography.
keys /etc/ntp/keys

# Specify the key identifiers which are trusted.
#trustedkey 4 8 42

# Specify the key identifier to use with the ntpdc utility.
#requestkey 8

# Specify the key identifier to use with the ntpq utility.
#controlkey 8

# Enable writing of statistics records.
#statistics clockstats cryptostats loopstats peerstats
4)设置当前时区为上海
[root@localhost ~]# rm -rf /etc/localtime
[root@localhost ~]# ln -s /usr/share/zoneinfo/Asia/Shanghai /etc/localtime
5)启动ntpd服务
[root@localhost ~]# service ntpd status
ntpd 已停
[root@localhost ~]# service ntpd start
正在启动 ntpd: [确定]
[root@localhost ~]# service ntpd status
ntpd (pid 30317) 正在运行...
[root@loahlhost ~]# chkconfig --level 2345 ntpd on
https://www.cnblogs.com/kerrycode/archive/2015/08/20/4744804.html
https://www.cnblogs.com/flytogalaxy/p/8471675.html
1)临时关闭:
[root@localhost ~]# getenforce
Enforcing
[root@localhost ~]# setenforce 0
[root@localhost ~]# getenforce
Permissive
2)永久关闭:
[root@localhost ~]# vim /etc/sysconfig/selinux
SELINUX=enforcing 改为 SELINUX=disabled
[root@localhost ~]# cat /etc/sysconfig/selinux

# This file controls the state of SELinux on the system.
# SELINUX= can take one of these three values:
#     enforcing - SELinux security policy is enforced.
#     permissive - SELinux prints warnings instead of enforcing.
#     disabled - No SELinux policy is loaded.
SELINUX=disabled
# SELINUXTYPE= can take one of these two values:
#     targeted - Targeted processes are protected,
#     mls - Multi Level Security protection.
SELINUXTYPE=targeted
1)查看当前限制
[root@localhost ~]# ulimit -a
core file size          (blocks, -c) 0
data seg size           (kbytes, -d) unlimited
scheduling priority             (-e) 0
file size               (blocks, -f) unlimited
pending signals                 (-i) 63653
max locked memory       (kbytes, -l) 64
max memory size         (kbytes, -m) unlimited
open files                      (-n) 1024
pipe size            (512 bytes, -p) 8
POSIX message queues     (bytes, -q) 819200
real-time priority              (-r) 0
stack size              (kbytes, -s) 10240
cpu time               (seconds, -t) unlimited
max user processes              (-u) 63653
virtual memory          (kbytes, -v) unlimited
file locks                      (-x) unlimited
2)临时增加系统对当前用户每个进程可以同时打开的最大文件数,可以运行的最大并发进程数( ulimit设置参考 )
[root@localhost ~]# ulimit -n 65535
[root@localhost ~]# ulimit -u 65535
3)永久修改
[root@localhost ~]# vi /etc/security/limits.conf
在文件末尾添加以下内容:
* soft noproc 65535
* hard noproc 65535
* soft nofile 65535
* hard nofile 65535
[root@localhost ~]# cat /etc/security/limits.conf
# /etc/security/limits.conf
#
#Each line describes a limit for a user in the form:
#
#<domain>        <type>  <item>  <value>
#
#Where:
#<domain> can be:
#        - a user name
#        - a group name, with @group syntax
#        - the wildcard *, for default entry
#        - the wildcard %, can be also used with %group syntax,
#                 for maxlogin limit
#
#<type> can have the two values:
#        - "soft" for enforcing the soft limits
#        - "hard" for enforcing hard limits
#
#<item> can be one of the following:
#        - core - limits the core file size (KB)
#        - data - max data size (KB)
#        - fsize - maximum filesize (KB)
#        - memlock - max locked-in-memory address space (KB)
#        - nofile - max number of open file descriptors
#        - rss - max resident set size (KB)
#        - stack - max stack size (KB)
#        - cpu - max CPU time (MIN)
#        - nproc - max number of processes
#        - as - address space limit (KB)
#        - maxlogins - max number of logins for this user
#        - maxsyslogins - max number of logins on the system
#        - priority - the priority to run user process with
#        - locks - max number of file locks the user can hold
#        - sigpending - max number of pending signals
#        - msgqueue - max memory used by POSIX message queues (bytes)
#        - nice - max nice priority allowed to raise to values: [-20, 19]
#        - rtprio - max realtime priority
#
#<domain>      <type>  <item>         <value>
#

#*               soft    core            0
#*               hard    rss             10000
#@student        hard    nproc           20
#@faculty        soft    nproc           20
#@faculty        hard    nproc           50
#ftp             hard    nproc           0
#@student        -       maxlogins       4

* soft noproc 65535
* hard noproc 65535
* soft nofile 65535
* hard nofile 65535

# End of file
4)再次查看当前限制信息
[root@localhost ~]# ulimit -a
core file size          (blocks, -c) 0
data seg size           (kbytes, -d) unlimited
scheduling priority             (-e) 0
file size               (blocks, -f) unlimited
pending signals                 (-i) 63653
max locked memory       (kbytes, -l) 64
max memory size         (kbytes, -m) unlimited
open files                      (-n) 65535
pipe size            (512 bytes, -p) 8
POSIX message queues     (bytes, -q) 819200
real-time priority              (-r) 0
stack size              (kbytes, -s) 10240
cpu time               (seconds, -t) unlimited
max user processes              (-u) 63653
virtual memory          (kbytes, -v) unlimited
file locks                      (-x) unlimited
https://blog.csdn.net/noizz/article/details/2486339
[root@localhost ~]# vi /etc/ssh/sshd_config
ClientAliveInterval 60 #server每隔60秒发送一次请求给client,然后client响应,从而保持连接
ClientAliveCountMax 3 #server发出请求后,客户端没有响应得次数达到3,就自动断开连接,正常情况下,client不会不响应
[root@localhost ~]# service sshd restart
停止 sshd:                                                [确定]
正在启动 sshd:                                            [确定]
[root@localhost ~]# yum install vixie-cron crontab
[root@localhost ~]# chkconfig --level 2345 crond on
[root@localhost ~]# yum install wget zip unzip lrzsz telnet
[root@localhost ~]# wget --no-cookies --no-check-certificate --header "Cookie: gpw_e24=http%3A%2F%2Fwww.oracle.com%2F; oraclelicense=accept-securebackup-cookie" "https://download.oracle.com/otn-pub/java/jdk/8u191-b12/2787e4a523244c269598db4e85c51e0c/jdk-8u191-linux-x64.rpm"
#安装JAVA JDK
[root@localhost ~]# yum install jdk-8u191-linux-x64.rpm
1)下载MySQL
[root@localhost ~]# wget https://dev.mysql.com/get/Downloads/MySQL-5.7/mysql-5.7.24-1.el6.x86_64.rpm-bundle.tar
[root@localhost ~]# tar xvf mysql-5.7.24-1.el6.x86_64.rpm-bundle.tar
[root@localhost ~]# yum install mysql-*.rpm
[root@localhost ~]# vi /etc/my.cnf
2)编辑mysql配置,在[mysqld]下面添加配置
max_connections=1000
wait_timeout=50
sql-mode="STRICT_TRANS_TABLES,NO_AUTO_CREATE_USER,NO_ENGINE_SUBSTITUTION"
[root@localhost ~]# cat /etc/my.cnf

# For advice on how to change settings please see
# http://dev.mysql.com/doc/refman/5.7/en/server-configuration-defaults.html

[mysqld]
#
# Remove leading # and set to the amount of RAM for the most important data
# cache in MySQL. Start at 70% of total RAM for dedicated server, else 10%.
# innodb_buffer_pool_size = 128M
#
# Remove leading # to turn on a very important data integrity option: logging
# changes to the binary log between backups.
# log_bin
#
# Remove leading # to set options mainly useful for reporting servers.
# The server defaults are faster for transactions and fast SELECTs.
# Adjust sizes as needed, experiment to find the optimal values.
# join_buffer_size = 128M
# sort_buffer_size = 2M
# read_rnd_buffer_size = 2M
datadir=/var/lib/mysql
socket=/var/lib/mysql/mysql.sock

#最大链接数
max_connections=1000
wait_timeout=50
sql-mode="STRICT_TRANS_TABLES,NO_AUTO_CREATE_USER,NO_ENGINE_SUBSTITUTION"

#MySQL在完成某些join(连接)需求的时候,为了减少参与join的“被驱动表”的读取次数以提高性能,
#需要使用到join buffer来协助完成join操作,当join buffer 太小,
#MySQL不会将该buffer存入磁盘文件而是先将join buffer中的结果与需求join的表进行操作,
#然后清空join buffer中的数据,继续将剩余的结果集写入次buffer中
join_buffer_size = 512M
tmp_table_size = 128M
tmpdir = /tmp

#该值设置过小将导致单个记录超过限制后写入数据库失败,且后续记录写入也将失败
max_allowed_packet = 100M

innodb_buffer_pool_size=4096M
innodb_log_file_size = 512M
#MySQL读入缓冲区的大小
read_buffer_size = 64M
#MySQL的随机读缓冲区大小
read_rnd_buffer_size = 16M
#MySQL的顺序读缓冲区大小
sort_buffer_size = 16M

#查询缓存
query_cache_size=100M
key_buffer_size=64m
thread_cache_size=64

#开启慢查询日志
slow_query_log = 1
#超出次设定值的SQL即被记录到慢查询日志
long_query_time = 6
slow_query_log_file = /var/log/mysql/slow.log
#表示记录下没有使用索引的查询
log_queries_not_using_indexes = 1

# Disabling symbolic-links is recommended to prevent assorted security risks
symbolic-links=0
log-error=/var/log/mysql/mysqld.log
pid-file=/var/run/mysqld/mysqld.pid
3)启动msyql
[root@localhost ~]# service mysqld start
[root@localhost ~]# chkconfig --level 2345 mysqld on
4)查看msyql root密码
[root@localhost ~]# grep ‘temporary password‘ /var/log/mysqld.log
5)登录mysql
[root@localhost ~]# mysql -uroot -p密码
6)修改密码
mysql> ALTER USER ‘root‘@‘localhost‘ IDENTIFIED BY ‘新密码‘;
7)编辑防火墙,开放端口3306
[root@localhost ~]# vi /etc/sysconfig/iptables
添加一条命令:
-A INPUT -m state --state NEW -m tcp -p tcp --dport 3306 -j ACCEPT
[root@localhost ~]# cat /etc/sysconfig/iptables
# Firewall configuration written by system-config-firewall
# Manual customization of this file is not recommended.
*filter
:INPUT ACCEPT [0:0]
:FORWARD ACCEPT [0:0]
:OUTPUT ACCEPT [0:0]
-A INPUT -m state --state ESTABLISHED,RELATED -j ACCEPT
-A INPUT -p icmp -j ACCEPT
-A INPUT -i lo -j ACCEPT
-A INPUT -m state --state NEW -m tcp -p tcp --dport 22 -j ACCEPT
-A INPUT -m state --state NEW -m tcp -p tcp --dport 80 -j ACCEPT
-A INPUT -m state --state NEW -m tcp -p tcp --dport 3306 -j ACCEPT
-A INPUT -j REJECT --reject-with icmp-host-prohibited
-A FORWARD -j REJECT --reject-with icmp-host-prohibited
COMMIT
8)重启防火墙
[root@localhost ~]# service iptables restart
[root@localhost ~]# yum install epel-release   #添加epel源
[root@localhost ~]# yum install redis
[root@localhost ~]# service redis start
[root@localhost ~]# chkconfig --level 2345 redis on
[root@localhost ~]# wget -P /home/server/tomcat8 http://mirrors.hust.edu.cn/apache/tomcat/tomcat-8/v8.5.35/bin/apache-tomcat-8.5.35.tar.gz
[root@localhost ~]# cd /home/server/tomcat8
[root@localohst ~]# tar zxvf apache-tomcat-8.5.35.tar.gz
上传至 /home/server/tomcat8.35/webapps/
?  ~ rsync webApllication.war root@www.xxx.com:/home/server/tomcat8.35/webapps/
[root@localohst ~]# jar xvf webApllication.war
1)添加如下配置:
[root@localohst ~]# vi /home/server/tomcat8/venus_server/bin/startup.sh
SERVER_ROOT_DIR=`pwd`
export CATALINA_OPTS="$CATALINA_OPTS
-Dcom.sun.management.jmxremote
-Djava.rmi.server.hostname=服务器外网ip
-Dcom.sun.management.jmxremote.port=端口
-Dcom.sun.management.jmxremote.ssl=false
-Dcom.sun.management.jmxremote.authenticate=true
-Dcom.sun.management.jmxremote.password.file=SERVERROOTDIR/conf/jmxremote.password−Dcom.sun.management.jmxremote.access.file=SERVERROOTDIR/conf/jmxremote.password−Dcom.sun.management.jmxremote.access.file=SERVER_ROOT_DIR/conf/jmxremote.access"
[root@localohst ~]# cat /home/server/tomcat8/venus_server/bin/startup.sh
# this work for additional information regarding copyright ownership.
# The ASF licenses this file to You under the Apache License, Version 2.0
# (the "License"); you may not use this file except in compliance with
# the License.  You may obtain a copy of the License at
#
#     http://www.apache.org/licenses/LICENSE-2.0
#
# Unless required by applicable law or agreed to in writing, software
# distributed under the License is distributed on an "AS IS" BASIS,
# WITHOUT WARRANTIES OR CONDITIONS OF ANY KIND, either express or implied.
# See the License for the specific language governing permissions and
# limitations under the License.

# -----------------------------------------------------------------------------
# Start Script for the CATALINA Server
# -----------------------------------------------------------------------------

# Better OS/400 detection: see Bugzilla 31132
os400=false
case "`uname`" in
OS400*) os400=true;;
esac

# resolve links - $0 may be a softlink
PRG="$0"

while [ -h "$PRG" ] ; do
  ls=`ls -ld "$PRG"`
  link=`expr "$ls" : ‘.*-> \(.*\)$‘`
  if expr "$link" : ‘/.*‘ > /dev/null; then
    PRG="$link"
  else
    PRG=`dirname "$PRG"`/"$link"
  fi
done

PRGDIR=`dirname "$PRG"`
EXECUTABLE=catalina.sh

# Check that target executable exists
if $os400; then
  # -x will Only work on the os400 if the files are:
  # 1. owned by the user
  # 2. owned by the PRIMARY group of the user
  # this will not work if the user belongs in secondary groups
  eval
else
  if [ ! -x "$PRGDIR"/"$EXECUTABLE" ]; then
    echo "Cannot find $PRGDIR/$EXECUTABLE"
    echo "The file is absent or does not have execute permission"
    echo "This file is needed to run this program"
    exit 1
  fi
fi

# jvisualvm settings

SERVER_ROOT_DIR=`pwd`

export CATALINA_OPTS="$CATALINA_OPTS
-Dcom.sun.management.jmxremote
-Djava.rmi.server.hostname=0.0.0.0
-Dcom.sun.management.jmxremote.port=1100
-Dcom.sun.management.jmxremote.ssl=false
-Dcom.sun.management.jmxremote.authenticate=true
-Dcom.sun.management.jmxremote.password.file=$SERVER_ROOT_DIR/conf/jmxremote.password
-Dcom.sun.management.jmxremote.access.file=$SERVER_ROOT_DIR/conf/jmxremote.access"

# enf of jvisualvm

#设置启动内存
export JAVA_OPTS="$JAVA_OPTS -server -Xms6144m -Xmx6144m -XX:NewSize=1024m -XX:MaxNewSize=2048m -XX:SurvivorRatio=2 -XX:+UseParallelGC"

exec "$PRGDIR"/"$EXECUTABLE" start "$@"
2)设置远程监控账号:
[root@localhost conf]# vi /home/server/tomcat8.35/conf/jmxremote.access
内容如下:
用户名 权限类型(readonly:只读,readwrite:读写)
[root@localhost conf]# cat jmxremote.access
guest readonly
root readwrite
设置远程监控密码:
用户名 密码
[root@localhost conf]# vi /home/server/tomcat8.35/conf/jmxremote.password
[root@localhost conf]# cat /home/server/tomcat8.35/conf/jmxremote.password
guest xxxxxx
root  xxxxxx
3)设置文件权限
[root@localhost conf]# chmod 600 /home/server/tomcat8.35/conf/jmxremote*
4)启动web应用
[root@localhost conf]# sh /home/server/tomcat8.35/bin/startup.sh
1.内存监控,并回收脚本
#!/bin/bash

LIMIT=512
LOG_FILE="/var/log/timing_dropcaches.log"

#定时清理系统内存
#https://blog.csdn.net/gaojinshan/article/details/40710369
used=`free -m | awk ‘NR==2‘ | awk ‘{print $3}‘`
free=`free -m | awk ‘NR==2‘ | awk ‘{print $4}‘`

echo "===========================" >> $LOG_FILE
date +"%Y-%m-%d %H:%M.%S" >> $LOG_FILE
echo "Memory usage | [Use:${used}MB][Free:${free}MB] | [${LIMIT}]MB" >> $LOG_FILE

# drop caches when the free memory less than 2G
if [ $free -le $LIMIT ] ; then
 #sync && echo 1 > /proc/sys/vm/drop_caches
 #sync && echo 2 > /proc/sys/vm/drop_caches
 sync && echo 3 > /proc/sys/vm/drop_caches
 echo "OK" >> $LOG_FILE
else
 echo "Not required" >> $LOG_FILE
fi
2.日志清理脚本
[root@localhost ~]# crontab -e

#删除2天前的日志
/usr/bin/find /home/server/tomcat8.35 -name *.log -mtime +2 | grep `date +%Y` | xargs rm -Rf {} > /dev/null 2>&1
wget http://home.tiscali.cz/~cz210552/distfiles/webbench-1.5.tar.gz
tar -zxvf ./webbench-1.5.tar.gz
yum install -y gcc ctags
cd ./webbench-1.5
make &make install
make clean
参考:webbench安装
t是benchmark持续多久。
c是指time时间内请求多少次。
比如我们测试百度, 启动100个客户端同时请求百度首页,持续60S:
webbench -t 60 -c 100 http://www.baidu.com/
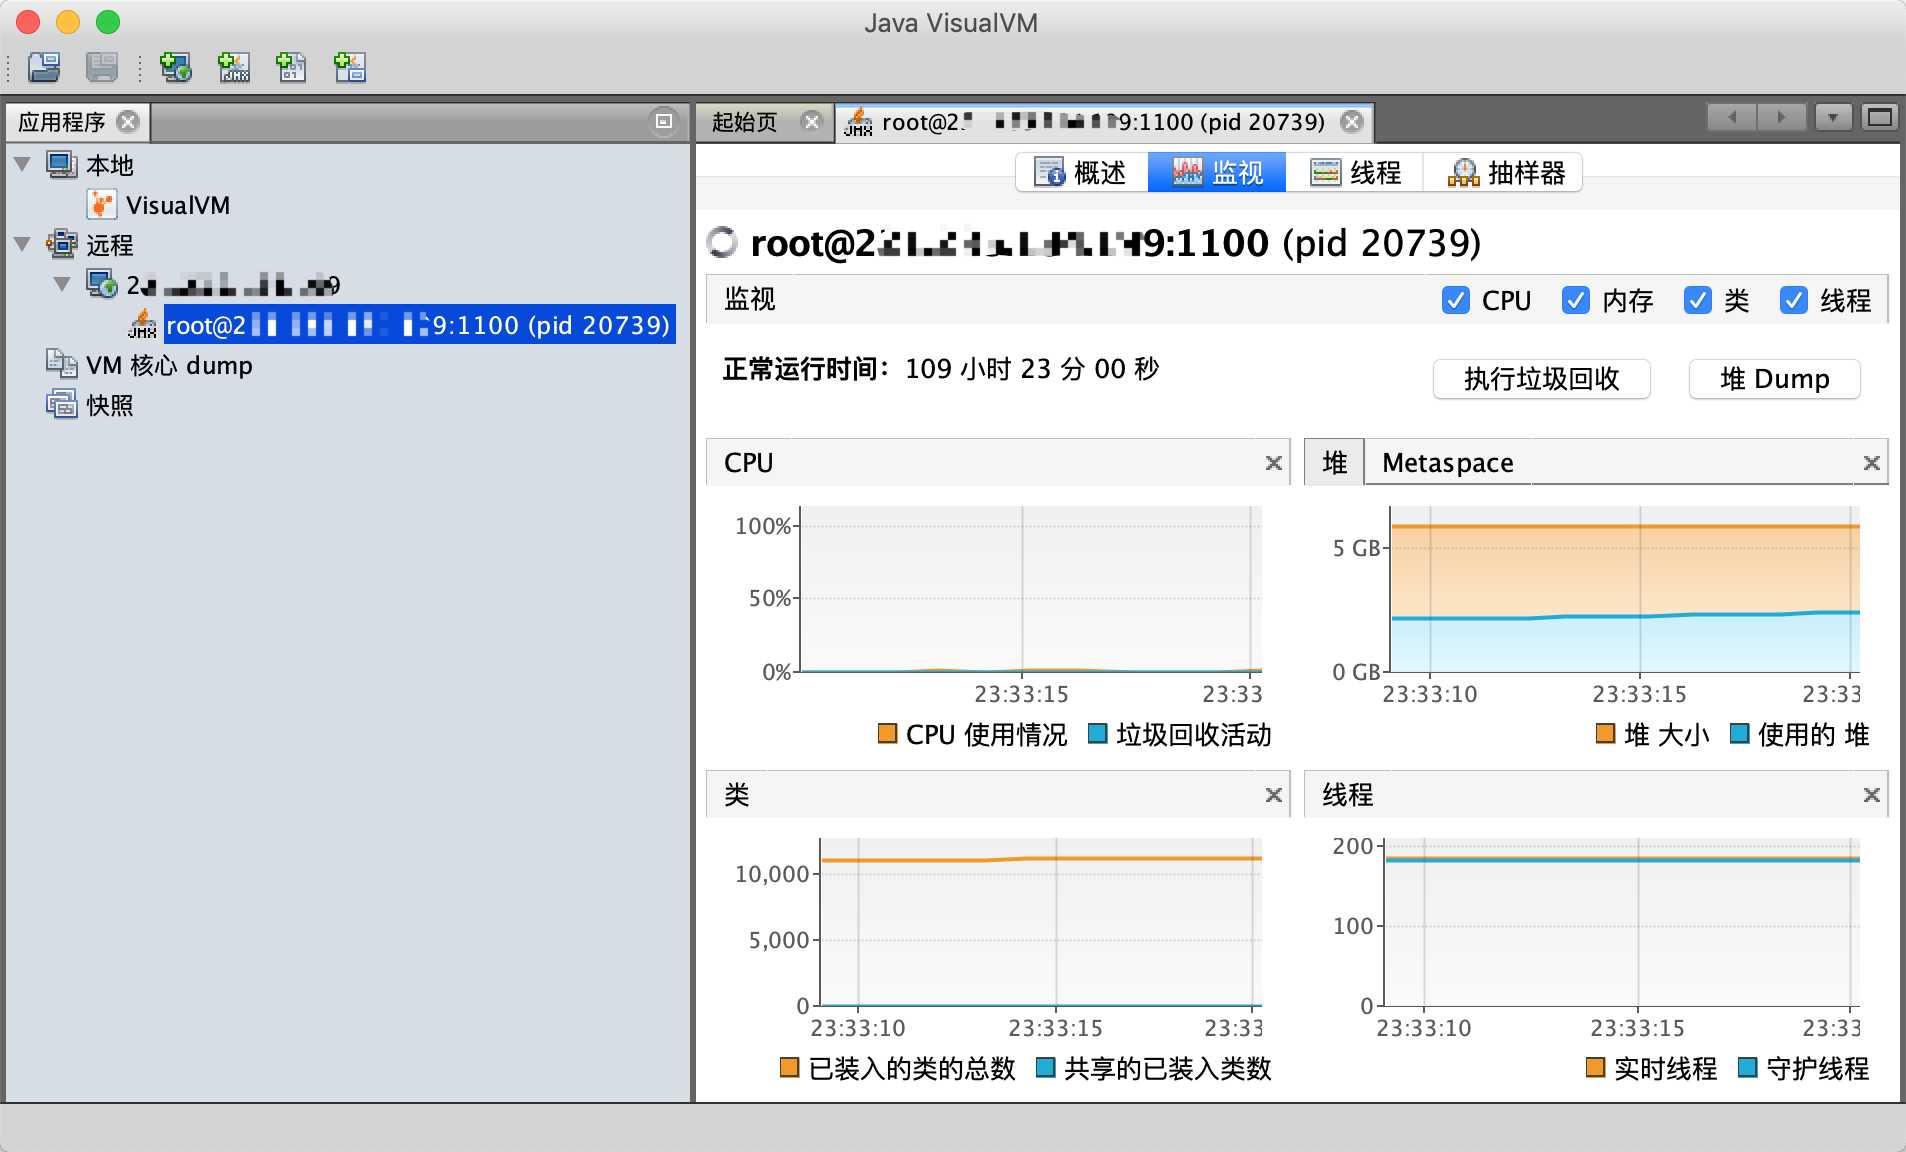
5.1、启动jvisualvm
? ~ jvisualvm
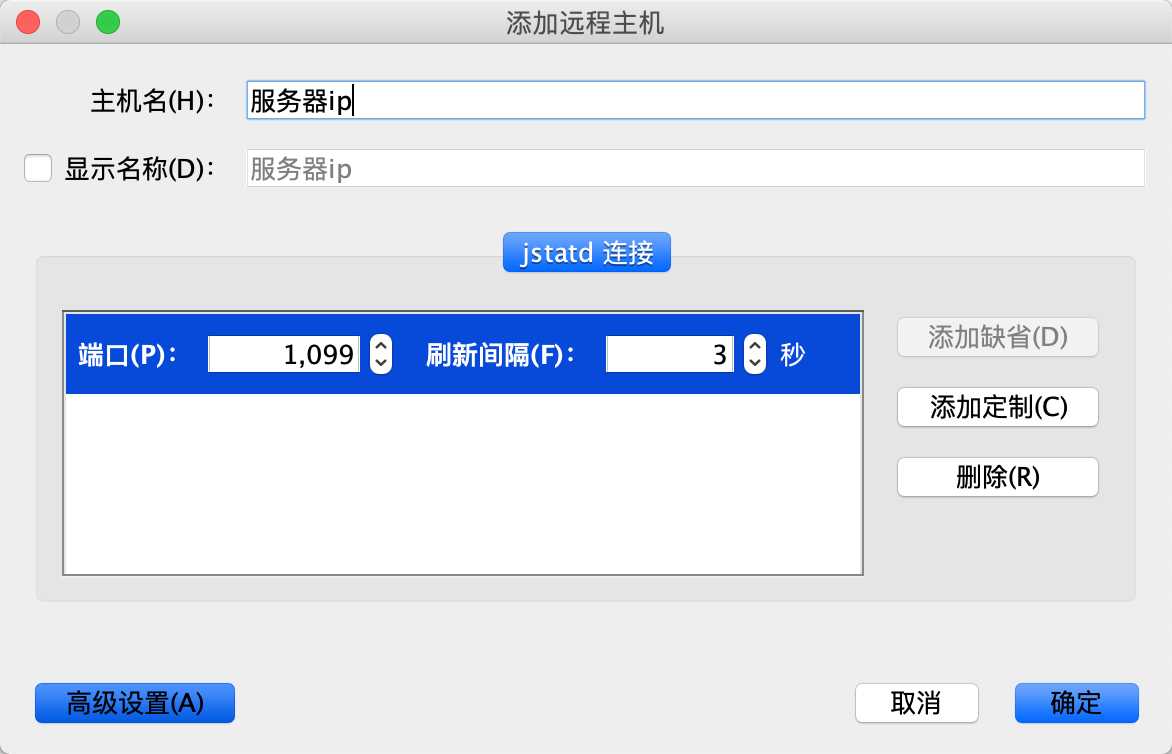
5.2、添加远程主机
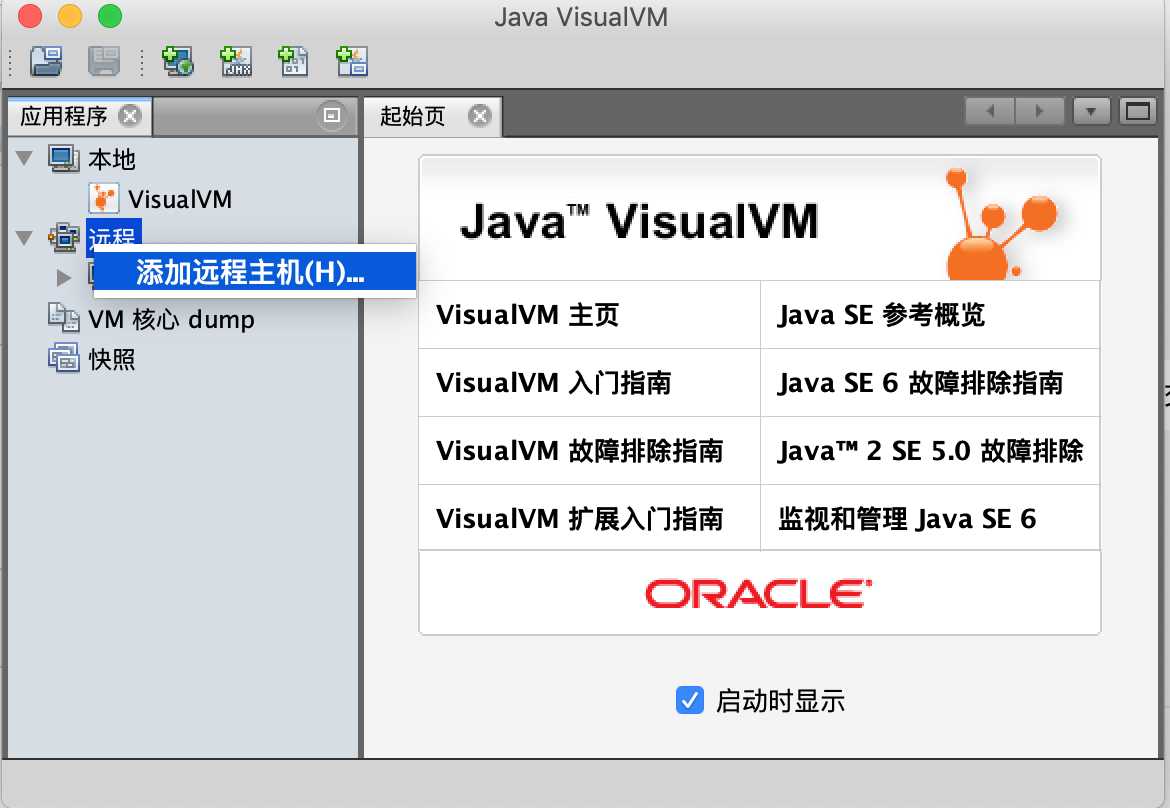
5.3、输入服务IP、默认端口1099,点击确认。
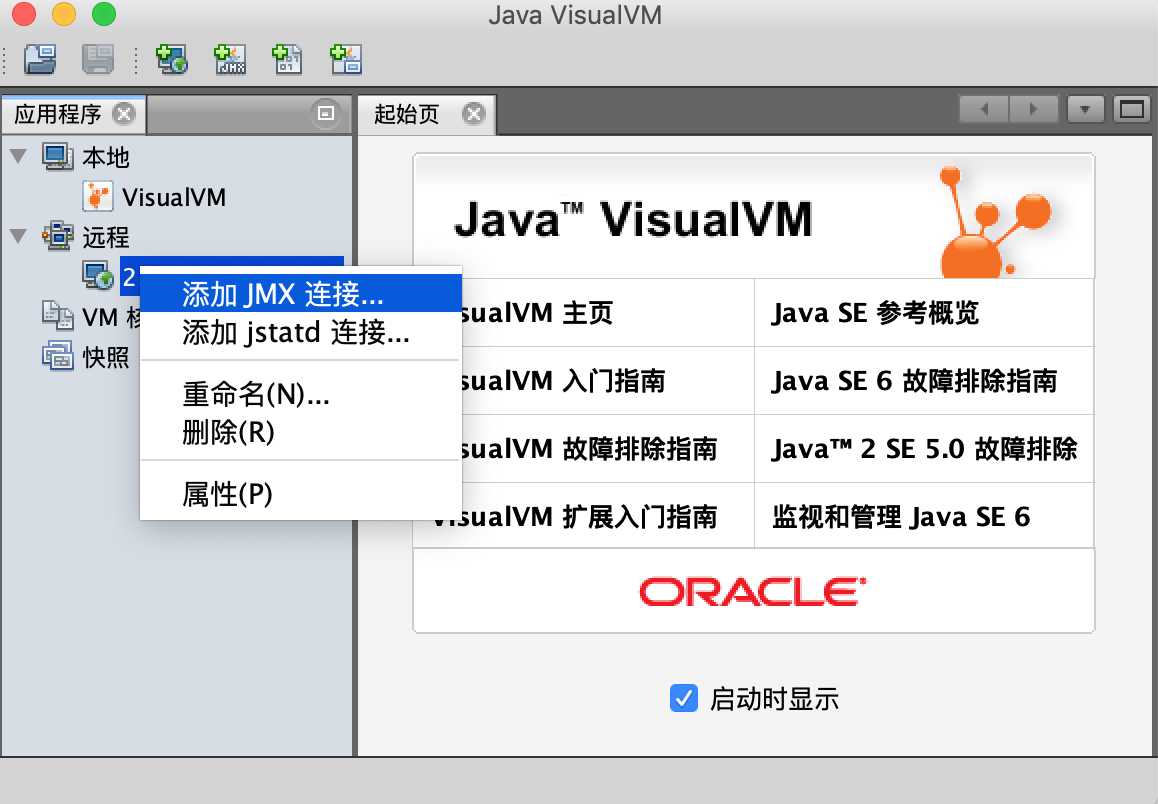
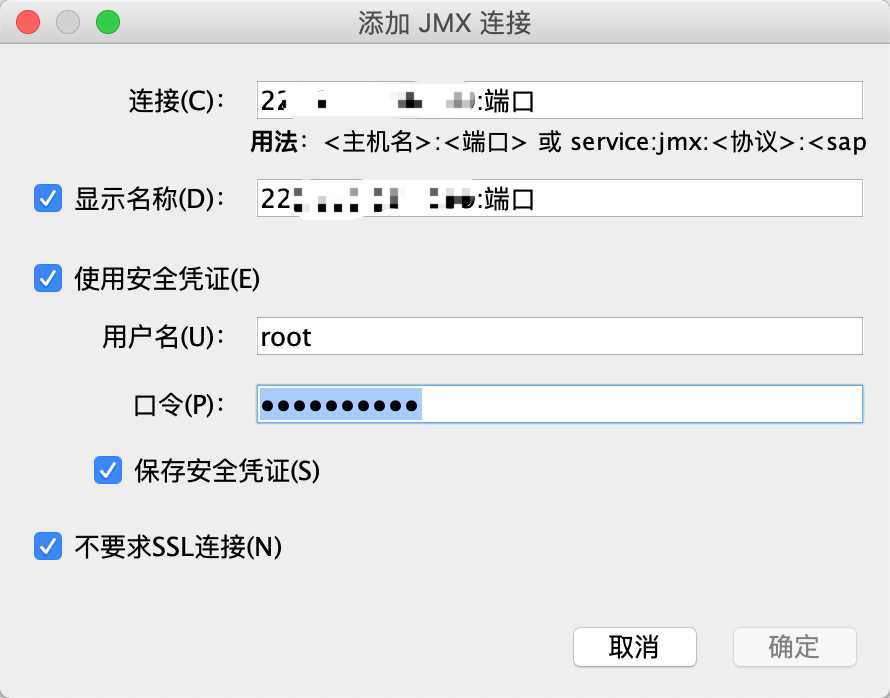
5.4、添加JMX连接,输入端口(本文1100)、用户名、密码,勾选不要求SSL。
5.5、打开连接,查看监控信息。
6.1、下载JProfiler并安装
[root@localhost ~]# wget https://download-keycdn.ej-technologies.com/jprofiler/jprofiler_linux_9_1_1.rpm
[root@localhsot ~]# yum -y install jprofiler_linux_9_1_1.rpm
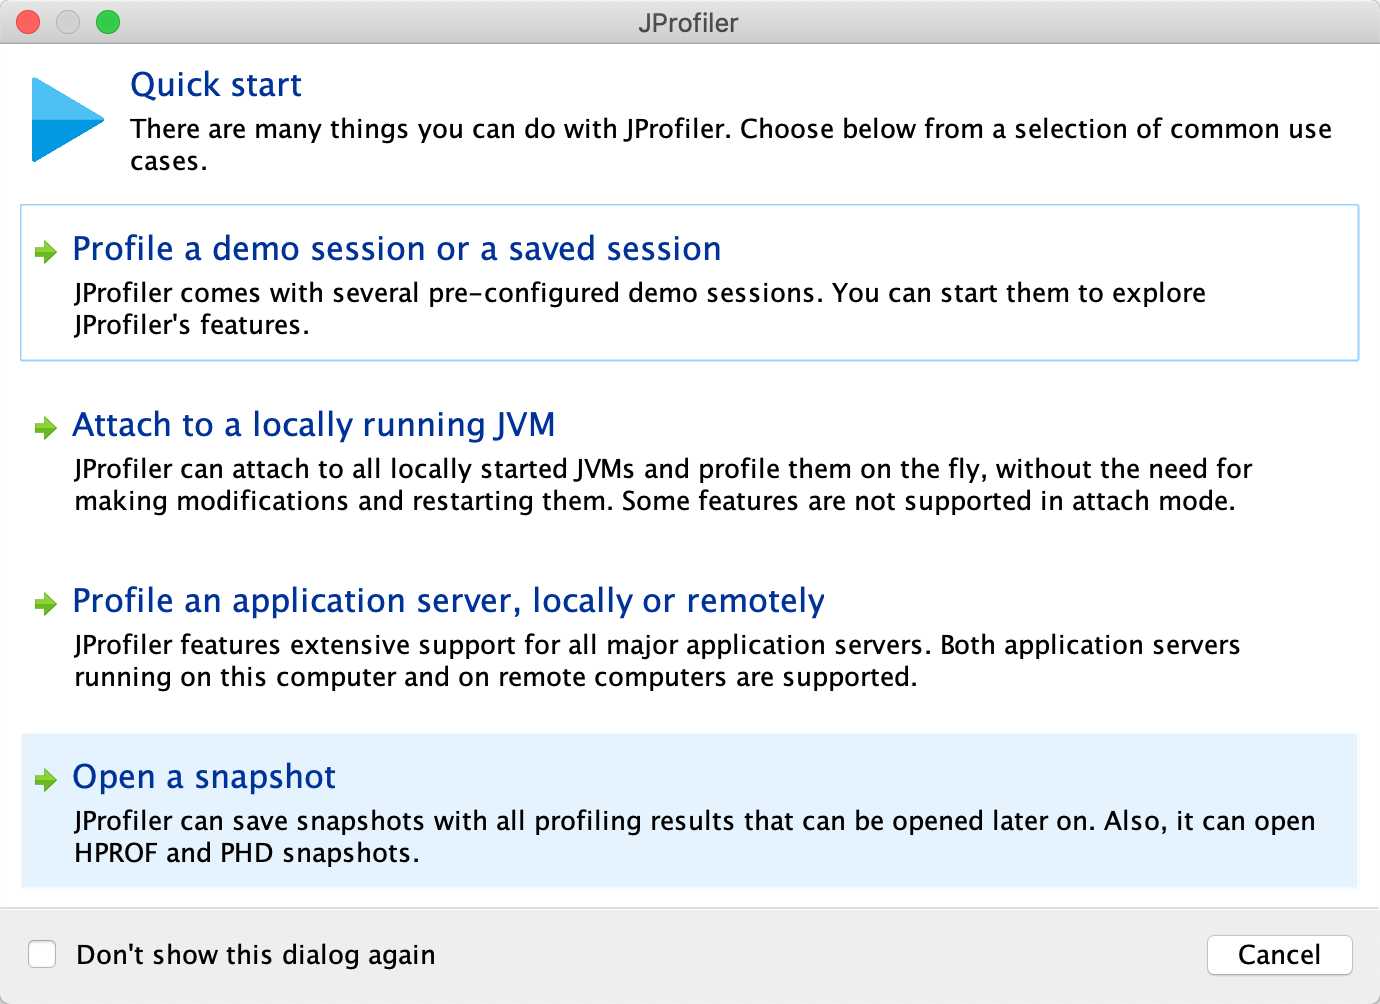
6.2、安装JProfile客户端,并打开软件,选择 Pfofile an application server,locally or remotely
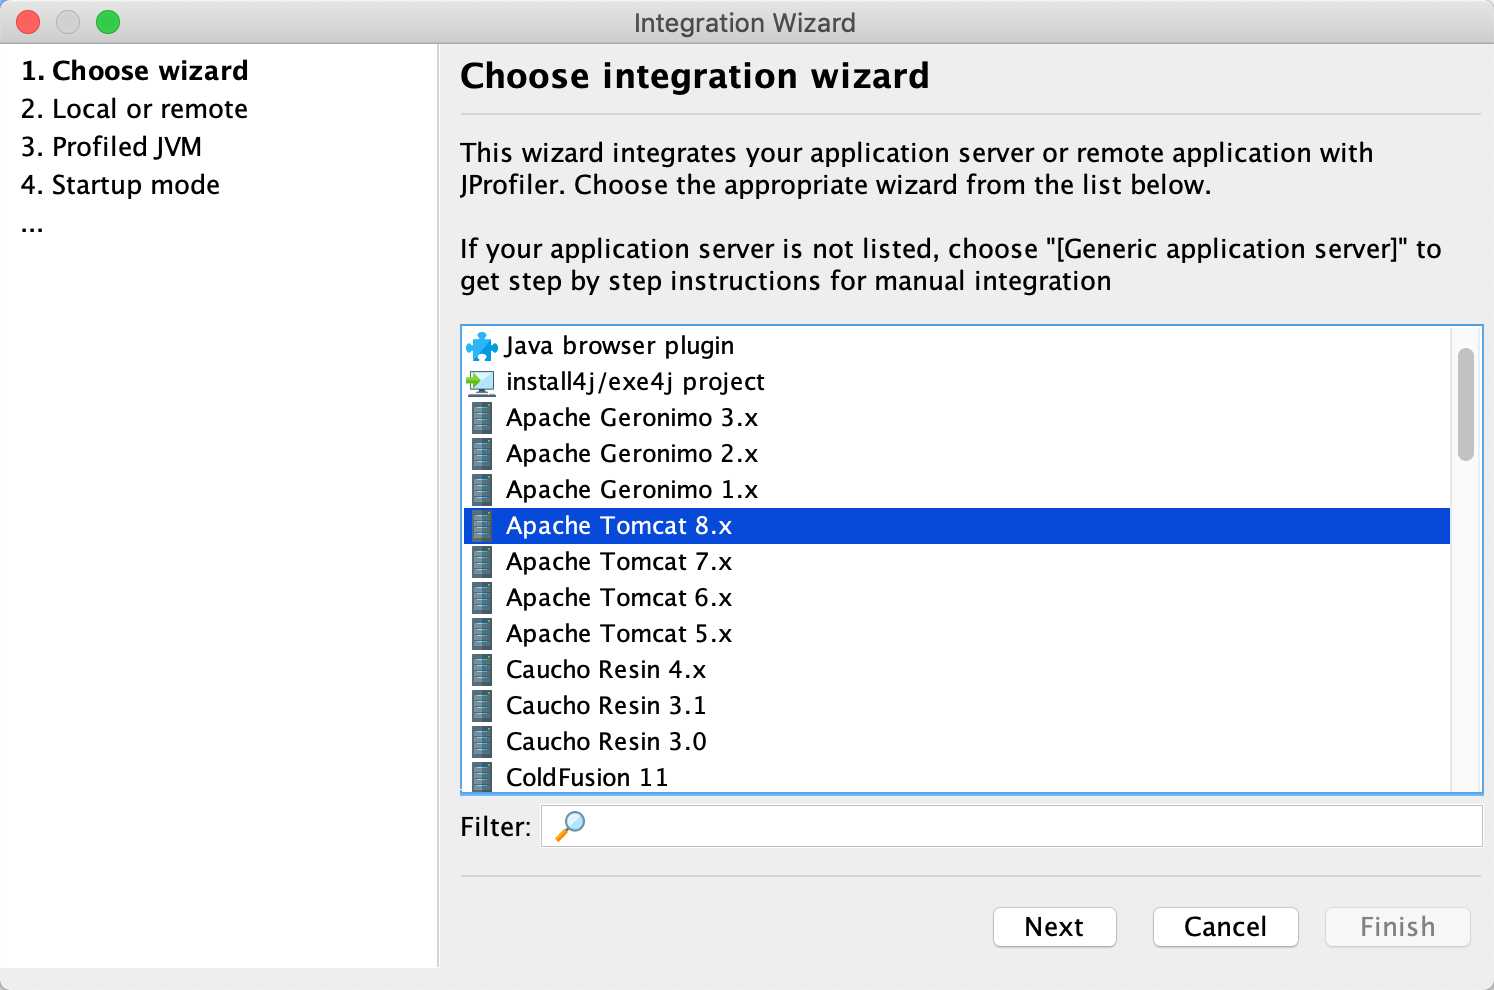
选择对应的Tomcat版本
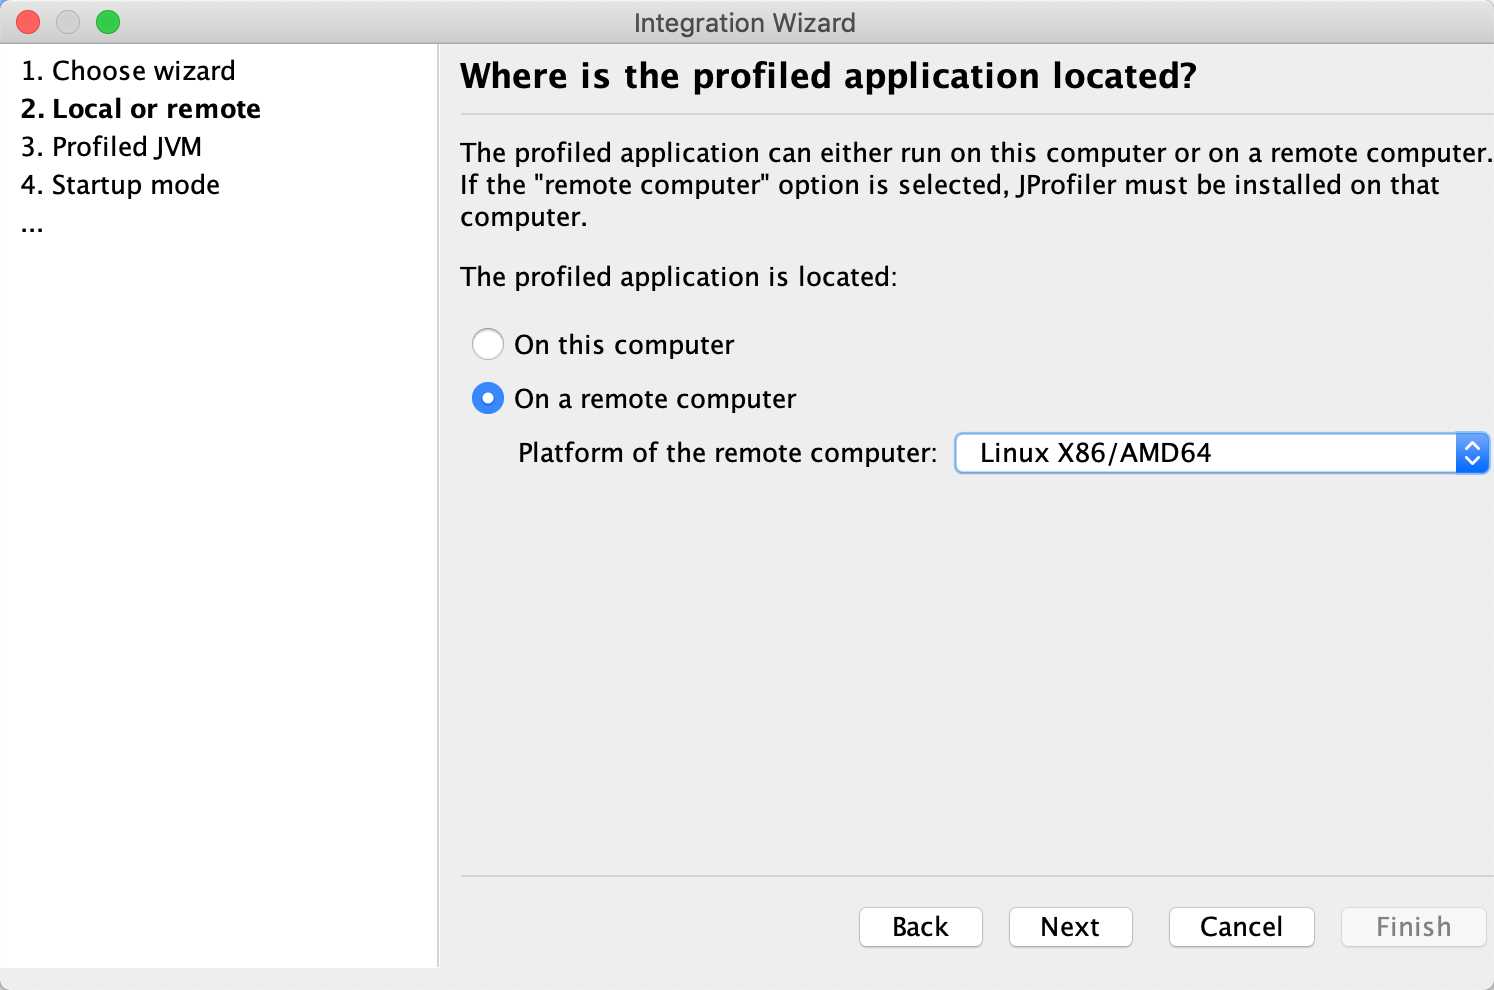
选择 On a remote computer, 服务器的系统版本
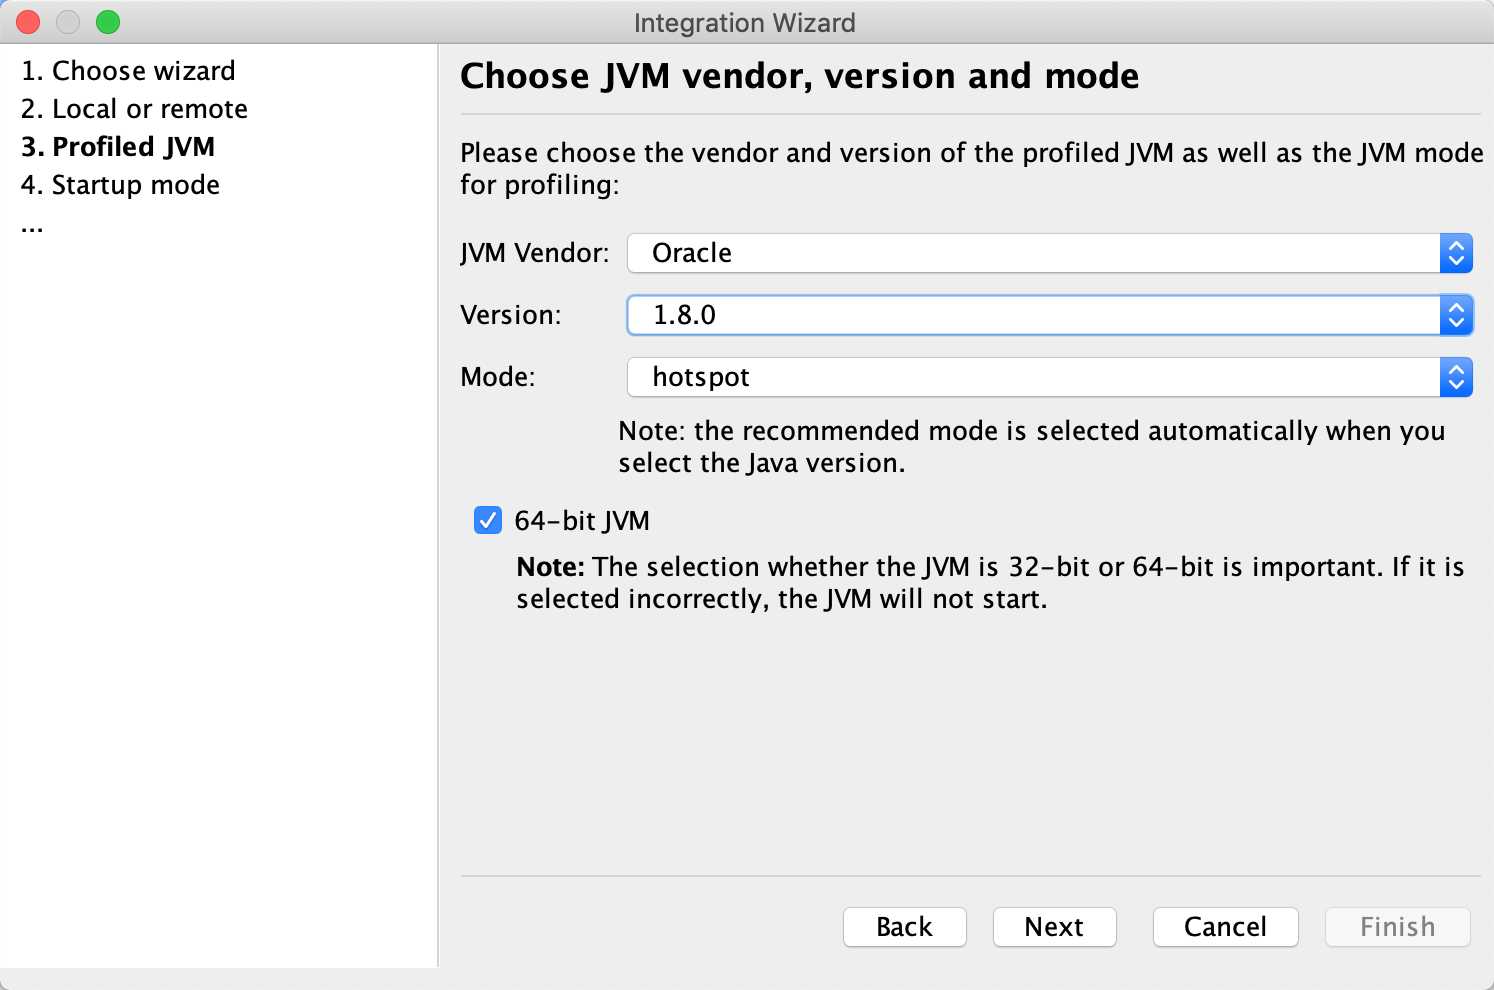
选择JAVA虚拟机的版本
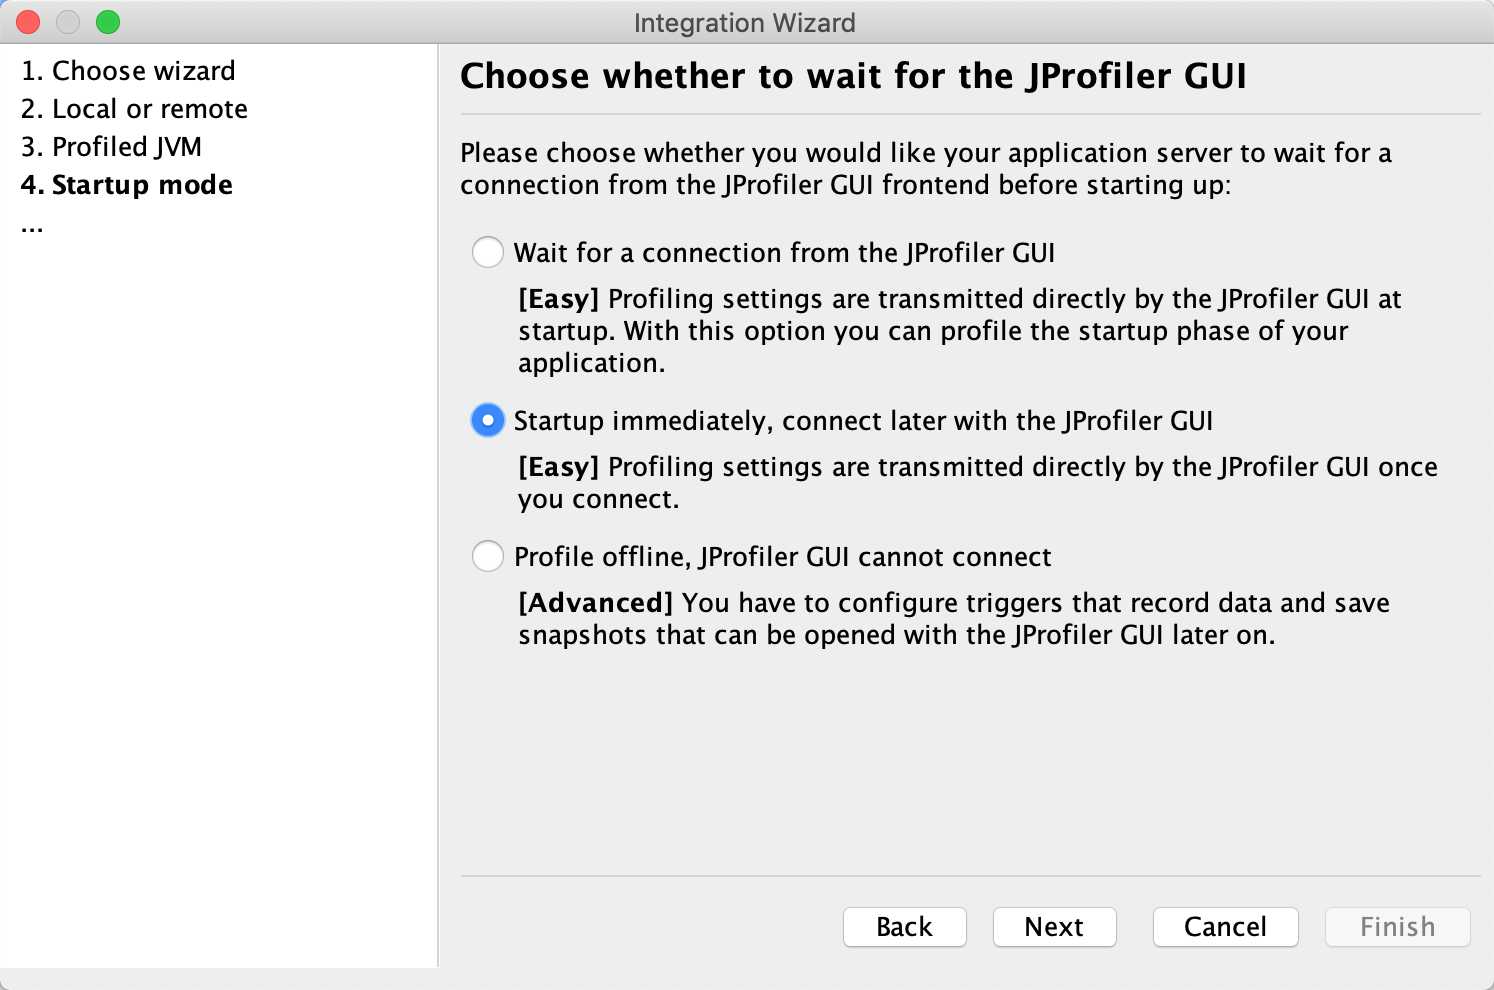
选择稍后远程连接服务器
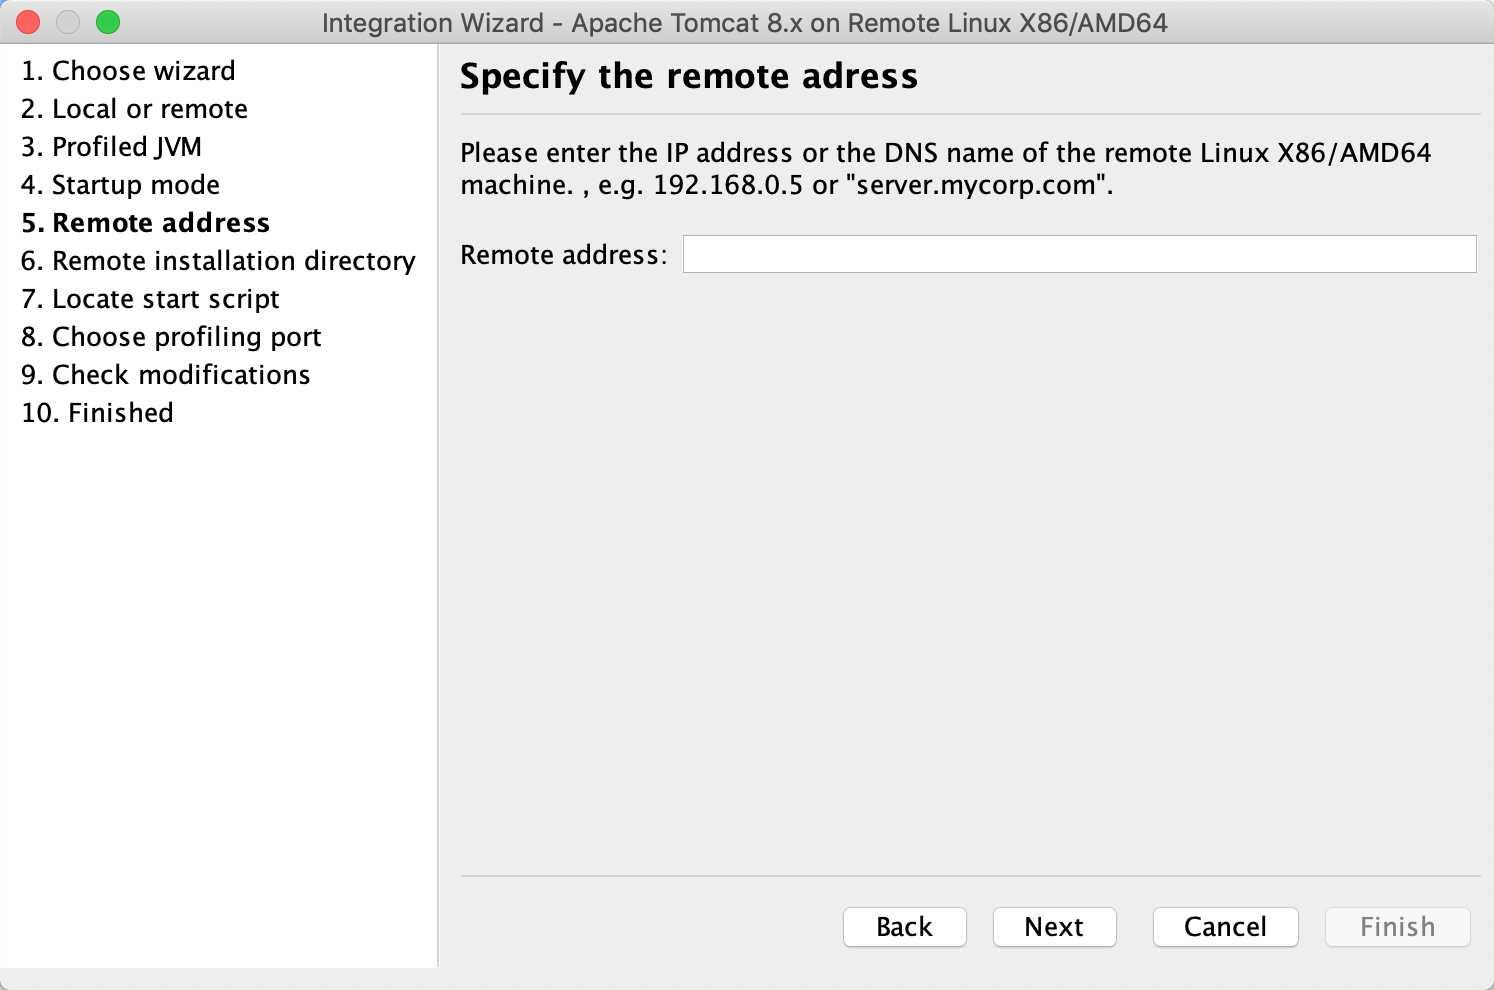
输入服务器域名或IP
输入服务器端JProfiler安装目录 /opt/jprofiler9

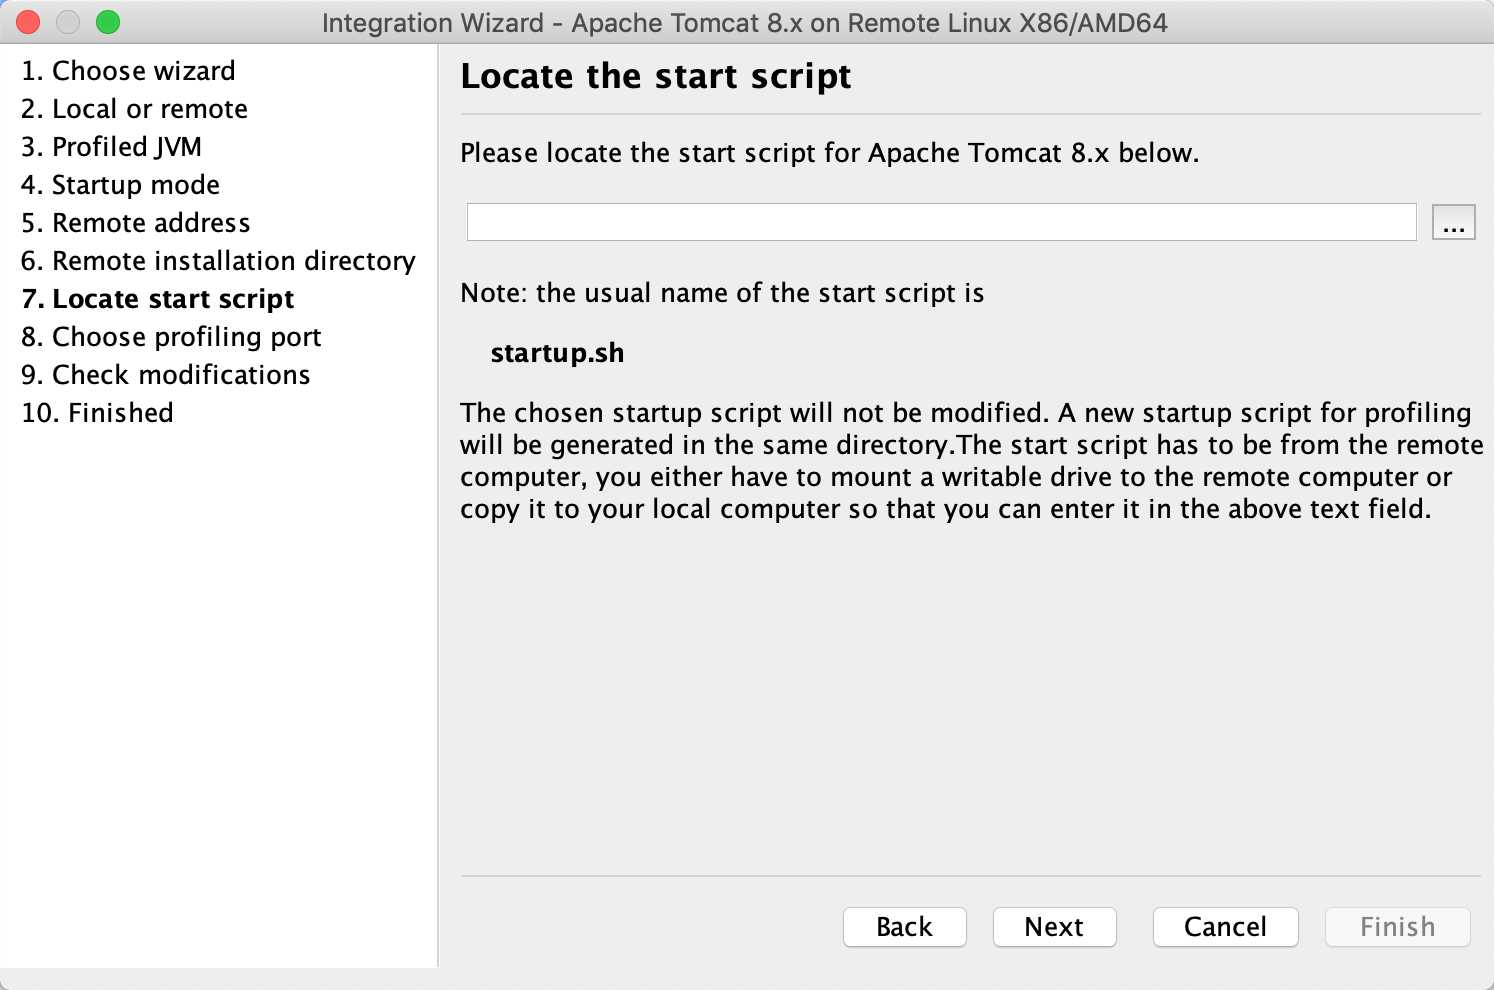
上传服务器Tomcat的startup.sh启动脚本
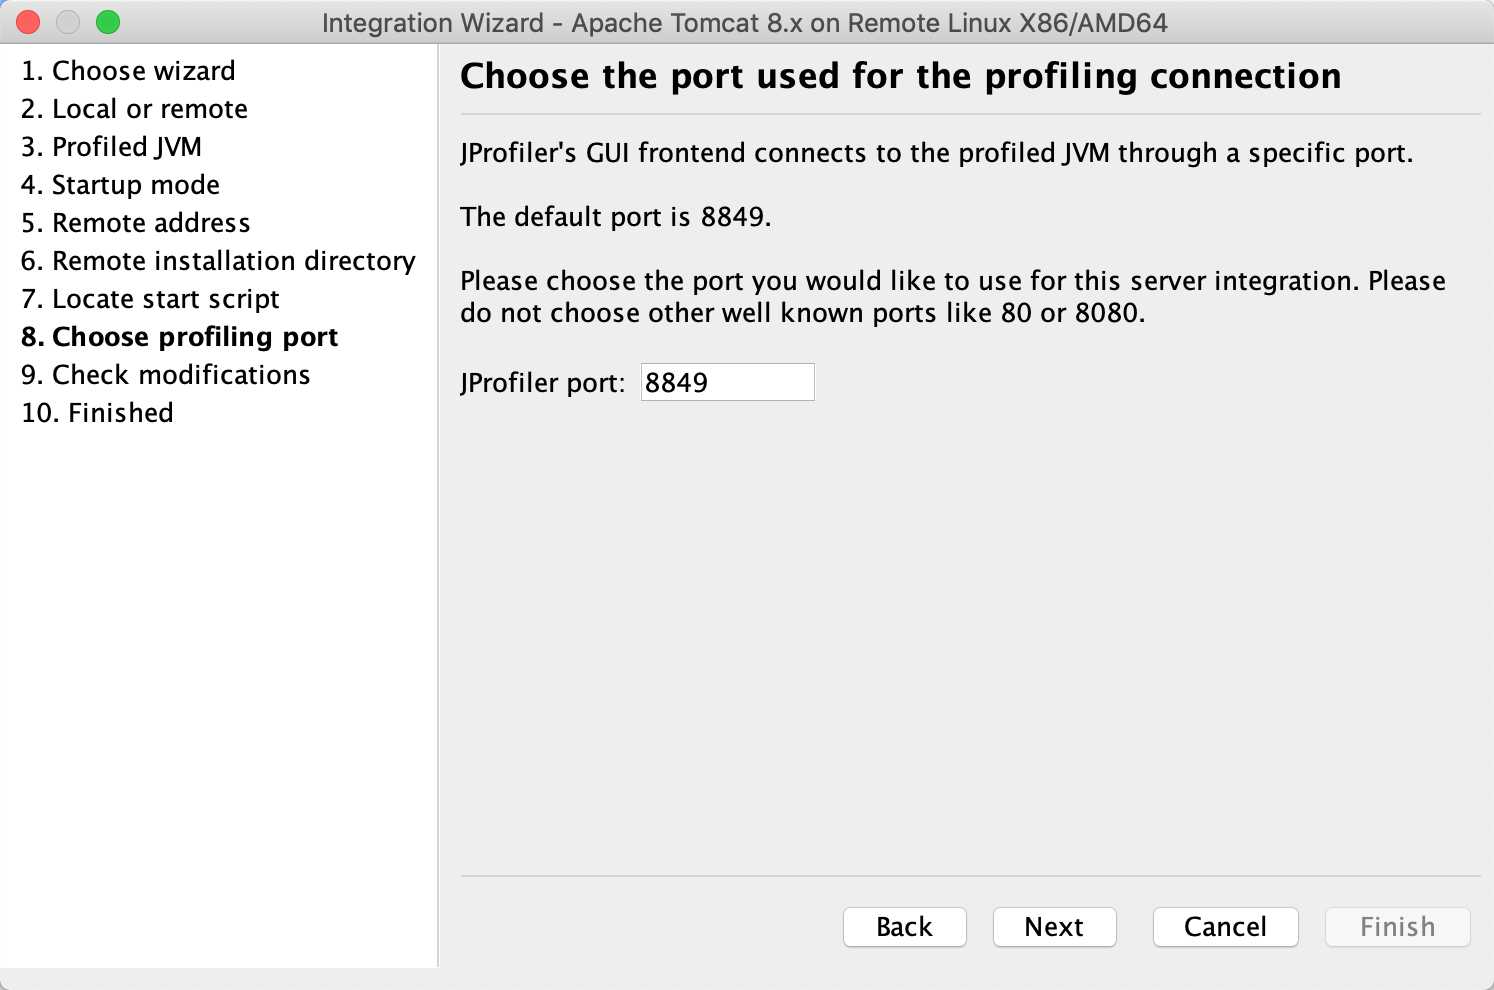
输入监控连接端口,默认即可
此时会在之前上传的startup.sh文件的同目录下生成一个startup_jprofiler.sh文件,把该文件上传至服务器的Tomcat的bin目录下,使用startup_jprofiler.sh启动Tomcat。
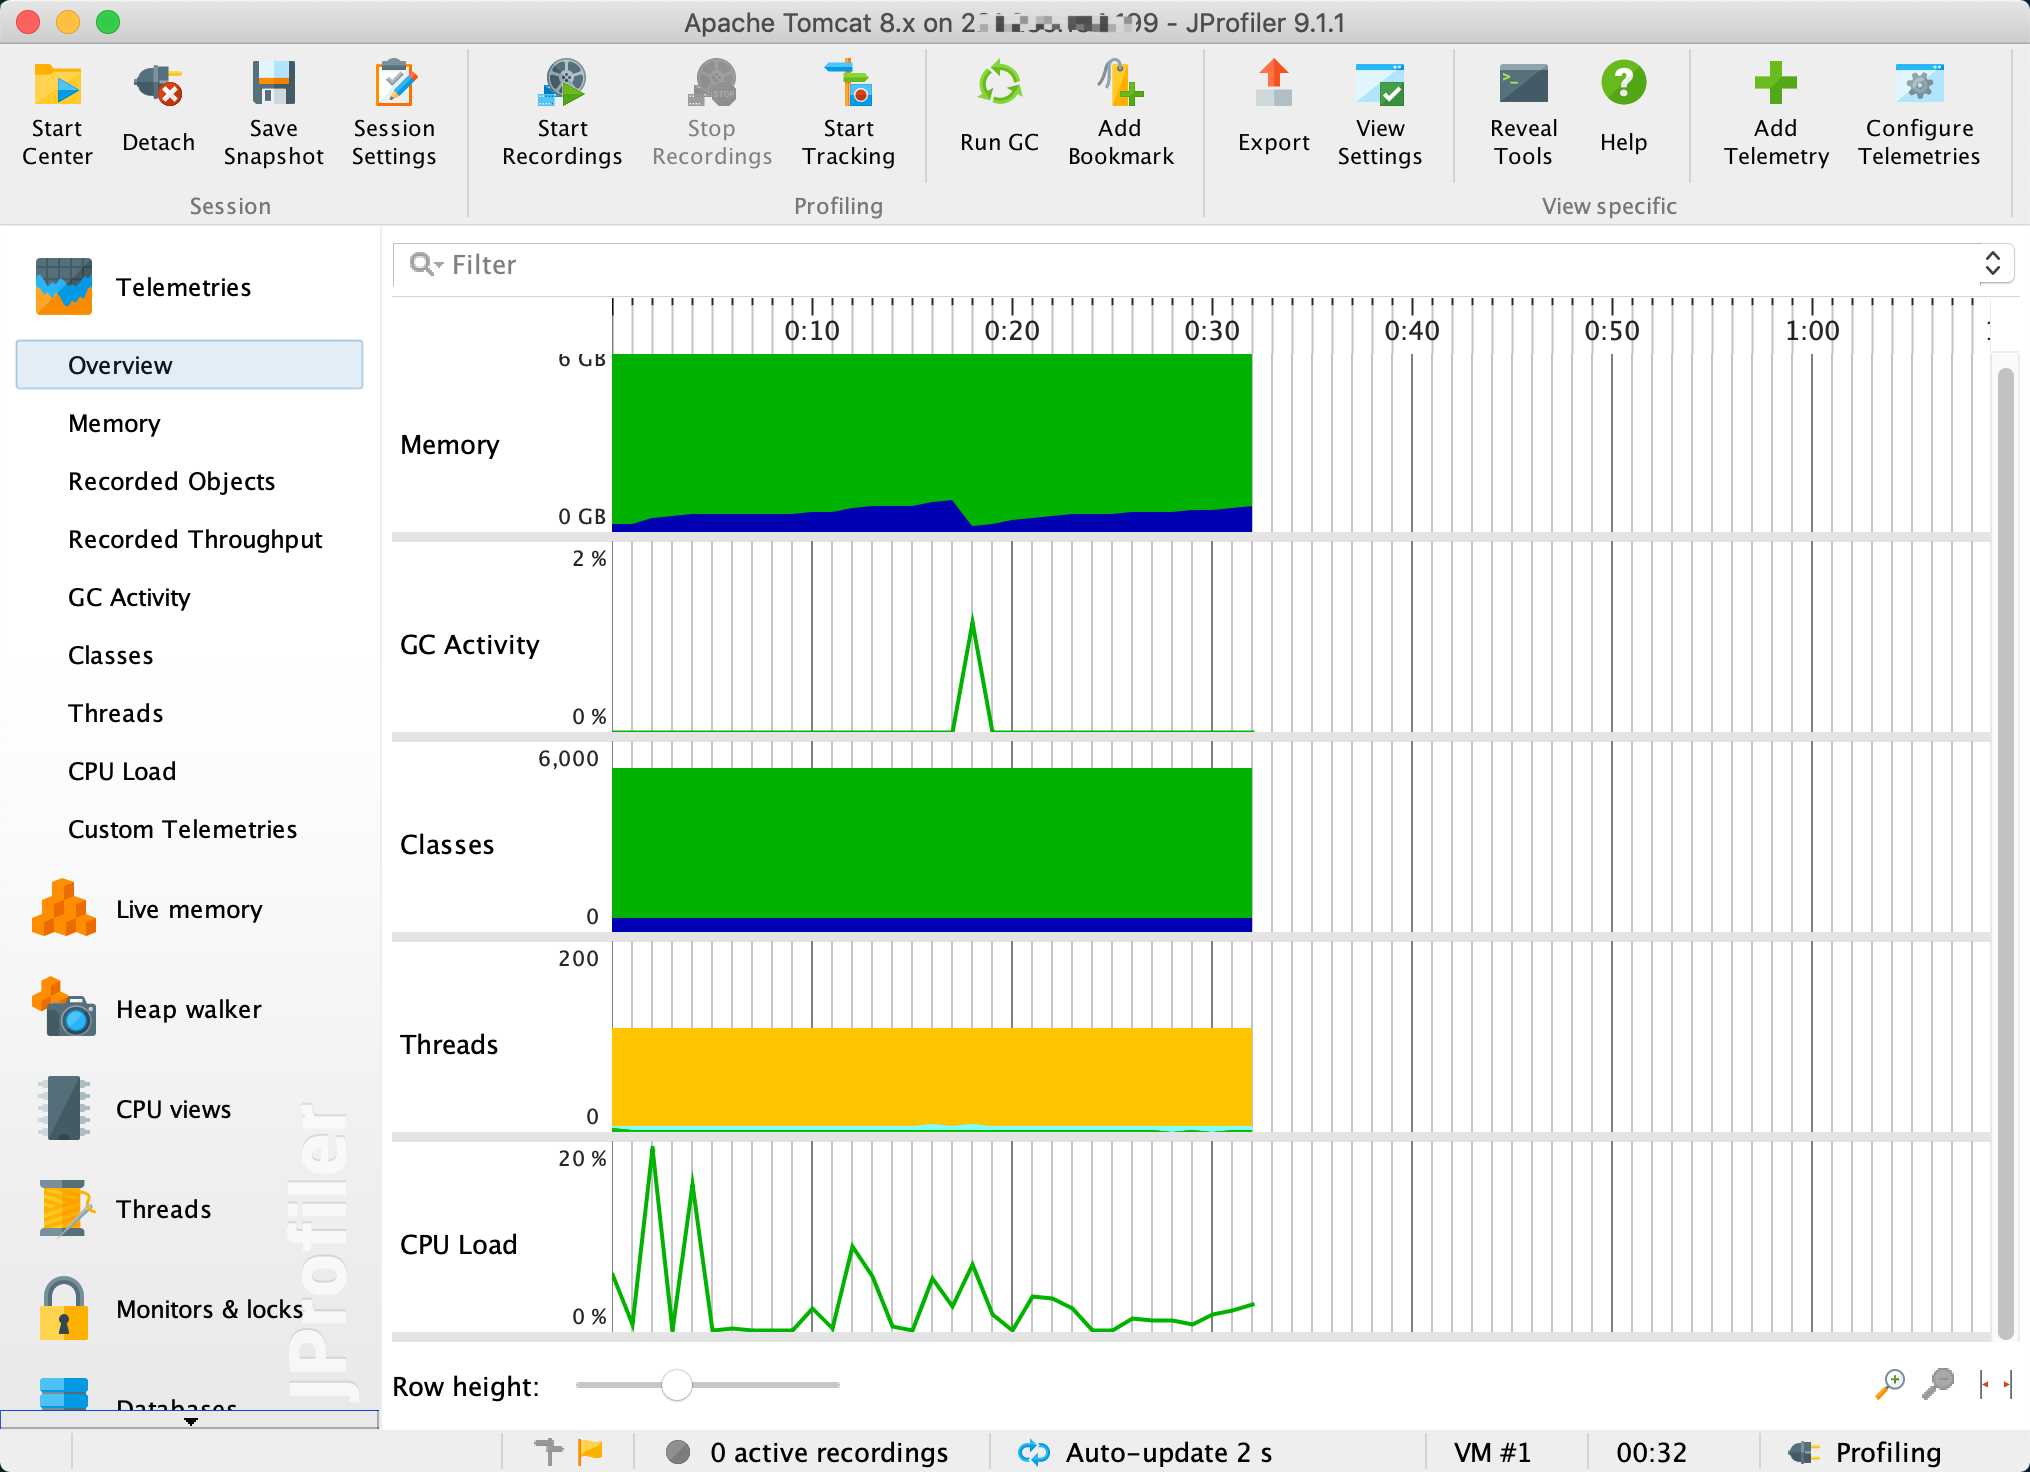
再打开软件JProfiler,选择刚刚设置的连接配置,进行远程监控操作。
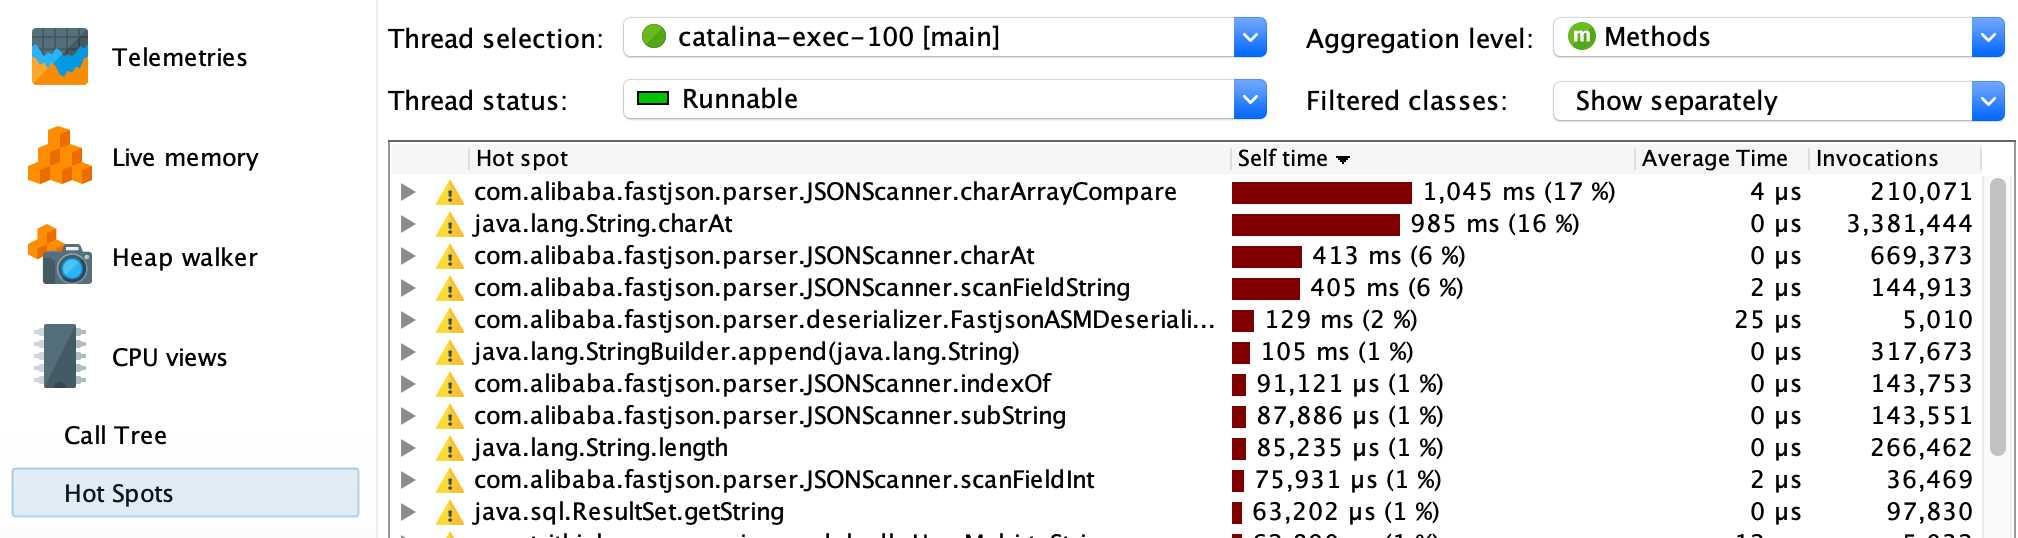
查看线程情况, 选择左菜单Threads,选择颜色为红色的线程,右键菜单选择 Show Call Tree For Selected Thread。
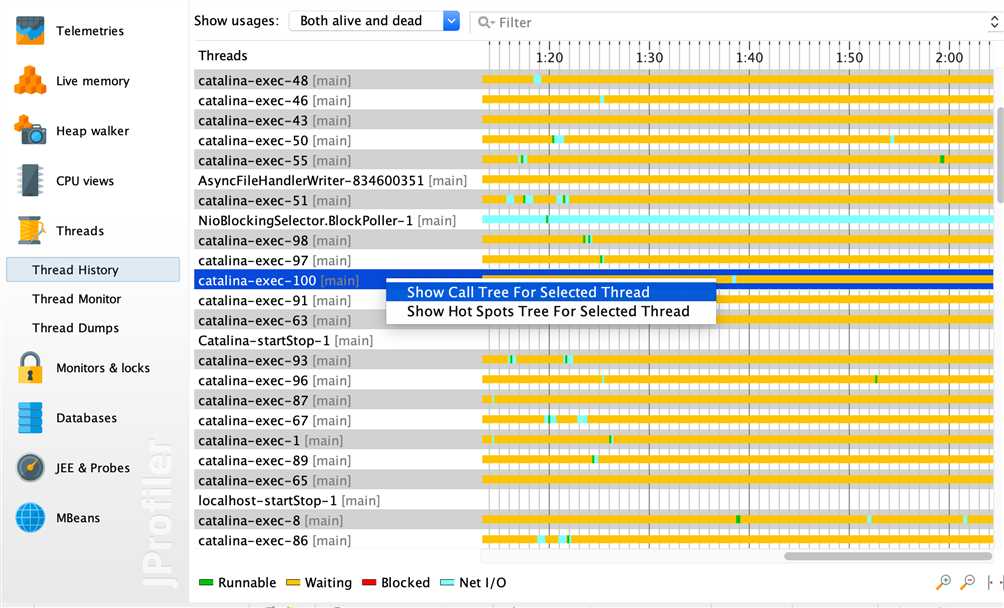
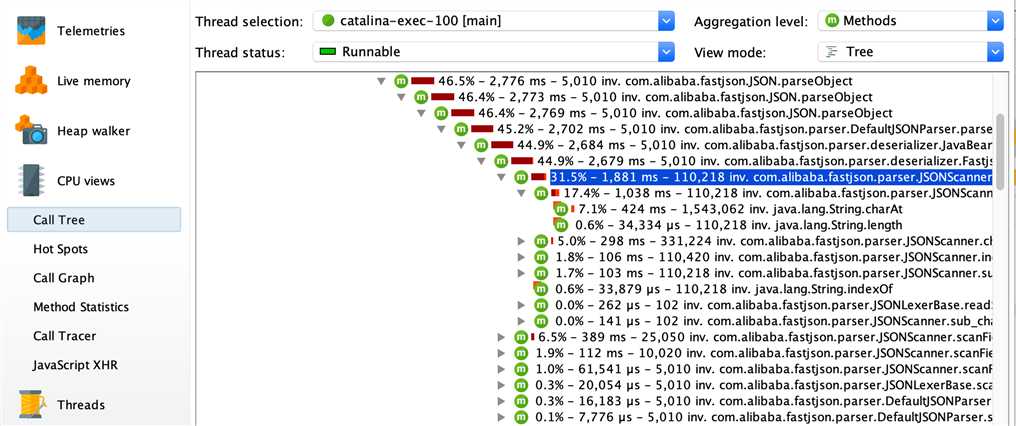
查看线程最耗时的操作是在哪个调用栈上,比对对应的源码,找到导致线程阻塞的原因。
或者结合查看内存的使用情况,定位到是哪个类对象使用内存开销过大。
参考:Java性能分析神器-JProfiler详解 使用JProfiler进行内存分析
最后一步,使用webbench进行压力测试,使用监控工具分析应用的性能瓶颈或排查其他比如内存泄漏等程序问题。
PS:
https://www.jianshu.com/p/d59b3b971aa3
https://www.cnblogs.com/wuweidong/p/5815348.html
Centos6.8 下 从零开始 部署 Java Web 应用
标签:mask vma word pwd mission remote 输入 dwr mys
原文地址:https://www.cnblogs.com/phpdragon/p/10129324.html