标签:back user.js title component serve 利用 jstl 别名 就是
一数据的普通校验;
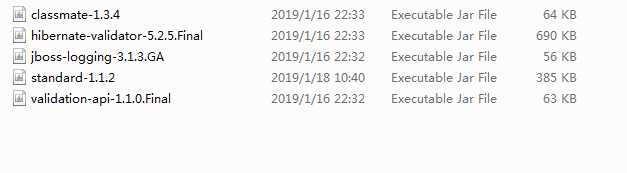
第一步:导入相关的jar包这里用到的jar包有:
第二步:这里我们为了以后修改验证信息的方便;使用一种使用键值对形式专门存储验证信息的文件:这样的文件是以.properties结尾的
创建一个这样的文件:
1 user.username.null=\u8D26\u53F7\u4E0D\u80FD\u4E3A\u7A7A!
2 user.username.size=\u8D26\u53F7\u7684\u957F\u5EA63\u52306\u4F4D
3 user.password.size=\u5BC6\u7801\u7684\u957F\u5EA63\u52306\u4F4D
4 user.passsowrd.null=\u5BC6\u7801\u4E0D\u80FD\u4E3A\u7A7A!
第三步:在配置文件中添加验证框架的配置信息
 1 <?xml version="1.0" encoding="UTF-8"?>
 2 <beans xmlns="http://www.springframework.org/schema/beans"
 3     xmlns:xsi="http://www.w3.org/2001/XMLSchema-instance"
 4     xmlns:context="http://www.springframework.org/schema/context"
 5     xmlns:mvc="http://www.springframework.org/schema/mvc"
 6     xsi:schemaLocation="http://www.springframework.org/schema/mvc http://www.springframework.org/schema/mvc/spring-mvc-4.3.xsd
 7         http://www.springframework.org/schema/beans http://www.springframework.org/schema/beans/spring-beans.xsd
 8         http://www.springframework.org/schema/context http://www.springframework.org/schema/context/spring-context-4.3.xsd">
 9
10     <!-- 开启注解  validator关联验证信息-->
11     <mvc:annotation-driven validator="validator"></mvc:annotation-driven>
12     <!-- 开启扫描 -->
13     <context:component-scan base-package="com.sxt.controller"></context:component-scan>
14     <!--添加对JSR-303验证框架的支持 -->
15     <bean id="validator"
16         class="org.springframework.validation.beanvalidation.LocalValidatorFactoryBean">
17         <property name="providerClass" value="org.hibernate.validator.HibernateValidator" />
18          <!--不设置则默认为classpath下的 ValidationMessages.properties -->
19         <property name="validationMessageSource" ref="validatemessageSource" />
20     </bean>
21     <bean id="validatemessageSource"
22         class="org.springframework.context.support.ReloadableResourceBundleMessageSource">
23         <property name="basename" value="classpath:ValidateMessages" />
24         <property name="fileEncodings" value="utf-8" />
25         <property name="cacheSeconds" value="120" />
26     </bean>
27
28 </beans>
第四步:以上是为了实现验证所做的准备工作,现在创建一个验证的对象
 1 /**
 2  *
 3  */
 4 package com.sxt.bean;
 5
 6 import javax.validation.constraints.Size;
 7
 8 import org.hibernate.validator.constraints.NotBlank;
 9
10 /**
11  * @author ASUS
12  * 验证注解:@Size
13  *
14  */
15 public class User {
16     @Size(max=6,min=3,message="{user.username.size}")
17     @NotBlank(message="{user.username.null}")
18     private String username;
19     @Size(max=6,min=3,message="{user.password.size}")
20     @NotBlank(message="{user.passsowrd.null}")
21     private String password;
22     public String getUsername() {
23         return username;
24     }
25     public void setUsername(String username) {
26         this.username = username;
27     }
28     public String getPassword() {
29         return password;
30     }
31     public void setPassword(String password) {
32         this.password = password;
33     }
34     @Override
35     public String toString() {
36         return "User [username=" + username + ", password=" + password + "]";
37     }
38
39
40 }
利用注解的形式将验证信息与对应的属性绑定
第五步:controller代码:
 1 /**
 2      * @Validated该注解是进入该方法执行对数据做已经绑定的验证信息验证
 3      * BindingResult就是存储的验证的结果,不会做出处理,只会返回信
 4      * 利用这些验证框架不需要自己写验证信息
 5      * 这里是一个对象,如果是多个对象,那么每一个@Validated后面跟一个对象
 6      * 如何将这些错误信息显示到客户端:通过前面讲的几种传值方式
 7      * @param user
 8      * @param result
 9      * @return
10      */
11     @RequestMapping("/add3")
12
13     public String add3(@Validated User user,BindingResult result,Model m ) {
14         System.out.println("----------");
15         List<ObjectError> allErrors = result.getAllErrors();
16         for (ObjectError o : allErrors) {
17             System.out.println(o.getDefaultMessage());
18         }
19         m.addAttribute("errors", allErrors);
20         return "/index.jsp";
21     }
user.jsp页面代码:
 1 <%@ page language="java" contentType="text/html; charset=UTF-8"
 2     pageEncoding="UTF-8"%>
 3     <%
 4 String path = request.getContextPath();
 5 String basePath = request.getScheme()+"://"+request.getServerName()+":"+request.getServerPort()+path+"/";
 6 %>
 7 <!DOCTYPE html>
 8 <html>
 9 <head>
10  <base href="<%=basePath%>">
11 <meta charset="UTF-8">
12 <title>Insert title here</title>
13 </head>
14 <body>
15 <form action="add3" method="post" >
16         <table>
17             <tr>
18                 <td>用户名</td>
19                 <td><input type="text" name="username" ></td>
20             </tr>
21             <tr>
22                 <td>用户密码</td>
23                 <td><input type="password" name="password"></td>
24             </tr>
25
26             <tr>
27                 <td><input type="submit" value="注册"></td>
28             </tr>
29         </table>
30     </form>
31 </body>
32 </body>
33 </html>
这里通过存取器的形式从对象中取数据
index.jsp页面代码:
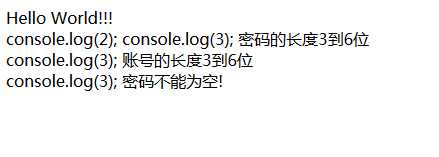
 1 <%@ page language="java" contentType="text/html; charset=UTF-8"
 2     pageEncoding="UTF-8"%>
 3 <%@ taglib uri="http://java.sun.com/jsp/jstl/core"  prefix="c"%>
 4 <%
 5 String path = request.getContextPath();
 6 String basePath = request.getScheme()+"://"+request.getServerName()+":"+request.getServerPort()+path+"/";
 7 %>
 8 <!DOCTYPE html>
 9 <html>
10 <head>
11  <base href="<%=basePath%>">
12 <meta charset="UTF-8">
13 <title>Insert title here</title>
14 </head>
15 <body>
16 Hello World!!!<br>
17     <c:if test="${errors ne null }">
18     console.log(2);
19         <c:forEach items="${errors}" var="e">
20         console.log(3);
21             ${e.defaultMessage }<br>
22         </c:forEach>
23     </c:if>
24 </body>
25 </html>
最后将错误信息显示到客户端:
二:分组校验:针对的不同的业务,不同的验证规则;例如有些只需要校验为空,有些复杂一些
分组代码:创建两个标志接口:
 1 /**
 2  *
 3  */
 4 package com.sxt.group;
 5
 6 /**
 7  * @author ASUS
 8  * 验证分组的标志接口1
 9  *
10  */
11 public interface GroupInterfence1 {
12
13 }
 1 /**
 2  *
 3  */
 4 package com.sxt.group;
 5
 6 /**
 7  * @author ASUS
 8  * 验证分组的接口2
 9  *
10  */
11 public interface GroupInterfence2 {
12
13 }
注意:这里的接口没有任何的变量和方法,只是为了后面绑定一定的验证规则给不同的业务去使用
user对象代码:
 1 /**
 2  *
 3  */
 4 package com.sxt.bean;
 5
 6 import javax.validation.constraints.Size;
 7
 8 import org.hibernate.validator.constraints.NotBlank;
 9
10 import com.sxt.group.GroupInterfence1;
11 import com.sxt.group.GroupInterfence2;
12
13 /**
14  * @author ASUS
15  * 验证注解:@Size
16  *
17  */
18 public class User {
19     //这里将账号和密码分别放在两个组的验证规则里面
20     //如果一个数据需要多个组的验证规则,用{}包裹即可
21     /**
22      * 在这里组一绑定的就是长度,组2绑定的验证规则是不能为空
23      */
24     @Size(max=6,min=3,message="{user.username.size}",groups=GroupInterfence1.class)
25     @NotBlank(message="{user.username.null}",groups=GroupInterfence2.class)
26     private String username;
27     @Size(max=6,min=3,message="{user.password.size}",groups= {GroupInterfence2.class,GroupInterfence1.class})
28     @NotBlank(message="{user.passsowrd.null}")
29     private String password;
30     public String getUsername() {
31         return username;
32     }
33     public void setUsername(String username) {
34         this.username = username;
35     }
36     public String getPassword() {
37         return password;
38     }
39     public void setPassword(String password) {
40         this.password = password;
41     }
42     @Override
43     public String toString() {
44         return "User [username=" + username + ", password=" + password + "]";
45     }
46
47
48 }
注意: 在哪一个验证规则的后面绑定了哪一个接口,那么该接口组就代表了相应的验证规则
jsp页面代码:
 1 <%@ page language="java" contentType="text/html; charset=UTF-8"
 2     pageEncoding="UTF-8"%>
 3     <%
 4 String path = request.getContextPath();
 5 String basePath = request.getScheme()+"://"+request.getServerName()+":"+request.getServerPort()+path+"/";
 6 %>
 7 <!DOCTYPE html>
 8 <html>
 9 <head>
10  <base href="<%=basePath%>">
11 <meta charset="UTF-8">
12 <title>Insert title here</title>
13 </head>
14 <body>
15 <form action="add1" method="post" >
16         <table>
17             <tr>
18                 <td>用户名</td>
19                 <td><input type="text" name="username" ></td>
20             </tr>
21             <tr>
22                 <td>用户密码</td>
23                 <td><input type="password" name="password"></td>
24             </tr>
25
26             <tr>
27                 <td><input type="submit" value="注册"></td>
28             </tr>
29         </table>
30     </form>
31     <hr>
32     <form action="add2" method="post" >
33         <table>
34             <tr>
35                 <td>用户名</td>
36                 <td><input type="text" name="username" ></td>
37             </tr>
38             <tr>
39                 <td>用户密码</td>
40                 <td><input type="password" name="password"></td>
41             </tr>
42
43             <tr>
44                 <td><input type="submit" value="注册"></td>
45             </tr>
46         </table>
47     </form>
48 </body>
49 </body>
50 </html>
index.jsp代码:
 1 <%@ page language="java" contentType="text/html; charset=UTF-8"
 2     pageEncoding="UTF-8"%>
 3 <%@ taglib uri="http://java.sun.com/jsp/jstl/core"  prefix="c"%>
 4 <%
 5 String path = request.getContextPath();
 6 String basePath = request.getScheme()+"://"+request.getServerName()+":"+request.getServerPort()+path+"/";
 7 %>
 8 <!DOCTYPE html>
 9 <html>
10 <head>
11  <base href="<%=basePath%>">
12 <meta charset="UTF-8">
13 <title>Insert title here</title>
14 </head>
15 <body>
16 Hello World!!!<br>
17     <c:if test="${errors ne null }">
18     console.log(2);
19         <c:forEach items="${errors}" var="e">
20         console.log(3);
21             ${e.defaultMessage }<br>
22         </c:forEach>
23     </c:if>
24 </body>
25 </html>
配置文件信息不改变。
数据回写:
可以使用前面讲过的三种方式来传值;将数据从服务器传送到客户端;通过存取器将数据填写到对应的表单中。
这里要特别注意Model传值,如果使用对象来接收数据,那么数据会默认的保存到Model中
controller代码:
 1 /**
 2  *
 3  */
 4 package com.sxt.controller;
 5 import org.springframework.stereotype.Controller;
 6 import org.springframework.web.bind.annotation.ModelAttribute;
 7 import org.springframework.web.bind.annotation.RequestMapping;
 8 import com.sxt.bean.User;
 9 /**
10  * @author ASUS
11  * 数据回写
12  *
13  *
14  */
15 @Controller
16 public class MyController {
17     /**
18      * 需要注意的这里用的对象名称接收数据必须与jsp中存取器取数据的名称一致
19      * 如果一定要不一致可以用@ModelAttribute("aa")取个别名
20      * @param user
21      * @return
22      */
23     @RequestMapping("/update")
24     public String update(@ModelAttribute("aa") User user) {
25         System.out.println("------------");
26         System.out.println(user);
27         return "/user.jsp";
28     }
29
30 }
你会发现一个问题;这里并没有使用三种传值方式的任何一种,可是最后值还是传到了客户端,为什么?
因为你如果使用对象来接收数据,那么默认的是将数据传到Model中,这样我们就可以直接在jsp页面中通过存取器来取值并放回到对应的表单中。
jsp代码:
 1 <%@ page language="java" contentType="text/html; charset=UTF-8"
 2     pageEncoding="UTF-8"%>
 3     <%
 4 String path = request.getContextPath();
 5 String basePath = request.getScheme()+"://"+request.getServerName()+":"+request.getServerPort()+path+"/";
 6 %>
 7 <!DOCTYPE html>
 8 <html>
 9 <head>
10  <base href="<%=basePath%>">
11 <meta charset="UTF-8">
12 <title>Insert title here</title>
13 </head>
14 <body>
15 <form action="update" method="post" >
16         <table>
17             <tr>
18                 <td>用户名</td>
19                 <td><input type="text" name="username" value="${user.username }"></td>
20             </tr>
21             <tr>
22                 <td>用户密码</td>
23                 <td><input type="text" name="password" value="${user.password }"></td>
24             </tr>
25
26             <tr>
27                 <td><input type="submit" value="注册"></td>
28             </tr>
29         </table>
30     </form>
31 </body>
32 </html>
配置文件代码:
 1 <?xml version="1.0" encoding="UTF-8"?>
 2 <beans xmlns="http://www.springframework.org/schema/beans"
 3     xmlns:xsi="http://www.w3.org/2001/XMLSchema-instance"
 4     xmlns:context="http://www.springframework.org/schema/context"
 5     xmlns:mvc="http://www.springframework.org/schema/mvc"
 6     xsi:schemaLocation="http://www.springframework.org/schema/mvc http://www.springframework.org/schema/mvc/spring-mvc-4.3.xsd
 7         http://www.springframework.org/schema/beans http://www.springframework.org/schema/beans/spring-beans.xsd
 8         http://www.springframework.org/schema/context http://www.springframework.org/schema/context/spring-context-4.3.xsd">
 9
10     <!-- 开启注解 -->
11     <mvc:annotation-driven ></mvc:annotation-driven>
12     <!-- 开启扫描 -->
13     <context:component-scan base-package="com.sxt.controller"></context:component-scan>
14
15
16 </beans>
标签:back user.js title component serve 利用 jstl 别名 就是
原文地址:https://www.cnblogs.com/liyunfeng-deng/p/10289996.html