标签:dap 装包 log sel 能力 relay_log isp its ln -s
1、通过网络或其他方式获取MySQL安装包mysql-5.7.15-linux-glibc2.5-x86_64.tar.gz;
2、随意创建一个存放MySQL压缩包的目录,如/data
[root@mysql01 yum.repos.d]# mkdir -p /data
3、上传mysql-5.7.15-linux-glibc2.5-x86_64.tar.gz 、一键安装脚本(mysql_install_5.7_v2.sh)到/data目录。(如果服务器可以访问互联网只需要上传mysql_install_5.7_v2.sh脚本赋予权限后执行即可)

#!/bin/sh
#mysql_install by James
#version 2.0
#安装版本 5.7
#安装要求:
#需要可以联网,若无网络,可以先创建/data目录,将安装包上传到/data目录下

#判断/data目录是否存在,若不存在则创建,并且下载mysql
datamenu="/data"
read  -p "Input a mysql version:" -t 120  mysql_version
read  -p "Input a mysql port:" -t 120  mysql_port
read  -p "Input a mysql_server_id:" -t 120 mysql_server_id
read  -p "Input a mysql_server_Memory(GB):" -t 120 mysql_server_Memory

memory_all=${mysql_server_Memory}
var=2
innodb_memory=$[$memory_all/$var]

mysqlfile="$datamenu/mysql-$mysql_version-linux-glibc2.5-x86_64.tar.gz"

if [ ! -d "$datamenu" ];then
     mkdir  "$datamenu"
     wget -P /data  http://dev.mysql.com/get/Downloads/MySQL-5.7/mysql-$mysql_version-linux-glibc2.5-x86_64.tar.gz
elif [ ! -f "$mysqlfile" ];then
     wget -P /data  http://dev.mysql.com/get/Downloads/MySQL-5.7/mysql-$mysql_version-linux-glibc2.5-x86_64.tar.gz
fi

#解压下载好的mysql
cd /opt
mkdir mysql
cd mysql
tar zxvf $mysqlfile -C /opt/mysql

#创建mysql用户

egrep "^mysql" /etc/group >& /dev/null
if [ $? -ne 0 ]
then
    groupadd mysql
fi

#create user if not exists
egrep "^mysql" /etc/passwd >& /dev/null
if [ $? -ne 0 ]
then
    useradd -g mysql -s /sbin/nologin -d /usr/local/mysql mysql
fi


#创建mysql软连接,并授权给mysql用户
cd /usr/local/
rm -rf /usr/local/mysql
ln -s /opt/mysql/mysql-$mysql_version-linux-glibc2.5-x86_64 /usr/local/mysql
chown -R mysql:mysql /usr/local/mysql
chown -R mysql:mysql /usr/local/mysql/

#基于配置文件,创建mysql安装目录,并授权
mkdir -p /data/mysql
mkdir -p /data/mysql/mysql${mysql_port}
cd  /data/mysql/mysql${mysql_port}/
mkdir /data/mysql/mysql${mysql_port}/data
mkdir /data/mysql/mysql${mysql_port}/logs
mkdir /data/mysql/mysql${mysql_port}/tmp
chown -R mysql:mysql /data/mysql/mysql${mysql_port}

cat > /etc/my.cnf << EOF
[client]
port    = 3306
socket            = /data/mysql/mysql${mysql_port}/data/mysql.sock

[mysql]
prompt="\u@mysqldb1 \R:\m:\s [\d]> "
no-auto-rehash

[mysqld]
user    = mysql
port            = ${mysql_port}
basedir         = /usr/local/mysql
datadir         = /data/mysql/mysql${mysql_port}/data
tmpdir          = /data/mysql/mysql${mysql_port}/tmp
socket            = /data/mysql/mysql${mysql_port}/data/mysql.sock
pid-file = mysqldb1.pid
lower_case_table_names  = 1  #忽略表名大小写
character-set-server = utf8
skip_name_resolve = 1
open_files_limit    = 65535
back_log = 1024
max_connections = 512
max_connect_errors = 1000000
table_open_cache = 1024
table_definition_cache = 1024
table_open_cache_instances = 64
thread_stack = 512K
external-locking = FALSE
max_allowed_packet = 32M
sort_buffer_size = 4M
join_buffer_size = 4M
thread_cache_size = 768
query_cache_size = 0
query_cache_type = 0
interactive_timeout = 600
wait_timeout = 600
#default_table_type = DEFAULT_ENGINE
tmp_table_size = 32M
max_heap_table_size = 32M
slow_query_log = 1
slow_query_log_file = slow.log
log-error = error.log
long_query_time = 0.1
server-id = 3306
log-bin     = /data/mysql/mysql${mysql_port}/logs/mysql-bin
sync_binlog = 1
binlog_cache_size = 4M
max_binlog_cache_size = 2G
max_binlog_size = 1G
expire_logs_days = 7
master_info_repository = TABLE
relay_log_info_repository = TABLE
gtid_mode = on
enforce_gtid_consistency = 1
log_slave_updates
binlog_format = row
relay_log_recovery = 1
relay-log-purge = 1
key_buffer_size = 32M
read_buffer_size = 8M
read_rnd_buffer_size = 4M
bulk_insert_buffer_size = 64M
myisam_sort_buffer_size = 128M
myisam_max_sort_file_size = 10G
myisam_repair_threads = 1
lock_wait_timeout = 3600
explicit_defaults_for_timestamp = 1
innodb_thread_concurrency = 0
innodb_sync_spin_loops = 100
innodb_spin_wait_delay = 30

transaction_isolation = READ-COMMITTED
#innodb_additional_mem_pool_size = 16M
innodb_buffer_pool_size = ${innodb_memory}G
innodb_buffer_pool_instances = 8
innodb_buffer_pool_load_at_startup = 1
innodb_buffer_pool_dump_at_shutdown = 1
innodb_data_file_path = ibdata1:1G:autoextend
innodb_flush_log_at_trx_commit = 1
innodb_log_buffer_size = 32M
innodb_log_file_size = 2G
innodb_log_files_in_group = 2
innodb_max_undo_log_size = 4G

# 根据您的服务器IOPS能力适当调整
# 一般配普通SSD盘的话,可以调整到 10000 - 20000
# 配置高端PCIe SSD卡的话,则可以调整的更高,比如 50000 - 80000
innodb_io_capacity = 4000
innodb_io_capacity_max = 8000

innodb_write_io_threads = 8
innodb_read_io_threads = 8
innodb_purge_threads = 4
innodb_page_cleaners = 4
innodb_open_files = 65535
innodb_max_dirty_pages_pct = 50
innodb_flush_method = O_DIRECT
innodb_lru_scan_depth = 4000
innodb_checksum_algorithm = crc32
#innodb_file_format = Barracuda
#innodb_file_format_max = Barracuda
innodb_lock_wait_timeout = 10
innodb_rollback_on_timeout = 1
innodb_print_all_deadlocks = 1
innodb_file_per_table = 1
innodb_online_alter_log_max_size = 4G
internal_tmp_disk_storage_engine = InnoDB
innodb_status_file = 1
innodb_status_output = 1
innodb_status_output_locks = 1
innodb_stats_on_metadata = 0

#performance_schema
performance_schema = 1
performance_schema_instrument = ‘%=on‘

#innodb monitor
innodb_monitor_enable="module_innodb"
innodb_monitor_enable="module_server"
innodb_monitor_enable="module_dml"
innodb_monitor_enable="module_ddl"
innodb_monitor_enable="module_trx"
innodb_monitor_enable="module_os"
innodb_monitor_enable="module_purge"
innodb_monitor_enable="module_log"
innodb_monitor_enable="module_lock"
innodb_monitor_enable="module_buffer"
innodb_monitor_enable="module_index"
innodb_monitor_enable="module_ibuf_system"
innodb_monitor_enable="module_buffer_page"
innodb_monitor_enable="module_adaptive_hash"

[mysqldump]
quick
max_allowed_packet = 32M

EOF


#初始化mysql

cd /usr/local/mysql
./bin/mysqld --initialize-insecure


#在/etc/init.d下创建mysql 启动脚本
cp /usr/local/mysql/support-files/mysql.server /etc/init.d/mysql


#添加环境变量,并使/etc/profile环境变量生效
echo "export PATH=$PATH:/usr/local/mysql/bin">>/etc/profile && source /etc/profile
4、赋予安装脚本操作权限。
chmod +x mysql_install_5.7_v2.sh
5、执行一键安装脚本。
sh mysql_install_5.7_v2.sh
6、根据提示输入对应参数,参考如下:
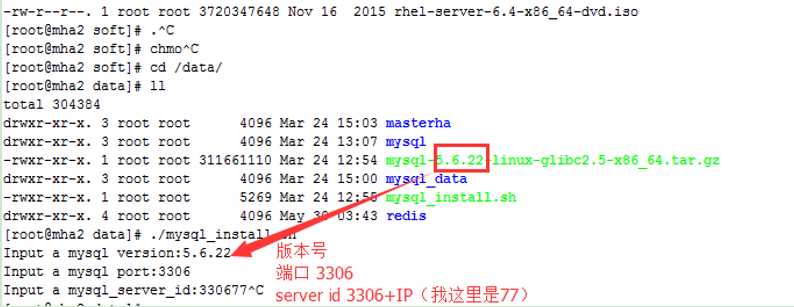
1)版本号根据你下载的版本面定
2)端口号默认是3306
3)Server_ID :3306+IP最后一个数字
4)输入服务器内存,以GB为单位输入如:我的服务器为6G 输入6即可
7、启动MySQL
[root@mysql01 data]# /etc/init.d/mysql status
MySQL is not running, but PID file exists [FAILED]
[root@ mysql01 data]# /etc/init.d/mysql start
Starting MySQL [ OK ]
8、登录MYSQL, 修改ROOT密码。第一次登录是不需要密码的。 这样MYSQL就安装成功了。
执行前source 一下:
[root@mysql01 local]#source /etc/profile
[root@mysql01 local]# mysql -uroot -p
Welcome to the MySQL monitor. Commands end with ; or \g.
Your MySQL connection id is 1
Server version: 5.5.37-log MySQL Community Server (GPL)
Copyright (c) 2000, 2014, Oracle and/or its affiliates. All rights reserved.
Oracle is a registered trademark of Oracle Corporation and/or its
affiliates. Other names may be trademarks of their respective
owners.
Type ‘help;‘ or ‘\h‘ for help. Type ‘\c‘ to clear the current input statement.
(testing)root@mysql01 [(none)]> use mysql;
Database changed
(testing)root@mysql01 [mysql]> update user set authentication_string = password(‘coship‘) where user=‘root‘;
Query OK, 4 rows affected (0.01 sec)
Rows matched: 5 Changed: 4 Warnings: 0
(testing)root@mysql01 [mysql]> commit;
Query OK, 0 rows affected (0.00 sec)
(testing)root@mysql01 [mysql]> flush privileges;
Query OK, 0 rows affected (0.00 sec)
9、配置用权限、安全、设置认证账户
mysql [(none)]>select user,host, authentication_string from mysql.user;
+------+-----------------------+----------+
| user | host | password |
+------+-----------------------+----------+
| root | localhost | |
| root | localhost.localdomain | |
| root | 127.0.0.1 | |
| root | ::1 | |
| | localhost | |
| | localhost.localdomain | |
+------+-----------------------+----------+
6 rows in set (0.27 sec)
mysql [(none)]>delete from mysql.user where user!=‘root‘ or host!=‘localhost‘;
Query OK, 5 rows affected (0.36 sec)
mysql [(none)]>truncate mysql.db;
Query OK, 0 rows affected (0.04 sec)
mysql [(none)]>drop database test;
Query OK, 0 rows affected (0.05 sec)
mysql [(none)]>flush privileges;
Query OK, 0 rows affected (1.65 sec)
mysql [(none)]>reset master;
Query OK, 0 rows affected (0.06 sec)
mysql [(none)]>flush privileges;
Query OK, 0 rows affected (0.00 sec)
mysql [(none)]>select user,host,authentication_string from mysql.user;
+------+-----------+----------+
| user | host | password |
+------+-----------+----------+
| root | localhost | |
+------+-----------+----------+
1 row in set (0.00 sec)
mysql [(none)]>grant all privileges on *.* to ‘root‘@‘%‘ identified by ‘coship‘;
标签:dap 装包 log sel 能力 relay_log isp its ln -s
原文地址:https://www.cnblogs.com/LBeautiful/p/10557130.html
