标签:结果 databases d3d 字符 学习 mysqldb where last 通道
开发堡垒机之前,先来学习Python的paramiko模块,该模块机遇SSH用于连接远程服务器并执行相关操作
SSHClient
用于连接远程服务器并执行基本命令
基于用户名密码连接:
 SSHClient 封装 Transport
import paramiko

transport = paramiko.Transport((‘hostname‘, 22))
transport.connect(username=‘wupeiqi‘, password=‘123‘)

ssh = paramiko.SSHClient()
ssh._transport = transport

stdin, stdout, stderr = ssh.exec_command(‘df‘)
print stdout.read()

transport.close()
SSHClient 封装 Transport 基于私钥字符串进行连接SFTPClient
用于连接远程服务器并执行上传下载
基于用户名密码上传下载
基于公钥密钥上传下载
Demo实现思路:
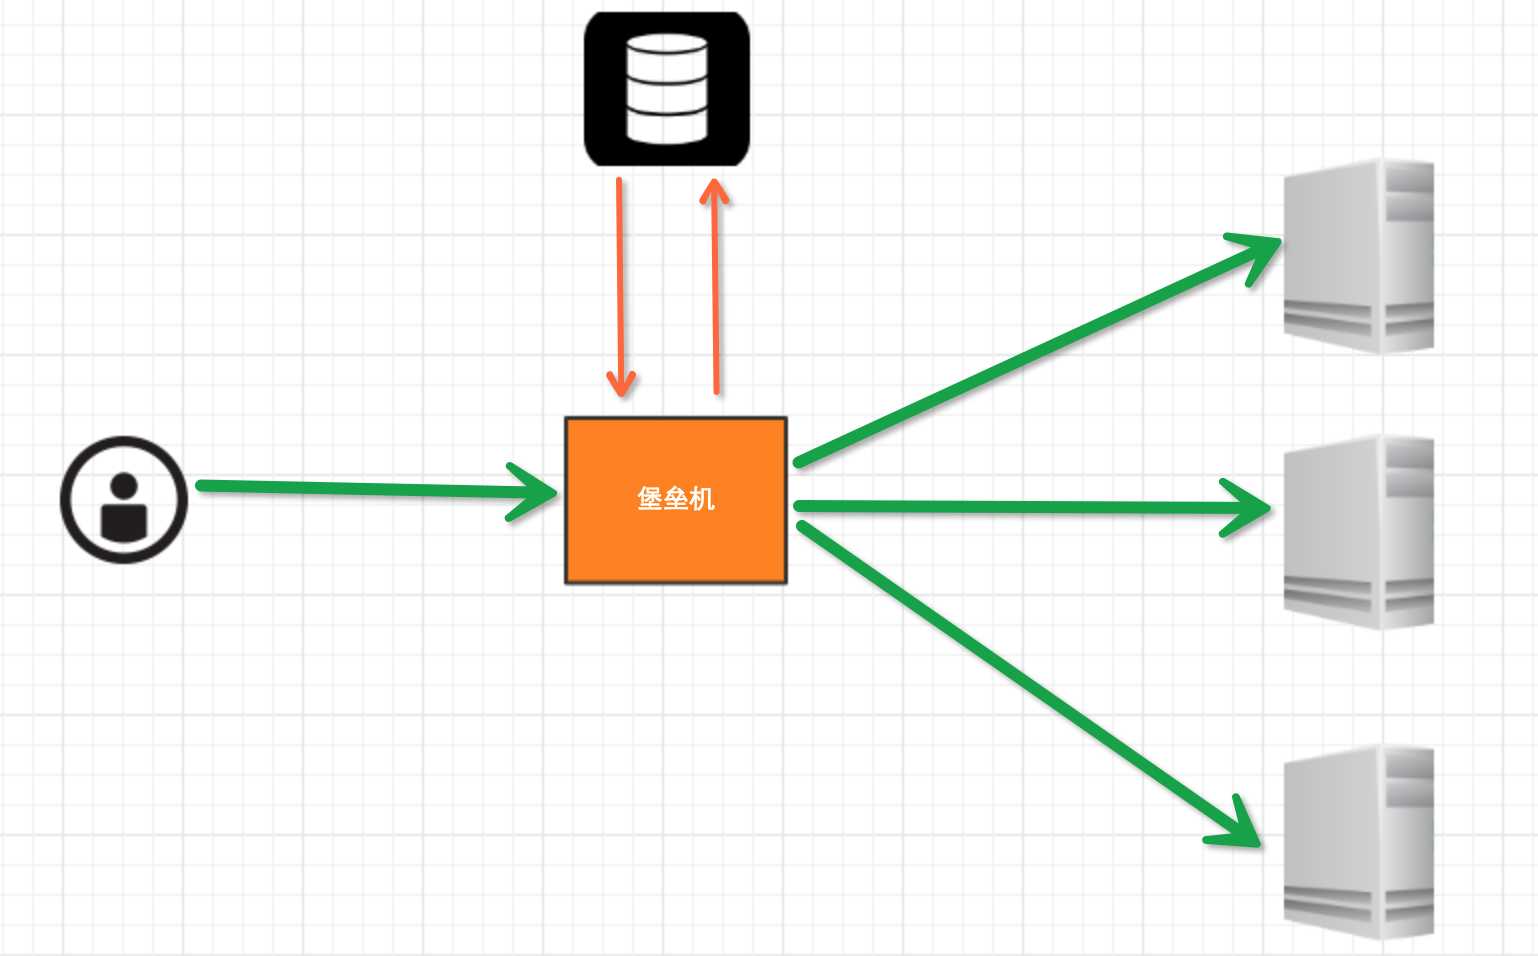
堡垒机执行流程:
注:配置.brashrc实现ssh登陆后自动执行脚本,如:/usr/bin/python /home/wupeiqi/menu.py
实现过程
步骤一,实现用户登陆
|
1
2
3
4
5
6
7
8
|
import getpassuser = raw_input(‘username:‘)pwd = getpass.getpass(‘password‘)if user == ‘alex‘ and pwd == ‘123‘: print ‘登陆成功‘else: print ‘登陆失败‘ |
步骤二,根据用户获取相关服务器列表
|
1
2
3
4
5
6
7
8
9
10
11
12
13
14
15
16
17
18
19
20
21
|
dic = { ‘alex‘: [ ‘172.16.103.189‘, ‘c10.puppet.com‘, ‘c11.puppet.com‘, ], ‘eric‘: [ ‘c100.puppet.com‘, ]}host_list = dic[‘alex‘]print ‘please select:‘for index, item in enumerate(host_list, 1): print index, iteminp = raw_input(‘your select (No):‘)inp = int(inp)hostname = host_list[inp-1]port = 22 |
步骤三,根据用户名、私钥登陆服务器
|
1
2
3
4
5
6
7
8
9
10
11
12
13
14
15
16
17
18
19
20
21
22
|
tran = paramiko.Transport((hostname, port,))tran.start_client()default_path = os.path.join(os.environ[‘HOME‘], ‘.ssh‘, ‘id_rsa‘)key = paramiko.RSAKey.from_private_key_file(default_path)tran.auth_publickey(‘wupeiqi‘, key)# 打开一个通道chan = tran.open_session()# 获取一个终端chan.get_pty()# 激活器chan.invoke_shell()########## 利用sys.stdin,肆意妄为执行操作# 用户在终端输入内容,并将内容发送至远程服务器# 远程服务器执行命令,并将结果返回# 用户终端显示内容#########chan.close()tran.close() |
肆意妄为方式一 肆意妄为方式二 肆意妄为方式三注:密码验证 t.auth_password(username, pw)
详见:paramiko源码demo
Python 操作 Mysql 模块的安装
|
1
2
3
4
5
|
linux: yum install MySQL-pythonwindow: http://files.cnblogs.com/files/wupeiqi/py-mysql-win.zip |
SQL基本使用
1、数据库操作
|
1
2
3
|
show databases;use [databasename];create database [name]; |
2、数据表操作
|
1
2
3
4
5
6
7
8
9
10
|
show tables;create table students ( id int not null auto_increment primary key, name char(8) not null, sex char(4) not null, age tinyint unsigned not null, tel char(13) null default "-" ); |
View Code3、数据操作
|
1
2
3
4
5
6
7
|
insert into students(name,sex,age,tel) values(‘alex‘,‘man‘,18,‘151515151‘)delete from students where id =2;update students set name = ‘sb‘ where id =1;select * from students |
4、其他
|
1
2
3
|
主键外键左右连接 |
Python MySQL API
一、插入数据
|
1
2
3
4
5
6
7
8
9
10
11
12
13
14
15
|
import MySQLdb conn = MySQLdb.connect(host=‘127.0.0.1‘,user=‘root‘,passwd=‘1234‘,db=‘mydb‘) cur = conn.cursor() reCount = cur.execute(‘insert into UserInfo(Name,Address) values(%s,%s)‘,(‘alex‘,‘usa‘))# reCount = cur.execute(‘insert into UserInfo(Name,Address) values(%(id)s, %(name)s)‘,{‘id‘:12345,‘name‘:‘wupeiqi‘}) conn.commit() cur.close()conn.close() print reCount |
批量插入数据注意:cur.lastrowid
二、删除数据
|
1
2
3
4
5
6
7
8
9
10
11
12
13
14
|
import MySQLdbconn = MySQLdb.connect(host=‘127.0.0.1‘,user=‘root‘,passwd=‘1234‘,db=‘mydb‘)cur = conn.cursor()reCount = cur.execute(‘delete from UserInfo‘)conn.commit()cur.close()conn.close()print reCount |
三、修改数据
|
1
2
3
4
5
6
7
8
9
10
11
12
13
|
import MySQLdbconn = MySQLdb.connect(host=‘127.0.0.1‘,user=‘root‘,passwd=‘1234‘,db=‘mydb‘)cur = conn.cursor()reCount = cur.execute(‘update UserInfo set Name = %s‘,(‘alin‘,))conn.commit()cur.close()conn.close()print reCount |
四、查数据
|
1
2
3
4
5
6
7
8
9
10
11
12
13
14
15
16
17
18
19
20
21
22
23
24
25
26
27
28
29
30
31
32
33
34
35
36
37
38
39
40
41
42
43
44
|
# ############################## fetchone/fetchmany(num) ##############################import MySQLdbconn = MySQLdb.connect(host=‘127.0.0.1‘,user=‘root‘,passwd=‘1234‘,db=‘mydb‘)cur = conn.cursor()reCount = cur.execute(‘select * from UserInfo‘)print cur.fetchone()print cur.fetchone()cur.scroll(-1,mode=‘relative‘)print cur.fetchone()print cur.fetchone()cur.scroll(0,mode=‘absolute‘)print cur.fetchone()print cur.fetchone()cur.close()conn.close()print reCount# ############################## fetchall ##############################import MySQLdbconn = MySQLdb.connect(host=‘127.0.0.1‘,user=‘root‘,passwd=‘1234‘,db=‘mydb‘)#cur = conn.cursor(cursorclass = MySQLdb.cursors.DictCursor)cur = conn.cursor()reCount = cur.execute(‘select Name,Address from UserInfo‘)nRet = cur.fetchall()cur.close()conn.close()print reCountprint nRetfor i in nRet: print i[0],i[1] |
import paramiko transport = paramiko.Transport((‘hostname‘, 22)) transport.connect(username=‘wupeiqi‘, password=‘123‘) ssh = paramiko.SSHClient() ssh._transport = transport stdin, stdout, stderr = ssh.exec_command(‘df‘) print stdout.read() transport.close()
import paramiko transport = paramiko.Transport((‘hostname‘, 22)) transport.connect(username=‘wupeiqi‘, password=‘123‘) ssh = paramiko.SSHClient() ssh._transport = transport stdin, stdout, stderr = ssh.exec_command(‘df‘) print stdout.read() transport.close()
标签:结果 databases d3d 字符 学习 mysqldb where last 通道
原文地址:https://www.cnblogs.com/xwqhl/p/10694345.html