标签:res factory env sch 发送请求 link include nbsp features
Springboot启动器:
<dependency>
    <groupId>org.springframework.boot</groupId>
    <artifactId>spring‐boot‐starter‐web</artifactId>
</dependency>
spring-boot-starter-web:
spring-boot-starter:spring-boot场景启动器;帮我们导入了web模块正常运行所依赖的组件;
Spring Boot将所有的功能场景都抽取出来,做成一个个的starters(启动器),只需要在项目里面引入这些starter
相关场景的所有依赖都会导入进来。要用什么功能就导入什么场景的启动器
主程序类,主入口类
**
 *  @SpringBootApplication 来标注一个主程序类,说明这是一个Spring Boot应用
 */
@SpringBootApplication
public class HelloWorldMainApplication {
    public static void main(String[] args) {
        // Spring应用启动起来
        SpringApplication.run(HelloWorldMainApplication.class,args);
    }
}
@SpringBootApplication: Spring Boot应用标注在某个类上说明这个类是SpringBoot的主配置类,SpringBoot
就应该运行这个类的main方法来启动SpringBoot应用;
@Target(ElementType.TYPE)
@Retention(RetentionPolicy.RUNTIME)
@Documented
@Inherited
@SpringBootConfiguration
@EnableAutoConfiguration
@ComponentScan(excludeFilters = {
      @Filter(type = FilterType.CUSTOM, classes = TypeExcludeFilter.class),
      @Filter(type = FilterType.CUSTOM, classes = AutoConfigurationExcludeFilter.class) })
public @interface SpringBootApplication {
@SpringBootConfiguration:Spring Boot的配置类;
标注在某个类上,表示这是一个Spring Boot的配置类;
@Configuration:配置类上来标注这个注解;
配置类 ----- 配置文件;配置类也是容器中的一个组件;@Component
@EnableAutoConfiguration:开启自动配置功能;
以前我们需要配置的东西,Spring Boot帮我们自动配置;@EnableAutoConfiguration告诉SpringBoot开启自
动配置功能;这样自动配置才能生效;
@AutoConfigurationPackage
@Import(EnableAutoConfigurationImportSelector.class)
public @interface EnableAutoConfiguration {
@AutoConfigurationPackage:自动配置包
@Import(AutoConfigurationPackages.Registrar.class):
Spring的底层注解@Import,给容器中导入一个组件;导入的组件由
AutoConfigurationPackages.Registrar.class;
将主配置类(@SpringBootApplication标注的类)的所在包及下面所有子包里面的所有组件扫描到Spring容器;
@Import(EnableAutoConfigurationImportSelector.class);
给容器中导入组件?
EnableAutoConfigurationImportSelector:导入哪些组件的选择器;
将所有需要导入的组件以全类名的方式返回;这些组件就会被添加到容器中;
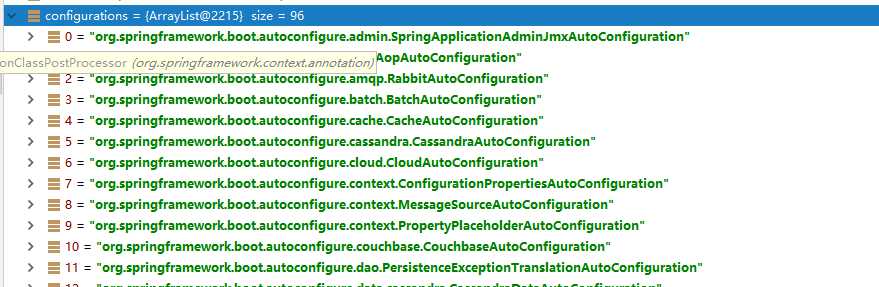
会给容器中导入非常多的自动配置类(xxxAutoConfiguration);就是给容器中导入这个场景需要的所有组件,
并配置好这些组件;
有了自动配置类,免去了我们手动编写配置注入功能组件等的工作;
SpringFactoriesLoader.loadFactoryNames(EnableAutoConfiguration.class,classLoader);
Spring Boot在启动的时候从类路径下的META-INF/spring.factories中获取EnableAutoConfiguration指定的值,将
这些值作为自动配置类导入到容器中,自动配置类就生效,帮我们进行自动配置工作;以前我们需要自己配置的东
西,自动配置类都帮我们;
J2EE的整体整合解决方案和自动配置都在spring-boot-autoconfigure-1.5.9.RELEASE.jar;
关于
/**
 * 将配置文件中配置的每一个属性的值,映射到这个组件中
 * @ConfigurationProperties:告诉SpringBoot将本类中的所有属性和配置文件中相关的配置进行绑定;
 *      prefix = "person":配置文件中哪个下面的所有属性进行一一映射
 *
 * 只有这个组件是容器中的组件,才能容器提供的@ConfigurationProperties功能;
 *
 */
@Component
@ConfigurationProperties(prefix = "person")
public class Person {
    private String lastName;
    private Integer age;
    private Boolean boss;
    private Date birth;
    private Map<String,Object> maps;
    private List<Object> lists;
    private Dog dog;
我们可以导入配置文件处理器,以后编写配置就有提示了
<!‐‐导入配置文件处理器,配置文件进行绑定就会有提示‐‐>
<dependency>
<groupId>org.springframework.boot</groupId>
<artifactId>spring‐boot‐configuration‐processor</artifactId>
<optional>true</optional>
</dependency>
@Value获取值和@ConfigurationProperties获取值比较
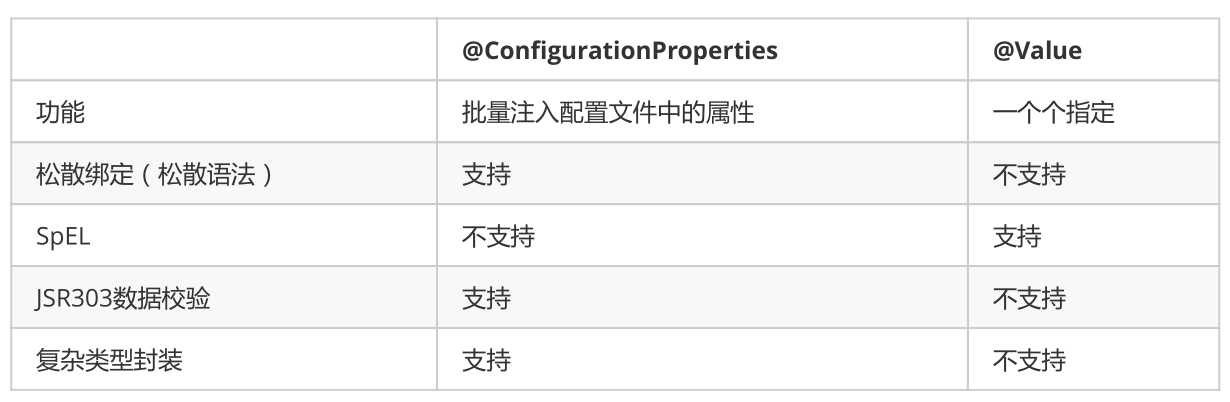
配置文件yml还是properties他们都能获取到值;
如果说,我们只是在某个业务逻辑中需要获取一下配置文件中的某项值,使用@Value;
如果说,我们专门编写了一个javaBean来和配置文件进行映射,我们就直接使用@ConfigurationProperties;
配置文件注入值数据校验
@Component
@ConfigurationProperties(prefix = "person")
@Validated
public class Person {
    /**
     * <bean class="Person">
     *      <property name="lastName" value="字面量/${key}从环境变量、配置文件中获取值/#
{SpEL}"></property>
     * <bean/>
     */
   //lastName必须是邮箱格式
    @Email
    //@Value("${person.last‐name}")
    private String lastName;
    //@Value("#{11*2}")
    private Integer age;
    //@Value("true")
    private Boolean boss;
    private Date birth;
    private Map<String,Object> maps;
    private List<Object> lists;
    private Dog dog;
@PropertySource&@ImportResource&@Bean
@PropertySource:加载指定的配置文件;
/**
 * 将配置文件中配置的每一个属性的值,映射到这个组件中
 * @ConfigurationProperties:告诉SpringBoot将本类中的所有属性和配置文件中相关的配置进行绑定;
 *      prefix = "person":配置文件中哪个下面的所有属性进行一一映射
 *
 * 只有这个组件是容器中的组件,才能容器提供的@ConfigurationProperties功能;
 *  @ConfigurationProperties(prefix = "person")默认从全局配置文件中获取值;
 *
 */
@PropertySource(value = {"classpath:person.properties"})
@Component
@ConfigurationProperties(prefix = "person")
//@Validated
public class Person {
    /**
     * <bean class="Person">
     *      <property name="lastName" value="字面量/${key}从环境变量、配置文件中获取值/#
{SpEL}"></property>
     * <bean/>
     */
   //lastName必须是邮箱格式
   // @Email
    //@Value("${person.last‐name}")
    private String lastName;
    //@Value("#{11*2}")
    private Integer age;
    //@Value("true")
    private Boolean boss;
@ImportResource:导入Spring的配置文件,让配置文件里面的内容生效;
Spring Boot里面没有Spring的配置文件,我们自己编写的配置文件,也不能自动识别;
想让Spring的配置文件生效,加载进来;@ImportResource标注在一个配置类上
@ImportResource(locations = {"classpath:beans.xml"})
导入Spring的配置文件让其生效
不来编写Spring的配置文件
<?xml version="1.0" encoding="UTF‐8"?>
<beans xmlns="http://www.springframework.org/schema/beans"
       xmlns:xsi="http://www.w3.org/2001/XMLSchema‐instance"
       xsi:schemaLocation="http://www.springframework.org/schema/beans
http://www.springframework.org/schema/beans/spring‐beans.xsd">
    <bean id="helloService" class="com.atguigu.springboot.service.HelloService"></bean>
</beans>
SpringBoot推荐给容器中添加组件的方式;推荐使用全注解的方式
1、配置类@Configuration------>Spring配置文件
2、使用@Bean给容器中添加组件
/**
 * @Configuration:指明当前类是一个配置类;就是来替代之前的Spring配置文件
 *
* 在配置文件中用<bean><bean/>标签添加组件
 *
 */
@Configuration
public class MyAppConfig {
    //将方法的返回值添加到容器中;容器中这个组件默认的id就是方法名
    @Bean
    public HelloService helloService02(){
        System.out.println("配置类@Bean给容器中添加组件了...");
        return new HelloService();
    }
}
配置文件占位符
随机数
${random.value}、${random.int}、${random.long}
${random.int(10)}、${random.int[1024,65536]}
占位符获取之前配置的值,如果没有可以是用:指定默认值
person.last‐name=张三${random.uuid}
person.age=${random.int}
person.birth=2017/12/15
person.boss=false
person.maps.k1=v1
person.maps.k2=14
person.lists=a,b,c
person.dog.name=${person.hello:hello}_dog
person.dog.age=15
Profile
多Profile文件
我们在主配置文件编写的时候,文件名可以是 application-{profile}.properties/yml
默认使用application.properties的配置;
yml支持多文档块方式
server:
  port: 8081
spring:
  profiles:
    active: prod
‐‐‐
server:
  port: 8083
spring:
  profiles: dev
‐‐‐
server:
  port: 8084
spring:
  profiles: prod  #指定属于哪个环境
激活指定profile
1、在配置文件中指定 spring.profiles.active=dev
2、命令行:
java -jar spring-boot-02-config-0.0.1-SNAPSHOT.jar --spring.profiles.active=dev;
可以直接在测试的时候,配置传入命令行参数
3、虚拟机参数;
-Dspring.profiles.active=dev
配置文件加载位置
springboot 启动会扫描以下位置的application.properties或者application.yml文件作为Spring boot的默认配置文
件
–file:./config/
–file:./
–classpath:/config/
–classpath:/
优先级由高到底,高优先级的配置会覆盖低优先级的配置;
server:
port: 8081
spring:
profiles:
active: prod
‐‐‐
server:
port: 8083
spring:
profiles: dev
‐‐‐
server:
port: 8084
spring:
profiles: prod #指定属于哪个环境
SpringBoot会从这四个位置全部加载主配置文件;互补配置;
我们还可以通过spring.config.location来改变默认的配置文件位置
项目打包好以后,我们可以使用命令行参数的形式,启动项目的时候来指定配置文件的新位置;指定配置文件和默
认加载的这些配置文件共同起作用形成互补配置;
java -jar spring-boot-02-config-02-0.0.1-SNAPSHOT.jar --spring.config.location=G:/application.properties
外部配置加载顺序
SpringBoot也可以从以下位置加载配置; 优先级从高到低;高优先级的配置覆盖低优先级的配置,所有的配置会
形成互补配置
1.命令行参数
所有的配置都可以在命令行上进行指定
java -jar spring-boot-02-config-02-0.0.1-SNAPSHOT.jar --server.port=8087 --server.context-path=/abc
多个配置用空格分开; --配置项=值
2.来自java:comp/env的JNDI属性
3.Java系统属性(System.getProperties())
4.操作系统环境变量
5.RandomValuePropertySource配置的random.*属性值
由jar包外向jar包内进行寻找;
优先加载带profile
6.jar包外部的application-{profile}.properties或application.yml(带spring.profile)配置文件
7.jar包内部的application-{profile}.properties或application.yml(带spring.profile)配置文件
再来加载不带profile
8.jar包外部的application.properties或application.yml(不带spring.profile)配置文件
9.jar包内部的application.properties或application.yml(不带spring.profile)配置文件
10.@Configuration注解类上的@PropertySource
11.通过SpringApplication.setDefaultProperties指定的默认属性
所有支持的配置加载来源;
参考官方:https://docs.spring.io/spring-boot/docs/1.5.9.RELEASE/reference/htmlsingle/#boot-features-external-config
Web开发
使用SpringBoot;
1)、创建SpringBoot应用,选中我们需要的模块;
2)、SpringBoot已经默认将这些场景配置好了,只需要在配置文件中指定少量配置就可以运行起来
3)、自己编写业务代码;
自动配置原理?
这个场景SpringBoot帮我们配置了什么?能不能修改?能修改哪些配置?能不能扩展?xxx
xxxxAutoConfiguration:帮我们给容器中自动配置组件;
xxxxProperties:配置类来封装配置文件的内容;
SpringBoot对静态资源的映射规则
@ConfigurationProperties(prefix = "spring.resources", ignoreUnknownFields = false)
public class ResourceProperties implements ResourceLoaderAware {
  //可以设置和静态资源有关的参数,缓存时间等
WebMvcAuotConfiguration:
@Override
public void addResourceHandlers(ResourceHandlerRegistry registry) {
if (!this.resourceProperties.isAddMappings()) {
logger.debug("Default resource handling disabled");
return;
}
Integer cachePeriod = this.resourceProperties.getCachePeriod();
if (!registry.hasMappingForPattern("/webjars/**")) {
customizeResourceHandlerRegistration(
registry.addResourceHandler("/webjars/**")
.addResourceLocations(
"classpath:/META‐INF/resources/webjars/")
.setCachePeriod(cachePeriod));
}
String staticPathPattern = this.mvcProperties.getStaticPathPattern();
           //静态资源文件夹映射
if (!registry.hasMappingForPattern(staticPathPattern)) {
customizeResourceHandlerRegistration(
registry.addResourceHandler(staticPathPattern)
.addResourceLocations(
this.resourceProperties.getStaticLocations())
.setCachePeriod(cachePeriod));
}
}
        //配置欢迎页映射
@Bean
public WelcomePageHandlerMapping welcomePageHandlerMapping(
ResourceProperties resourceProperties) {
return new WelcomePageHandlerMapping(resourceProperties.getWelcomePage(),
this.mvcProperties.getStaticPathPattern());
}
       //配置喜欢的图标
@Configuration
@ConditionalOnProperty(value = "spring.mvc.favicon.enabled", matchIfMissing = true)

public static class FaviconConfiguration {
private final ResourceProperties resourceProperties;
public FaviconConfiguration(ResourceProperties resourceProperties) {
this.resourceProperties = resourceProperties;
}
@Bean
public SimpleUrlHandlerMapping faviconHandlerMapping() {
SimpleUrlHandlerMapping mapping = new SimpleUrlHandlerMapping();
mapping.setOrder(Ordered.HIGHEST_PRECEDENCE + 1);
               //所有  **/favicon.ico
mapping.setUrlMap(Collections.singletonMap("**/favicon.ico",
faviconRequestHandler()));
return mapping;
}
@Bean
public ResourceHttpRequestHandler faviconRequestHandler() {
ResourceHttpRequestHandler requestHandler = new
ResourceHttpRequestHandler();

requestHandler
.setLocations(this.resourceProperties.getFaviconLocations());
return requestHandler;
}
}
1)、所有 /webjars/** ,都去 classpath:/META-INF/resources/webjars/ 找资源;
webjars:以jar包的方式引入静态资源;

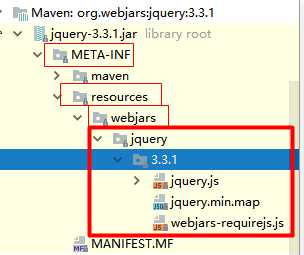
localhost:8080/webjars/jquery/3.3.1/jquery.js
<!‐‐引入jquery‐webjar‐‐>在访问的时候只需要写webjars下面资源的名称即可
<dependency>
<groupId>org.webjars</groupId>
<artifactId>jquery</artifactId>
<version>3.3.1</version>
</dependency>
"/**" 访问当前项目的任何资源,都去(静态资源的文件夹)找映射
"classpath:/META‐INF/resources/",
"classpath:/resources/",
"classpath:/static/",
"classpath:/public/"
"/":当前项目的根路径
localhost:8080/abc === 去静态资源文件夹里面找abc
3)、欢迎页; 静态资源文件夹下的所有index.html页面;被"/**"映射;
localhost:8080/ 找index页面
4)、所有的 **/favicon.ico 都是在静态资源文件下找;
SpringMVC自动配置
https://docs.spring.io/spring-boot/docs/1.5.10.RELEASE/reference/htmlsingle/#boot-features-developing-web-applications
1. Spring MVC auto-configuration
Spring Boot 自动配置好了SpringMVC
以下是SpringBoot对SpringMVC的默认配置:(WebMvcAutoConfiguration)
Inclusion of ContentNegotiatingViewResolver and BeanNameViewResolver beans.
自动配置了ViewResolver(视图解析器:根据方法的返回值得到视图对象(View),视图对象决定如何
渲染(转发?重定向?))
ContentNegotiatingViewResolver:组合所有的视图解析器的;
如何定制:我们可以自己给容器中添加一个视图解析器;自动的将其组合进来;
Support for serving static resources, including support for WebJars (see below).静态资源文件夹路
径,webjars
Static index.html support. 静态首页访问
Custom Favicon support (see below). favicon.ico
自动注册了 of Converter , GenericConverter , Formatter beans.
Converter:转换器; public String hello(User user):类型转换使用Converter
Formatter 格式化器; 2017.12.17===Date;
Bean
@ConditionalOnProperty(prefix = "spring.mvc", name = "date‐format")//在文件中配置日期格
式化的规则

public Formatter<Date> dateFormatter() {
return new DateFormatter(this.mvcProperties.getDateFormat());//日期格式化组件
}
自己添加的格式化器转换器,我们只需要放在容器中即可
Support for HttpMessageConverters (see below).
HttpMessageConverter:SpringMVC用来转换Http请求和响应的;User---Json;
HttpMessageConverters 是从容器中确定;获取所有的HttpMessageConverter;
自己给容器中添加HttpMessageConverter,只需要将自己的组件注册容器中(@Bean,@Component)
Automatic registration of MessageCodesResolver (see below).定义错误代码生成规则
Automatic use of a ConfigurableWebBindingInitializer bean (see below).
我们可以配置一个ConfigurableWebBindingInitializer来替换默认的;(添加到容器)
初始化WebDataBinder;
请求数据=====JavaBean;
org.springframework.boot.autoconfigure.web:web的所有自动场景;
If you want to keep Spring Boot MVC features, and you just want to add additional MVC configuration
(interceptors, formatters, view controllers etc.) you can add your own @Configuration class of type
WebMvcConfigurerAdapter , but without @EnableWebMvc . If you wish to provide custom instances of
RequestMappingHandlerMapping , RequestMappingHandlerAdapter or ExceptionHandlerExceptionResolver
you can declare a WebMvcRegistrationsAdapter instance providing such components.
If you want to take complete control of Spring MVC, you can add your own @Configuration annotated with
@EnableWebMvc .
扩展SpringMVC
<mvc:view‐controller path="/hello" view‐name="success"/>
    <mvc:interceptors>
        <mvc:interceptor>
            <mvc:mapping path="/hello"/>
            <bean></bean>
        </mvc:interceptor>
    </mvc:interceptors>
编写一个配置类(@Configuration),是WebMvcConfigurerAdapter类型;不能标注@EnableWebMvc;
既保留了所有的自动配置,也能用我们扩展的配置;
//使用WebMvcConfigurerAdapter可以来扩展SpringMVC的功能
@Configuration
public class MyMvcConfig extends WebMvcConfigurerAdapter {
    @Override
    public void addViewControllers(ViewControllerRegistry registry) {
       // super.addViewControllers(registry);
        //浏览器发送 /atguigu 请求来到 success
        registry.addViewController("/atguigu").setViewName("success");
    }
}
原理:
1)、WebMvcAutoConfiguration是SpringMVC的自动配置类
2)、在做其他自动配置时会导入;@Import(EnableWebMvcConfiguration.class)
@Configuration
public static class EnableWebMvcConfiguration extends DelegatingWebMvcConfiguration {
      private final WebMvcConfigurerComposite configurers = new WebMvcConfigurerComposite();
 //从容器中获取所有的WebMvcConfigurer
      @Autowired(required = false)
      public void setConfigurers(List<WebMvcConfigurer> configurers) {
          if (!CollectionUtils.isEmpty(configurers)) {
              this.configurers.addWebMvcConfigurers(configurers);
             //一个参考实现;将所有的WebMvcConfigurer相关配置都来一起调用;
             @Override
             // public void addViewControllers(ViewControllerRegistry registry) {
              //    for (WebMvcConfigurer delegate : this.delegates) {
               //       delegate.addViewControllers(registry);
               //   }
              }
          }
}
3)、容器中所有的WebMvcConfigurer都会一起起作用;
4)、我们的配置类也会被调用;
效果:SpringMVC的自动配置和我们的扩展配置都会起作用
全面接管SpringMVC;
SpringBoot对SpringMVC的自动配置不需要了,所有都是我们自己配置;所有的SpringMVC的自动配置都失效了
我们需要在配置类中添加@EnableWebMvc即可;
//使用WebMvcConfigurerAdapter可以来扩展SpringMVC的功能
@EnableWebMvc
@Configuration
public class MyMvcConfig extends WebMvcConfigurerAdapter {
    @Override
    public void addViewControllers(ViewControllerRegistry registry) {
       // super.addViewControllers(registry);
        //浏览器发送 /atguigu 请求来到 success
        registry.addViewController("/atguigu").setViewName("success");
    }
}
原理:
为什么@EnableWebMvc自动配置就失效了;
1)@EnableWebMvc的核心
@Import(DelegatingWebMvcConfiguration.class)
public @interface EnableWebMvc {
2)、
@Configuration
public class DelegatingWebMvcConfiguration extends WebMvcConfigurationSupport {
3)、
@Configuration
@ConditionalOnWebApplication
@ConditionalOnClass({ Servlet.class, DispatcherServlet.class,
WebMvcConfigurerAdapter.class })
//容器中没有这个组件的时候,这个自动配置类才生效
@ConditionalOnMissingBean(WebMvcConfigurationSupport.class)
@AutoConfigureOrder(Ordered.HIGHEST_PRECEDENCE + 10)
@AutoConfigureAfter({ DispatcherServletAutoConfiguration.class,
ValidationAutoConfiguration.class })
public class WebMvcAutoConfiguration {
4)、@EnableWebMvc将WebMvcConfigurationSupport组件导入进来;
5)、导入的WebMvcConfigurationSupport只是SpringMVC最基本的功能;
5、如何修改SpringBoot的默认配置
模式:
1)、SpringBoot在自动配置很多组件的时候,先看容器中有没有用户自己配置的(@Bean、@Component)如
果有就用用户配置的,如果没有,才自动配置;如果有些组件可以有多个(ViewResolver)将用户配置的和自己默
认的组合起来;
2)、在SpringBoot中会有非常多的xxxConfigurer帮助我们进行扩展配置
3)、在SpringBoot中会有很多的xxxCustomizer帮助我们进行定制配置
RestfulCRUD :
默认访问首页
//使用WebMvcConfigurerAdapter可以来扩展SpringMVC的功能
//@EnableWebMvc   不要接管SpringMVC
@Configuration
public class MyMvcConfig extends WebMvcConfigurerAdapter {
@Override
    public void addViewControllers(ViewControllerRegistry registry) {
       // super.addViewControllers(registry);
        //浏览器发送 /atguigu 请求来到 success
        registry.addViewController("/atguigu").setViewName("success");
    }
    //所有的WebMvcConfigurerAdapter组件都会一起起作用
    @Bean //将组件注册在容器
    public WebMvcConfigurerAdapter webMvcConfigurerAdapter(){
        WebMvcConfigurerAdapter adapter = new WebMvcConfigurerAdapter() {
            @Override
            public void addViewControllers(ViewControllerRegistry registry) {
                registry.addViewController("/").setViewName("login");
                registry.addViewController("/index.html").setViewName("login");
            }
        };
        return adapter;
    }
}
拦截器进行登陆检查
**
 * 登陆检查,
 */
public class LoginHandlerInterceptor implements HandlerInterceptor {
    //目标方法执行之前
    @Override
    public boolean preHandle(HttpServletRequest request, HttpServletResponse response,
Object handler) throws Exception {
        Object user = request.getSession().getAttribute("loginUser");
        if(user == null){
            //未登陆,返回登陆页面
            request.setAttribute("msg","没有权限请先登陆");
            request.getRequestDispatcher("/index.html").forward(request,response);
            return false;
        }else{
            //已登陆,放行请求
            return true;
        }
    }
    @Override
    public void postHandle(HttpServletRequest request, HttpServletResponse response, Object
handler, ModelAndView modelAndView) throws Exception {
    }
    @Override
    public void afterCompletion(HttpServletRequest request, HttpServletResponse response,
Object handler, Exception ex) throws Exception {
    }
}
注册拦截器
//所有的WebMvcConfigurerAdapter组件都会一起起作用
    @Bean //将组件注册在容器
    public WebMvcConfigurerAdapter webMvcConfigurerAdapter(){
        WebMvcConfigurerAdapter adapter = new WebMvcConfigurerAdapter() {
            @Override
            public void addViewControllers(ViewControllerRegistry registry) {
                registry.addViewController("/").setViewName("login");
                registry.addViewController("/index.html").setViewName("login");
                registry.addViewController("/main.html").setViewName("dashboard");
            }
            //注册拦截器
            @Override
            public void addInterceptors(InterceptorRegistry registry) {
                //super.addInterceptors(registry);
                //静态资源;  *.css , *.js
                //SpringBoot已经做好了静态资源映射
                registry.addInterceptor(new
LoginHandlerInterceptor()).addPathPatterns("/**")
                        .excludePathPatterns("/index.html","/","/user/login");
            }
        };
        return adapter;
    }
错误处理机制
SpringBoot默认的错误处理机制
默认效果:
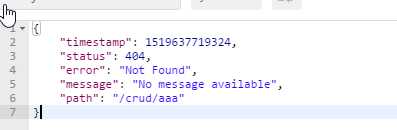
1)、浏览器,返回一个默认的错误页面
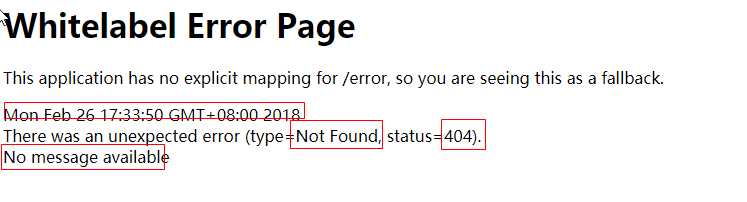
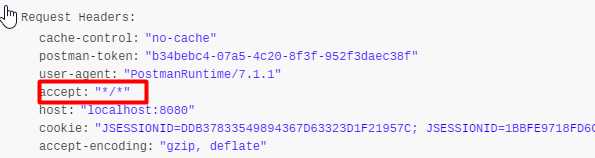
浏览器发送请求的请求头:

如果是其他客户端,默认响应一个json数据
原理:
可以参照ErrorMvcAutoConfiguration;错误处理的自动配置;
给容器中添加了以下组件
1、DefaultErrorAttributes:
帮我们在页面共享信息;
@Override
public Map<String, Object> getErrorAttributes(RequestAttributes requestAttributes,
boolean includeStackTrace) {
Map<String, Object> errorAttributes = new LinkedHashMap<String, Object>();
errorAttributes.put("timestamp", new Date());
addStatus(errorAttributes, requestAttributes);
addErrorDetails(errorAttributes, requestAttributes, includeStackTrace);
addPath(errorAttributes, requestAttributes);
return errorAttributes;
}
BasicErrorController:处理默认/error请求
@Controller
@RequestMapping("${server.error.path:${error.path:/error}}")
public class BasicErrorController extends AbstractErrorController {

    @RequestMapping(produces = "text/html")//产生html类型的数据;浏览器发送的请求来到这个方法处理
public ModelAndView errorHtml(HttpServletRequest request,
HttpServletResponse response) {
HttpStatus status = getStatus(request);
Map<String, Object> model = Collections.unmodifiableMap(getErrorAttributes(
request, isIncludeStackTrace(request, MediaType.TEXT_HTML)));
response.setStatus(status.value());

        //去哪个页面作为错误页面;包含页面地址和页面内容
ModelAndView modelAndView = resolveErrorView(request, response, status, model);
return (modelAndView == null ? new ModelAndView("error", model) : modelAndView);
}
@RequestMapping
@ResponseBody    //产生json数据,其他客户端来到这个方法处理;

public ResponseEntity<Map<String, Object>> error(HttpServletRequest request) {
Map<String, Object> body = getErrorAttributes(request,
isIncludeStackTrace(request, MediaType.ALL));
HttpStatus status = getStatus(request);
return new ResponseEntity<Map<String, Object>>(body, status);
}
ErrorPageCustomizer:
@Value("${error.path:/error}")
private String path = "/error";  系统出现错误以后来到error请求进行处理;(web.xml注册的错误页
面规则)
DefaultErrorViewResolver:
@Override
public ModelAndView resolveErrorView(HttpServletRequest request, HttpStatus status,
Map<String, Object> model) {
ModelAndView modelAndView = resolve(String.valueOf(status), model);
if (modelAndView == null && SERIES_VIEWS.containsKey(status.series())) {
modelAndView = resolve(SERIES_VIEWS.get(status.series()), model);
}
return modelAndView;
}
private ModelAndView resolve(String viewName, Map<String, Object> model) {
        //默认SpringBoot可以去找到一个页面?  error/404
String errorViewName = "error/" + viewName;

        //模板引擎可以解析这个页面地址就用模板引擎解析
TemplateAvailabilityProvider provider = this.templateAvailabilityProviders
.getProvider(errorViewName, this.applicationContext);
if (provider != null) {
            //模板引擎可用的情况下返回到errorViewName指定的视图地址
return new ModelAndView(errorViewName, model);
}
        //模板引擎不可用,就在静态资源文件夹下找errorViewName对应的页面   error/404.html
return resolveResource(errorViewName, model);
}
步骤:
一但系统出现4xx或者5xx之类的错误;ErrorPageCustomizer就会生效(定制错误的响应规则);就会来到/error
请求;就会被BasicErrorController处理;
1)响应页面;去哪个页面是由DefaultErrorViewResolver解析得到的;
protected ModelAndView resolveErrorView(HttpServletRequest request,
      HttpServletResponse response, HttpStatus status, Map<String, Object> model) {
    //所有的ErrorViewResolver得到ModelAndView
   for (ErrorViewResolver resolver : this.errorViewResolvers) {
      ModelAndView modelAndView = resolver.resolveErrorView(request, status, model);
      if (modelAndView != null) {
         return modelAndView;
      }
   }
   return null;
}
2)、如果定制错误响应:
1)、如何定制错误的页面;
1)、有模板引擎的情况下;error/状态码; 【将错误页面命名为 错误状态码.html 放在模板引擎文件夹里面的
error文件夹下】,发生此状态码的错误就会来到 对应的页面;
我们可以使用4xx和5xx作为错误页面的文件名来匹配这种类型的所有错误,精确优先(优先寻找精确的状态
码.html);
页面能获取的信息;
timestamp:时间戳
status:状态码
error:错误提示
exception:异常对象
message:异常消息
errors:JSR303数据校验的错误都在这里
2)、没有模板引擎(模板引擎找不到这个错误页面),静态资源文件夹下找;
3)、以上都没有错误页面,就是默认来到SpringBoot默认的错误提示页面;
2)、如何定制错误的json数据;
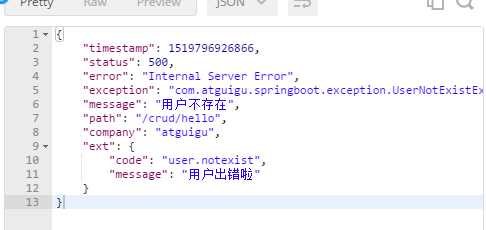
1)、自定义异常处理&返回定制json数据;
@ControllerAdvice
public class MyExceptionHandler {
    @ResponseBody
    @ExceptionHandler(UserNotExistException.class)
    public Map<String,Object> handleException(Exception e){
        Map<String,Object> map = new HashMap<>();
        map.put("code","user.notexist");
        map.put("message",e.getMessage());
        return map;
    }
}
转发到/error进行自适应响应效果处理
@ExceptionHandler(UserNotExistException.class)
    public String handleException(Exception e, HttpServletRequest request){
        Map<String,Object> map = new HashMap<>();
        //传入我们自己的错误状态码  4xx 5xx,否则就不会进入定制错误页面的解析流程
        /**
         * Integer statusCode = (Integer) request
         .getAttribute("javax.servlet.error.status_code");
         */
        request.setAttribute("javax.servlet.error.status_code",500);
        map.put("code","user.notexist");
        map.put("message",e.getMessage());
        //转发到/error
        return "forward:/error";
    }
将我们的定制数据携带出去;
出现错误以后,会来到/error请求,会被BasicErrorController处理,响应出去可以获取的数据是由
getErrorAttributes得到的(是AbstractErrorController(ErrorController)规定的方法);
1、完全来编写一个ErrorController的实现类【或者是编写AbstractErrorController的子类】,放在容器中;
2、页面上能用的数据,或者是json返回能用的数据都是通过errorAttributes.getErrorAttributes得到;
容器中DefaultErrorAttributes.getErrorAttributes();默认进行数据处理的;
自定义ErrorAttributes
//给容器中加入我们自己定义的ErrorAttributes
@Component
public class MyErrorAttributes extends DefaultErrorAttributes {
    @Override
    public Map<String, Object> getErrorAttributes(RequestAttributes requestAttributes,
boolean includeStackTrace) {
        Map<String, Object> map = super.getErrorAttributes(requestAttributes,
includeStackTrace);
        map.put("company","atguigu");
        return map;
    }
}
最终的效果:响应是自适应的,可以通过定制ErrorAttributes改变需要返回的内容
标签:res factory env sch 发送请求 link include nbsp features
原文地址:https://www.cnblogs.com/toov5/p/10733358.html