标签:初始 cond coreos execution 进入 自己 option map uri
Kubernetes v1.13版本发布后,kubeadm才正式进入GA,可以生产使用。本人历经了线下环境 和线上阿里环境 使用kubeadm方式部署了多master kubernetes集群。版本采用v1.14.2,将线下 过程分享给朋友们,如下(不喜勿喷)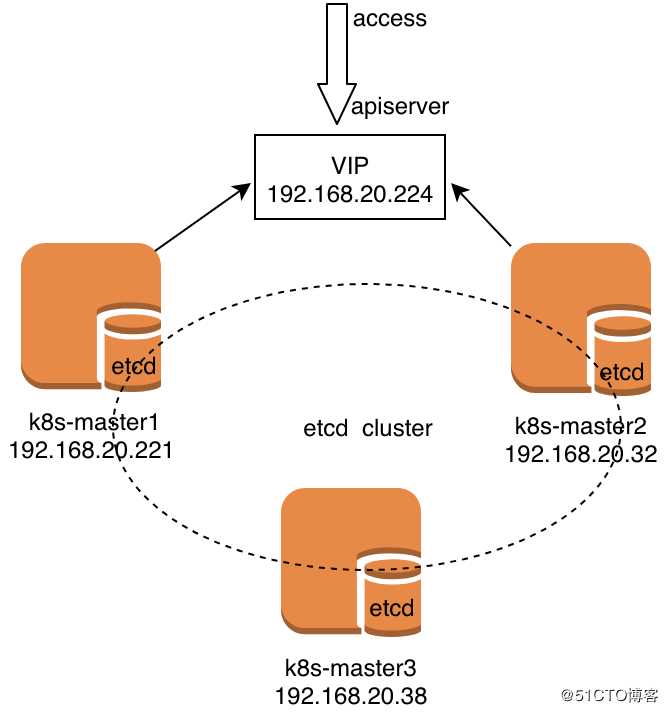
2、修改内核参数
cat <<EOF >>  /etc/sysctl.conf
net.bridge.bridge-nf-call-ip6tables = 1
net.bridge.bridge-nf-call-iptables = 1
net.ipv4.ip_nonlocal_bind = 1
net.ipv4.ip_forward = 1
vm.swappiness=0
EOF

sysctl -p
3、加载ipvs模块
本例不再使用iptables转发,使用ipvs转发数据。
[root@k8s-master1-dev ~]# cat > /etc/sysconfig/modules/ipvs.modules <<EOF
#!/bin/bash
modprobe -- ip_vs
modprobe -- ip_vs_rr
modprobe -- ip_vs_wrr
modprobe -- ip_vs_sh
modprobe -- nf_conntrack_ipv4
EOF
[root@k8s-master1-dev ~]#
[root@k8s-master1-dev ~]# chmod 755 /etc/sysconfig/modules/ipvs.modules && bash /etc/sysconfig/modules/ipvs.modules && lsmod | grep -e ip_vs -e nf_conntrack_ipv4
ip_vs_sh               12688  0
ip_vs_wrr              12697  0
ip_vs_rr               12600  0
nf_conntrack_ipv4      15053  2
nf_defrag_ipv4         12729  1 nf_conntrack_ipv4
ip_vs                 145497  6 ip_vs_rr,ip_vs_sh,ip_vs_wrr
nf_conntrack          137239  7 ip_vs,nf_nat,nf_nat_ipv4,xt_conntrack,nf_nat_masquerade_ipv4,nf_conntrack_netlink,nf_conntrack_ipv4
libcrc32c              12644  4 xfs,ip_vs,nf_nat,nf_conntrack
[root@k8s-master1-dev ~]#
4、配置keepalived、haproxy
[root@k8s-master1-dev ~]#  yum install -y keepalived  haproxy
[root@k8s-master1-dev ~]#  vim /etc/keepliaved/keepalived.conf
[root@k8s-master1-dev ~]#  cat /etc/keepalived/keepalived.conf
! Configuration File for keepalived

global_defs {
   router_id master1
}

vrrp_instance VI_1 {
    state BACKUP
    interface ens192
    virtual_router_id 51
    priority 100
    nopreempt
    advert_int 1
    unicast_src_ip 192.168.20.221
    unicast_peer {
       192.168.20.32
    }
    authentication {
        auth_type PASS
        auth_pass 1111
    }
    virtual_ipaddress {
       192.168.20.224
    }
}
[root@k8s-master1-dev ~]#
[root@k8s-master1-dev ~]#  vim /etc/haproxy/haproxy.conf
[root@k8s-master1-dev ~]# tail /etc/haproxy/haproxy.cfg

listen https-apiserver
        bind 192.168.20.224:8443
        mode tcp
        balance roundrobin
        timeout server 900s
        timeout connect 15s

        server apiserver01 192.168.20.32:6443 check port 6443 inter 5000 fall 5
        server apiserver02 192.168.20.221:6443 check port 6443 inter 5000 fall 5
[root@k8s-master1-dev ~]#
[root@k8s-master1-dev ~]# systemctl enable keepalived && systemctl start keepalived
[root@k8s-master1-dev ~]# systemctl enable haproxy && systemctl start haproxy
k8s-master2-dev 操作步骤相同,不再赘述
5、配置安装k8s cluster
所有master节点都需要安装包,如下操作:
[root@k8s-master1-dev ~]#  yum install -y kubelet kubeadm kubectl ipvsadm ipset docker-ce
[root@k8s-master1-dev ~]# systemctl enable docker && systemctl start docker
[root@k8s-master1-dev ~]# systemctl enable kubelet
在master1节点上生成cluster初始化文件,操作如下:
[root@k8s-master1-dev ~]# kubeadm config print init-defaults > kubeadm-init.yaml
[root@k8s-master1-dev ~]# vim kubeadm-init.yaml

[root@k8s-master1-dev ~]# cat kubeadm-init.yaml
apiVersion: kubeadm.k8s.io/v1beta1
bootstrapTokens:
- groups:
  - system:bootstrappers:kubeadm:default-node-token
  token: abcdef.0123456789abcdef
  ttl: 24h0m0s
  usages:
  - signing
  - authentication
kind: InitConfiguration
localAPIEndpoint:
  advertiseAddress: 192.168.20.221
  bindPort: 6443
nodeRegistration:
  criSocket: /var/run/dockershim.sock
  name: k8s-master1-dev
  taints:
  - effect: NoSchedule
    key: node-role.kubernetes.io/master
---
apiServer:
  timeoutForControlPlane: 4m0s
apiVersion: kubeadm.k8s.io/v1beta1
certificatesDir: /etc/kubernetes/pki
clusterName: kubernetes
controlPlaneEndpoint: "192.168.20.224:8443"
controllerManager: {}
dns:
  type: CoreDNS
etcd:
  local:
    dataDir: /var/lib/etcd
kind: ClusterConfiguration
kubernetesVersion: v1.14.2
networking:
  dnsDomain: cluster.local
  podSubnet: 10.244.0.0/16
  serviceSubnet: 10.96.0.0/12
scheduler: {}
---
apiVersion: kubeproxy.config.k8s.io/v1alpha1
kind: KubeProxyConfiguration
mode: "ipvs"
[root@k8s-master1-dev ~]#
说明:本例中192.168.20.221为master1的IP地址;192.168.20.224为 keepalived VIP;在配置文件中手工指定了 podSubnet 为 10.244.0.0/16;在最后一段手工添加了 ipvs mode ;修改了配置文件中的kubernetesVersion。
然后下载k8s cluster所需要images,如下操作:
[root@k8s-master1-dev ~]# kubeadm config images pull --config kubeadm-init.yaml然后根据cluster初始化配置清单文件 进行创建k8s cluster,如下操作:
[root@k8s-master1-dev ~]# swapoff -a
[root@k8s-master1-dev ~]# kubeadm init --config kubeadm-init.yaml
[init] Using Kubernetes version: v1.14.2
[preflight] Running pre-flight checks
[preflight] Pulling images required for setting up a Kubernetes cluster
[preflight] This might take a minute or two, depending on the speed of your internet connection
[preflight] You can also perform this action in beforehand using ‘kubeadm config images pull‘
[kubelet-start] Writing kubelet environment file with flags to file "/var/lib/kubelet/kubeadm-flags.env"
[kubelet-start] Writing kubelet configuration to file "/var/lib/kubelet/config.yaml"
[kubelet-start] Activating the kubelet service
[certs] Using certificateDir folder "/etc/kubernetes/pki"
[certs] Generating "ca" certificate and key
[certs] Generating "apiserver" certificate and key
[certs] apiserver serving cert is signed for DNS names [k8s-master1-dev kubernetes kubernetes.default kubernetes.default.svc kubernetes.default.svc.cluster.local] and IPs [10.96.0.1 192.168.20.221 192.168.20.224]
[certs] Generating "apiserver-kubelet-client" certificate and key
[certs] Generating "front-proxy-ca" certificate and key
[certs] Generating "front-proxy-client" certificate and key
[certs] Generating "etcd/ca" certificate and key
[certs] Generating "etcd/server" certificate and key
[certs] etcd/server serving cert is signed for DNS names [k8s-master1-dev localhost] and IPs [192.168.20.221 127.0.0.1 ::1]
[certs] Generating "etcd/peer" certificate and key
[certs] etcd/peer serving cert is signed for DNS names [k8s-master1-dev localhost] and IPs [192.168.20.221 127.0.0.1 ::1]
[certs] Generating "etcd/healthcheck-client" certificate and key
[certs] Generating "apiserver-etcd-client" certificate and key
[certs] Generating "sa" key and public key
[kubeconfig] Using kubeconfig folder "/etc/kubernetes"
[endpoint] WARNING: port specified in controlPlaneEndpoint overrides bindPort in the controlplane address
[kubeconfig] Writing "admin.conf" kubeconfig file
[endpoint] WARNING: port specified in controlPlaneEndpoint overrides bindPort in the controlplane address
[kubeconfig] Writing "kubelet.conf" kubeconfig file
[endpoint] WARNING: port specified in controlPlaneEndpoint overrides bindPort in the controlplane address
[kubeconfig] Writing "controller-manager.conf" kubeconfig file
[endpoint] WARNING: port specified in controlPlaneEndpoint overrides bindPort in the controlplane address
[kubeconfig] Writing "scheduler.conf" kubeconfig file
[control-plane] Using manifest folder "/etc/kubernetes/manifests"
[control-plane] Creating static Pod manifest for "kube-apiserver"
[control-plane] Creating static Pod manifest for "kube-controller-manager"
[control-plane] Creating static Pod manifest for "kube-scheduler"
[etcd] Creating static Pod manifest for local etcd in "/etc/kubernetes/manifests"
[wait-control-plane] Waiting for the kubelet to boot up the control plane as static Pods from directory "/etc/kubernetes/manifests". This can take up to 4m0s
[apiclient] All control plane components are healthy after 29.527897 seconds
[upload-config] storing the configuration used in ConfigMap "kubeadm-config" in the "kube-system" Namespace
[kubelet] Creating a ConfigMap "kubelet-config-1.14" in namespace kube-system with the configuration for the kubelets in the cluster
[upload-certs] Skipping phase. Please see --experimental-upload-certs
[mark-control-plane] Marking the node k8s-master1-dev as control-plane by adding the label "node-role.kubernetes.io/master=‘‘"
[mark-control-plane] Marking the node k8s-master1-dev as control-plane by adding the taints [node-role.kubernetes.io/master:NoSchedule]
[bootstrap-token] Using token: abcdef.0123456789abcdef
[bootstrap-token] Configuring bootstrap tokens, cluster-info ConfigMap, RBAC Roles
[bootstrap-token] configured RBAC rules to allow Node Bootstrap tokens to post CSRs in order for nodes to get long term certificate credentials
[bootstrap-token] configured RBAC rules to allow the csrapprover controller automatically approve CSRs from a Node Bootstrap Token
[bootstrap-token] configured RBAC rules to allow certificate rotation for all node client certificates in the cluster
[bootstrap-token] creating the "cluster-info" ConfigMap in the "kube-public" namespace
[addons] Applied essential addon: CoreDNS
[endpoint] WARNING: port specified in controlPlaneEndpoint overrides bindPort in the controlplane address
[addons] Applied essential addon: kube-proxy

Your Kubernetes control-plane has initialized successfully!

To start using your cluster, you need to run the following as a regular user:

  mkdir -p $HOME/.kube
  sudo cp -i /etc/kubernetes/admin.conf $HOME/.kube/config
  sudo chown $(id -u):$(id -g) $HOME/.kube/config

You should now deploy a pod network to the cluster.
Run "kubectl apply -f [podnetwork].yaml" with one of the options listed at:
  https://kubernetes.io/docs/concepts/cluster-administration/addons/

You can now join any number of control-plane nodes by copying certificate authorities
and service account keys on each node and then running the following as root:

  kubeadm join 192.168.20.224:8443 --token abcdef.0123456789abcdef     --discovery-token-ca-cert-hash sha256:abf9ad7d970f2257dfbc95c9a55b785bde27abf06cc2d857a4cc220d9e7ec009     --experimental-control-plane

Then you can join any number of worker nodes by running the following on each as root:

kubeadm join 192.168.20.224:8443 --token abcdef.0123456789abcdef     --discovery-token-ca-cert-hash sha256:abf9ad7d970f2257dfbc95c9a55b785bde27abf06cc2d857a4cc220d9e7ec009
说明
kubeadm init主要执行了以下操作:
? [init]:指定版本进行初始化操作
? [preflight] :初始化前的检查和下载所需要的Docker镜像文件
? [kubelet-start] :生成kubelet的配置文件”/var/lib/kubelet/config.yaml”,没有这个文件kubelet无法启动,所以初始化之前的kubelet实际上启动失败。
? [certificates]:生成Kubernetes使用的证书,存放在/etc/kubernetes/pki目录中。
? [kubeconfig] :生成 KubeConfig 文件,存放在/etc/kubernetes目录中,组件之间通信需要使用对应文件。
? [control-plane]:使用/etc/kubernetes/manifest目录下的YAML文件,安装 Master 组件。
? [etcd]:使用/etc/kubernetes/manifest/etcd.yaml安装Etcd服务。
? [wait-control-plane]:等待control-plan部署的Master组件启动。
? [apiclient]:检查Master组件服务状态。
? [uploadconfig]:更新配置
? [kubelet]:使用configMap配置kubelet。
? [patchnode]:更新CNI信息到Node上,通过注释的方式记录。
? [mark-control-plane]:为当前节点打标签,打了角色Master,和不可调度标签,这样默认就不会使用Master节点来运行Pod。
? [bootstrap-token]:生成token记录下来,后边使用kubeadm join往集群中添加节点时会用到
? [addons]:安装附加组件CoreDNS和kube-proxy
依据提示 为kubectl复制相关配置文件,操作如下:
[root@k8s-master1-dev ~]# rm -rf $HOME/.kube
[root@k8s-master1-dev ~]#   mkdir -p $HOME/.kube
[root@k8s-master1-dev ~]#   sudo cp -i /etc/kubernetes/admin.conf $HOME/.kube/config
[root@k8s-master1-dev ~]#   sudo chown $(id -u):$(id -g) $HOME/.kube/config
[root@k8s-master1-dev ~]#

[root@k8s-master1-dev ~]# kubectl get cs
NAME                 STATUS    MESSAGE             ERROR
scheduler            Healthy   ok
controller-manager   Healthy   ok
etcd-0               Healthy   {"health":"true"}
[root@k8s-master1-dev ~]#
6、将master1的 证书文件复制到其它的master节点
[root@k8s-master1-dev ~]# USER=root
[root@k8s-master1-dev ~]# MASTERS_IPS="k8s-master2-dev k8s-master3-dev"
[root@k8s-master1-dev ~]# for host in ${MASTERS_IPS}; do
ssh "${USER}"@$host "mkdir -p /etc/kubernetes/pki/etcd"
scp /etc/kubernetes/pki/ca.* "${USER}"@$host:/etc/kubernetes/pki/
scp /etc/kubernetes/pki/sa.* "${USER}"@$host:/etc/kubernetes/pki/
scp /etc/kubernetes/pki/front-proxy-ca.* "${USER}"@$host:/etc/kubernetes/pki/
scp /etc/kubernetes/pki/etcd/ca.* "${USER}"@$host:/etc/kubernetes/pki/etcd/
scp /etc/kubernetes/admin.conf "${USER}"@$host:/etc/kubernetes/
done
ca.crt                                                                        100% 1025   456.8KB/s   00:00
ca.key                                                                        100% 1675   923.9KB/s   00:00
sa.key                                                                        100% 1675   971.3KB/s   00:00
sa.pub                                                                        100%  451   166.0KB/s   00:00
front-proxy-ca.crt                                                            100% 1038   668.9KB/s   00:00
front-proxy-ca.key                                                            100% 1679   622.2KB/s   00:00
ca.crt                                                                        100% 1017   481.3KB/s   00:00
ca.key                                                                        100% 1675   803.1KB/s   00:00
admin.conf                                                                    100% 5450     2.7MB/s   00:00
[root@k8s-master1-dev ~]#
7、将其它masters加入k8s cluster (本例以master2为示例,master3操作过程相同)
说明: 在其他master执行,一定要添加--experimental-control-plane参数
[root@k8s-master2-dev ~]# tree /etc/kubernetes/
/etc/kubernetes/
├── admin.conf
└── pki
    ├── ca.crt
    ├── ca.key
    ├── etcd
    │?? ├── ca.crt
    │?? └── ca.key
    ├── front-proxy-ca.crt
    ├── front-proxy-ca.key
    ├── sa.key
    └── sa.pub

2 directories, 9 files
[root@k8s-master2-dev ~]# kubeadm join 192.168.20.224:8443 --token abcdef.0123456789abcdef     --discovery-token-ca-cert-hash sha256:abf9ad7d970f2257dfbc95c9a55b785bde27abf06cc2d857a4cc220d9e7ec009     --experimental-control-plane --ignore-preflight-errors=Swap
[preflight] Running pre-flight checks
[preflight] Reading configuration from the cluster...
[preflight] FYI: You can look at this config file with ‘kubectl -n kube-system get cm kubeadm-config -oyaml‘
[preflight] Running pre-flight checks before initializing the new control plane instance
[preflight] Pulling images required for setting up a Kubernetes cluster
[preflight] This might take a minute or two, depending on the speed of your internet connection
[preflight] You can also perform this action in beforehand using ‘kubeadm config images pull‘
[certs] Using certificateDir folder "/etc/kubernetes/pki"
[certs] Generating "etcd/peer" certificate and key
[certs] etcd/peer serving cert is signed for DNS names [k8s-master2-dev localhost] and IPs [192.168.20.32 127.0.0.1 ::1]
[certs] Generating "etcd/server" certificate and key
[certs] etcd/server serving cert is signed for DNS names [k8s-master2-dev localhost] and IPs [192.168.20.32 127.0.0.1 ::1]
[certs] Generating "etcd/healthcheck-client" certificate and key
[certs] Generating "apiserver-etcd-client" certificate and key
[certs] Generating "apiserver" certificate and key
[certs] apiserver serving cert is signed for DNS names [k8s-master2-dev kubernetes kubernetes.default kubernetes.default.svc kubernetes.default.svc.cluster.local] and IPs [10.96.0.1 192.168.20.32 192.168.20.224]
[certs] Generating "apiserver-kubelet-client" certificate and key
[certs] Generating "front-proxy-client" certificate and key
[certs] Valid certificates and keys now exist in "/etc/kubernetes/pki"
[certs] Using the existing "sa" key
[kubeconfig] Generating kubeconfig files
[kubeconfig] Using kubeconfig folder "/etc/kubernetes"
[endpoint] WARNING: port specified in controlPlaneEndpoint overrides bindPort in the controlplane address
[kubeconfig] Using existing kubeconfig file: "/etc/kubernetes/admin.conf"
[kubeconfig] Writing "controller-manager.conf" kubeconfig file
[kubeconfig] Writing "scheduler.conf" kubeconfig file
[control-plane] Using manifest folder "/etc/kubernetes/manifests"
[control-plane] Creating static Pod manifest for "kube-apiserver"
[control-plane] Creating static Pod manifest for "kube-controller-manager"
[control-plane] Creating static Pod manifest for "kube-scheduler"
[check-etcd] Checking that the etcd cluster is healthy
[kubelet-start] Downloading configuration for the kubelet from the "kubelet-config-1.14" ConfigMap in the kube-system namespace
[kubelet-start] Writing kubelet configuration to file "/var/lib/kubelet/config.yaml"
[kubelet-start] Writing kubelet environment file with flags to file "/var/lib/kubelet/kubeadm-flags.env"
[kubelet-start] Activating the kubelet service
[kubelet-start] Waiting for the kubelet to perform the TLS Bootstrap...
[etcd] Announced new etcd member joining to the existing etcd cluster
[etcd] Wrote Static Pod manifest for a local etcd member to "/etc/kubernetes/manifests/etcd.yaml"
[etcd] Waiting for the new etcd member to join the cluster. This can take up to 40s
[upload-config] storing the configuration used in ConfigMap "kubeadm-config" in the "kube-system" Namespace
[mark-control-plane] Marking the node k8s-master2-dev as control-plane by adding the label "node-role.kubernetes.io/master=‘‘"
[mark-control-plane] Marking the node k8s-master2-dev as control-plane by adding the taints [node-role.kubernetes.io/master:NoSchedule]

This node has joined the cluster and a new control plane instance was created:

* Certificate signing request was sent to apiserver and approval was received.
* The Kubelet was informed of the new secure connection details.
* Control plane (master) label and taint were applied to the new node.
* The Kubernetes control plane instances scaled up.
* A new etcd member was added to the local/stacked etcd cluster.

To start administering your cluster from this node, you need to run the following as a regular user:

    mkdir -p $HOME/.kube
    sudo cp -i /etc/kubernetes/admin.conf $HOME/.kube/config
    sudo chown $(id -u):$(id -g) $HOME/.kube/config

Run ‘kubectl get nodes‘ to see this node join the cluster.

[root@k8s-master2-dev ~]# rm -rf $HOME/.kube
[root@k8s-master2-dev ~]#
[root@k8s-master2-dev ~]# mkdir -p $HOME/.kube
[root@k8s-master2-dev ~]# sudo cp -i /etc/kubernetes/admin.conf $HOME/.kube/config
[root@k8s-master2-dev ~]# sudo chown $(id -u):$(id -g) $HOME/.kube/config
[root@k8s-master2-dev ~]# kubectl get cs
NAME                 STATUS    MESSAGE             ERROR
scheduler            Healthy   ok
controller-manager   Healthy   ok
etcd-0               Healthy   {"health":"true"}
[root@k8s-master2-dev ~]# kubectl get nodes
NAME              STATUS     ROLES    AGE     VERSION
k8s-master1-dev   NotReady   master   7m5s    v1.14.2
k8s-master2-dev   NotReady   master   3m34s   v1.14.2
[root@k8s-master2-dev ~]# kubectl get pods -n kube-system
NAME                                      READY   STATUS    RESTARTS   AGE
coredns-fb8b8dccf-5mwn5                   1/1     Running   0          7m
coredns-fb8b8dccf-f6sw9                   1/1     Running   0          7m
etcd-k8s-master1-dev                      1/1     Running   0          6m2s
etcd-k8s-master2-dev                      1/1     Running   0          3m45s
kube-apiserver-k8s-master1-dev            1/1     Running   0          6m15s
kube-apiserver-k8s-master2-dev            1/1     Running   0          3m45s
kube-controller-manager-k8s-master1-dev   1/1     Running   1          6m17s
kube-controller-manager-k8s-master2-dev   1/1     Running   0          3m45s
kube-proxy-6zjfj                          1/1     Running   0          3m46s
kube-proxy-7vmr6                          1/1     Running   0          7m
kube-scheduler-k8s-master1-dev            1/1     Running   1          6m4s
kube-scheduler-k8s-master2-dev            1/1     Running   0          3m45s
[root@k8s-master2-dev ~]#
8、安装 flannel
[root@k8s-master2-dev ~]# kubectl apply -f https://raw.githubusercontent.com/coreos/flannel/master/Documentation/kube-flannel.yml9、查看etcd集群
[root@k8s-master1-dev ~]# kubectl -n kube-system exec etcd-k8s-master1-dev -- etcdctl --endpoints=https://192.168.20.221:2379 --ca-file=/etc/kubernetes/pki/etcd/ca.crt --cert-file=/etc/kubernetes/pki/etcd/server.crt --key-file=/etc/kubernetes/pki/etcd/server.key cluster-health
member 3b1a647a6587e07e is healthy: got healthy result from https://192.168.20.32:2379
member 4ce7f2fb1ec443c6 is healthy: got healthy result from https://192.168.20.221:2379
cluster is healthy
[root@k8s-master1-dev ~]#
说明:本例在查看etcd时 集群中仅有两台etcd ,第三台暂无加入,请知悉
10、排错
1) 服务器时间不同步,加入第二个master时现象如下:
[root@k8s-master2-dev ~]# kubeadm join 192.168.20.224:8443 --token abcdef.0123456789abcdef     --discovery-token-ca-cert-hash sha256:ccfd3814612084d0698cc696d387ebd67df1266733fd260b55b98c8eba2cd455     --experimental-control-plane --ignore-preflight-errors=Swap
[preflight] Running pre-flight checks
    [WARNING Swap]: running with swap on is not supported. Please disable swap
[preflight] Reading configuration from the cluster...
[preflight] FYI: You can look at this config file with ‘kubectl -n kube-system get cm kubeadm-config -oyaml‘
error execution phase preflight: unable to fetch the kubeadm-config ConfigMap: failed to get config map: Get https://192.168.20.224:8443/api/v1/namespaces/kube-system/configmaps/kubeadm-config: x509: certificate has expired or is not yet valid
[root@k8s-master2-dev ~]#
2) 证书同步错误,加入第二个master时现象如下:
[root@k8s-master2-dev ~]# kubeadm join 192.168.20.224:8443 --token abcdef.0123456789abcdef >     --discovery-token-ca-cert-hash sha256:abf9ad7d970f2257dfbc95c9a55b785bde27abf06cc2d857a4cc220d9e7ec009 >     --experimental-control-plane --ignore-preflight-errors=Swap
[preflight] Running pre-flight checks
[preflight] Reading configuration from the cluster...
[preflight] FYI: You can look at this config file with ‘kubectl -n kube-system get cm kubeadm-config -oyaml‘
error execution phase preflight: unable to fetch the kubeadm-config ConfigMap: failed to get config map: Get https://192.168.20.224:8443/api/v1/namespaces/kube-system/configmaps/kubeadm-config: x509: certificate signed by unknown authority (possibly because of "crypto/rsa: verification error" while trying to verify candidate authority certificate "kubernetes")
[root@k8s-master2-dev ~]#
11、关于阿里云
阿里云最早时期不支持 keepalived 组播模式,据说后来阿里支持了单播模式。经过本人亲身踩坑发现 虽然keepalived 单播模式可以实现 VIP的漂移,但阿里的交换机并不转发该VIP ,也就是说 其它任何ECS无法与VIP 通迅。
据说阿里有段时间支持一种叫HAVIP的东东,可以申请这种IP,然后将keepalived的VIP 绑定申请来的 HAVIP就可以实现keepalived虚IP了。但经过本人的再次踩坑证明,阿里已经不再支持所谓的HAVIP,如果要使用VIP功能 ,也只能采购阿里的SLB (我都不想说啥了,NND)。
再次经过本人的亲身踩坑,发现阿里SLB的私网模式免费,而公网模式才收费(很开心吧)。决定购买 SLB的私网模式,将这个SLB 私网模式IP绑定到 k8s apiServer 地址上。然后发现在 kubeadm init --config kubeadm-init.yaml 时总是失败,查看log 发现 在初始化cluster 时,本master必须可以 访问 https://SLB_ip:port/.... ,但一直失败。经过阿里工单系统的反馈 ,得知 阿里并不支持 ECS做 SLB的客户端。因为 SLB的后端服务器将指向ECS,当后端服务器自身访问 SLB时,经过SLB的转发又回到了本机,阿里不允许这种现象,导致后端服务器自身无法访问SLB IP。也就是说 master 自己无法访问这个SLB IP,但其它非master的ECS可以正常访问。本人决定将SLB IP 绑定在master本机的 eth0:0 上,并手工添加明细路由。使用脚本如下:
# cat /etc/init.d/vip.sh
#!/bin/bash
VIP=******(SLB的vip)
start(){
    ifconfig eth0:0 $VIP netmask 255.255.255.255 up
    echo "1" > /proc/sys/net/ipv4/conf/eth0/arp_ignore
    echo "2" > /proc/sys/net/ipv4/conf/eth0/arp_announce
    echo "1" > /proc/sys/net/ipv4/conf/all/arp_ignore
    echo "2" > /proc/sys/net/ipv4/conf/all/arp_announce
    route add -host $VIP dev eth0:0
}
stop(){
    ifconfig eth0:0 down
    echo "0" > /proc/sys/net/ipv4/conf/eth0/arp_ignore
    echo "2" > /proc/sys/net/ipv4/conf/eth0/arp_announce
    echo "0" > /proc/sys/net/ipv4/conf/all/arp_ignore
    echo "2" > /proc/sys/net/ipv4/conf/all/arp_announce
    route delete -host $VIP dev eth0:0
}
$1
通过上述方法 成功解决阿里云上运行自定义的多master k8s cluster
Kebernetes 学习总结(15) K8s多master
标签:初始 cond coreos execution 进入 自己 option map uri
原文地址:https://blog.51cto.com/caiyuanji/2405434